完成画面
今回の画面は、人気技術ブログ「R Effect」さんの「Next.js 14でStableになったServer ActionsでCRUD操作」の記事を参考にして、少しUIリッチな感じにしたアプリです。
Next.jsでフロントからサーバまでの処理を一気通貫したサンプルを作っていきます。
技術スタック
■Next.js
■Tailwind CSS
■Typescript
■Prisma
■MySQL
一覧画面

新規追加画面

詳細画面

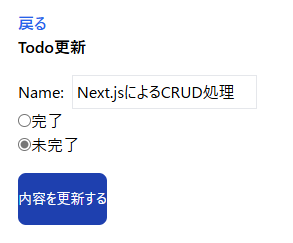
更新用の画面
1行削除後の画面

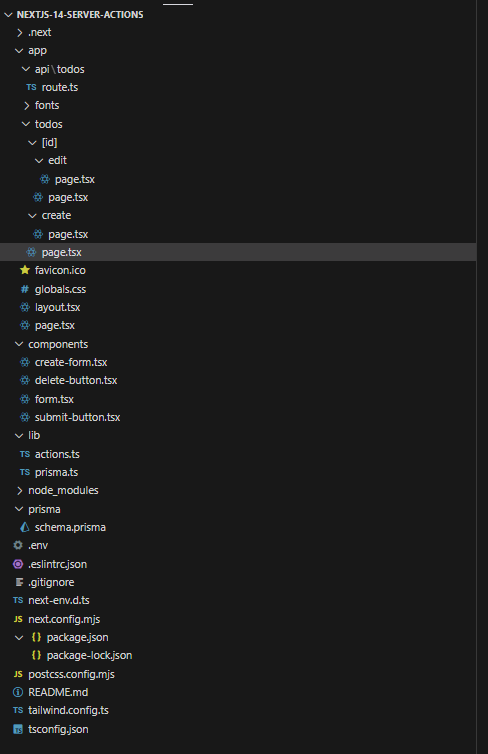
ディレクトリ構成
プロジェクトの構成は、下記のとおりです。
データベースとPrismaのスキーマ構成
テーブルの構成は、下記のとおりです。
// This is your Prisma schema file,
// learn more about it in the docs: https://pris.ly/d/prisma-schema

// Looking for ways to speed up your queries, or scale easily with your serverless or edge functions?
// Try Prisma Accelerate: https://pris.ly/cli/accelerate-init

generator client {
  provider = "prisma-client-js"
}

datasource db {
  provider = "mysql"
  url      = env("DATABASE_URL")
}

model Todo{
  id Int @id @default(autoincrement())
  name String
  isCompleted Boolean @default(false)
}
Prismaスキーマをデータベースへ反映する。
作成したスキーマをテーブルへマイグレーションするためのファイルを作成しましょう。
プロジェクト直下に「lib」フォルダを作成して、「prisma.ts」を作成します。
declare global{
    var prisma:PrismaClient;
}

import {PrismaClient} from '@prisma/client';

let prisma:PrismaClient;

if(process.env.NODE_ENV === 'production'){
    prisma = new PrismaClient();
}else{
    if(!global.prisma){
        global.prisma = new PrismaClient();
    }
    prisma = global.prisma;
}

export default prisma;
一覧画面を作成する。
appディレクトリにサブフォルダ「todos」を作成して、todosフォルダの配下に「Page.tsx」ファイルを作成します。
import prisma from '@/lib/prisma';
import Link from 'next/link';
import DeleteButton from '@/components/delete-button';

const Page = async()=>{
    const todos = await prisma.todo.findMany();
    return(
        <div className='m-8'>
            <h1 className='text-x1 font-bold'>Todo一覧</h1>
            <Link href="/todos/create"
            className='bg-blue-600 px-2 py-1 rounded-lg text-sm text-white'>新規追加</Link>
            <table className='border-collapse border border-slate-400'>
                <th scope='col' className='border border-slate-300 bg-gray-300 font-mono'>ID</th>
                <th scope='col' className='border border-slate-300 bg-gray-300 font-mono'>名前</th>
                <th scope='col' className='border border-slate-300 bg-gray-300 font-mono'>詳細</th>
                <th scope='col' className='border border-slate-300 bg-gray-300 font-mono'>更新</th>
                <th scope='col' className='border border-slate-300 bg-gray-300 font-mono'>削除</th>
                {todos.map((todo)=>(
                    <tr key={todo.id}>
                        <td scope='col' className='border border-slate-300 font-mono'>{todo.id}</td>
                        <td scope='col' className='border border-slate-300 font-mono'>{todo.name}</td>
                        <td scope='col' className='border border-slate-300'>
                            <Link href={`/todos/${todo.id}`} className='bg-blue-600 text-white rounded-sm font-mono'>
                                詳細
                            </Link>
                        </td>
                        <td scope='col' className='border border-slate-300'>
                            <Link href={`/todos/${todo.id}/edit`} className='bg-orange-600 text-white rounded-sm font-mono'>
                                更新
                            </Link>
                        </td>
                        <td scope='col' className='border border-slate-300'>
                            <DeleteButton id={todo.id}/>
                        </td>
                    </tr>
                ))}
            </table>
        </div>
    )
}

export default Page;
新規追加画面を作成する。
appディレクトリは以下に、サブフォルダ「create」を作成します。
「create」フォルダ配下に、「Page.tsx」を作成します。
import React from 'react'; //インポートしておく
import Link from 'next/link';
import CreateForm from '@/components/create-form';

const Page = async () => {

  return (
    <div className="m-8">
      <Link href="/todos">戻る</Link>
      <h1 className="text-xl font-bold">Todo追加</h1>
      <CreateForm/>
    </div>
  );
};

export default Page;
新規データを登録するためのサーバ処理を作成する
新規データをデータベースに登録するために、appしれく鳥は以下にサブフォルダ「api」を作ります。
次にapiディレクトリ直下に「todos」フォルダを作成します。
つづいて、todosフォルダ配下に「route.ts」を作成します。
export async function POST(request:Request){
    const {name} = await request.json();
    await prisma.todo.create({data:{name}});
    return Response.json({message:'success'});
}
CRUD処理に関する処理を追加する。
プロジェクト直下にフォルダ「lib」を作成します。
「lib」フォルダにフロントからサーバ間のデータ受け渡し処理を記述する「action.ts」を作成します。
'use server';
import { revalidatePath } from "next/cache";
import { redirect } from 'next/navigation';
import {z} from 'zod';

//Zodライブラリによりバリデーション処理
const schema = z.object({
    name:z.string().min(2),
});

//新規追加処理
export const addTodo = async(prevState:any,data:FormData)=>{
    const name = data.get('name') as string;
    const validatedFields = schema.safeParse({name});

    //追加データをJSONデータで出力
    console.log(JSON.stringify(validatedFields,null,2));

    //入力項目値のバリデーションチェック
    if(!validatedFields.success){
        return {
            erros:validatedFields.error.flatten().fieldErrors,
        }
    }

    try{
        //データ登録時に0.1秒のプロミス処理
        await new Promise((resolve)=>setTimeout(resolve,100));
        //データ登録
        await prisma.todo.create({data:{name}});
    }catch(e){
        return {
            message:'Failed to add'
        }
    }

    revalidatePath('/todos');
    redirect('/todos');
};

//削除処理
export const deleteTodo = async(id:number)=>{

    await prisma.todo.delete({
        where:{
            id,
        }
    });
    revalidatePath('/todos');

};

//更新処理
export const updateTodo = async (id:number,data:FormData)=>{
    const name = data.get('name') as string;
    const isCompleted = data.get('isCompleted') as string;
    await prisma.todo.update({
        where:{
            id,
        },
        data:{
            name,
            isCompleted:isCompleted === 'true' ? true:false,
        }
    });
    revalidatePath('/todos');
    redirect('/todos');
}
詳細画面を作成する
appディレクトリ直下の「todos」フォルダの移動します。
「todos」フォルダの直下に「Page.tsx」を作成します。
import Link from "next/link"
export default async function Page({params}:{params:{id:string}}){
    const id = Number(params.id);
    const todo = await prisma.todo.findUnique({
        where:{id,}
    });

    return (
        <div className="m-8">
            <Link href="/todos" className='font-medium text-blue-600 dark:text-blue-500 hover:underline'>戻る</Link>
            <h1 className="text-x1 font-bold">Todo詳細</h1>
            <div>Id:{todo?.id}</div>
            <div>名前:{todo?.name}</div>
            <div>
                完了:{todo?.isCompleted ? <span>完了</span>:<span>未完了</span>}
            </div>
        </div>
    )
}
更新用の画面を作成する
appディレクトリ直下の「todos」フォルダの移動します。
「todos」フォルダの直下に「[ID]」フォルダを作成します。
「[ID]」フォルダに移動して「edit」フォルダを作りましょう。
「edit」フォルダに移動して、「Page.tsx」を作成します。
import {updateTodo} from '@/lib/actions';
import Link from 'next/link';

export default async function Page({params}:{params:{id:string}}){
    const id = Number(params.id);
    const updateTodoWithId = updateTodo.bind(null,id);
    const todo = await prisma.todo.findUnique({
        where:{
            id,
        }
    });

    return (
        <div className='m-8'>
            <Link href="/todos" className='font-medium text-blue-600 dark:text-blue-500 hover:underline'>戻る</Link>
            <h1 className='text-x1 font-bold'>Todo更新</h1>
            <form action={updateTodoWithId} className='mt-4'>
                <div className='display:inline-block'>
                    <label htmlFor='name'>Name:</label>
                    <input
                        type="text"
                        name="name"
                        className='border mx-2 p-1'
                        defaultValue={todo?.name}
                    />
                </div>
                <div className='display:inline-block'>
                    <input
                        name='isCompleted'
                        type='radio'
                        value="true"
                        defaultChecked={todo?.isCompleted === true}
                    />
                    <label htmlFor='isCompleted'>完了</label>
                </div>
                <div className='display:inline-block'>
                    <input
                        name='isCompleted'
                        type='radio'
                        value="false"
                        defaultChecked={todo?.isCompleted === false}
                    />
                    <label htmlFor='isCompleted'>未完了</label>
                </div>
                <button
                    type='submit'
                    className='mt-4 bg-blue-800 py-4 py-1 rounded-lg text-sm text-white'
                >
                    内容を更新する
                </button>
            </form>
        </div>
    )
}
CRUDのモジュール分割
コードの見やすさやメンテナンス性を高めるために、モジュールを分割してみます。
分割した「モジュールの配置場所は、プロジェクトの直下に「components」フォルダを作り、このフォルダに
CRUD系の処理を配置します。
'use client';

import { useFormState } from "react-dom";
import {addTodo} from '@/lib/actions';
import { SubmitButton } from "./submit-button";

const initialState = {
    message:null,
    erros:{},
};

const CreateForm = ()=>{
    const [state,formAction] = useFormState(addTodo,initialState);
    return (
        <form className="flex items-center mt-4" action={formAction}>
            <label htmlFor="name">Name:</label>
            <input type="text" name="name" className="border mx-2 p-1" />
            {state?.message && (
                <div className="text-red-600 font-bold my-2">
                    {state?.message}
                </div>
            )}
            {state?.erros?.name && state.erros.name.map((erros:string)=>(
                <div className="text-red-600 font-bold my-2" key={erros}>
                    {erros}
                </div>
            ))}
            <SubmitButton />
      </form>
    )
}

export default CreateForm;
import { deleteTodo } from "@/lib/actions";

const DeleteButton = ({id}:{id:number})=>{
    const deleteTodoWithId = deleteTodo.bind(null,id);
    return (
        <form action={deleteTodoWithId}>
            <button className="bg-red-500 px-2 py-1 rounded-lg text-sm text-white">
                削除
            </button>
        </form>
    )
}
export default DeleteButton;
'use client';
import { addTodo } from '@/lib/actions';
import { useState } from 'react';

const Form = ()=>{
    const [name,setName] = useState('');
    const handleChange = (e:React.ChangeEvent<HTMLInputElement>)=>{
        setName(e.target.value);
    };
    const handleSubmit = async(e:React.FormEvent<HTMLFormElement>)=>{
        e.preventDefault();
        await addTodo(name);
    };

    return (
        <form className="flex items-center mt-4" onSubmit={handleSubmit}>
            <label htmlFor='name'>Name:</label>
            <input
                id="name"
                name="name"
                value={name}
                onChange={handleChange}
                className="border mx-2 p-1"
            />
            <button
                type="submit"
                className="bg-blue-600 px-2 py-1 rounded-lg text-sm text-white"
            >
                Add Todo
            </button>
        </form>
    )
}

export default Form;
'use client';

import { useFormState } from "react-dom";

export function SubmitButton(){
    const {pending} = useFormState();

    return (
        <button
            type="submit"
            disabled={pending}
            className={`bg-blue-600 px-2 py-1 rounded-lg text-sm text-white
                ${pending ? 'opacity-50':''}`}
        >
            Add Todo
        </button>
    )
}
以上となります。
ありがとうございました。