はじめに
SwiftでFirebaseを使ってチャットアプリを作ってみたいと思います。
Firebase初心者にもわかりやすく、デザインパターン、コードの可読性もしっかり守っているので、Firebaseの入門アプリとしてはぴったりかなと。
では始めていきます。ぜひ最後までご覧ください。
UIの設計
このように配置していきます。
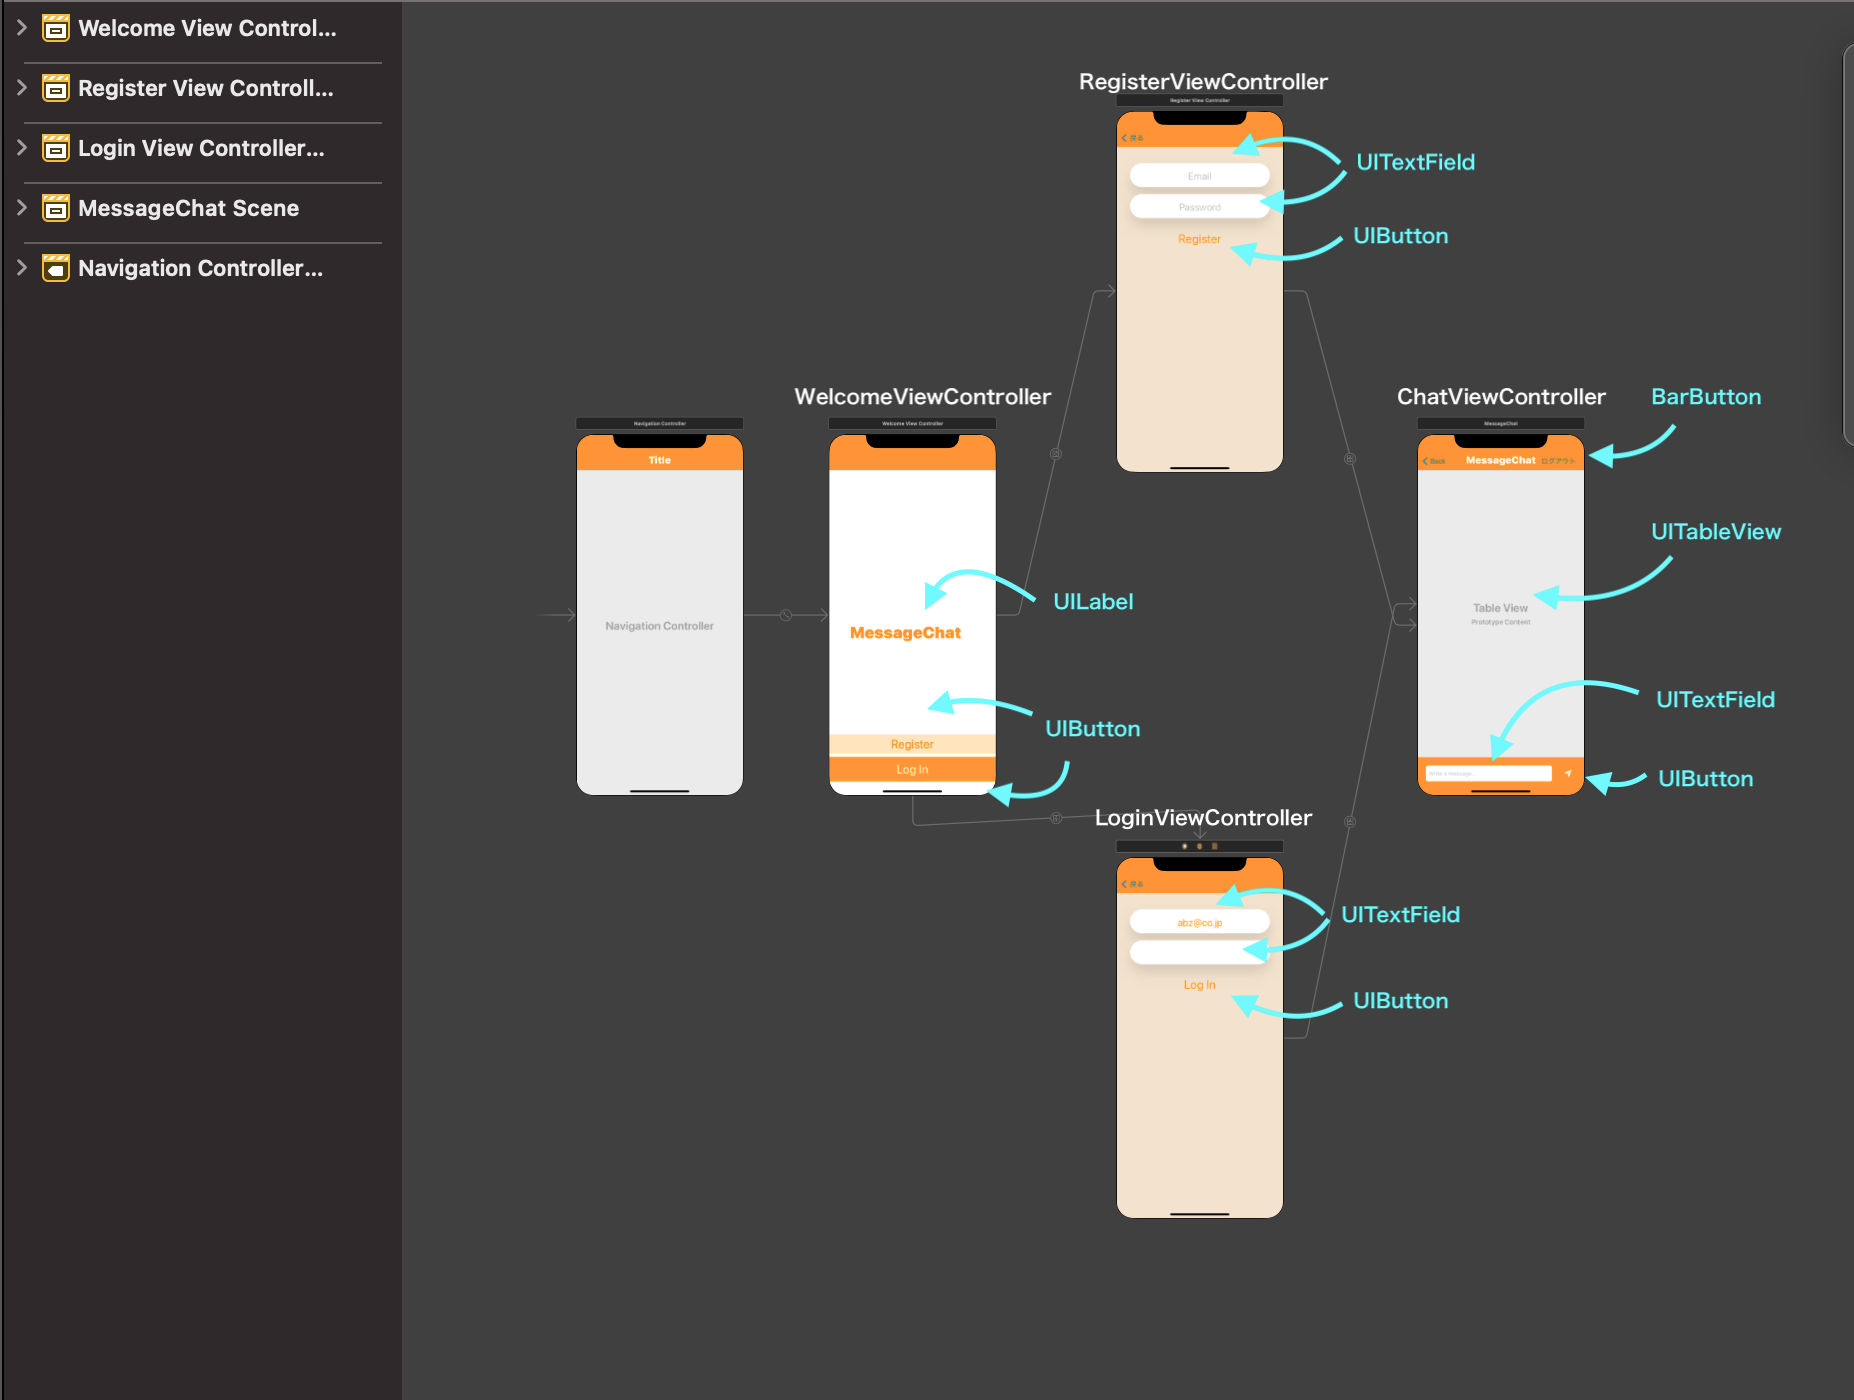
また上記のように、それぞれの画面に対応する、WelcomeViewController,RegisterViewController,LoginViewController,ChatViewControllerを作成し、それぞれの画面に接続します。
RegisterButtonを押しながら、RegisterViewControllerにドラッグ&ドロップしてsegueで結びます。
またLoginButtonを押しながら、LoginViewControllerにドラッグ&ドロップしてsegueで結びます。
ChatViewControllerにはそれぞれの画面からsegueで結んでください。そしてそれぞれのsegueのidentifierを
RegisterToChat,LoginToChatにしてください。
それぞれのViewControllerに、IBOutlet,IBAction接続します。

class WelcomeViewController: UIViewController{

    @IBOutlet weak var titleLabel: UILabel!
}
import UIKit

class RegisterViewController: UIViewController {
    @IBOutlet weak var emailTextField: UITextField!
    @IBOutlet weak var passwordTextField: UITextField!

    @IBAction func registerPressed(_ sender: UIButton) {
    }

}
import UIKit

class LoginViewController: UIViewController {
    @IBOutlet weak var emailTextField: UITextField!
    @IBOutlet weak var passwordTextField: UITextField!

    @IBAction func loginPressed(_ sender: UIButton) {
    }

}
import UIKit

class ChatViewController: UIViewController {

    @IBOutlet weak var tableView: UITableView!
    @IBOutlet weak var messageTextField: UITextField!

    override func viewDidLoad() {
        super.viewDidLoad()
    }

    @IBAction func sendPressed(_ sender: UIButton) {

    }

    @IBAction func logOutPressed(_ sender: UIBarButtonItem) {

    }
}
Firebaseの導入
Firebaseを使うために今回はCocoapodsを導入します。
Cocoapodsの導入の仕方は、このサイトなどを見ながら各自行ってください。
ここでPodfileを以下のように挿入します。
pod 'Firebase/Auth'
pod 'Firebase/Firestore'
pod installで導入していきます。
そして、Firebaseプロジェクトを追加

そのあとはプロジェクトの作成の手順に従って作業を進めていきます。
このプロジェクトに、Bundle identifierを登録しプロジェクトと接続します。
次にXcodeとの初期設定として、以下のコードを追加していきます。
ここでタイムライン機能の時に使うキーボード表示時に便利な機能の追加も行っていきます。
import UIKit
import Firebase
import IQKeyboardManagerSwift

@main
class AppDelegate: UIResponder, UIApplicationDelegate {

    func application(_ application: UIApplication, didFinishLaunchingWithOptions launchOptions: [UIApplication.LaunchOptionsKey: Any]?) -> Bool {
        // Override point for customization after application launch.

        FirebaseApp.configure()

        IQKeyboardManager.shared.enable = true
        IQKeyboardManager.shared.enableAutoToolbar = false
        IQKeyboardManager.shared.shouldResignOnTouchOutside = true

        return true
    }

    // MARK: UISceneSession Lifecycle

    func application(_ application: UIApplication, configurationForConnecting connectingSceneSession: UISceneSession, options: UIScene.ConnectionOptions) -> UISceneConfiguration {
        // Called when a new scene session is being created.
        // Use this method to select a configuration to create the new scene with.
        return UISceneConfiguration(name: "Default Configuration", sessionRole: connectingSceneSession.role)
    }

    func application(_ application: UIApplication, didDiscardSceneSessions sceneSessions: Set<UISceneSession>) {
        // Called when the user discards a scene session.
        // If any sessions were discarded while the application was not running, this will be called shortly after application:didFinishLaunchingWithOptions.
        // Use this method to release any resources that were specific to the discarded scenes, as they will not return.
    }
}
ようやく準備が終わりました。
ここからホーム画面、ログイン、新規アカウント登録、ログアウト,タイムラインを作っていきます。
まずは、ホーム画面から実装していきましょう。
ホーム画面
import UIKit

class WelcomeViewController: UIViewController {

    @IBOutlet weak var titleLabel: UILabel!

    override func viewWillAppear(_ animated: Bool) {
        super.viewWillAppear(animated)
        navigationController?.isNavigationBarHidden = true
    }
    override func viewWillDisappear(_ animated: Bool) {
        super.viewWillDisappear(animated)
        navigationController?.isNavigationBarHidden = false
    }
}
新規アカウント登録機能
import UIKit
import FirebaseAuth

class RegisterViewController: UIViewController {

    @IBOutlet weak var emailTextField: UITextField!
    @IBOutlet weak var passwordTextField: UITextField!

    @IBAction func registerPressed(_ sender: UIButton) {
        //emailTextFieldもpasswordTextFieldも値が存在していた場合
        if let email = emailTextField.text,let password = passwordTextField.text{

            //アカウント作成
            Auth.auth().createUser(withEmail: email, password: password) { authResult, error in
                if error != nil{
                    print(error)
                }else{
                    //アカウント作成に成功したら、chatViewControllerにナビゲートされる
                    self.performSegue(withIdentifier: "RegisterToChat", sender: self)
                }
            }
        }
    }
}
ログイン機能
import UIKit
import FirebaseAuth

class LoginViewController: UIViewController {

    @IBOutlet weak var emailTextField: UITextField!
    @IBOutlet weak var passwordTextField: UITextField!

    @IBAction func loginPressed(_ sender: UIButton) {
        //emailTextFieldもpasswordTextFieldも値が存在していた場合
        if let email = emailTextField.text,let password = passwordTextField.text{

            //サインイン
            Auth.auth().signIn(withEmail: email, password: password) { authResult, error in
                if error != nil {
                    print(error)
                }else{
                    //ログインに成功したら、chatViewControllerにナビゲートされる
                    self.performSegue(withIdentifier: K.loginSegue, sender: self)
                }
            }
        }
    }
}

## タイムライン機能
次にタイムライン機能を実装していきたいのですが、少しタイムラインのUIが複雑になりそうなので、CustomCellを使っていきたいと思います。
New File -> Cocoatouchclass -> MessageCell(subclass:UITableViewCell)でAlso Create XIBfileにチェックを入れ
MessageCell.swiftとMessageMessageCell.xibを作成します。
MessageCell.xibはこのように配置します。
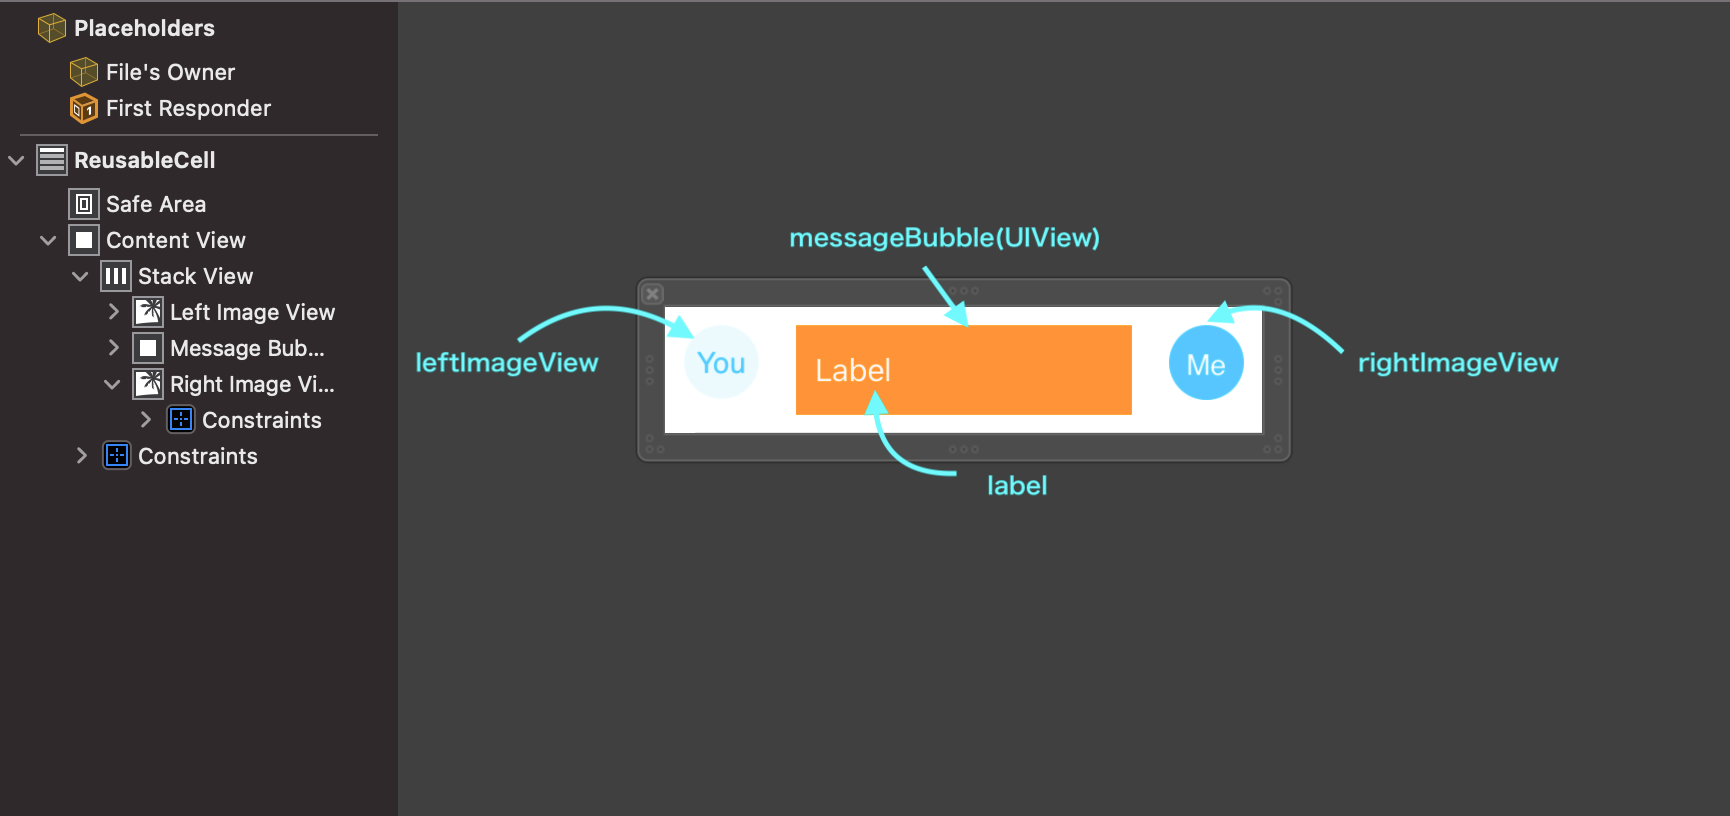
CellのidentifierにReusableCellとつけてください。
import UIKit

class MessageCell: UITableViewCell {

    @IBOutlet weak var messageBubble: UIView!
    @IBOutlet weak var label: UILabel!

    @IBOutlet weak var rightImageView: UIImageView!
    @IBOutlet weak var leftImageView: UIImageView!

    override func awakeFromNib() {
        super.awakeFromNib()
        messageBubble.layer.cornerRadius = messageBubble.frame.size.height / 5
    }

    override func setSelected(_ selected: Bool, animated: Bool) {
        super.setSelected(selected, animated: animated)
    }

}
ここでメッセージを管理するためのモデル、データの変数を管理するためのモデルを作ります。
import Foundation

struct Message {
    let sender:String
    let body:String
}
struct K {
    static let appName = "MessageChat"
    static let cellIdentifier = "ReusableCell"
    static let cellNibName = "MessageCell"
    static let registerSegue = "RegisterToChat"
    static let loginSegue = "LoginToChat"

    struct FStore {
        static let collectionName = "messages"
        static let senderField = "sender"
        static let bodyField = "body"
        static let dateField = "date"
    }
}
最後にChatViewControllerを作成します。
import UIKit
import Firebase

class ChatViewController: UIViewController {

    @IBOutlet weak var tableView: UITableView!
    @IBOutlet weak var messageTextField: UITextField!

    let db = Firestore.firestore()

    var messages:[Message] = [

    ]

    override func viewDidLoad() {
        super.viewDidLoad()

        tableView.delegate = self
        tableView.dataSource = self
        title = K.appName
        navigationItem.hidesBackButton = true

        tableView.register(UINib(nibName: K.cellNibName, bundle: nil), forCellReuseIdentifier: K.cellIdentifier)

        loadMessages()
    }

    func loadMessages(){

        db.collection(K.FStore.collectionName)
            .order(by: K.FStore.dateField)
            .addSnapshotListener { querySnapshot, error in

            self.messages = []

            if let e = error{
                print("The was an issue retrieving data from Firestore.\(e)")
            }else{
                if let snapshotDocuments = querySnapshot?.documents{
                    for doc in snapshotDocuments {
                        let data = doc.data()
                        if let messageSender = data[K.FStore.senderField] as? String,let messageBody = data[K.FStore.bodyField] as? String{
                            let newMessage = Message(sender: messageSender, body: messageBody)
                            self.messages.append(newMessage)

                            DispatchQueue.main.async {
                                self.tableView.reloadData()
                                let indexPath = IndexPath(row: self.messages.count-1, section: 0)

                                self.tableView.scrollToRow(at: indexPath, at: .top, animated: true)
                            }

                        }


                    }
                }
            }
        }
    }
    @IBAction func sendPressed(_ sender: UIButton) {
        if let messageBody = messageTextField.text
           ,let messageSender = Auth.auth().currentUser?.email{
            db.collection(K.FStore.collectionName).addDocument(data: [
                K.FStore.senderField:messageSender,
                K.FStore.bodyField:messageBody,
                K.FStore.dateField:Date().timeIntervalSince1970
            ]) { (error) in
                if error != nil{
                    print(error)
                }else{
                    print("Success.")

                    DispatchQueue.main.async {
                        self.messageTextField.text = ""
                    }
                }
            }
        }

    }

    @IBAction func logOutPressed(_ sender: UIBarButtonItem) {
        //ログアウト機能
        do {
            try Auth.auth().signOut()
            navigationController?.popToRootViewController(animated: true)
        } catch let signOutError as NSError {
            print("Error signing out: %@", signOutError)
        }

    }

}

//MARK: - UITableViewDataSource
extension ChatViewController:UITableViewDataSource{
    func tableView(_ tableView: UITableView, numberOfRowsInSection section: Int) -> Int {
        return messages.count

    }

    func tableView(_ tableView: UITableView, cellForRowAt indexPath: IndexPath) -> UITableViewCell {

        let message = messages[indexPath.row]
        let cell = tableView.dequeueReusableCell(withIdentifier: K.cellIdentifier, for: indexPath) as! MessageCell


        cell.label.text = message.body

        //This is a message from the current user.
        if message.sender == Auth.auth().currentUser?.email {
            cell.leftImageView.isHidden = true
            cell.rightImageView.isHidden = false
            cell.messageBubble.backgroundColor = UIColor(named: K.BrandColors.lightPurple)
            cell.label.textColor = UIColor(named: K.BrandColors.purple)

        }
        // This is a message frm the another sender
        else{
            cell.leftImageView.isHidden = false
            cell.rightImageView.isHidden = true
            cell.messageBubble.backgroundColor = UIColor(named: K.BrandColors.purple)
            cell.label.textColor = UIColor(named: K.BrandColors.lightPurple)
        }

        return cell

    }
}

//MARK: - UITableViewDelegate
extension ChatViewController: UITableViewDelegate {
    //receive index path
    func tableView(_ tableView: UITableView, didSelectRowAt indexPath: IndexPath) {
        print(indexPath.row)
    }
}
以上で完成しました。
コードはこちらに載せておきます。
指摘がありましたら、コメントでもよろしくお願いします。