本記事はTIS株式会社様のMedium記事の転載となっております(了承済み)。
A. はじめに
前回の投稿では https://qiita.com/SBIR3Japan/items/0d6a3956613ec076381c (以降“前記事”とします), ロードバランサを使用して、「ホットコールド高可用性デプロイメント」の設定方法を説明しました。その設定はバージョン4.0も使用できます。
この記事では、バージョン4.0から提供された3rd party製ロードバランサを必要としないHAノードを設定する代替アプローチを説明します。
この記事の検証環境は、前回と同じAWS環境を使用します。 ただし、AWS Load Balancerサービスは使用しません。
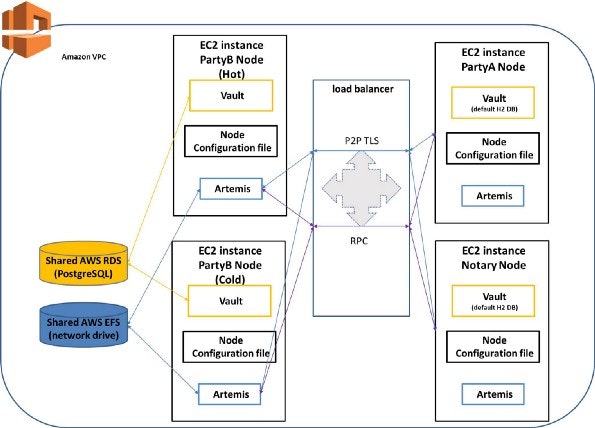
図1 本記事のHA設定の全体像
B. EFS とRDSを作成する
前回の投稿では、AWS のEFSとRDSサービスの構築手順を説明しました。今回も前記事と同様に構築してください。(前記事のセクションDおよびE参照)
C. ノードの設定
Cordaの公式サイトでは、HA用のバックアップノードは [additionalP2PAddresses]設定で追加できることを簡単に述べています。この構成の詳細な手順を本章で説明します。
1.build.gradleファイルの設定について
HAに関する設定情報は本ファイルには必要ありません。
HAの設定については、後程HAノード(Step3 )の“PartyB_conf”ファイルで追記・説明します。
build.gradle
…<略>…
node {
        name "O=PartyB,L=Tokyo,C=JP"
        p2pAddress  "26.132.137.54:1433"
        //上記のp2pAddressは、ホットPartyBノードのIPです。 ロードバランサのDNS名としてp2pAddressを設定する必要がなくなりました。
        rpcSettings {
            address("localhost:10009")
            adminAddress("localhost:10049")
        }
         cordapps = [
                "$project.group:cordapp-contracts-states:$project.version",
                "$project.group:cordapp:$project.version"
        ]
        rpcUsers = [[ user: "user1", "password": "test", "permissions": ["ALL"]]]
    }
…<略>…
※前回の記事ではextraConfigの記載をしておりましたが、ver4.0 から変更になり、利用できなくなりました。
2.CorDappsをビルドする
上記のファイルを保存して、CorDappsのディレクトリで「./gradlew deployNodes」を実行してCorDappsをコンパイルします。これで、PartyBを含むすべてのcordaノードのディレクトリが“ build / nodes”の下に作成されます。 PartyBのnode.confファイルは次のようになります。
# -----PartyB/node.conf right after compile "./gradlew deployNodes"-----#
devMode=true
myLegalName="O=PartyB,L=Osaka,C=JP"
p2pAddress="26.132.137.54:1433"
rpcSettings {
    address="localhost:10009"
    adminAddress="localhost:10049"
}
security {
    authService {
        dataSource {
            type=INMEMORY
            users=[
                {
                    password=test
                    permissions=[
                        ALL
                    ]
                    user=user1
                }
            ]
        }
    }
}
# -----------------------------------------------#
3.HAノード(PartyB)の設定
HA設定に関する情報(additionalP2PAddresses(コールドノードIP), 共有DB )を/ build / nodesの下の“ PartyB_conf”ファイルに追加してください。
devMode=true
myLegalName="O=PartyB,L=Osaka,C=JP"
p2pAddress="26.132.137.54:1433"                 // this is the IP for the hot PartyB node
additionalP2PAddresses=["26.132.133.94:1433"]   // this is the IP for the cold PartyB node
// the 3rd Party DB (e.g. PostgreSQL) info., which is the shared DB by PartyB’s Hot & Cold nodes
dataSourceProperties {
    dataSource {
        password=tisbcpoc
        url="jdbc:postgresql://ce4-pgsql.*****.ap-northeast-1.rds.amazonaws.com:5432/HAPartyB"
        user=ubuntu
    }
    dataSourceClassName="org.postgresql.ds.PGSimpleDataSource"
}
database {
    runMigration="true"
    schema="my_schema"
    transactionIsolationLevel="READ_COMMITTED"
}
jarDirs=[
  //ドライバ“ postgresql-42.1.4.jar”が配置されているディレクトリ
  "/home/ubuntu/driver"
]
rpcSettings {
    address="localhost:10009"
    adminAddress="localhost:10049"
}
security {
    authService {
        dataSource {
            type=INMEMORY
            users=[
                {
                    password=test
                    permissions=[
                        ALL
                    ]
                    user=user1
                }
            ]
        }
    }
}
additionalP2PAddressesには複数定義することが出来るため、配列型[ ]で定義します。
ネットワークに新しいノード(コールドノード)が追加されたので、ネットワークパラメータファイルを更新するためにブートストラップの実行が必要となります。
ブートストラップを実行する前に、PostgreSQL DBに必要なスキーマを作成するために、まずPartyB用のデータ移行ファイルを作成する必要があります。
4.必要な「移行スクリプト」を作成する
移行スクリプトの説明と作成方法は、前記事のSection Iで紹介しました。同じ手順で作成してください。
5.HAノードのNW構築を作成(ブートストラップ)
プロジェクトのルートディレクトリの下で、以下のコマンドを実行してください。
java -jar corda-tools-network-bootstrapper-4.0.jar — dir build/nodes/
上記で使用されている「corda-tools-network-bootstrapper-4.0.jar」ファイルは、Corda-Enterprise-4.0 Evaluation Packの〜/ tools / network-bootstrapper /からコピーしたものです。
ブートストラップが成功すると、以下のようなコンソールメッセージが表示されます。
Bootstrapping local test network in /mnt/**-poc-CE-additionalP2PAddresses/build/nodes
Generating node directory for PartyB
Generating node directory for Regulator
Generating node directory for Notary
Generating node directory for PartyA
Nodes found in the following sub-directories: [PartyA, PartyB, Notary, Regulator]
Found the following CorDapps: []
Not copying CorDapp JARs as --copy-cordapps is set to FirstRunOnly, and it looks like this network has already been bootstrapped.
Waiting for all nodes to generate their node-info files...
Distributing all node-info files to all nodes
Loading existing network parameters... NetworkParameters {
      minimumPlatformVersion=4
      notaries=[NotaryInfo(identity=O=Notary, L=London, C=GB, validating=true)]
      maxMessageSize=10485760
      maxTransactionSize=524288000
      whitelistedContractImplementations {
      }
      eventHorizon=PT720H
      packageOwnership {

      }
      modifiedTime=2019-06-25T10:37:15.047Z
      epoch=1
  }
Gathering notary identities
Generating contract implementations whitelist
Network parameters unchanged
Bootstrapping complete!
これで、PartyBのコールドノードの情報が新しいCordaネットワークに追加されました。
ブートストラップが完了後、PartyBのnode.confファイルも更新されました。更新された内容は次のようになります。
devMode=true
myLegalName="O=PartyB,L=Osaka,C=JP"
p2pAddress="26.132.137.54:1433"
additionalP2PAddresses=["26.132.133.94:1433"]
dataSourceProperties {
    dataSource {
        password=tisbcpoc
        url="jdbc:postgresql://ce4-pgsql.*****.ap-northeast-1.rds.amazonaws.com:5432/HAPartyB"
        user=ubuntu
    }
    dataSourceClassName="org.postgresql.ds.PGSimpleDataSource"
}
database {
    runMigration="true"
    schema="my_schema"
    transactionIsolationLevel="READ_COMMITTED"
}
jarDirs=[
  "/home/ubuntu/driver"
]
rpcSettings {
    address="localhost:10009"
    adminAddress="localhost:10049"
}
security {
    authService {
        dataSource {
            type=INMEMORY
            users=[
                {
                    password=test
                    permissions=[
                        ALL
                    ]
                    user=user1
                }
            ]
        }
    }
}
PartyBのコールドノードのIP(additionalP2PAddresses)、ホットノードとコールドノードの共有データベース「HAPartyB」( dataSourceProperties)を設定できました。
6.ParyBの設定情報をホットノード・コールドノードに配置する
上記Step5で作成されたPartyBのディレクトリをホットノードの”26.132.137.54" とコールドノードの”26.132.133.94" 両方にコピーします。
7.HAノード用の共有ドライブを設定する
前記事のSection-Hに参照し、PartyBのホットノードとコールドノード用の共有ドライブ(Artemis)を設定してください。
D. 全てのcordaノードを起動・検証する
Step5で作成されたPartyB以外の全てのノードディレクトリを各自の該当ノードに配置(コピー)してください。これで、図1のように、すべてのCordaノードがEC2インスタンスで正常に起動できます。
PartyBのHA機能の動作確認については、前記事のSection-Jに参照し、ご検証ください。前記事と同じく動作可能なことが確認できます。また、前記事と同様、PartyBのホットノード、コールドノードとも、corda.jarの起動が必要です。コールドノード起動時、ホットノードが稼働していたら、待ち状態となります。
まとめ
本記事は、Corda Enterpriseバージョン(CE4.0)のロードバランサなしでHAノードを設定するアプローチを説明しました。CE4.0は、従来必要な3rd Partyのロードバランサ サービス及びその設定は必要無くなり、より簡単・低コストで、ノードの高可用性を担保できると考えます。ただし、前回記事でも記載した通り、あくまでノードのHA構成です。実際の運用ではDBや共有ドライブについてもHA構成が必要となります。
次回の記事は、Notaryクラスタに関して紹介する予定です。
記:TIS Blockchain Promotion Office (羅)
Thanks to Kiyotaka Yamasaki.
本記事はTIS株式会社様のMedium記事の転載となっております(了承済み)。
本文URL:https://medium.com/@TIS_BC_Prom/r3-corda%E3%83%8E%E3%83%BC%E3%83%89%E3%81%AE%E9%AB%98%E5%8F%AF%E7%94%A8%E6%80%A7-ha-%E3%81%A8%E3%81%9D%E3%81%AE%E6%A7%8B%E6%88%90%E6%96%B9%E6%B3%95-34cb5dd409d1
本記事に関する問い合わせ:
SBI R3 Japan
info-srj@sbir3japan.co.jp