
はじめに
このブログでは、ディープラーニングを使用してAIモデリングコンペティションにおける分類タスクを実施する手順について説明します。主にPythonのライブラリであるPyTorchを活用し、データ前処理、モデルの構築、トレーニング、評価、および予測のステップを紹介します。
データの準備
データの読み込みは、タスクの開始点となります。ここでは、トレーニングデータ、テストデータ、および提出形式のサンプルファイルの読み込みを行っています。これらのファイルは、タスクの背後にあるデータを提供し、モデルのトレーニングと評価に使用します。
import pandas as pd

train_df = pd.read_csv('train.csv')
test_df = pd.read_csv('test.csv')
sample_submit = pd.read_csv('sample_submission.csv', index_col=0, header=None)
データの前処理と特徴量選択
データの中から重要な特徴量を選択することは、モデルの性能に直接影響を与えます。またターゲット変数の選択と、カテゴリカル変数と数値変数の区別を行っています。これにより、モデルのトレーニングに使用する特徴量が明確になります。
target = 'health'

categorical_features = train_df.select_dtypes(include=['object', 'category']).columns.tolist()
categorical_features.remove('created_at')

numerical_features = train_df.select_dtypes(include=['int64', 'float64']).columns.tolist()
numerical_features.remove(target)
パイプラインの構築
データ前処理パイプラインの構築は、データのクリーニングと変換の段階です。数値変数の欠損値を中央値で埋め、標準化を行うパイプラインと、カテゴリカル変数の欠損値を最頻値で埋め、ワンホットエンコーディングを行うパイプラインが含まれています。これにより、モデルが処理できる形式のデータが得られます。
from sklearn.pipeline import Pipeline
from sklearn.preprocessing import StandardScaler, OneHotEncoder
from sklearn.compose import ColumnTransformer
from sklearn.impute import SimpleImputer

numerical_pipeline = Pipeline([
    ('imputer', SimpleImputer(strategy='median')),
    ('scaler', StandardScaler())
])

categorical_pipeline = Pipeline([
    ('imputer', SimpleImputer(strategy='most_frequent')),
    ('encoder', OneHotEncoder(handle_unknown='ignore'))
])

preprocessor = ColumnTransformer(
    transformers=[
        ('num', numerical_pipeline, numerical_features),
        ('cat', categorical_pipeline, categorical_features)
    ])
データの変換
データ前処理パイプラインを適用し、トレーニングデータとバリデーションデータを準備します。これらのデータは、tensorデータセットに変換され、モデルのトレーニングに使用されます。tensor型はPyTorchで扱いやすいデータ形式です。
import numpy as np
import torch
from torch.utils.data import TensorDataset, DataLoader

X = train_df.drop(target, axis=1)
y = train_df[target]

X_train, X_val, y_train, y_val = train_test_split(X, y, test_size=0.2, random_state=42)

X_train_processed = preprocessor.fit_transform(X_train)
X_val_processed = preprocessor.transform(X_val)

X_train_tensor = torch.tensor(X_train_processed.toarray().astype(np.float32))
y_train_tensor = torch.tensor(y_train.values.astype(np.int64))
X_val_tensor = torch.tensor(X_val_processed.toarray().astype(np.float32))
y_val_tensor = torch.tensor(y_val.values.astype(np.int64))

train_dataset = TensorDataset(X_train_tensor, y_train_tensor)
val_dataset = TensorDataset(X_val_tensor, y_val_tensor)
ニューラルネットワークモデルの定義
モデルの定義は、ディープラーニングの核心です。この例では、3つの隠れ層を持つニューラルネットワークを示しています。隠れ層の数やユニット数は、タスクに応じて調整できます。このモデルは、データを受け取り、出力を生成する方法を定義しています。
import torch.nn as nn

class NeuralNet(nn.Module):
    def __init__(self, num_features):
        super(NeuralNet, self).__init__()
        self.layer1 = nn.Linear(num_features, 64)
        self.layer2 = nn.Linear(64, 64)
        self.output_layer = nn.Linear(64, 3)

    def forward(self, x):
        x = torch.relu(self.layer1(x))
        x = torch.relu(self.layer2(x))
        x = self.output_layer(x)
        return x

model = NeuralNet(X_train_tensor.shape[1])
モデルのトレーニング
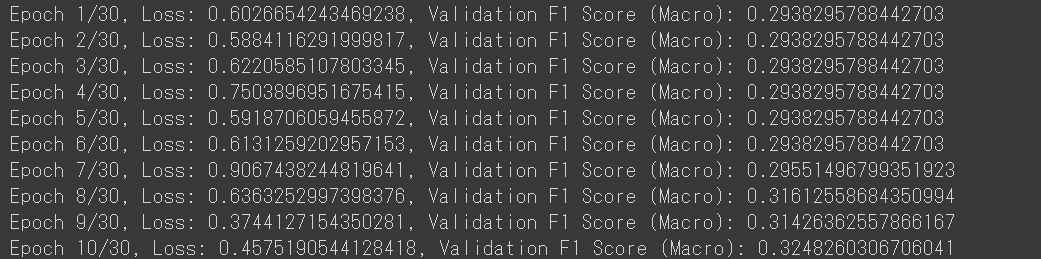
モデルのトレーニングは、損失関数とオプティマイザーの設定、エポック数の指定など、ディープラーニングプロセスの中核です。この例では、CrossEntropyLossを損失関数として使用し、Adamオプティマイザーを適用しています。トレーニングの各エポックで損失と評価指標(F1スコアなど)を記録し、モデルの性能を監視しています。
import torch.optim as optim
from sklearn.metrics import f1_score

criterion = nn.CrossEntropyLoss()
optimizer = optim.Adam(model.parameters(), lr=0.002)

num_epochs = 30
for epoch in range(num_epochs):
    model.train()
    for inputs, labels in train_loader:
        optimizer.zero_grad()
        outputs = model(inputs)
        loss = criterion(outputs, labels)
        loss.backward()
        optimizer.step()

    model.eval()
    all_labels = []
    all_predictions = []
    with torch.no_grad():
        for inputs, labels in val_loader:
            outputs = model(inputs)
            _, predicted = torch.max(outputs.data, 1)
            all_labels.extend(labels.numpy())
            all_predictions.extend(predicted.numpy())

    val_f1 = f1_score(all_labels, all_predictions, average='macro')
    print(f'Epoch {epoch+1}/{num_epochs}, Loss: {loss.item()}, Validation F1 Score (Macro): {val_f1}')
テストデータへの予測
トレーニングされたモデルを使用してテストデータに対する予測を行います。。これにより、タスクの最終的な目標である予測値が得られます。これらの予測を提出ファイルに保存し、各コンペティションの提出先に提出することで評価されます。
python
Copy code
X_test_processed = preprocessor.transform(test_df)
X_test_tensor = torch.tensor(X_test_processed.toarray().astype(np.float32))

model.eval()
with torch.no_grad():
    test_outputs = model(X_test_tensor)
    _, test_predictions = torch.max(test_outputs, 1)

# 提出ファイルの作成
submission_df = pd.DataFrame({
    'Id': test_ids,
    'Prediction': test_predictions.numpy()
})
最後に
以上が、深層学習(ディープラーニング)を使用した基本的な分類タスクの実践となります。実際の深層学習では必要に応じてデータの複雑な前処理やハイパーパラメータ調整、他の評価メトリクスの検討を行うことで、モデルのパフォーマンスを向上させることができます。