Bag of Words Meets Bags of Popcorn
こちらはKaggleの感情分析(Sentiment Analysis)のチュートリアルコンペです。
感情分析とは言葉から感情を読み解くという”分類”に含まれる分野です。皮肉や言葉遊びなどの要素もあり機械学習の中でも難解な物とされています。
今回はNLP(自然言語処理)モデルであるWord2Vecを用いて感情分析に応用していきます。
Word2Vecとはその名の通り単語を数値ベクトルに変換するモデルで、主に文章理解や意味的な単語同士の繋がりの解読を目的とします。
この記事はKaggleの記事を参考にしています。
https://www.kaggle.com/c/word2vec-nlp-tutorial
コンペについて
このコンペは映画の批評が肯定的なものか否定的なものかを判定する二項分類のモデルを目指します。
提出は
『コンマで区切られた25,000行2列、そして"id"と"sentiment"のヘッダー行を含んだファイル』
で"sentiment"列には肯定的なものには『1』否定的なものには『0』の判定結果を出力します。
提出ファイル例
id,sentiment
123_45,0
678_90,1
12_34,0
...
評価
提出ファイルはAUCで評価されます。
(FYI)AUCとは
AUCとはArea Under Curveの略でこれを理解するにはROC曲線も理解しないといけません。
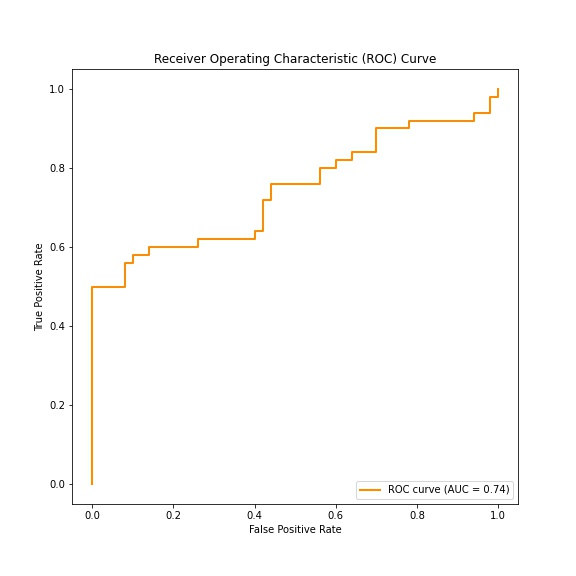
ROC曲線とは簡単に、二項分類におけるTPR(真陽性率)、FPR(偽陽性率)をグラフにしたものです。
より分かりやすくするために実際にプロットしてみます。
今回は乱数でデータを取ります。
import numpy as np
import matplotlib.pyplot as plt
from sklearn.metrics import roc_curve, auc

# サンプルデータ生成
true_labels = np.concatenate([np.ones(50), np.zeros(50)])  # 真陽性と偽陽性のラベル
scores = np.concatenate([np.random.rand(50), np.random.rand(50) * 0.5]) # スコア

# ROS曲線計算
fpr, tpr, thresholds = roc_curve(true_labels, scores2)
roc_auc = auc(fpr, tpr)

# プロット
plt.figure(figsize=(8, 8))
plt.plot(fpr, tpr, color='darkorange', lw=2, label=f'ROC curve (AUC = {roc_auc:.2f})')
plt.xlabel('False Positive Rate')
plt.ylabel('True Positive Rate')
plt.title('Receiver Operating Characteristic (ROC) Curve')
plt.legend(loc='lower right')

plt.savefig('figure01.jpg')
このように実際の値(true_labels: 今回なら批評が肯定的か否定的かの答え)に対して正確に判別できた確率(今回なら分類器の正答率)がプロットされ、曲線以下の面積がAUC(今回ならAUC=0.74)として導き出されます。
最大値は面積が最大になる直角にプロットされた場合でAUC=1になります。
なのでAUC=1に近いほど正確に予測できているという指標になります。
実装
bag-of-words model
コンペタイトルの”bag-of-words”は『bag-of-words model』という自然言語処理の分類器に使われるもので、順番を考慮しない単語のコレクション(バッグ)を扱うモデルを指します。
例)
// Sentence
"John likes to watch movies. Mary likes movies too."

// JSON Representation
{"John":1,"likes":2,"to":1,"watch":1,"movies":2,"Mary":1,"too":1}
データ読み込み
データはKaggleのページのデータタブからダウンロードします。
まずlabeledTrainDataという肯定、否定のラベル付けがされた批評のデータを含むファイルを読み込みます。
import pandas as pd
train = pd.read_csv("/kaggle/input/word2vec-nlp-tutorial/labeledTrainData.tsv.zip", header=0, \delimiter="\t", quoting=3)
header=0:最初の行にコラム名のヘッダーを含む
delimiter=\t:フィールドがタブで区切られる
quoting=3:ダブルクオート(”)を無視する
試しにデータを一つ見てみます。
print(train["review"][100])
出力
"I thought this was one of the better films I saw last year, and I see a lot of films. It wasn't nominated for two Spirit Awards for nothing. <br /><br />If you've never seen an artistic film, I can understand why you might not like it. It's a smart film for smart people."
和訳
これは私が昨年見た中で、かなり良い映画の一つだと思いました。私は多くの映画を見ていますが、これが2つのスピリットアワードにノミネートされた理由がわかります。<br /><br />もしアートな映画を見たことがないのなら、なぜあなたがこれを好まないか理解できます。これは賢い人々のための賢い映画です。
というものでした。
自分でもいろんなデータを見てみると楽しいかもしれません。
文中に<br/>などのHTMLタグが入っていてノイズになるのでこれらを取り除きます。
データクレンジング(方法)
・HTMLタグ
必要ならライブラリをインストールします(Kaggleではデフォルトで入ってるみたいです)
!pip install BeautifulSoup4
from bs4 import BeautifulSoup

example1 = BeautifulSoup(train["review"][100])

print(example1.get_text())
さっきのデータをクレンジングしてみると、下記のように出力され先ほどのと比較してHTMLタグが除去されています。
"I thought this was one of the better films I saw last year, and I see a lot of films. It wasn't nominated for two Spirit Awards for nothing. If you've never seen an artistic film, I can understand why you might not like it. It's a smart film for smart people."
・句読点、数字
これらは解こうとしている問題によって取捨選択しなければなりません。
例えば句読点などはほとんどのケースで必要ありませんが、びっくりマーク(!!)や:-(のような顔文字、絵文字などが文章の意図を読み解くのに重要であるケースもあるでしょう。
今回は数字、句読点は全て取り除いてしまいます。
import re

letters_only = re.sub("[^a-zA-Z]",
                      " ",
                      example1.get_text() )

print(letters_only)
I thought this was one of the better films I saw last year and I see a lot of films It wasn t nominated for two Spirit Awards for nothing If you ve never seen an artistic film I can understand why you might not like it It s a smart film for smart people
a-z(小文字のaからz)A-Z(大文字のAからZ)以外をスペースに置き換えました。
そして文章を全て小文字にし、単語に分解します(トークン化)
lower_case = letters_only.lower()
words = lower_case.split()

print(words)
['i', 'thought', 'this', 'was', 'one', 'of', 'the', 'better', 'films', 'i', 'saw', 'last', 'year', 'and', 'i', 'see', 'a', 'lot', 'of', 'films', 'it', 'wasn', 't', 'nominated', 'for', 'two', 'spirit', 'awards', 'for', 'nothing', 'if', 'you', 've', 'never', 'seen', 'an', 'artistic', 'film', 'i', 'can', 'understand', 'why', 'you', 'might', 'not', 'like', 'it', 'it', 's', 'a', 'smart', 'film', 'for', 'smart', 'people']
・ストップワード
ストップワードとは冠詞、接続詞、前置詞などの機能語(英語のa,
the, and, orなど。日本語の「は」「の」「です」など。)です。
繰り返し文章に含まれていてあまり意味をなさないのでこれらも取り除きます。
Python Natural Language Toolkit (NLTK)にストップワードのワードリストがあるのでそれを利用します。
NLTKはダウンロードにインタラクションが必要でKaggleのノートブック内でダウンロードをすると提出時にエラーが起きるので、Anaconda等のPython環境でストップワードをダウンロードし、それをKaggleにアップロードします。
import nltk
nltk.download('stopwords')

上の画像のアップロードから先ほどダウンロードしたzipファイルをアップロードすると画像のようにデータセットが追加されます。
これで先ほど追加したファイルからストップワードにアクセスします。
import nltk
from nltk.corpus import stopwords
nltk.data.path.append('/kaggle/input/stopwords/stopwords')

words = [w for w in words if not w in stopwords.words("english")]
print(stopwords.words("english") )
print(words)
ストップワードのリスト
['i', 'me', 'my', 'myself', 'we', 'our', 'ours', 'ourselves', 'you', "you're", "you've", "you'll", "you'd", 'your', 'yours', 'yourself', 'yourselves', 'he', 'him', 'his', 'himself', 'she', "she's", 'her', 'hers', 'herself', 'it', "it's", 'its', 'itself', 'they', 'them', 'their', 'theirs', 'themselves', 'what', 'which', 'who', 'whom', 'this', 'that', "that'll", 'these', 'those', 'am', 'is', 'are', 'was', 'were', 'be', 'been', 'being', 'have', 'has', 'had', 'having', 'do', 'does', 'did', 'doing', 'a', 'an', 'the', 'and', 'but', 'if', 'or', 'because', 'as', 'until', 'while', 'of', 'at', 'by', 'for', 'with', 'about', 'against', 'between', 'into', 'through', 'during', 'before', 'after', 'above', 'below', 'to', 'from', 'up', 'down', 'in', 'out', 'on', 'off', 'over', 'under', 'again', 'further', 'then', 'once', 'here', 'there', 'when', 'where', 'why', 'how', 'all', 'any', 'both', 'each', 'few', 'more', 'most', 'other', 'some', 'such', 'no', 'nor', 'not', 'only', 'own', 'same', 'so', 'than', 'too', 'very', 's', 't', 'can', 'will', 'just', 'don', "don't", 'should', "should've", 'now', 'd', 'll', 'm', 'o', 're', 've', 'y', 'ain', 'aren', "aren't", 'couldn', "couldn't", 'didn', "didn't", 'doesn', "doesn't", 'hadn', "hadn't", 'hasn', "hasn't", 'haven', "haven't", 'isn', "isn't", 'ma', 'mightn', "mightn't", 'mustn', "mustn't", 'needn', "needn't", 'shan', "shan't", 'shouldn', "shouldn't", 'wasn', "wasn't", 'weren', "weren't", 'won', "won't", 'wouldn', "wouldn't"]
ストップワードを除いたもの
['thought', 'one', 'better', 'films', 'saw', 'last', 'year', 'see', 'lot', 'films', 'nominated', 'two', 'spirit', 'awards', 'nothing', 'never', 'seen', 'artistic', 'film', 'understand', 'might', 'like', 'smart', 'film', 'smart', 'people']
・ステミング(Porter Stemming)とレミマティゼーション(Lemmatizing)
これらの他にステミングとレミマティゼーションなるものがあります。
簡単に言うと単語を原形(lemma)にするというものです。
意味と関係のない、複数形のsを省いたり、過去形、分詞を元の形にします。
今回は簡略化のために省きますが、これを行うとより精密な分類が期待できます。
データクレンジング(実装)
今行ったステップをデータセット全体に反映するための関数を作ります。
def review_to_words( raw_review ):
    # 1. Remove HTML
    review_text = BeautifulSoup(raw_review).get_text()

    # 2. Remove non-letters
    letters_only = re.sub("[^a-zA-Z]", " ", review_text)

    # 3. Convert to lower case, split into individual words
    words = letters_only.lower().split()

    # 4. In Python, searching a set is much faster than searching
    #   a list, so convert the stop words to a set
    stops = set(stopwords.words("english"))

    # 5. Remove stop words
    meaningful_words = [w for w in words if not w in stops]

    # 6. Join the words back into one string separated by space,
    # and return the result.
    return( " ".join( meaningful_words ))
効率のためストップワードのリストを集合のset型にしています。
データセットをループします。
num_reviews = train["review"].size

clean_train_reviews = []

for i in xrange( 0, num_reviews ):
    clean_train_reviews.append( review_to_words( train["review"][i] ) )
特徴エンジニアリング
もちろんのこと機械は文字を理解できませんので、何かしらの数字のパターンに変換する必要があります。
前述した通り、今回はBag of Wordsというモデルを使用します。
このモデルでは出てきた単語を学習し、その使用頻度を計算しそれをデータに特徴(量)として付与してあげます。
カバンに単語を詰め込んでいくイメージです。
from sklearn.feature_extraction.text import CountVectorizer

vectorizer = CountVectorizer(analyzer = "word",
                             tokenizer = None,
                             preprocessor = None,
                             stop_words = None,
                             max_features = 5000)

train_data_features = vectorizer.fit_transform(clean_train_reviews)

train_data_features = train_data_features.toarray()

vocab = vectorizer.get_feature_names_out()
print(vocab)
['abandoned' 'abbott' 'abilities' ... 'zombie' 'zombies' 'zone']
パラメーターのtokenizer = None, preprocessor = None, stop_words = None, max_features = 5000にあるようにトークン化などはCountVectorizerでまとめて行うこともできます。
また特徴量の最大値を5000に設定しています。
下記が数字で特徴付けされた単語の一部
409 abandoned
160 abbott
320 abilities
902 ability
2680 able
242 absence
177 absent
725 absolute
2901 absolutely
549 absurd
400 abuse
…
学習
データの準備はできたので、ランダムフォレストという分類アルゴリズムを使って教師あり学習をします。
from sklearn.ensemble import RandomForestClassifier

forest = RandomForestClassifier(n_estimators = 100)

forest = forest.fit( train_data_features, train["sentiment"] )
提出
テストデータ/kaggle/input/word2vec-nlp-tutorial/testData.tsv.zipを読み取り、訓練データと同様にクレンジングなどを行い、先ほど学習させたランダムフォレストに予測させます。
csvファイルに変換して提出用のファイルを用意します。
test = pd.read_csv("/kaggle/input/word2vec-nlp-tutorial/testData.tsv.zip", header=0, delimiter="\t", \
                   quoting=3 )

num_reviews = len(test["review"])
clean_test_reviews = []

for i in range(0,num_reviews):
    clean_review = review_to_words( test["review"][i] )
    clean_test_reviews.append( clean_review )

test_data_features = vectorizer.transform(clean_test_reviews)
test_data_features = test_data_features.toarray()

result = forest.predict(test_data_features)

output = pd.DataFrame( data={"id":test["id"], "sentiment":result} )

output.to_csv( "Bag_of_Words_model.csv", index=False, quoting=3 )
これで提出すれば完了です。
次の記事ではWord2vecを用いた方法を試してみます。
