とにかくUIをもっと高速かつ正確に開発したい
- JetpackComposeはUI開発は高速化してくれた
- もっともっとUI開発を高速化するためにPreviewActivityをHackする
本記事の内容はXML時代でも自分でrunConfigurationを用意すれば同様のことはできる(がIDE機能と統合されたPreviewActivityと同等のものを用意するのは非常に面倒)
なぜPreviewActivityをHackするのか
エミュレータ要らずで確認できるけども・・・
- Composable関数に
@PreviewアノテーションをつけるとAndroid Studioとエミュレータまたは実機でプレビューを見ることができる -
@Previewアノテーションにさまざまなパラメータを設定することでAndroid Studio上で設定違いのUIを一覧で表示できる
| Preview on Android Studio | Preview on Emulator |
|---|---|
 |
 |
Android Studio上のプレビューはcom.android.tools.layoutlib:layoutlibを使って描画されている
- Layoutlib故の問題点もある
- 実際と異なるpadding、marginが表示されてしまう
- SystemUIを表示できるが調整はできないためwindowInsetsの確認に使えない
- Coilなどでネットワーク経由の画像を表示できない
- UIを作っているタイミングで実際と異なる表示がなされるプレビューを信じ切ることができない
制限事項とベスト プラクティス
Android Studio は、プレビュー コードをプレビュー領域で直接実行します。Android フレームワークのポートされた部分(Layoutlib)を利用するため、エミュレータや物理デバイスを実行する必要はありません。Layoutlib は、Android デバイスの外部で実行するように設計された Android フレームワークのカスタム バージョンです。このライブラリの目的は、デバイスでのレンダリングに非常に近いレイアウトのプレビューを Android Studio で提供することである。
https://developer.android.com/develop/ui/compose/tooling/previews?hl=ja#best-practices
Layoutlibはcashapp/paparazziでも使われている
実例
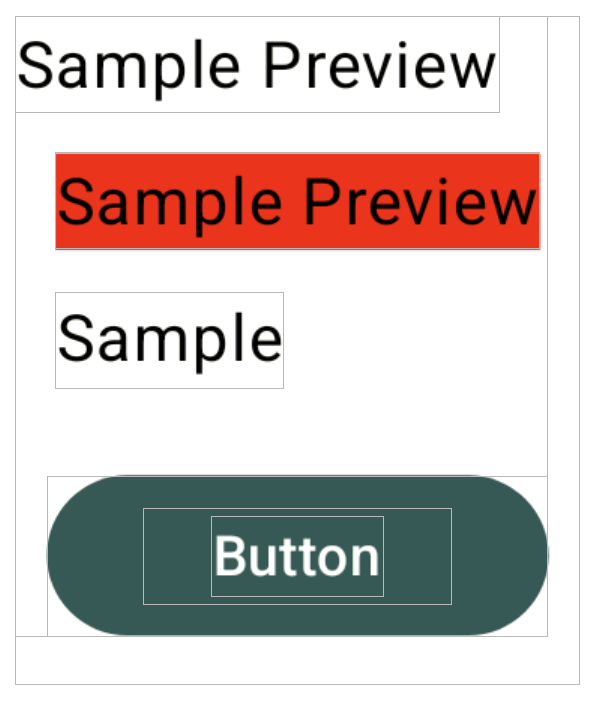
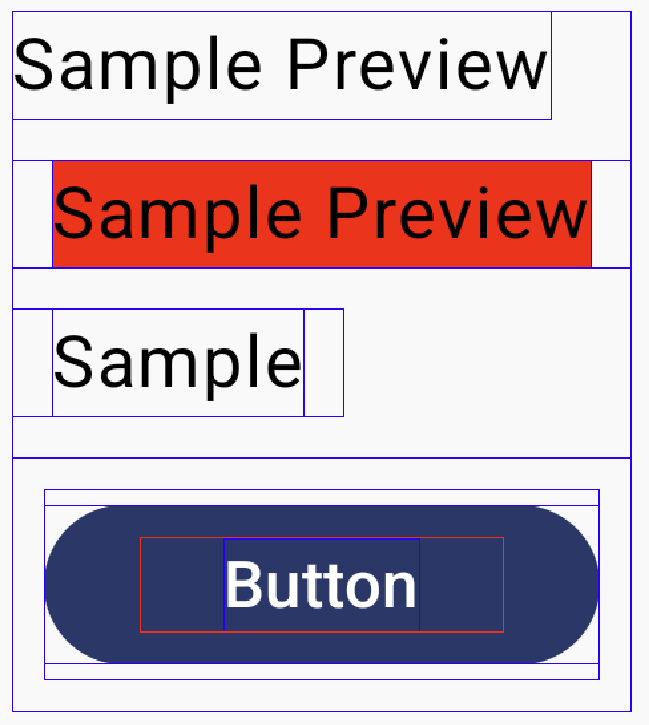
| Preview on Android Studio | Preview on Emulator |
|---|---|
 |
 |
- 背景色赤のTextの右側に余計なmarginが入っている
- Buttonの上下のpaddingが描画されていない
実測値で見れば入っている可能性はあるがinspector上では入っていることが確認できないため混乱する
そのため、エミュレータまたは実機で確認できるPreviewActivityをメインで使用することにした
PreviewActivityとは
- PreviewActivityは
@Previewアノテーションが付与された関数を実行するために用意されたAcitvity -
androidx.compose.ui:ui-toolingに含まれている
なぜdebugImplementationなのかは後述するが👇の形でセットアップすることが多い
implementation "androidx.compose.ui:ui-tooling-preview:$compose_version"
debugImplementation "androidx.compose.ui:ui-tooling:$compose_version"
PreviewActivity.android.kt
class PreviewActivity : ComponentActivity() {

    private val TAG = "PreviewActivity"

    override fun onCreate(savedInstanceState: Bundle?) {
        super.onCreate(savedInstanceState)
        if (applicationInfo.flags and ApplicationInfo.FLAG_DEBUGGABLE == 0) {
            Log.d(TAG, "Application is not debuggable. Compose Preview not allowed.")
            finish()
            return
        }
        intent?.getStringExtra("composable")?.let { setComposableContent(it) }
    }

    private fun setComposableContent(composableFqn: String) {
        val className = composableFqn.substringBeforeLast('.')
        val methodName = composableFqn.substringAfterLast('.')
        intent.getStringExtra("parameterProviderClassName")?.let { parameterProvider ->
            setParameterizedContent(className, methodName, parameterProvider)
            return@setComposableContent
        }
        setContent {
            ComposableInvoker.invokeComposable(
                className,
                methodName,
                currentComposer
            )
        }
    }

    private fun setParameterizedContent(
        className: String,
        methodName: String,
        parameterProvider: String
    ) {
        val previewParameters = getPreviewProviderParameters(
            parameterProvider.asPreviewProviderClass(),
            intent.getIntExtra("parameterProviderIndex", -1)
        )

        if (previewParameters.size > 1) {
            setContent {
                val index = remember { mutableIntStateOf(0) }
                Scaffold(
                    content = { padding ->
                        Box(Modifier.padding(padding)) {
                            ComposableInvoker.invokeComposable(
                                className,
                                methodName,
                                currentComposer,
                                previewParameters[index.intValue]
                            )
                        }
                    },
                    floatingActionButton = {
                        ExtendedFloatingActionButton(
                            text = { Text("Next") },
                            onClick = {
                                index.intValue = (index.intValue + 1) % previewParameters.size
                            }
                        )
                    }
                )
            }
        } else {
            setContent {
                ComposableInvoker.invokeComposable(
                    className,
                    methodName,
                    currentComposer,
                    *previewParameters
                )
            }
        }
    }
}
androidx.compose.ui.tooling:AndroidManifest.xml
<manifest xmlns:android="http://schemas.android.com/apk/res/android">
    <application>
        <activity
            android:name=".PreviewActivity"
            android:exported="true" />
    </application>
</manifest>
- PreviewActivityはthemeなどのtag属性なしでAndroidManifestに定義されている
- PreviewActivityはComposable関数とPreviewParameterProviderのFQCNを受け取り、その関数を実行する
-
parameterProviderClassNameが指定されている場合はComposable関数をandroidx.compose.material.Scaffoldで包まれた状態で実行し、指定がない場合は直接実行する - ガターアイコンをクリックし、実機プレビューを実行するとPreviewActivityを起動する形でプレビュー用のアプリが実行される
- つまり実態としては👇のようなadbコマンドが実行されていると考えればいい
adb shell am start -a android.intent.action.MAIN -c android.intent.category.LAUNCHER -n $applicationId/androidx.compose.ui.tooling.PreviewActivity --es composable $ComposableFQCN --es parameterProviderClassName $PreviewParameterProviderFQCN --ei parameterProviderIndex $index
さまざまな互換機能を提供するandroidx.appcompat.app.AppCompatActivityではないので古い端末で実行する際は注意が必要
どうHackするのか
- 実機プレビューはmoduleの種類によってPreviewActivityの格納先が異なる
| Application module | Library module | |
|---|---|---|
| variant | debug | debugAndroidTest |
| apk | app/build/outputs/apk/debug/app-debug.apk |
app/build/outputs/apk/androidTest/debug/app-debug.apk |
なぜdebugImplementationなのかは後述するが👇の形でセットアップすることが多い
- Application moduleの場合は普通のapkにPreviewActivityを格納するためにdebugImplementationを使う必要がある
- Library moduleの場合はInstrumented Test用apkにPreviewActivityが格納されていればよいので
androidTestImplementationでも構わない
- この違いを踏まえて追加設定や実装を行うことでHackできる
AndroidManifest.xmlをハックする
- 実行環境と対応する
AndroidManifest.xmlをいじることでTheme、Permissionなどが変更できる
| Application module | Library module |
|---|---|
src/main/AndroidManifest.xmlor src/debug/AndroidManifest.xml
|
src/androidTest/AndroidManifest.xmlor src/debug/AndroidManifest.xml
|
- Library moduleの実機Previewでリモート画像が表示できない問題は、
src/androidTest/AndroidManifest.xmlに<uses-permission android:name="android.permission.INTERNET" />を追加することで解決できる
AndroidManifestはマージされるのでマージ前提で上手に定義してあげるとよい
https://developer.android.com/build/manage-manifests
case1: WindowInsets
- android15で強制されたEdge To Edgeを対応する際にもPreviewActivity上で確認できる
-
@Previewアノテーションが付与されたComposable関数はComponentActivity#onCreateで実行する関数と考えればよい - ->
@Previewアノテーションが付与されたComposable関数内でandroidx.activity.enableEdgeToEdgeを呼べば良い
private fun Context.getActivity(): ComponentActivity? = when (this) {
    is ComponentActivity -> this
    is ContextWrapper -> baseContext.getActivity()
    else -> null
}

@Preview
@Composable
private fun PreviewEdgeToEdge() {
    // 単にComponentActivityで実行されている関数と考えて良い
    val activity = LocalContext.current.getActivity() ?: return
    activity.enableEdgeToEdge()
    SuburiTheme {
        Scaffold {
            Box(
                modifier = Modifier
                    .fillMaxSize()
                    .padding(it),
            )
        }
    }
}
PreviewParameterProviderを使用するとandroidx.compose.material.Scaffoldに包まれた状態でComposable関数が実行されてしまう
WindowInsetsの確認をしたい場合はPreviewParameterProviderを使わないようにするのが望ましい(特にandroidx.compose.material3を使用している場合は)
- AndroidManifest.xmlをいじることでWindowInsetsAnimationの確認も可能
<?xml version="1.0" encoding="utf-8"?>
<manifest xmlns:android="http://schemas.android.com/apk/res/android"
    xmlns:tools="http://schemas.android.com/tools">

    <application>
        <activity
            android:name="androidx.compose.ui.tooling.PreviewActivity"
            android:windowSoftInputMode="adjustResize"
            tools:node="merge" />
    </application>

</manifest>
余談だがEdge To Edgeの確認はscroll effectが要素が伸縮するようになったandroid12より古い端末で確認したほうが正しい位置にinsetを適用できているか確認がスムーズに行える
case2: PictureInPicture
-
PictureInPicture時のUIについてもPreviewActivityでお手軽に確認できる
<?xml version="1.0" encoding="utf-8"?>
<manifest xmlns:android="http://schemas.android.com/apk/res/android"
    xmlns:tools="http://schemas.android.com/tools">

    <application>
        <activity
            android:name="androidx.compose.ui.tooling.PreviewActivity"
            android:supportsPictureInPicture="true"
            tools:node="merge" />
    </application>

</manifest>
@Preview
@Composable
private fun PreviewPictureInPicture() {
    val activity = LocalContext.current.getActivity() ?: return
    SuburiTheme {
        Scaffold {
            Box(
                modifier = Modifier
                    .fillMaxSize()
                    .padding(it),
            )
        }
    }

    LaunchedEffect(activity) {
        // composable関数のレンダリング終了後に`enterPictureInPictureMode`を実行するためのdelay
        delay(300)
        activity.enterPictureInPictureMode(PictureInPictureParams.Builder().build())
    }
}
関数をハックする
- Composable関数は
ComponentActivity#onCreateで実行する関数だがandroidx.activity.compose.ComponentActivityKt#setContentのラムダ内で実行されている - ラムダ内で実行することを配慮できればActivityの機能をフルで使うことができる
case1: Inflate XML layout
- PreviewActivityは
AndroidViewなしでXML layoutの確認にも使える - ComposeViewはViewGroupだがcompositionが作成された後でなければaddViewができないため、直接Inflateできない
abstract class AbstractComposeView @JvmOverloads constructor(
    context: Context,
    attrs: AttributeSet? = null,
    defStyleAttr: Int = 0
) : ViewGroup(context, attrs, defStyleAttr) {

    private var creatingComposition = false

    private fun checkAddView() {
        if (!creatingComposition) {
            throw UnsupportedOperationException(
                "Cannot add views to " +
                    "${javaClass.simpleName}; only Compose content is supported"
            )
        }
    }
}
- ただしcomposition作成を待ちさえすれば、windowのdecoreViewごと上書きできる
- Choreographerが絡むAndroidUiDispatcherとは別のスレッド(純粋なUIスレッド)で待てば, ActivityのwindowのdecoreViewを上書きできる
@Preview
@Composable
private fun PreviewXmlInflate() {
    val activity = LocalContext.current.getActivity() ?: return
    // delay for composition
    Handler(Looper.getMainLooper()).postDelayed({ activity.setContentView(R.layout.view_sample) }, 300)
}
case2:
・・・なにか他によい例があればください・・・・
まとめ
- 正確なUIの確認にはPreviewActivityを使う
-
@Previewアノテーションが付与されたComposable関数はComponentActivity#onCreateで実行する関数と考えればよい -
androidx.activity.compose.ComponentActivityKt#setContentの制限事項に配慮すればActivityの機能をフルで使うことができる - AndroidManifestをいじって確認したい設定のActivityを構成する
-
androidx.compose.material.Scaffoldに包まれてしまうので実機Preview用のComposable関数でPreviewParameterProviderは使わない
