今回はKeyPathを使って色々なものを便利にしていきたいと思います。
KeyPathとは
KeyPathとは、動的にプロパティにアクセスできるようにするものです。
\.nameのようなSwiftでよくみるアレです。
詳しい説明は省きますが、こんな感じでプロパティの値を読み取ったり書き込んだりすることができます。
struct Dog {
    var name: String
    var age: Int
}

var dog = Dog(name: "いぬ", age: 5)

// 値の読み取り
let keyPath: KeyPath<Dog, String> = \.name
print(dog[keyPath: keyPath]) // いぬ

// 書き込み
let writableKeyPath: WritableKeyPath<Dog, String> = \.age
dog[keyPath: writableKeyPath] = 10
print(dog.age) // 10
今回はこの機能を使って便利なものを作っていきたいと思います。
手始めにKeyPathでmapを自作してみる
SwiftのmapにはKeyPathを使った便利な書き方が可能です。
dogs.map(\.name)
これを自作するとこのようになります。↓
extension Sequence {
    func myMap<Value>(_ keyPath: KeyPath<Element, Value>) -> [Value] {
        map { $0[keyPath: keyPath] }
    }
}
keyPathを使うことで引数で指定したpropertyのみの配列に変換することができます。
そしてmapと同じように使うことができました!
let dogs = [
    Dog(name: "たけし", age: 1),
    Dog(name: "たかはし", age: 2),
    Dog(name: "たろう", age: 3)
]
print(dogs.myMap(\.name))
// ["たけし", "たかはし", "たろう"]
AttributedStringを便利にしてみる
AttributedStringとは、文字の色やfontなどを部分的に変えたりできる優れもの。
let text = "大小"
let attributedString = AttributedString(text)
if let range = attributedString.range(of: "大") {
    attributedString[range].font = .boldSystemFont(ofSize: 30)
}
↑これで大のみが大きくなります。
こんな感じで簡単に一部分だけfontを変えることができますが、以下のようにViewBuilder内にこれを書くとエラーになってしまいます。
var body: some View {
    let text = "大小"
    let attributedString = AttributedString(text)
    if let range = attributedString.range(of: "大") {
        attributedString[range].font = .boldSystemFont(ofSize: 30)
    }
    Text(attributedString)
}
これでは不便なので、
この処理をKeyPathを使ってString型のメソッドにする。↓
extension String {
    func attribute<Value>(
        range: String,
        keyPath: WritableKeyPath<AttributedSubstring, Value>,
        value: Value
    ) -> AttributedString {
        var attributedString = AttributedString(self)
        if let range = attributedString.range(of: range) {
            attributedString[range][keyPath: keyPath] = value
        }
        return attributedString
    }
}
すると、このように書くことができます。
var body: some View {
    Text(
        "大小"
            .attribute(range: "大", keyPath: \.font, value: .boldSystemFont(ofSize: 30))
    )
}
これでエラーがでずに済みました。
ですが、これだと"小"をもっと小さくしたい場合にメソッドチェーンできません。
なのでAttributedStringに以下のメソッドを付け足します。
extension AttributedString {
    func attribute<Value>(
        range: String,
        keyPath: WritableKeyPath<AttributedSubstring, Value>,
        value: Value
    ) -> AttributedString {
        var copy = self
        if let range = copy.range(of: range) {
            copy[range][keyPath: keyPath] = value
        }
        return copy
    }
}
すると、こんな感じでメソッドチェーンできるようになりました!
var body: some View {
    Text(
        "大小"
            .attribute(range: "大", keyPath: \.font, value: .boldSystemFont(ofSize: 30))
            .attribute(range: "小", keyPath: \.font, value: .systemFont(ofSize: 10))
    )
}
つぎはこんな感じでページの表示をする場合を考えてみます。
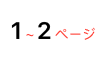
この場合、以下のようなコードになります。
var body: some View {
    Text(
        "1 ~ 2 ページ"
            .attribute(range: "1", keyPath: \.font, value: .boldSystemFont(ofSize: 30))
            .attribute(range: "2", keyPath: \.font, value: .boldSystemFont(ofSize: 30))
            .attribute(range: "~", keyPath: \.foregroundColor, value: .red)
            .attribute(range: "ページ", keyPath: \.foregroundColor, value: .red)
    )
}
1と2, ~とページとで同じAttributeをつけているのにも関わらず、同じメソッドを複数書かなければならないため、冗長なコードです。
そこで、StringとAttributedStringにこのようなメソッドを付け足しました。
extension String {
    func attribute<Value>(
        ranges: [String],
        keyPath: WritableKeyPath<AttributedSubstring, Value>,
        value: Value
    ) -> AttributedString {
        ranges.reduce(AttributedString(self)) { attributedString, element in
            attributedString.attribute(range: element, keyPath: keyPath, value: value)
        }
    }
}

extension AttributedString {
    func attribute<Value>(
        ranges: [String],
        keyPath: WritableKeyPath<AttributedSubstring, Value>,
        value: Value
    ) -> AttributedString {
        ranges.reduce(self) { attributedString, element in
            attributedString.attribute(range: element, keyPath: keyPath, value: value)
        }
    }
}
rangeを配列にすることで、同じAttributeをかける文字でメソッドをまとめることができました!!
以下が修正後のコードです。
var body: some View {
    Text(
        "1 ~ 2 ページ"
            .attribute(ranges: ["1", "2"], keyPath: \.font, value: .boldSystemFont(ofSize: 30))
            .attribute(ranges: ["~", "ページ"], keyPath: \.foregroundColor, value: .red)
    )
}
これでかなり便利にAttributedStringを扱うことができました!
全体のコード
コピペしてお使いください。
extension String {
    func attribute<Value>(
        range: String,
        keyPath: WritableKeyPath<AttributedSubstring, Value>,
        value: Value
    ) -> AttributedString {
        var attributedString = AttributedString(self)
        if let range = attributedString.range(of: range) {
            attributedString[range][keyPath: keyPath] = value
        }
        return attributedString
    }

    func attribute<Value>(
        ranges: [String],
        keyPath: WritableKeyPath<AttributedSubstring, Value>,
        value: Value
    ) -> AttributedString {
        ranges.reduce(AttributedString(self)) { attributedString, element in
            attributedString.attribute(range: element, keyPath: keyPath, value: value)
        }
    }
}

extension AttributedString {
    func attribute<Value>(
        range: String,
        keyPath: WritableKeyPath<AttributedSubstring, Value>,
        value: Value
    ) -> AttributedString {
        var copy = self
        if let range = copy.range(of: range) {
            copy[range][keyPath: keyPath] = value
        }
        return copy
    }

    func attribute<Value>(
        ranges: [String],
        keyPath: WritableKeyPath<AttributedSubstring, Value>,
        value: Value
    ) -> AttributedString {
        ranges.reduce(self) { attributedString, element in
            attributedString.attribute(range: element, keyPath: keyPath, value: value)
        }
    }
}
その他
配列から特定のプロパティの重複を削除することができるKeyPathを使用した関数も作成しました。
まとめ
これでAttributedStringがより便利になった。
KeyPathでもっと面白そうなことができそうですね。
参考文献