はじめに
- 今回の内容
- Spring Frameworkの基盤の一つ、DIコンテナについて
- 筆者の解釈による補完がいっぱいあるので、ご指摘あればぜひお願いします
題材
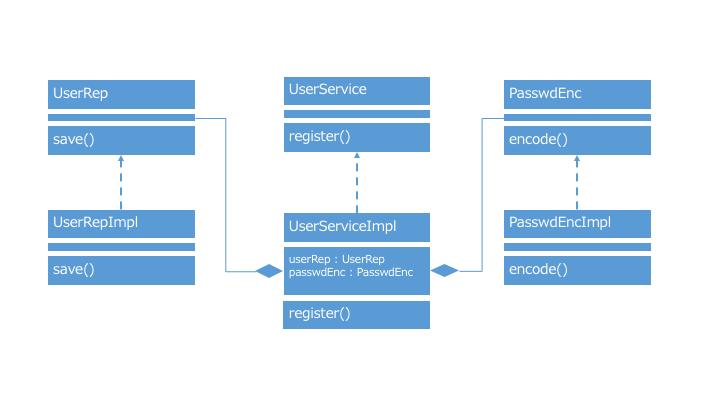
- 以下のインターフェースと、それぞれの実装クラス。
- ユーザの登録業務を行う
UserService - 永続か処理を行う
UserRep - パスワードのハッシュ化を行う
PasswdEnc
- ユーザの登録業務を行う
- クラス図を描くと以下のような感じ。
依存性の注入(Dependency Injection, DI)
-
UserServiceクラスのコンストラクタがUserRepとPasswdEnc、それぞれの実装を引数にとると仮定する。 - このとき
UserServiceImplクラスの使用例は以下の通り。
PasswdEnc passwdEnc = new PasswdEncImpl();
UserRep userRep = new UserRepImpl();
UserService userService = new UserServiceImpl(passwdEnc, userRep);
- このように、あるクラスの初期化に必要となるコンポーネントを設定すること を 依存性の注入(Dependency Injection, DI) と呼ぶ。
- DIを自動で行う基盤 を DIコンテナ と呼ぶ。
- 「自動で行う」とはどういうことか?
- (俺俺解釈) あるインターフェース型のインスタンスを初期化するときに、毎回呼びたい実装をあらかじめ設定しておくことで、インターフェース使用時の記述を楽にすること。
Bean定義ファイル
- 「あらかじめ設定しておく」には...
-
@Configurationアノテーションを付与したクラス(Bean定義ファイル)にて定義を行う。 -
@Beanアノテーションを付与したコンポーネントを付与して、毎回呼びたい実装を指定する。 - このようなコンポーネントは、他のコンポーネントの中に注入することもできる。
-
@Configuration
public class AppConfig{
  @Bean
  UserRep userRep(){
    return new UserRepImpl();
  }

  @Bean
  PasswdEnc passwdEnc(){
    return new PasswdEncImpl();
  }

  @Bean
  UserService userService(){
    return new UserServiceImpl(userRep(), passwdEnc());
  }
}
- 上のようにあらかじめ設定しておけば、
UserServiceインターフェース型の初期化はDIコンテナを経由して楽に実現できる。
ApplicationContext context = new AnnotationConfigApplicationContext(AppConfig.class);
// DIコンテナを生成

UserService userService = context.getBean(UserService.class)
// DIコンテナを経由してあらかじめ設定した実装を取得
- つまり、DIコンテナの利用は次の3つのフェイズに大別される。
- Bean定義にコンポーネントを登録する
- Bean定義からDIコンテナを生成する
- DIコテンナとBeanを指定して、意図した実装を呼び出す(ルックアップ)
コンポーネントスキャン
- Bean登録の方法には、Bean定義ファイルへの記述以外に、コンポーネントスキャンというものがある。
- 実装クラスに直接
@Componentアノテーションを付与してBean登録し、他のコンポーネントから呼び出したいときは@Autowiredアノテーションを付与する。
@Component // 自身をBean登録する
public class UserRepImpl implemente UserRep {
  // 省略
}
@Component // 自身をBean登録する
public class PasswdEncImpl implemente PasswdEnc {
  // 省略
}
@Component // 自身をBean登録するとともに...
public class UserServiceImpl implemente UserService {
  @Autowired // 他のBeanを注入する
  public UserServiceImpl(UserRep userRep, PasswdEnc passwdEnc)
}
-
@Autowiredは デフォルトで対象の型が一致するBean をDIコンテナから探す。 - コンポーネントスキャンを行う場合、以下のようにBean定義ファイルにてコンポーネントスキャン対象としたいパッケージを明示する必要がある。
@Configuration
@ComponentScan("com.example.hoge")
public class AppConfig{
}
- ルックアップはBean定義ファイル利用時と同様。
ApplicationContext context = new AnnotationConfigApplicationContext(AppConfig.class);
// DIコンテナを生成

UserService userService = context.getBean(UserService.class)
// DIコンテナを経由してあらかじめ設定した実装を取得
つづく
参考文献
- 株式会社NTTデータ (2016) 『Spring徹底入門 Spring FrameworkによるJavaアプリケーション開発』 翔泳社
