はじめに
こんにちは!都内で細々とバックエンドエンジニアをしているRyoです。
今回は、FASTAPIとGoogleのGemini APIを使って、材料からレシピを自動生成するアプリを作ってみました!
「冷蔵庫に何があるか」と「何を作るか」の永遠の悩みを、AIの力で解決しちゃいましょう!![]()
この記事で学べること
- Google AI Studio(Gemini)の基本的な使い方
- 実用的なAIアプリケーションの作り方
- シンプルなフロントエンドの実装方法
開発環境の準備
1. プロジェクト構造
ai_recipe_assistant/
├── app/
│   ├── __init__.py
│   ├── main.py
│   ├── recipe_assistant.py
│   ├── prompts.py
│   └── static/
│       ├── index.html
│       ├── styles.css
│       └── script.js
├── .env
├── Dockerfile
├── docker-compose.yml
└── requirements.txt
2. Dockerfileの作成(Dockerfile)
FROM python:3.11-slim

WORKDIR /app

COPY requirements.txt .
RUN pip install --no-cache-dir -r requirements.txt

COPY . .

EXPOSE 8000

CMD ["uvicorn", "app.main:app", "--host", "0.0.0.0", "--port", "8000"]
3. requirements.txtの作成
必要なパッケージを記述します。
google-generativeai
python-dotenv
fastapi
uvicorn
4. Docker Composeの設定(docker-compose.yml)
services:
  app:
    build: .
    ports:
      - "8000:8000"
    volumes:
      - .:/app
    env_file:
      - .env
5. 環境変数の設定(.env)
Google AI StudioでAPIキーを取得して設定しましょう。
- まず、Google AI Studioにアクセスします。
- Googleアカウントでログインします。
- 画面右上の「Get API key」をクリックします。
- 「Create API key」をクリックして、新しいAPIキーを生成します。
- 生成されたAPIキーをコピーします。
次に、プロジェクトのルートディレクトリに.envファイルを作成し、以下のようにAPIキーを設定します。
# Google API Key
GOOGLE_API_KEY=あなたのAPIキー  # ここにコピーしたAPIキーを貼り付けます
# AIモデル
AI_MODEL=gemini-2.0-flash-lite
![]() 注意点:
注意点:
- APIキーは秘密情報なので、GitHubなどに公開しないように注意してください
実装!! 
1. プロンプト(app/prompts.py)
AIにレシピを生成してもらうためのお願い文を作成します。
def create_recipe_prompt(ingredients: str) -> str:
    return f"""
    以下の材料を使用したレシピを提案してください:
    {ingredients}

    以下の形式で出力してください:
    【料理名】
    【調理時間】
    【材料(2人分)】
    【手順】
    """
2. メインクラス(app/recipe_assistant.py)
AIとのやり取りを担当するクラスを実装します。
import os
import google.generativeai as genai
from dotenv import load_dotenv
from app.prompts import create_recipe_prompt
import re

class RecipeAssistant:
    def __init__(self):
        load_dotenv()
        genai.configure(api_key=os.getenv("GOOGLE_API_KEY"))
        self.model = genai.GenerativeModel('gemini-pro')

    def _parse_section(self, text: str, section_name: str) -> str:
        pattern = f'【{section_name}】\s*(.*?)(?=【|$)'
        match = re.search(pattern, text, re.DOTALL)
        return match.group(1).strip() if match else ""

    def _parse_list(self, text: str, section_name: str) -> list[str]:
        section = self._parse_section(text, section_name)
        return [line.strip() for line in section.split('\n') if line.strip()]

    def get_recipe(self, ingredients: str) -> dict:
        try:
            prompt = create_recipe_prompt(ingredients)
            response = self.model.generate_content(prompt)
            text = response.text

            return {
                "dish_name": self._parse_section(text, "料理名"),
                "cooking_time": self._parse_section(text, "調理時間"),
                "ingredients": self._parse_list(text, "材料(2人分)"),
                "steps": self._parse_list(text, "手順")
            }
        except Exception as e:
            return {"error": str(e)}
3. APIエンドポイント(app/main.py)
FastAPIを使って、APIエンドポイントを実装します。
from fastapi import FastAPI, Query
from fastapi.staticfiles import StaticFiles
from fastapi.responses import FileResponse
from recipe_assistant import RecipeAssistant

app = FastAPI()
assistant = RecipeAssistant()

# 静的ファイルのマウント
app.mount("/static", StaticFiles(directory="app/static"), name="static")

@app.get("/")
async def read_root():
    return FileResponse("app/static/index.html")

@app.post("/recipe")
async def generate_recipe(ingredients: str = Query(..., description="材料をカンマ区切りで入力")):
    return assistant.get_recipe(ingredients)
4. フロントエンドの実装
4.1 HTMLファイル(app/static/index.html)
<!DOCTYPE html>
<html lang="ja">
<head>
    <meta charset="UTF-8">
    <meta name="viewport" content="width=device-width, initial-scale=1.0">
    <title>AIレシピ生成アプリ</title>
    <link rel="stylesheet" href="styles.css">
</head>
<body>
    <div class="container">
        <h1>AIレシピ生成アプリ</h1>
        <div class="form-group">
            <input type="text" id="ingredients" placeholder="材料を入力(例: 豚肉、玉ねぎ、人参)">
        </div>
        <button onclick="generateRecipe()" id="generateButton">レシピを生成</button>
        <div class="loading" id="loading">
            <div class="loading-spinner"></div>
            <p>レシピを生成中...</p>
        </div>
        <div id="recipe" class="recipe"></div>
    </div>
    <script src="script.js"></script>
</body>
</html>
4.2 スタイルシート(app/static/styles.css)
:root {
    --primary: #4CAF50;
    --error: #ff4444;
    --bg: #f5f5f5;
    --card: #fff;
    --text: #333;
}

li {
    list-style-type: none;
}

* {
    box-sizing: border-box;
    margin: 0;
    padding: 0;
}

body {
    font-family: Arial, sans-serif;
    background: var(--bg);
    padding: 20px;
}

.container {
    max-width: 800px;
    margin: 0 auto;
    background: var(--card);
    padding: 20px;
    border-radius: 8px;
    box-shadow: 0 2px 4px rgba(0, 0, 0, 0.1);
}

h1 {
    color: var(--text);
    text-align: center;
    margin-bottom: 20px;
}

.form-group {
    margin-bottom: 20px;
}

input[type="text"] {
    width: 100%;
    padding: 10px;
    border: 1px solid #ddd;
    border-radius: 4px;
    font-size: 16px;
}

button {
    width: 100%;
    padding: 12px;
    background: var(--primary);
    color: white;
    border: none;
    border-radius: 4px;
    font-size: 16px;
    cursor: pointer;
    transition: background 0.3s;
}

button:hover {
    background: #45a049;
}

button:disabled {
    background: #ccc;
    cursor: not-allowed;
}

.recipe,
.loading {
    margin-top: 20px;
    padding: 20px;
    background: #f9f9f9;
    border-radius: 4px;
}

.loading {
    text-align: center;
    display: none;
}

.loading-spinner {
    width: 30px;
    height: 30px;
    border: 4px solid #f3f3f3;
    border-top: 4px solid var(--primary);
    border-radius: 50%;
    margin: 0 auto 10px;
    animation: spin 1s linear infinite;
}

.error {
    color: var(--error);
}

@keyframes spin {
    to {
        transform: rotate(360deg);
    }
}
4.3 JavaScriptファイル(app/static/script.js)
const el = {
    ingredients: document.getElementById('ingredients'),
    recipe: document.getElementById('recipe'),
    loading: document.getElementById('loading'),
    button: document.getElementById('generateButton')
};

const showLoading = () => {
    el.loading.style.display = 'block';
    el.recipe.style.display = 'none';
    el.button.disabled = true;
};

const hideLoading = () => {
    el.loading.style.display = 'none';
    el.button.disabled = false;
};

const showError = msg => {
    el.recipe.innerHTML = `<p class="error">${msg}</p>`;
    el.recipe.style.display = 'block';
};

const showRecipe = data => {
    el.recipe.innerHTML = `
        <h2>${data.dish_name}</h2>
        <p><strong>調理時間:</strong> ${data.cooking_time}</p>
        <p><strong>材料(2人分):</strong></p>
        <ul>${data.ingredients.map(ing => `<li>${ing}</li>`).join('')}</ul>
        <p><strong>手順:</strong></p>
        <ol>${data.steps.map(step => `<li>${step}</li>`).join('')}</ol>
    `;
    el.recipe.style.display = 'block';
};

const generateRecipe = async () => {
    const ingredients = el.ingredients.value.trim();
    if (!ingredients) return showError('材料を入力してください。');

    showLoading();
    try {
        const res = await fetch(`/recipe?ingredients=${encodeURIComponent(ingredients)}`, { method: 'POST' });
        const data = await res.json();
        data.error ? showError(data.error) : showRecipe(data);
    } catch (e) {
        showError(`エラーが発生しました: ${e.message}`);
    } finally {
        hideLoading();
    }
};
動作確認 
1. コンテナの起動
以下のコマンドをdocker-compose.ymlがあるディレクトリで実行します。
# ビルドして起動
docker-compose up --build -d
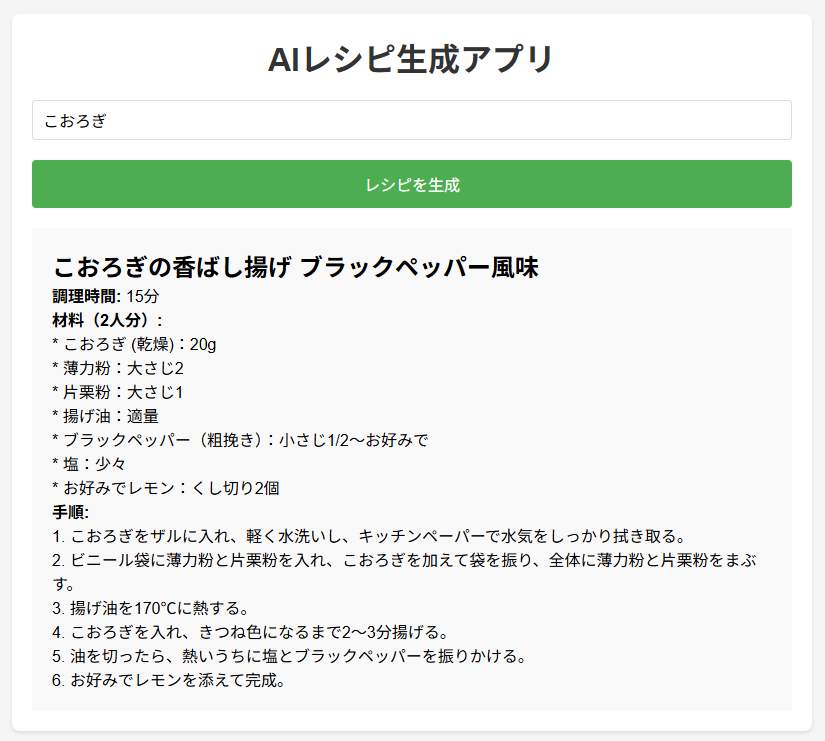
2. 実際に使ってみる!! 
ブラウザで http://localhost:8000 にアクセスする
材料を入力して「レシピを生成」ボタンをクリックすると、AIがレシピを生成します。
まとめ 
今回は、FASTAPIとGoogleのGemini APIを使って、材料からレシピを自動生成するアプリを作ってみました。
APIの使用量は無料なので、ぜひ作ってみてください!
最後に
このアプリを使って、冷蔵庫の余り物で何を作ろうか悩む時間を、美味しい料理を作る時間に変えましょう!
もし質問や改善点などありましたら、コメントで教えてください!
それでは、良いコーディングと美味しい料理を!![]()

