はじめに
GraphRAG (グラフラグ)は生成AIが外部情報を検索する仕組み(RAG)にグラフデータベースを利用したものです
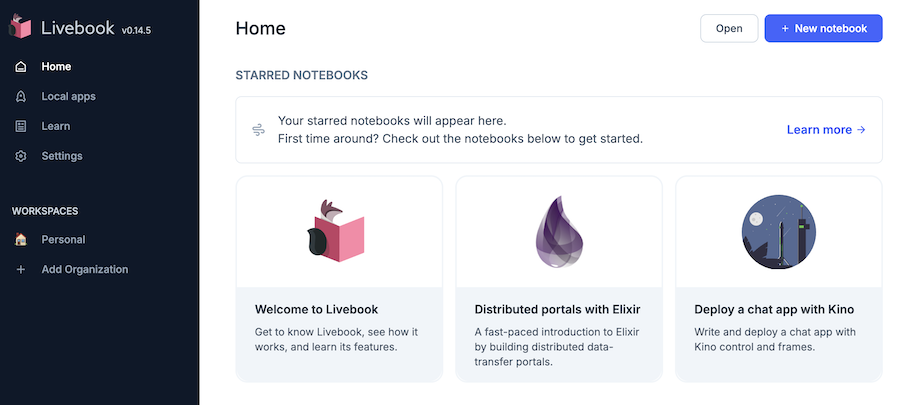
本記事では簡易的な GraphRAG を Livebook 上で実装してみます
実際使われている GraphRAG はもっと複雑なことをしています
本記事ではドキュメントをグラフデータベースに格納し、単純に検索して使用します
生成AIとしては OpenAI の GPT-4o グラフデータベースとしては FolkorDB を利用します
FolkorDB の基本的な利用方法については以下の記事を参照してください
実装したノートブックはこちら
事前準備
環境構築
以下のような内容で docker-compose.with-falkor-db.yml を作成します
services:
  livebook_with_falkor_db:
    image: ghcr.io/livebook-dev/livebook:0.14.5
    container_name: livebook_with_falkor_db
    ports:
      - '8080:8080'
      - '8081:8081'

  falkor_db_for_livebook:
    image: falkordb/falkordb:edge
    container_name: falkor_db_for_livebook
    tty: true
    ports:
      - 6379:6379
      - 3000:3000
    volumes:
      - ./falkor_db/data:/data
以下のコマンドを実行すると、 Livebook と FalkorDB がそれぞれコンテナで起動します
docker compose --file docker-compose.with-falkor-db.yml up
Livebook にはコンテナ起動時に表示される URL (トークン付き)でアクセスします
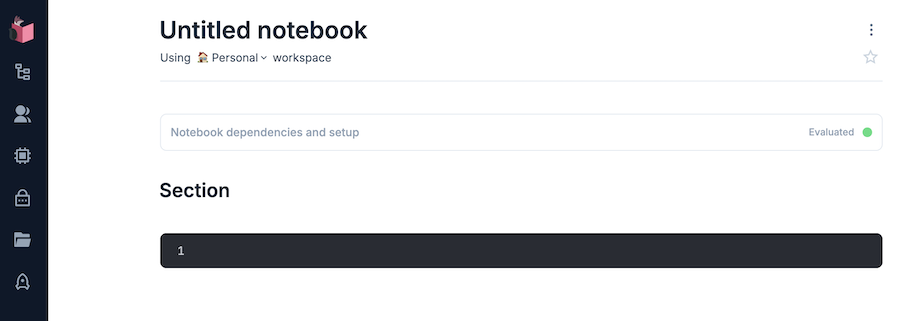
右上の "+ New notebook" から新しいノートブックを開きます
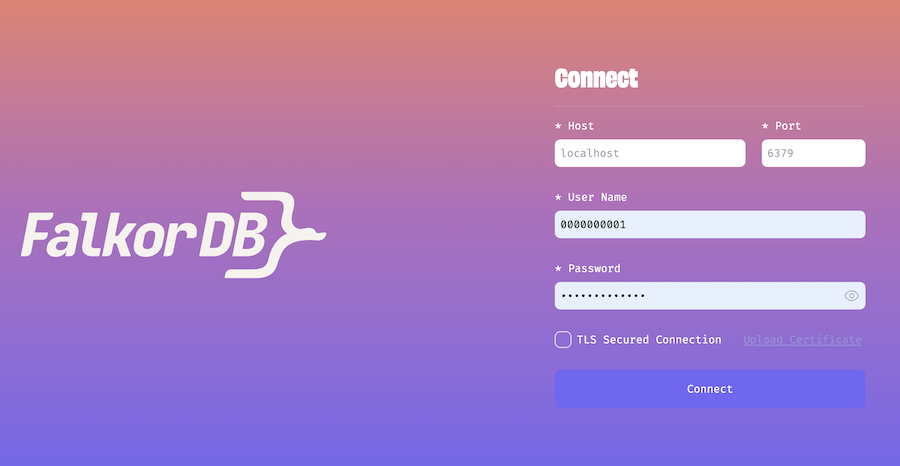
FalkorDB Browser(FalkorDB の操作用コンソール)には http://localhost:3000/ でアクセスします
認証の設定をしていないので、 "User Name" と "Password" の欄を空にして "Connect" をクリックしてください
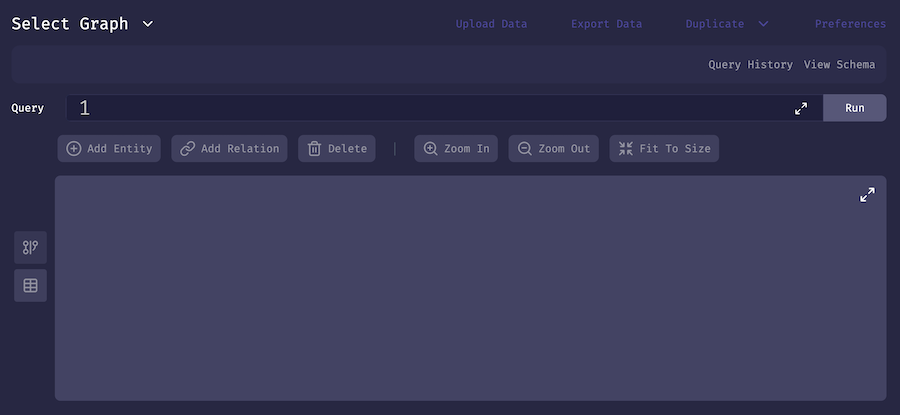
以下のような画面に遷移します
OpenAI APIキーの作成
OpenAI API の API キーを使用するため、あらかじめアカウント、APIキーを作成しておきます
公式サイトにアクセスし、サインアップしてください
OpenAI 社が提供する ChatGPT とは別契約になります
すでに ChatGPT のアカウントを保有をしていたとしても、別途 OpenAI API のサインアップが必要です
初回アカウント作成時は無償トライアルを受けることが可能ですが、基本的に前払いでクレジットを購入しておき、 API 利用のたびに消費していく契約になります
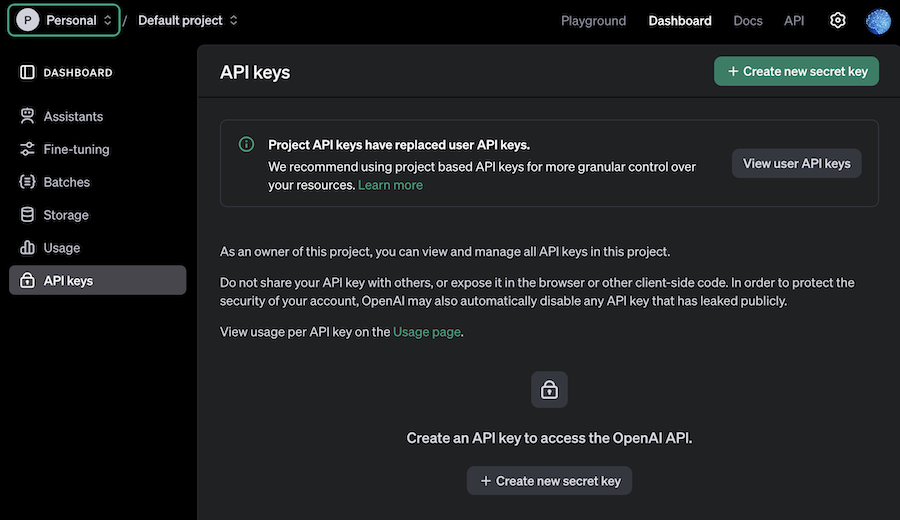
左メニュー API keys を開き、右上 "+ Create new secret key" をクリックします
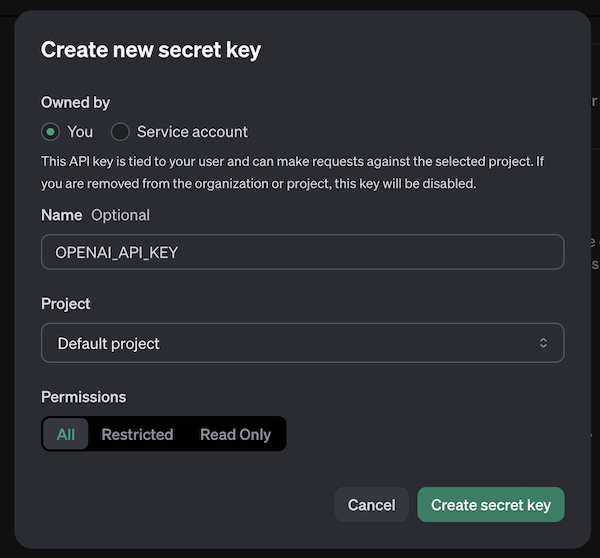
モーダルが開くので、適当な名前を入力して "Create secret key" をクリックします
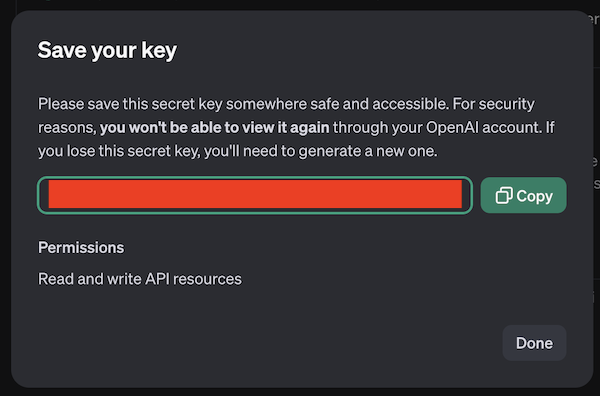
API キーが作成されるので、安全な場所に保管しておいてください
検索先ドキュメントの準備
今回は検索先ドキュメントとして桃太郎を使用します
青空文庫から桃太郎のテキストを取得し、平文テキストとして GitHub にアップロードしておきます
今回は楠山正雄さんの書いた桃太郎(著作権切れ)を使用します
青空文庫の収録ファイル取り扱い基準についてはこちら
ルビは邪魔なので削除します
ルビを削除した文書をテキストファイルとして保存し、 GitHub リポジトリーにコミット、プッシュします
準備したものがこちらです(本記事ではこれを使います)
セットアップ
Livebook のセットアップセルで以下のコードを実行し、必要なモジュールをインストールします
Mix.install([
  {:openai_ex, "~> 0.8.6"},
  {:redisgraph, "~> 0.1.0"},
  {:kino, "~> 0.14"},
  {:req, "~> 0.5"}
])

alias OpenaiEx.Chat
alias OpenaiEx.ChatMessage
alias RedisGraph.{Node, Edge, Graph, QueryResult}
Secrets の設定
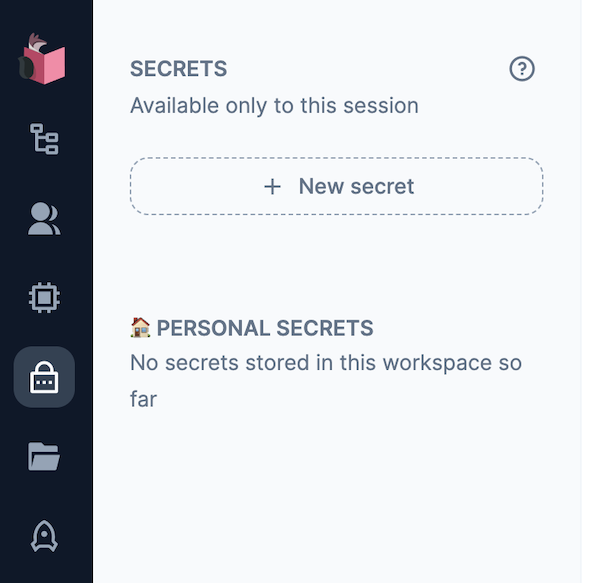
Livebook の左メニュー錠前アイコンをクリックすると、 "SECRETS" メニューが開きます
"+ New secret" をクリックすると、新しい secret = 秘密情報を保持することができます
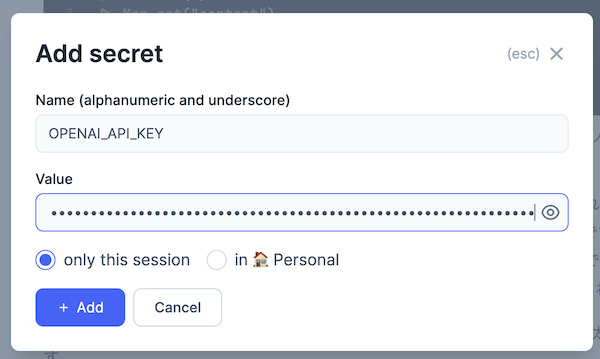
Secrets の設定モーダルが開きます
以下の内容を入力し、 "+ Add" をクリックしてください
Name: OPENAI_API_KEY
Value: OpenAI の API キー
ドキュメントのグラフデータベースへの格納
ドキュメントの読込
用意しておいたドキュメントを読み込み、そのままでは長いので章毎に分割しておきます
%{body: text} =
  Req.get!(
    "https://raw.githubusercontent.com/RyoWakabayashi/elixir-learning/main/livebooks/bumblebee/colab/momotaro.txt"
  )

chunks =
  text
  |> String.split("\n\n")
  |> Enum.slice(0, 4)
実行結果
[" むかし、むかし、あるところに、おじいさんとおばあさんがありました。まいにち、おじいさんは山へしば刈りに、...",
 " おじいさんとおばあさんは、それはそれはだいじにして桃太郎を育てました。桃太郎はだんだん成長するにつれて、...",
 " 桃太郎はずんずん行きますと、大きな山の上に来ました。すると、草むらの中から、「ワン、ワン。」と声をかけながら、...",
 " 桃太郎は、犬と猿をしたがえて、船からひらりと陸の上にとび上がりました。\n 見はりをしていた鬼の兵隊は、..."]
OpenAI クライアントの準備
OpenAI のクライアントを用意します
また、使用する生成 AI モデルとして GPT-4o のモデル ID を定義しておきます
openai =
  "LB_OPENAI_API_KEY"
  |> System.fetch_env!()
  |> OpenaiEx.new()

model_id = "gpt-4o"
ドキュメントからの関係性の抽出
ドキュメントをグラフデータベースに登録するための関数を用意します
parse_document = fn document, openai, model_id, entities ->
  system_message =
    """
    You are a top-tier algorithm designed for extracting information in structured formats to build a knowledge graph. Your task is to identify the entities and relations requested with the user prompt from a given text. You must generate the output in a JSON format containing a list with JSON objects. Each object should have the keys: "head", "head_type", "relation", "tail", and "tail_type". The "head" key must contain the text of the extracted entity with one of the types from the provided list in the user prompt.
    Attempt to extract as many entities and relations as you can. Maintain Entity Consistency: When extracting entities, it's vital to ensure consistency. If an entity, such as "John Doe", is mentioned multiple times in the text but is referred to by different names or pronouns (e.g., "Joe", "he"), always use the most complete identifier for that entity. The knowledge graph should be coherent and easily understandable, so maintaining consistency in entity references is crucial.
    IMPORTANT NOTES:
    - Don't add any explanation and text.
    - Ensure that both "head_type" and "tail_type" are always in English.
    """

  system_message =
    if Enum.empty?(entities) do
      system_message
    else
      system_message <> """
      Unify the “head” or “tail” values of similar entities to match the values of the existing entities.
      #{Enum.join(entities, "\n")}
      """
    end

  user_message =
    """
    Based on the following example, extract entities and relations from the provided text.
    Below are a number of examples of text and their extracted entities and relationships.
    [
        {'text': 'Adam is a software engineer in Microsoft since 2009, and last year he got an award as the Best Talent', 'head': 'Adam', 'head_type': 'Person', 'relation': 'WORKS_FOR', 'tail': 'Microsoft', 'tail_type': 'Company'},
        {'text': 'Adam is a software engineer in Microsoft since 2009, and last year he got an award as the Best Talent', 'head': 'Adam', 'head_type': 'Person', 'relation': 'HAS_AWARD', 'tail': 'Best Talent', 'tail_type': 'Award'},
        {'text': 'Microsoft is a tech company that provide several products such as Microsoft Word', 'head': 'Microsoft Word', 'head_type': 'Product', 'relation': 'PRODUCED_BY', 'tail': 'Microsoft', 'tail_type': 'Company'},
        {'text': 'Microsoft Word is a lightweight app that accessible offline', 'head': 'Microsoft Word', 'head_type': 'Product', 'relation': 'HAS_CHARACTERISTIC', 'tail': 'lightweight app', 'tail_type': 'Characteristic'},
        {'text': 'Microsoft Word is a lightweight app that accessible offline', 'head': 'Microsoft Word', 'head_type': 'Product', 'relation': 'HAS_CHARACTERISTIC', 'tail': 'accessible offline', 'tail_type': 'Characteristic'}
    ]

    For the following text, extract entities and relations as in the provided example.The output should be formatted as a JSON instance that conforms to the JSON schema below.

    As an example, for the schema {"properties": {"foo": {"title": "Foo", "description": "a list of strings", "type": "array", "items": {"type": "string"}}}, "required": ["foo"]}
    the object {"foo": ["bar", "baz"]} is a well-formatted instance of the schema. The object {"properties": {"foo": ["bar", "baz"]}} is not well-formatted.

    Here is the output schema:
    ```
    {
        "properties": {
            "head": {"description": "extracted head entity like Microsoft, Apple, John. Must use human-readable unique identifier.", "title": "Head", "type": "string"},
            "head_type": {"description": "type of the extracted head entity like Person, Company, etc", "title": "Head Type", "type": "string"},
            "relation": {"description": "relation between the head and the tail entities", "title": "Relation", "type": "string"},
            "tail": {"description": "extracted tail entity like Microsoft, Apple, John. Must use human-readable unique identifier.", "title": "Tail", "type": "string"},
            "tail_type": {"description": "type of the extracted tail entity like Person, Company, etc", "title": "Tail Type", "type": "string"}
        },
        "required": ["head", "head_type", "relation", "tail", "tail_type"]
    }
    ```

    Text: '#{document}'
    """

  openai
  |> Chat.Completions.create!(%{
    model: model_id,
    messages: [
      ChatMessage.system(system_message),
      ChatMessage.user(user_message)
    ]
  })
  |> Map.get("choices")
  |> Enum.at(0)
  |> Map.get("message")
  |> Map.get("content")
  |> String.replace("```json", "")
  |> String.replace("```", "")
  |> Jason.decode!()
end
以下のようなことを実行しています
-
生成 AI モデルにより、ドキュメントからエンティティとリレーションを抜き出し、以下の形式で出力する
{ "head": "おじいさん", "head_type": "Person", "relation": "LIVES_WITH", "tail": "おばあさん", "tail_type": "Person" } -
"head_type" と "tail_type" は必ず英語にする(FalkorDB の label として日本語は指定できないため)
-
entities(既存のエンティティ)が空でない場合、類似した単語を統一する(章を跨いでの表記ブレを抑えるため)
プロンプトの内容は LangChain の GraphRAG 用プロンプトを元にしています
システム用プロンプトの和訳
あなたは、知識グラフを構築するために情報を構造化形式で抽出するトップクラスのアルゴリズムです。ユーザーの指示に基づき、指定されたテキストからエンティティと関係を特定し、抽出することが任務です。出力はJSON形式で、リスト内にJSONオブジェクトを含む形で生成してください。各オブジェクトは、以下のキーを持つ必要があります:「head」、「head_type」、「relation」、「tail」、「tail_type」。
「head」キーには、ユーザーの指示に含まれるリスト内の種類の1つに該当する、抽出されたエンティティのテキストを含めてください。
できる限り多くのエンティティと関係を抽出することを目指してください。エンティティの一貫性を維持すること:
エンティティを抽出する際には、一貫性を保つことが重要です。たとえば、「John Doe」というエンティティがテキスト内で複数回登場し、異なる名前や代名詞(例: 「Joe」や「he」)で参照される場合、常にそのエンティティを最も完全な識別名で表記してください。知識グラフは一貫性があり、理解しやすいものにする必要があるため、エンティティ参照の一貫性を維持することが重要です。注意事項:
• 説明や追加のテキストを加えないでください。
• 「head_type」と「tail_type」は必ず英語で記述してください。
システム用プロンプトの追加部分(entities 指定時)の和訳
類似するエンティティの「head」または「tail」の値を、既存のエンティティの値と一致させて統一してください。
ユーザー用プロンプトの和訳
以下の例に基づき、提供されたテキストからエンティティと関係を抽出してください。
以下は、テキストとそれから抽出されたエンティティおよび関係の例です。[ { "text": "Adam is a software engineer in Microsoft since 2009, and last year he got an award as the Best Talent", "head": "Adam", "head_type": "Person", "relation": "WORKS_FOR", "tail": "Microsoft", "tail_type": "Company" }, { "text": "Adam is a software engineer in Microsoft since 2009, and last year he got an award as the Best Talent", "head": "Adam", "head_type": "Person", "relation": "HAS_AWARD", "tail": "Best Talent", "tail_type": "Award" }, { "text": "Microsoft is a tech company that provide several products such as Microsoft Word", "head": "Microsoft Word", "head_type": "Product", "relation": "PRODUCED_BY", "tail": "Microsoft", "tail_type": "Company" }, { "text": "Microsoft Word is a lightweight app that accessible offline", "head": "Microsoft Word", "head_type": "Product", "relation": "HAS_CHARACTERISTIC", "tail": "lightweight app", "tail_type": "Characteristic" }, { "text": "Microsoft Word is a lightweight app that accessible offline", "head": "Microsoft Word", "head_type": "Product", "relation": "HAS_CHARACTERISTIC", "tail": "accessible offline", "tail_type": "Characteristic" } ]次のテキストについても、上記の例に従ってエンティティと関係を抽出してください。出力は以下のJSONスキーマに準拠した形式で整形する必要があります。
以下のスキーマ例を参考にしてください:
例えば、スキーマ{ "properties": { "foo": { "title": "Foo", "description": "a list of strings", "type": "array", "items": {"type": "string"} } }, "required": ["foo"] }の場合、オブジェクト
{"foo": ["bar", "baz"]}はスキーマに準拠したフォーマットですが、
{"properties": {"foo": ["bar", "baz"]}}はスキーマに準拠していません。
以下が出力スキーマです:
{
    "properties": {
        "head": {
            "description": "extracted head entity like Microsoft, Apple, John. Must use human-readable unique identifier.",
            "title": "Head",
            "type": "string"
        },
        "head_type": {
            "description": "type of the extracted head entity like Person, Company, etc",
            "title": "Head Type",
            "type": "string"
        },
        "relation": {
            "description": "relation between the head and the tail entities",
            "title": "Relation",
            "type": "string"
        },
        "tail": {
            "description": "extracted tail entity like Microsoft, Apple, John. Must use human-readable unique identifier.",
            "title": "Tail",
            "type": "string"
        },
        "tail_type": {
            "description": "type of the extracted tail entity like Person, Company, etc",
            "title": "Tail Type",
            "type": "string"
        }
    },
    "required": ["head", "head_type", "relation", "tail", "tail_type"]
}
第1章の内容について、ドキュメントを読み込んでみます
chunks
|> hd()
|> parse_document.(openai, model_id, [])
実行結果
[
  %{
    "head" => "おじいさん",
    "head_type" => "Person",
    "relation" => "LIVES_WITH",
    "tail" => "おばあさん",
    "tail_type" => "Person"
  },
  %{
    "head" => "おじいさん",
    "head_type" => "Person",
    "relation" => "LIVES_IN",
    "tail" => "あるところ",
    "tail_type" => "Place"
  },
  %{
    "head" => "おじいさん",
    "head_type" => "Person",
    "relation" => "ACTIVITY",
    "tail" => "しば刈り",
    "tail_type" => "Activity"
  },
  %{
    "head" => "おばあさん",
    "head_type" => "Person",
    "relation" => "ACTIVITY",
    "tail" => "洗濯",
    "tail_type" => "Activity"
  },
  %{
    "head" => "おばあさん",
    "head_type" => "Person",
    "relation" => "FINDS",
    "tail" => "大きな桃",
    "tail_type" => "Object"
  },
  %{
    "head" => "おばあさん",
    "head_type" => "Person",
    "relation" => "THINKS_AS_GIFT",
    "tail" => "大きな桃",
    "tail_type" => "Object"
  },
  %{
    "head" => "おばあさん",
    "head_type" => "Person",
    "relation" => "TAKES_HOME",
    "tail" => "大きな桃",
    "tail_type" => "Object"
  },
  %{
    "head" => "おじいさん",
    "head_type" => "Person",
    "relation" => "RETURNS_WITH",
    "tail" => "しば",
    "tail_type" => "Object"
  },
  %{
    "head" => "おじいさん",
    "head_type" => "Person",
    "relation" => "EXAMINES",
    "tail" => "桃",
    "tail_type" => "Object"
  },
  %{
    "head" => "おじいさんとおばあさん",
    "head_type" => "Persons",
    "relation" => "RECEIVES",
    "tail" => "赤さん",
    "tail_type" => "Person"
  },
  %{
    "head" => "赤さん",
    "head_type" => "Person",
    "relation" => "BORN_FROM",
    "tail" => "桃",
    "tail_type" => "Object"
  },
  %{
    "head" => "赤さん",
    "head_type" => "Person",
    "relation" => "NAMED",
    "tail" => "桃太郎",
    "tail_type" => "Name"
  }
]
おじいさん LIVES_WITH おばあさん、赤さん(原文まま) BORN_FROM 桃 など、物語上の登場人物、モノとその関係性が抽出できています
全ての章について、関係性を抽出します
{relations, all_entities} =
  chunks
  |> Enum.reduce({[], []}, fn chunk, {acc_relations, acc_entities} ->
    relations = parse_document.(chunk, openai, model_id, acc_entities)

    entities =
      [
        Enum.map(relations, &Map.get(&1, "head")),
        Enum.map(relations, &Map.get(&1, "tail")),
        acc_entities
      ]
      |> Enum.concat()
      |> Enum.uniq()

    {[relations | acc_relations], entities}
  end)
{[
   [
     %{
       "head" => "桃太郎",
       "head_type" => "Person",
       "relation" => "LEADS",
       "tail" => "犬",
       "tail_type" => "Animal"
     },
     %{
       "head" => "桃太郎",
       "head_type" => "Person",
       "relation" => "LEADS",
       "tail" => "猿",
       "tail_type" => "Animal"
     },
     %{
       "head" => "桃太郎",
       "head_type" => "Person",
       "relation" => "LEADS",
       "tail" => "きじ",
       "tail_type" => "Animal"
     },
     ...
 ],
 ["桃太郎", "鬼の大将", "犬", "きじ", "猿", "鬼", "鬼が島", "門", "宝物",
  "日本の国", "車", "綱", "おじいさん", "おばあさん", "きびだんご",
  "漕ぎ手", "かじ取り", "物見", "いかめしいくろがねのお城", "桃", "赤さん",
  "神さま"]}
FalkorDB へのデータ登録
グラフデータベースに登録するグラフを作成します
graph = Graph.new(%{name: "桃太郎"})
ノードを作成します
nodes =
  relations
  |> Enum.flat_map(fn contnt ->
    [
      Enum.map(contnt, fn node ->
        %{
          label: [Map.get(node, "head_type")],
          name: Map.get(node, "head")
        }
      end),
      Enum.map(contnt, fn node ->
        %{
          label: [Map.get(node, "tail_type")],
          name: Map.get(node, "tail")
        }
      end)
    ]
    |> Enum.concat()
    |> Enum.uniq()
  end)
  |> Enum.uniq()
  |> Enum.reduce(%{}, fn node, acc_nodes ->
    case Map.get(acc_nodes, node.name) do
      nil ->
        Map.put(acc_nodes, node.name, node)

      existing_node ->
        merged_node =
          Map.put(existing_node, :label, existing_node.label ++ node.label)

        Map.put(acc_nodes, node.name, merged_node)
    end
  end)
  |> Enum.map(fn {name, node} ->
    Node.new(%{
      label: Enum.join(node.label, ":"),
      properties: %{
        name: name
      }
    })
  end)
少しややこしい実装になっていますが、以下のことを実行しています
- 関係性の "head" と "tail" のそれぞれに存在するものをノードとする
- ノードの重複を排除する
- 同じ名前で違うラベルのノードが存在する場合、複数ラベルのノードとして統合する
実行結果
[
  %RedisGraph.Node{
    id: nil,
    alias: nil,
    label: "Structure:Place",
    properties: %{name: "いかめしいくろがねのお城"}
  },
  %RedisGraph.Node{id: nil, alias: nil, label: "Person", properties: %{name: "おじいさん"}},
  %RedisGraph.Node{id: nil, alias: nil, label: "Person", properties: %{name: "おばあさん"}},
  %RedisGraph.Node{id: nil, alias: nil, label: "Role", properties: %{name: "かじ取り"}},
  %RedisGraph.Node{id: nil, alias: nil, label: "Animal", properties: %{name: "きじ"}},
  %RedisGraph.Node{id: nil, alias: nil, label: "Item:Food", properties: %{name: "きびだんご"}},
  %RedisGraph.Node{id: nil, alias: nil, label: "Object", properties: %{name: "宝物"}},
  %RedisGraph.Node{id: nil, alias: nil, label: "Location", properties: %{name: "日本の国"}},
  %RedisGraph.Node{id: nil, alias: nil, label: "Object", properties: %{name: "桃"}},
  %RedisGraph.Node{id: nil, alias: nil, label: "Person:Name", properties: %{name: "桃太郎"}},
  %RedisGraph.Node{id: nil, alias: nil, label: "Role", properties: %{name: "漕ぎ手"}},
  %RedisGraph.Node{id: nil, alias: nil, label: "Role", properties: %{name: "物見"}},
  %RedisGraph.Node{id: nil, alias: nil, label: "Animal", properties: %{name: "犬"}},
  %RedisGraph.Node{id: nil, alias: nil, label: "Animal", properties: %{name: "猿"}},
  %RedisGraph.Node{id: nil, alias: nil, label: "Entity", properties: %{name: "神さま"}},
  %RedisGraph.Node{id: nil, alias: nil, label: "Object", properties: %{name: "綱"}},
  %RedisGraph.Node{id: nil, alias: nil, label: "Person", properties: %{name: "赤さん"}},
  %RedisGraph.Node{id: nil, alias: nil, label: "Object", properties: %{name: "車"}},
  %RedisGraph.Node{id: nil, alias: nil, label: "Object", properties: %{name: "門"}},
  %RedisGraph.Node{id: nil, alias: nil, label: "Person", properties: %{name: "鬼"}},
  %RedisGraph.Node{id: nil, alias: nil, label: "Location", properties: %{name: "鬼が島"}},
  %RedisGraph.Node{id: nil, alias: nil, label: "Person", properties: %{name: "鬼の大将"}}
]
作成したノードをグラフに追加します
{graph, nodes} =
  nodes
  |> Enum.reduce({graph, nodes}, fn node, {acc_graph, acc_nodes} ->
    {acc_graph, node} = Graph.add_node(acc_graph, node)

    {acc_graph, [node | acc_nodes]}
  end)
エッジを作成します
get_node = fn name, nodes ->
  Enum.find(nodes, fn node -> node.properties.name == name end)
end

edges =
  relations
  |> Enum.flat_map(fn contnt ->
    contnt
    |> Enum.map(fn node ->
      Edge.new(%{
        src_node: node |> Map.get("head") |> get_node.(nodes),
        dest_node: node |> Map.get("tail") |> get_node.(nodes),
        relation: Map.get(node, "relation")
      })
    end)
  end)
  |> Enum.uniq()
エッジをグラフに追加します
graph =
  edges
  |> Enum.reduce(graph, fn edge, acc_graph ->
    {:ok, acc_graph} = Graph.add_edge(acc_graph, edge)

    acc_graph
  end)
FalkorDB に接続します
{:ok, conn} = Redix.start_link("redis://falkor_db_for_livebook:6379")
ここまでの操作内容を FalkorDB に反映します
{:ok, commit_result} = RedisGraph.commit(conn, graph)
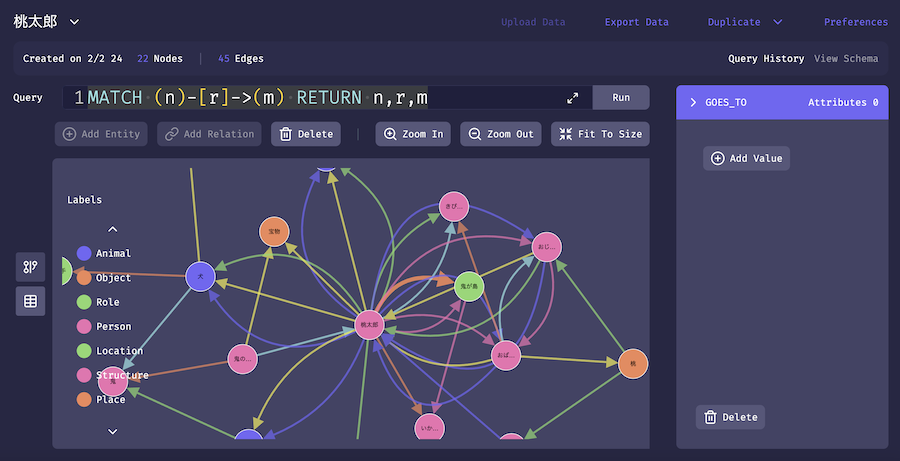
FalkorDB Browser で確認してみましょう
MATCH (n)-[r]->(m) RETURN n,r,m
実行結果
ちゃんと登録できていそうです
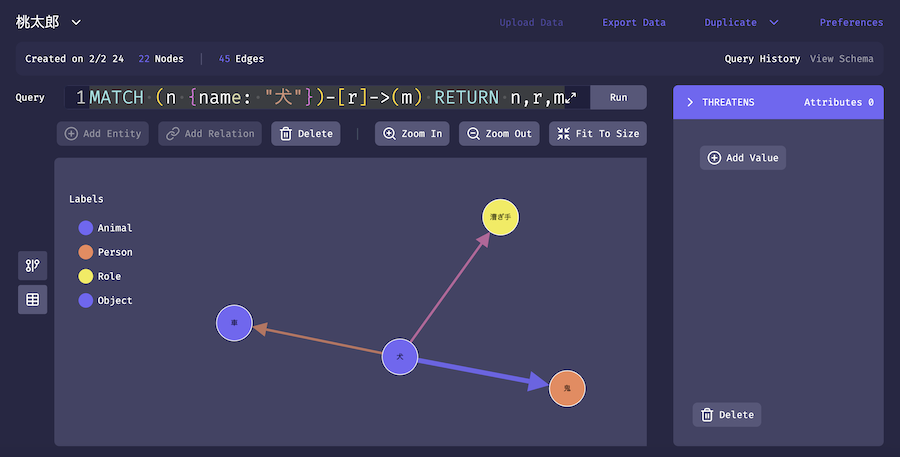
犬の関係性を確認してみましょう
MATCH (n {name: "犬"})-[r]->(m) RETURN n,r,m
実行結果
犬が鬼を威嚇しています
質問への応答
FalkorDB に登録した内容を使って、質問に答えてみます
question = "桃太郎の仲間は誰ですか"
エンティティの抽出
まず、生成 AI モデルを利用して、質問の中から検索キーワードとなるエンティティを抽出します
エンティティの表記ブレを防ぐため、類似した言葉はデータベース登録済のエンティティに統一させています
get_question_entities = fn question, openai, model_id, graph_entities ->
  openai
  |> Chat.Completions.create!(%{
    model: model_id,
    messages: [
      ChatMessage.system("""
      You are extracting entities from the input text.
      Step 1:
      Extract entities from the text.
      output format: entity,entity,entity

      Step 2:
      Unify entities similar to the following entity candidates to match the values of the entity candidates.
      Exclude any entities that are not included in the entity candidates.
      entity candidates: #{Enum.join(graph_entities, ",")}

      IMPORTANT NOTES:
      - Don't add any explanation and text.
      - Output only Step 2 result.
      """),
      ChatMessage.user("""
      Please execute the process of extracting entities only from the text step by step.
      text: #{question}
      """)
    ]
  })
  |> Map.get("choices")
  |> Enum.at(0)
  |> Map.get("message")
  |> Map.get("content")
  |> String.split(",")
end
システム用プロンプトの和訳
あなたは入力されたテキストからエンティティを抽出します。
ステップ1:
テキストからエンティティを抽出してください。
出力形式:entity,entity,entityステップ2:
以下のエンティティ候補に類似するエンティティを統一し、エンティティ候補の値に一致させてください。
また、エンティティ候補に含まれていないエンティティは除外してください。
ユーザー用プロンプトの和訳
テキストからエンティティを抽出するプロセスを、段階的に実行してください。
entities = get_question_entities.(question, openai, model_id, all_entities)
実行結果
["桃太郎"]
FalkorDB からの検索
関係性の元と先どちらかにキーワードとなるエンティティが存在する関係性を抽出します
get_relations = fn entity, graph ->
  query = """
  MATCH (n {name: "#{entity}"})-[r]->(neighbor)
  RETURN n.name + ' - ' + type(r) + ' -> ' + neighbor.name AS output
  UNION ALL
  MATCH (n {name: "#{entity}"})<-[r]-(neighbor)
  RETURN n.name + ' - ' + type(r) + ' -> ' + neighbor.name AS output
  """

  {:ok, query_result} = RedisGraph.query(conn, graph.name, query)

  query_result
end
relations = entities |> hd() |> get_relations.(graph)
実行結果
%RedisGraph.QueryResult{
  conn: #PID<0.2493.0>,
  graph_name: "桃太郎",
  raw_result_set: [
    [[1, "output"]],
    [
      [[2, "桃太郎 - RETURNS_WITH -> 宝物"]],
      [[2, "桃太郎 - RECEIVES -> 宝物"]],
      [[2, "桃太郎 - BIDS_FAREWELL_TO -> おばあさん"]],
      ...
    ],
    ["Cached execution: 1", "Query internal execution time: 1.889708 milliseconds"]
  ],
  header: ["output"],
  result_set: [
    ["桃太郎 - RETURNS_WITH -> 宝物"],
    ["桃太郎 - RECEIVES -> 宝物"],
    ["桃太郎 - BIDS_FAREWELL_TO -> おばあさん"],
    ...
  ],
  statistics: %{
    "Labels added" => nil,
    "Nodes created" => nil,
    "Nodes deleted" => nil,
    "Properties set" => nil,
    "Query internal execution time" => "1.889708",
    "Relationships created" => nil,
    "Relationships deleted" => nil
  },
  labels: ["Food", "Enemy", "Animal", "Country", "Person", "Role", "Location", "Structure", "Age",
   "Object", "Creature", "Place", "Item", "Activity", "Entity", "Group", "Character"],
  property_keys: ["name"],
  relationship_types: ["LIVES_WITH", "FINDS", "GIVES_TO", "HAS_CHILD", "NAMED", "CARED_FOR",
   "STRONGER_THAN", "AGED", "STRONGEST_IN", "INTERESTED_IN", "INHABITED_BY", "GUARDS", "TRAVELS_TO",
   "MADE_FOOD_FOR", "POSSESSES", "ENCOURAGES", "CARES_FOR", "WAS_AT", "HAS_COMPANION", "TARGET",
   "RECEIVED", "POSITION_ON_BOAT", "TRAVELED_TO", "HAS_STRUCTURE", "HAS_FEATURE", "COMMANDS",
   "DEFEATS", "ATTACKS", "RECEIVES", "RETURNS_WITH", "AWAITS", "LEADS", "EXPECTS_RETURN_OF",
   "TRAVELS_WITH", "REQUESTS", "GIVES", "TAKEN_BY", "HAS_COMRADE", "ROWS_BOAT", "STEERS_BOAT",
   "LOOKOUT_ON", ...]
}
生成 AI が参照するテキスト(コンテキスト情報)に変換します
get_context = fn relations ->
  relations.result_set
  |> Enum.map(&(hd(&1)))
  |> Enum.join("\n")
end
context = get_context.(relations)

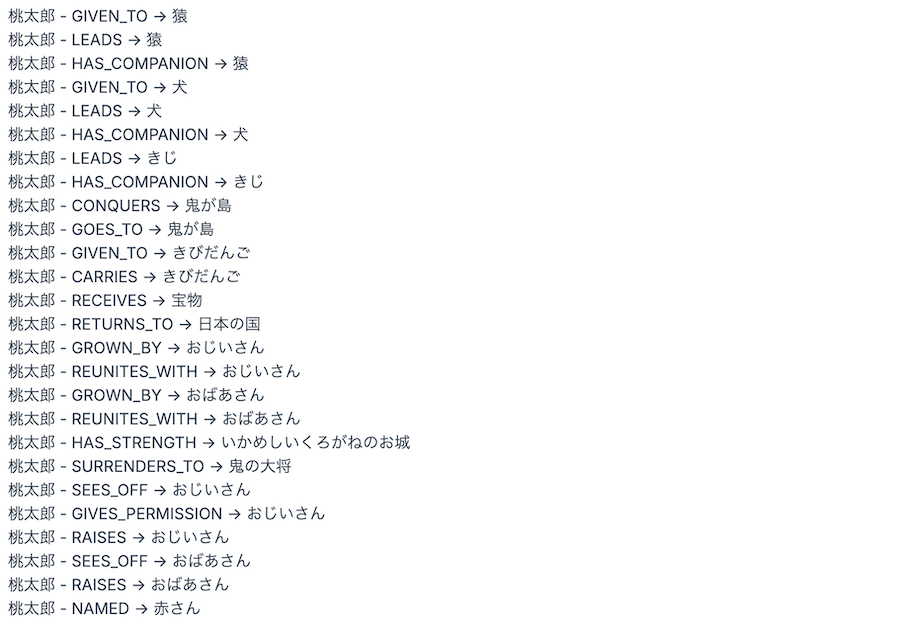
Kino.Text.new(context)
実行結果
"桃太郎 - HAS_COMPANION -> 猿" などの有用な情報が得られています
生成 AI による応答
生成 AI を使って質問に応答する関数を用意します
answer = fn context, question, openai, model_id ->
  openai
  |> Chat.Completions.create!(%{
    model: model_id,
    messages: [
      ChatMessage.system("Answer the question based only on the following context:\n#{context}"),
      ChatMessage.user(question)
    ]
  })
  |> Map.get("choices")
  |> Enum.at(0)
  |> Map.get("message")
  |> Map.get("content")
end
"based only on the following context" と指示することで、元々持っている知識を使わずに、コンテキスト情報だけを参照して回答させています
システム用プロンプトの和訳
以下の文脈に基づいてのみ質問に答えてください。
answer.(context, question, openai, model_id)
実行結果
"桃太郎の仲間は、猿、犬、きじです。"
正しく回答できました
GraphRAG を使わない場合、 ChatGPT-4o は以下のような回答をしました
桃太郎の仲間は、彼が鬼退治に行く途中で出会い、仲間になった動物たちです。それぞれの動物が桃太郎に協力して鬼ヶ島へ向かい、鬼を退治します。具体的には以下の3匹です:
- 犬(イヌ)
桃太郎が最初に出会う仲間で、桃太郎のお供として鬼退治に協力します。- 猿(サル)
次に出会う仲間で、犬と時々ケンカすることもありますが、チームとして鬼退治を助けます。- キジ
最後に加わる仲間で、空から鬼を攻撃するなど、特に活躍します。これらの動物たちは桃太郎の勇気や優しさに惹かれて、お供することを決意しました。彼らはそれぞれ得意な能力を活かして鬼退治を成功させます。
コンテキスト情報に限定せず、学習済みの情報を使って回答しているため、余計な情報を多分に含んでいます
エンティティの抽出、グラフデータベースの検索、コンテキスト情報の生成、回答を一つの関数にまとめます
answer_with_graph_rag = fn question, openai, model_id, graph, all_entities ->
  entities = get_question_entities.(question, openai, model_id, all_entities)

  context =
    entities
    |> Enum.map(fn entity ->
      entity
      |> get_relations.(graph)
      |> get_context.()
    end)
    |> Enum.filter(&(&1 != ""))
    |> Enum.join("\n")

  IO.puts(context)

  answer.(context, question, openai, model_id)
end
別の質問をしてみましょう
answer_with_graph_rag.("きびだんごを作ったのは誰ですか", openai, model_id, graph, all_entities)
標準出力
きびだんご - GIVEN_TO -> 桃太郎
きびだんご - CARRIES -> 桃太郎
きびだんご - PREPARES_FOOD -> おばあさん
実行結果
"きびだんごを作ったのはおばあさんです。"
グラフデータベースの内容をもとに回答できました
「きびだんご」を漢字に変えてみます
answer_with_graph_rag.("黍団子を作ったのは誰ですか", openai, model_id, graph, all_entities)
実行結果
"黍団子を作ったのはおばあさんです。"
まとめ
OpenAI と FalkorDB を使うことで、 Livebook 上で GraphRAG を実装することができました
ベクトルによる RAG との組み合わせなどを使って、より実用的な RAG を構築することもできそうです
