個人開発 Advent Calendar 2020、11日目の記事です。
PCで使っているディスプレイを買い替えて余ったしまったので、
前から欲しかったデジタルカレンダーを作ってみました。
ざっくりと作ったものを紹介
ディスプレイがあまったのでカレンダーにした🥳 pic.twitter.com/VUIUIvp31s
— 辰零 (@Ryo_TATSUREI) December 7, 2020
ツイートのように画面にGoogleカレンダーと今日の天気予報を表示するだけのものです。
基本的には Raspberry Piで卓上Googleカレンダーを作る と同様に、
Chromiumをキオスクモードで起動してカレンダーと天気予報を表示させています。
Googleカレンダーのみであれば上記のサイトと同じことをすれば済むのですが、
24インチの画面をカレンダーのみ表示させておくのは勿体ないなーと思い、天気も表示させることにしました。
Googleカレンダーと天気予報を同時に表示させる方法と、上記の記事だけでは色々と問題があったので、そちらについて書いていきます。
必要なもの(使った物)
・Raspberry Pi 4B (3Bでも可)
・ラズパイを動かすのに必要なもの一式(SDカードとか)
・ディスプレイ(今回は24インチFHD)
・ディスプレイマウンタ(ディスプレイを壁掛けしたいなら)
Raspberry Pi側の準備
OSはRaspberry Pi OSで、バージョンがBusterになります。
・Chromiumの変更
まず、下記のサイトを見てインストールされているChromiumをDeveloper版にします。
[Raspberry Pi][Buster] Chromium の更新失敗通知をなんとかする2
なぜかというと更新失敗通知が表示されてしまうからです。
・中華フォント修正
次にフォントのインストールです。
ラズパイOSで日本語を表示する際に中華フォントが使われますが、それを修正します。
中華フォントが気にならないのであればやらなくてOKです。
下記サイトの「フォントをダウンロード&インストール」と「システムフォントを変更する」を行ってください。
【Raspberry Pi】PixelのシステムフォントをNotoに変更する
もしChromiumが中華フォントのままであれば「Chromeのフォントを変更する」もやってください
(私はやらなくても変わりました。)
・画面自動OFF無効化・マウスカーソル非表示
ターミナルを起動し、下記コマンドでunclutter(カーソル非表示ツール)をインストール。
sudo apt-get install unclutter
下記コマンドでautostartを編集。
(自動起動関連のファイル、初めていじる場合は存在しないので新規で作ることになる。)
nano ~/.config/lxsession/LXDE-pi/autostart
内容は下記の通り。
@lxpanel --profile LXDE
@pcmanfm --desktop --profile LXDE
@xscreensaver -no-splash
@xset s off
@xset -dpms
@xset s noblank
@unclutter
(エディタがnanoであれば)Ctl+Xで保存・終了
※「@lxpanel --profile LXDE」と「@pcmanfm --desktop --profile LXDE」は入れないとデスクトップが表示されなかったので「/etc/xdg/lxsession/LXDE/autostart」からコピーしてきたもの。
・画面の回転
画面は縦前提で作っているので表示も縦にします。
Raspberry Pi 4 で画面を回転 を参考に回転させてください。
ディスプレイの回転方向によって「right」か「left」かは変わります。
Chromiumで表示するHTMLの準備
下記htmlをラズパイのどっかに保存してください。
<!DOCTYPE html>
<html lang="ja">
<head>
    <meta charset="UTF-8">
    <meta name="viewport" content="width=device-width, initial-scale=1.0">
    <meta http-equiv="X-UA-Compatible" content="ie=edge">
    <title>calendar</title>
    <style>
        html {
            height: 100%;
        }

        body {
            height: 100%;
            margin: 0;
        }

        body::-webkit-scrollbar {
            display: none;
        }
    </style>
    <script>
        const url_calendar = "https://calendar.google.com/calendar/u/0/r?tab=rc";
        const url_weather = {tenki.jpの表示したい地域の「3時間天気」のURL};

        let frm_calendar;
        let frm_weather;

        window.onload = function () {
            frm_calendar = document.getElementById("frm_calendar");
            frm_weather = document.getElementById("frm_weather");

            setInterval(function () {
                frm_weather.src = url_weather;
            }, 1000 * 60 * 30);

            setTimeout(function () {
                    frm_calendar.src = url_calendar;
                    frm_weather.src = url_weather;
            }, 2000);
        }
    </script>
</head>
<body>
    <iframe id="frm_calendar" src="" frameborder="0" style="width: 100%;height:60%;" ></iframe>
    <iframe id="frm_weather" src="" frameborder="0" style="width: 100%;height:40%;" ></iframe>
</body>

</html>
Chromiumの準備
・Googleアカウントでログイン
Googleカレンダーを表示させるので、ChromiumのアカウントとしてGoogleアカウントでログインしてください。
もし「こんな知らんシステムで俺のメインアカウントを使いたくない!」という場合は別でGoogleアカウントを作成し、
Googleカレンダーに本垢のカレンダーを追加してください。
他のユーザーの Google カレンダーを追加する
・拡張機能のインストール
ログイン後、Chromiumにこの拡張機能をインストールします。
Ignore X-Frame headers
※この拡張機能が入ってないとGoogleカレンダーと天気予報を同時に表示できません。
・天気予報表示部分をいじる拡張機能
天気部分はtenki.jpの「3時間天気」を表示しています。
そのままだと余計な部分も表示されてしまうので、レイアウトの調整用の拡張機能を入れます。
これは私の自作したものなので、ストアにありません。
なので下記のファイルを用意してください。
window.onload = function () {
    this.document.getElementsByClassName('header clearfix')[0].style.display = 'none';
    this.document.getElementsByClassName('thunder-link-btn')[0].style.display = 'none';
    this.document.getElementsByClassName('forecast-select-btn clearfix')[0].style.display = 'none';
//210729 tenki.jpのHTMLが変わったため変更
//    this.document.getElementsByClassName('sub-column-section-wrap typhoon-sub-column-parts')[0].style.display = 'none';
    this.document.getElementsByClassName('sub-column')[0].style.display = 'none';
    this.document.getElementsByClassName('head')[0].style.display = 'none';
    this.document.getElementsByTagName('nav')[0].style.display = 'none';
    this.document.getElementsByTagName('nav')[1].style.display = 'none';
    this.document.getElementsByTagName('h2')[0].style.display = "none";
    this.document.getElementById('tenki-ad-footer_PC_text_header').style.display = 'none';
    this.document.getElementById('tenki-ad-PC_CT').style.display = 'none';

    this.document.getElementsByClassName('date')[0].getElementsByTagName('th')[0].rowSpan = 1;
    this.document.getElementsByClassName('date')[0].style.display = 'none'
    this.document.getElementsByClassName('hour')[0].innerHTML = document.getElementsByClassName('date')[0].getElementsByTagName('th')[0].outerHTML + document.getElementsByClassName('hour')[0].innerHTML;
    this.document.getElementsByClassName('hour')[0].style = "background-color: #F4F4EE;";
    this.document.getElementsByTagName("th")[2].style.width = "280px";
};
{
    "name": "tenki.jp_改変",
    "version": "1.0.0",
    "manifest_version": 2,
    "description": "tenki.jpのいらない部分を削除",
    "content_scripts": [{
        "matches": ["https://tenki.jp/forecast/*/*/*/*/3hours.html"],
        "js": [
            "content.js"
        ],
        "css":[
            "style.css"
        ],
        "all_frames": true
    }]
}
body::-webkit-scrollbar {
    display: none;
}
body{
    padding-left: 15px !important;
}
これら3つのファイルを同じディレクトリに置いてChromiumに入れてください。
入れ方は 自作の拡張機能をChromeに追加するには を参考にしてください。
ちなみにこの拡張機能は「3時間天気」のページのみ有効ですので、
他のページを使いたい場合は独自にカスタマイズしてください。
動作チェック
「Chromiumで表示するHTMLの準備」で作成したhtmlファイルをChromiumで開いてみてください。
おそらくGoogleカレンダーが表示される部分が、Googleのログイン画面になってしまっていると思います。
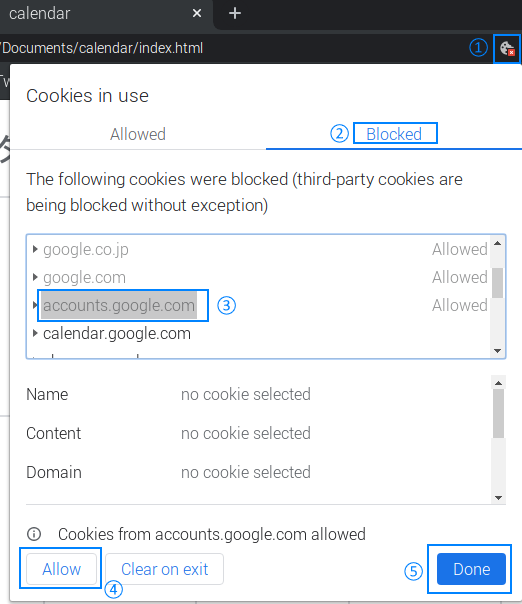
iframe内でのクッキーが無効になっているので有効にします。
クッキーの有効化
1.アドレスバーの右端にあるクッキーに☓マークが付いた部分をクリック
2.「Blocked」をクリック
3.リスト内から「accounts.google.com」を探し、クリック
4.「Allow」をクリック
5.「Done」をクリックして閉じる

無事カレンダーと天気予報が表示されたら表示倍率を150%にします。(Ctr+マウスホイール)
※私の環境(24インチのFHD)では丁度いいのですが、サイズや解像度が違うと見え方が違ってくると思います。
もし変えたい場合は「・天気予報表示部分をいじる拡張機能」の変更も必要になってくるので、各自でカスタマイズしてください。
自動起動化
問題なければ、あとは自動起動化すれば完成です。
下記コマンドでautostartを編集。
nano ~/.config/lxsession/LXDE-pi/autostart
末尾に下記のコードを追加してください。
@chromium --kiosk --app=file:///home/pi/Documents/calendar/index.html
※「Chromiumで表示するHTMLの準備」で作成したhtmlファイルの置き場所に合わせて「--app=」以降を変更してください。
おわりに
なんだかんだ言って以前の投稿からほぼ一年経ってしまいました。
来年はもうちょっと記事を書いていけたらいいなぁ~なんて思ってます。