環境
Ubuntu20.04として話していますが、ほかのOSでも対応できます。
リモートリポジトリとは?
・自分自身が操作している環境(localhost)に対して、Web上に存在するディレクトリのこと。
・GitHubだけと思いがちだが、Herokuなどにディレクトリを置いた場合も「リモートリポジトリ」と呼ぶ。
・リモートリポジトリはURLで示され、後述する下記のコマンドで、確認できる。
$ git remote -v
origin  https://Ryo-Sakon:token@github.com/Ryo-Sakon/example.git (fetch)
origin  https://Ryo-Sakon:token@github.com/Ryo-Sakon/example.git (push)
なおtokenの部分は、以前はpasswordでもOKだったが、2021年8月13日以降はtoken推奨となっている。(公式ブログ記事)
tokenの発行方法はこちら(個人アクセストークンを使用する)
手順
※GitHubのアカウント作成手順はチュートリアルが豊富にあるため省略します。
・リポジトリ一覧の画面に行き、「New」をクリック。(緑色のボタン)
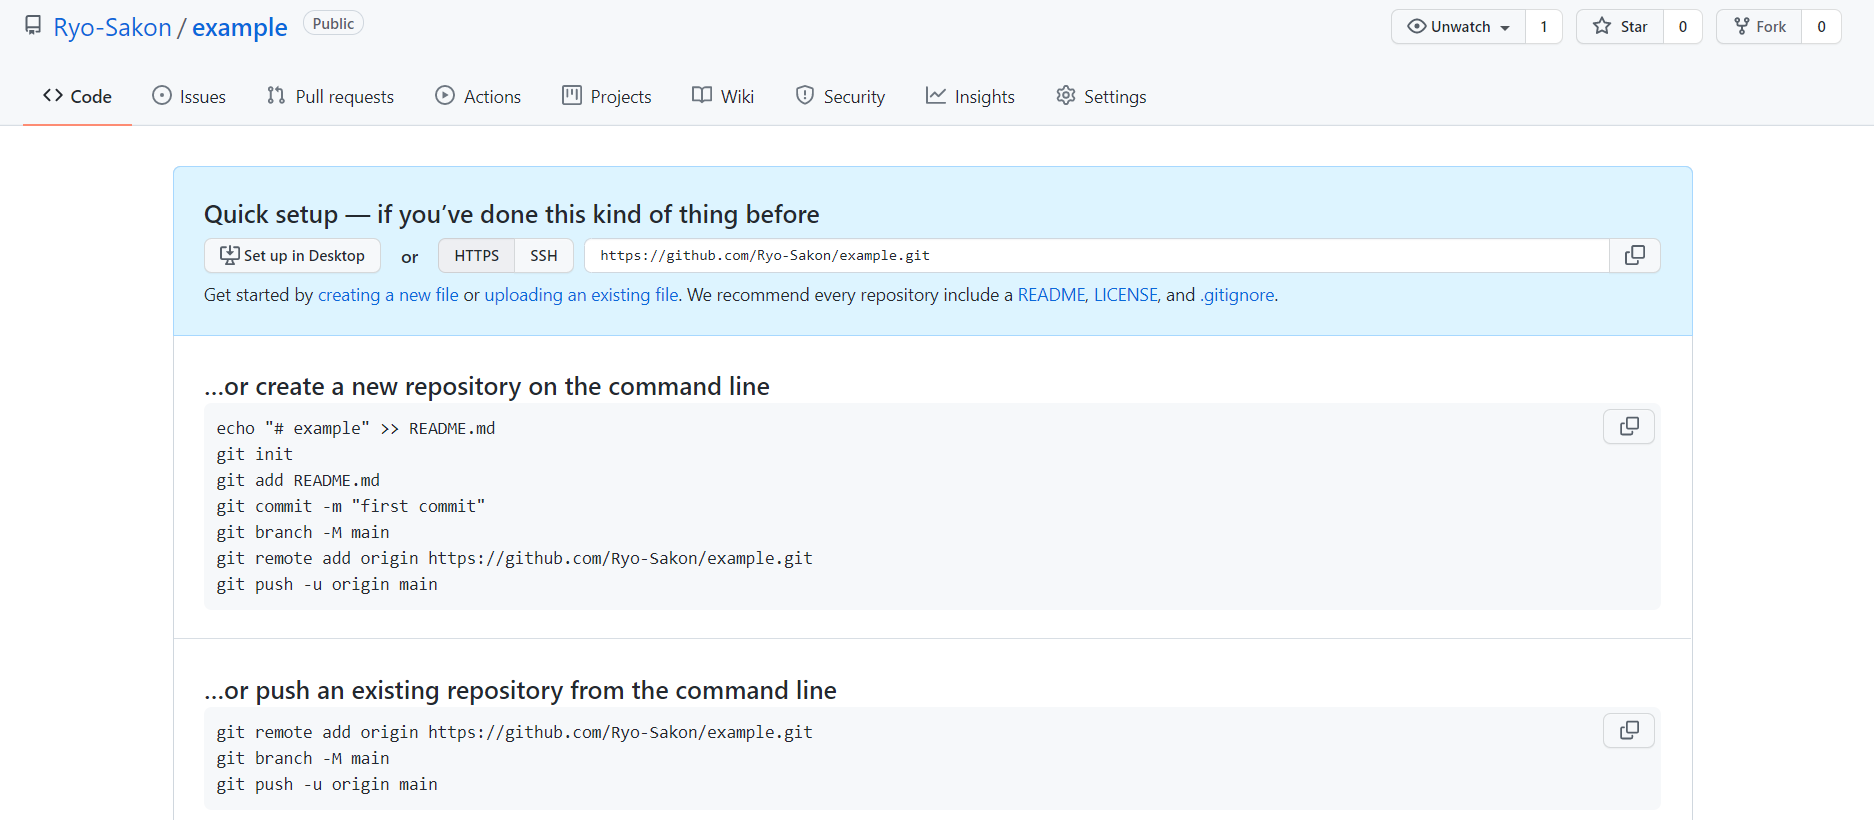
・リポジトリ名をつけ(ここではexampleとする)、登録すると下記の画面となる。(Public指定、チェックボックスは入れなくてOK)
・この画面には、ローカルとリモートリポジトリである「example」をつなぐためのチュートリアルが書かれているので、これに従って行うとよい。(commitやpushも行えるので、とてもよいチュートリアルだと思います。)
・SSH接続は今回取り扱いません。よくわからない人はスルーして大丈夫です。
チュートリアル通り、下記のコマンドを実行していきます。
※一部、あえて順序を変えています。また☆は、基本的に最初のみ実行するコマンドです。
git config --global user.name "Ryo-Sakon"
git config --global user.email "hogehoge@hoge.hoge" // ☆~/gitconfigに設定を書き込み
(cd /var/www/html/example/) //Linuxのみ

git init //☆ローカルリポジトリの初期化。おまじないのようなもの
echo "# example" >> README.md //テストファイル作成。touch+vim,nanoなどでもよい
git add README.md //ステージング
git commit -m "最初のコミット" //コミット。-mはメッセージ内容
git branch -M main //ブランチの作成
git remote add origin https://github.com/Ryo-Sakon/example.git //☆プッシュ先のリモートリポジトリを指定する
git push (-u origin main) //☆プッシュ。2回目以降は()内がなくてもOK
もしエラーが起きてしまったら?
・下記の2ファイルのどちらかに原因がある可能性がありますので、確認してみてください。
・~/gitconfig
・/var/www/html/example/.git/config
実際に起きたエラー紹介
$ pwd //ディレクトリ確認
/var/www/html/example
$ git push -u origin main
remote: Permission to Ryo-Sakon/example.git denied to sakon-hogehoge.
fatal: unable to access 'https://github.com/Ryo-Sakon/example.git/': The requested URL returned error: 403
・私は「sakon-hogehoge」という別のアカウントを持っているのですが、なぜかそちらのアカウントでPushを行うようになっていました。(ちゃんとgit config --global user.name したのに…)
このとき、/var/www/html/example/.git/config を編集することで解決しました。
[core]
        repositoryformatversion = 0
        filemode = true
        bare = false
        logallrefupdates = true
[remote "origin"]
        url = https://github.com/Ryo-Sakon/example.git
        fetch = +refs/heads/*:refs/remotes/origin/*
[branch "main"]
        remote = origin
        merge = refs/heads/main
url = https: //github.com/Ryo-Sakon/example.git
の部分を
url = https: //Ryo-Sakon:token@ github.com/Ryo-Sakon/example.git
とユーザーを明記するように変更すると、正常にPushできました。しかし、tokenの期限が切れるたびに同じ作業が必要になるのが今のネックです…。
参考:SSH接続の設定
鍵を作成
$ cd ~/.ssh
$ ssh-keygen -t rsa -b 4096 -f authorized_keys
・authorized_keysは変えてOK
・-t RSAは暗号手段の名称
・-b バイト数
・-f 鍵の名前
生成した公開鍵をGitHubに登録する
・https://github.com/settings/keys にアクセス
・画面右上の「New SSH key」ボタンを押す
・Title欄に公開鍵名(.pub)、Key欄に公開鍵の中身をペースト
・ボタンを押して登録
エラーへの対処(WSL2)
Warning: Permanently added 'github.com,52.192.72.89' (RSA) to the list of known hosts.
git@github.com: Permission denied (publickey).
$ eval `ssh-agent`
$ ssh-add ~/.ssh/authorized_keys
参考URL
https://qiita.com/y-tsutsu/items/ec984831e6c8262d3ff7
終わりに
以上でチュートリアルは終了です。この後は「Pull」,「Merge」,「Conflict」などを覚える必要があります。
また、「VSCode」などのエディターで開発を行っていくことになります。当然各々の言語で開発するわけですが、GitHubに限らず、公式ページには意外とやさしく説明が書かれていますので、ググる前に公式ドキュメントをぜひ読んでみてください!
応援しています!
