はじめに
前回LINE Front-end Framework(LIFF)でお問い合わせフォームを作成しました。
今回は、Nuxt.jsとLaravelを使ってECサイトを作ってみます。
開発環境
今回は以下の技術を採用しています。
| フロントエンド | バックエンド | インフラ | サービス |
|---|---|---|---|
| LIFF | Laravel | Docker | HubSpot |
| Nuxt.js | Netlify | Stripe | |
| Heroku | MicroCMS |
Dockerは環境構築のために使用しています。
デプロイに関しては、フロントエンドはNetlifyを使い、バックエンドはHerokuを使用しています。
HubSpotは顧客管理、Stripeは決済、MicroCMSはECで販売する商品を登録するために使用しています。
本業でカスタマーサクセスをやっているのでやっぱり顧客管理はCRM使いたいよねってことでHubSpotを選択しています。
Stripeも最初はpayment-linksを使いたかったですが、コード書くならcheckoutでいいよねってことで使いませんでした。
payment-linksはどういうタイミングで使えばいいんでしょうね?
MicroCMSは、わざわざ商品を登録するサイトを作るのがめんどくさかったので採用しました。
ECサイトを作る際にも普通に要件次第では使えるのではないかなーと感じました。
完成コード
サイトURLはこちらです。
このサイトはLINEログインしないと使えないので、LINEログインをするためにLINEブラウザで開いてください。
ハンズオン!
Githubからクローン
GitHubにやり方は書いていますが、以下を実行することで環境構築ができます。
$ git clone git@github.com:ssk9597/Docker-Laravel-Nuxt-Nginx-MySQL.git
$ cd Docker-Laravel-Nuxt-Nginx-MySQL
$ make nuxt
$ make backend
こちらは以下の記事を参考にしてください。
frontend/nuxt.config.jsに関してはこのままだとエラーが発生します。
なのでここだけは以下のコードをコピペしてください。
require('dotenv').config();
const { API_URL } = process.env;

export default {
  head: {
    title: 'frontend',
    htmlAttrs: {
      lang: 'ja',
    },
    meta: [
      { charset: 'utf-8' },
      { name: 'viewport', content: 'width=device-width, initial-scale=1' },
      { hid: 'description', name: 'description', content: '' },
    ],
    link: [{ rel: 'icon', type: 'image/x-icon', href: '/favicon.ico' }],
  },

  css: [],

  plugins: [],

  components: true,

  buildModules: [],

  watchers: {
    webpack: {
      poll: true,
    },
  },

  modules: ['@nuxtjs/axios', '@nuxtjs/proxy', '@nuxtjs/dotenv'],

  env: {
    API_URL,
  },

  proxy: {
    '/api': process.env.API_URL,
  },

  axios: {
    baseURL: process.env.API_URL,
    browserBaseURL: process.env.API_URL,
  },

  build: {},
};
NetlifyとHerokuにデプロイを行う
Netlify
以下の記事で詳細まで説明されているのでこちらを見てもらえれば問題なくできるかと思います。
また、ステージング環境に関してもやっておいた方がいいです。
Heroku
Herokuのデプロイは結構躓きがちなので自分が参考にした資料を載せておきます。
今回は複数のbuildpackが必要になるので以下を参考にしましょう。
ほとんどこちらの資料だけでできるはずです。
Papertrailでログも出しておきたいのでこれもやっておきましょう。
LIFFはフロント側でログを出すには、alertしか使えないですし、alertにオブジェクトなどが表示できないなど制限があります。
なので、Papertrailを使ってバックエンド側でログを出しておくのがいいかと思います。
最後に通信できているか確認しましょう。
以下の記事のAxiosの部分を追加しましょう。
これでHello World!が表示されればOKです。
サイト内で使用する画像を準備する
私は以下の2サイトから持ってきました。
まぁ正直なんでもいいです。
LINE Developersでチャネルを作成する
作成手順
①プロバイダーの作成
②新規チャネルの作成
③LIFFの作成
プロバイダーを作成します。

プロバイダー名はご自身のお名前でいいかと思います。

新規チャネルを作成します。

LINEログインを選択してください。
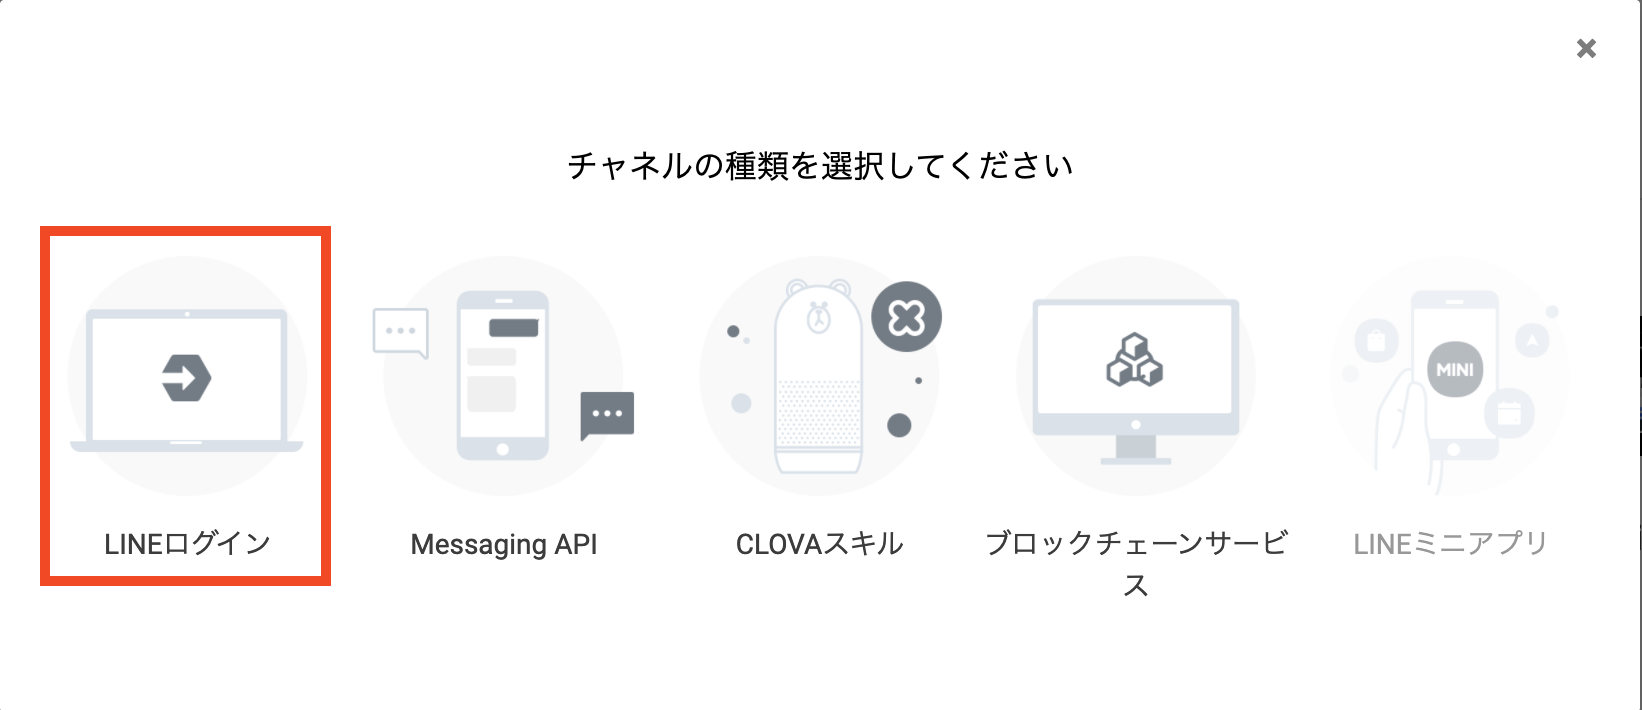
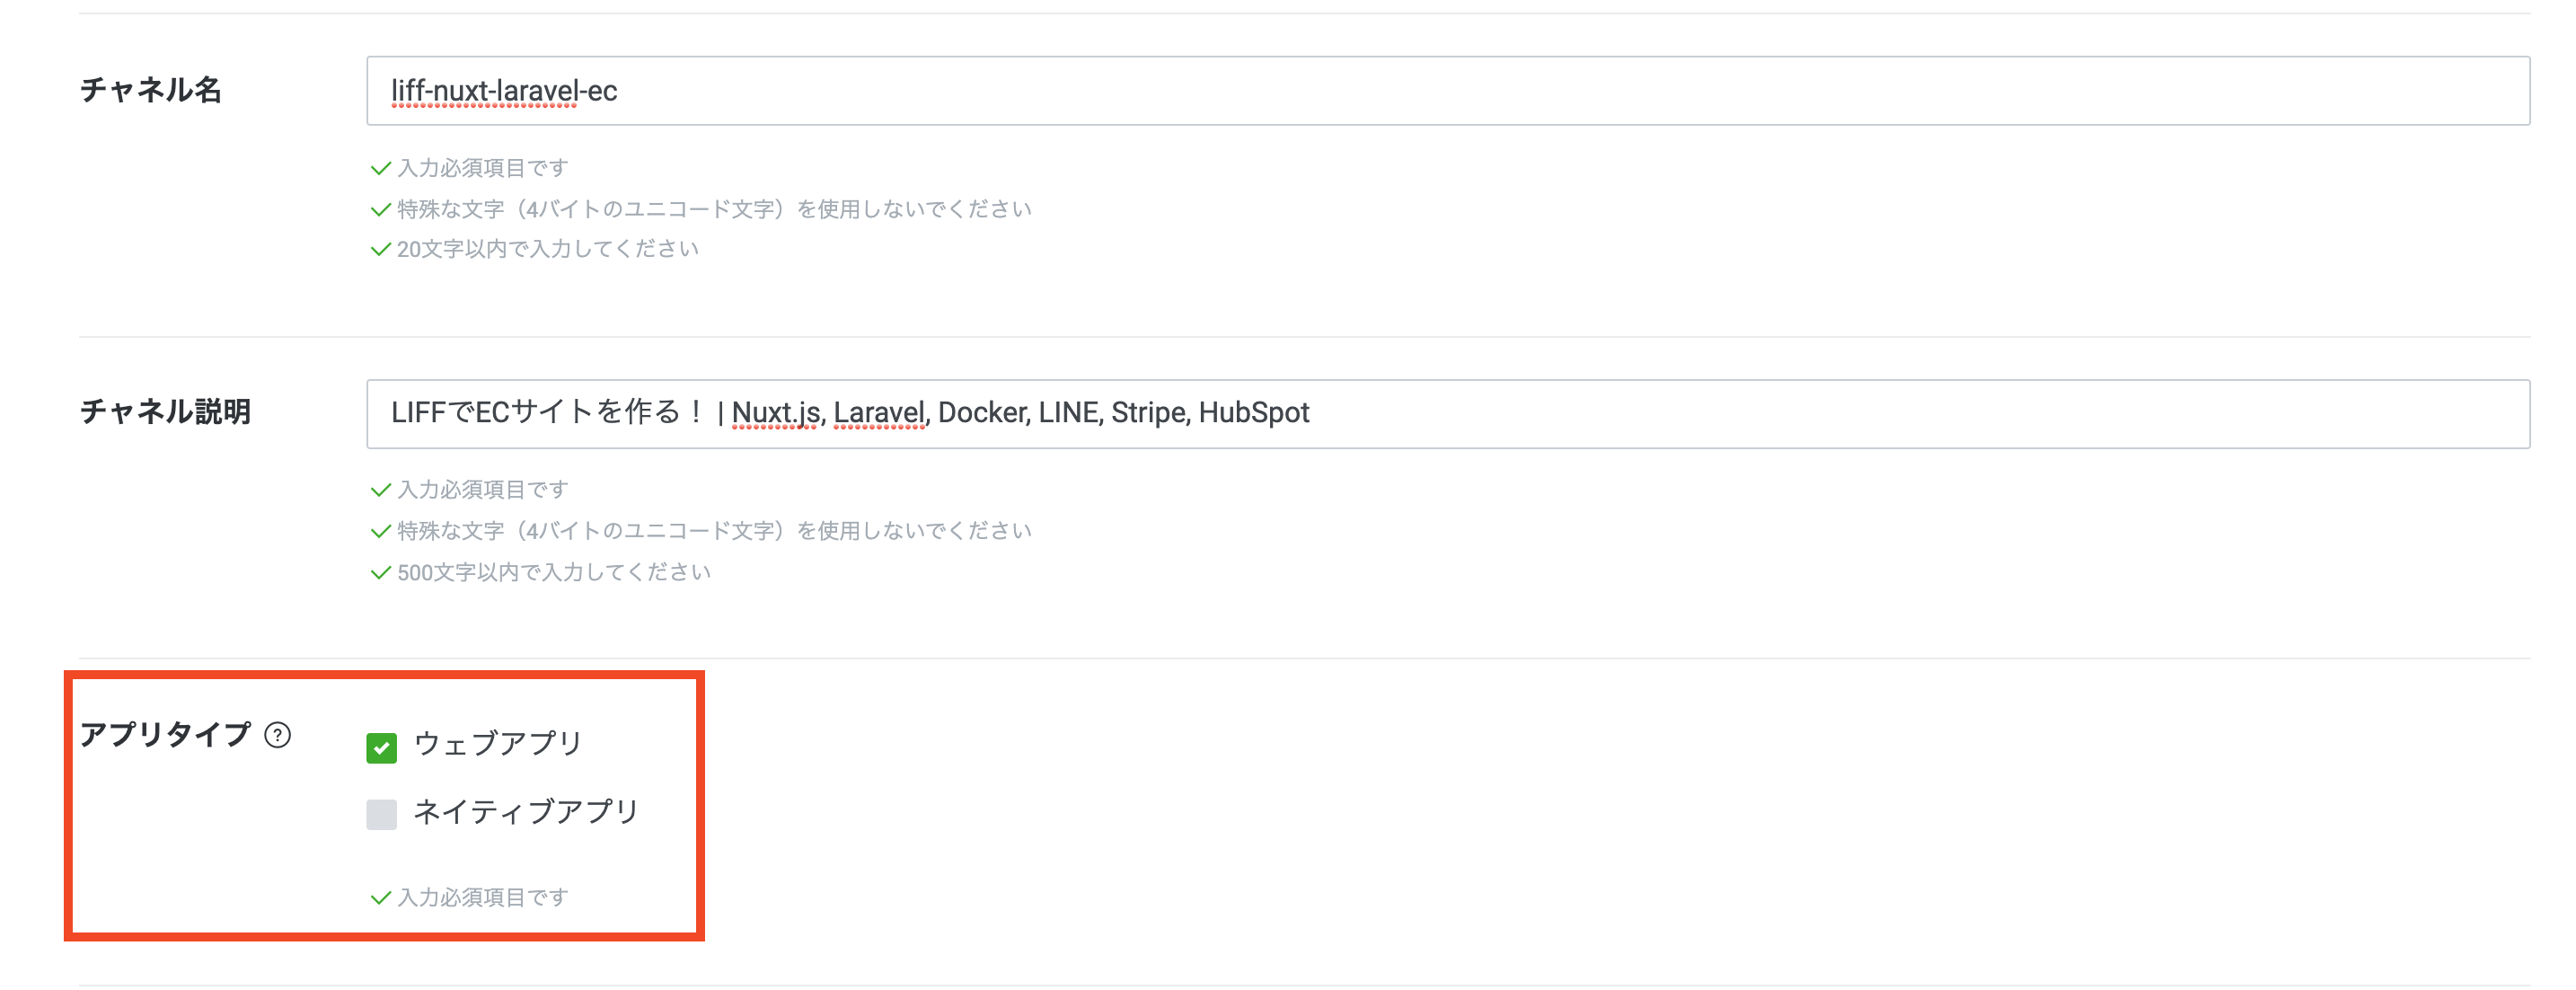
設定を行います。
ウェブページにLINEログインを組み込むので、アプリタイプはウェブアプリにしておいてください。
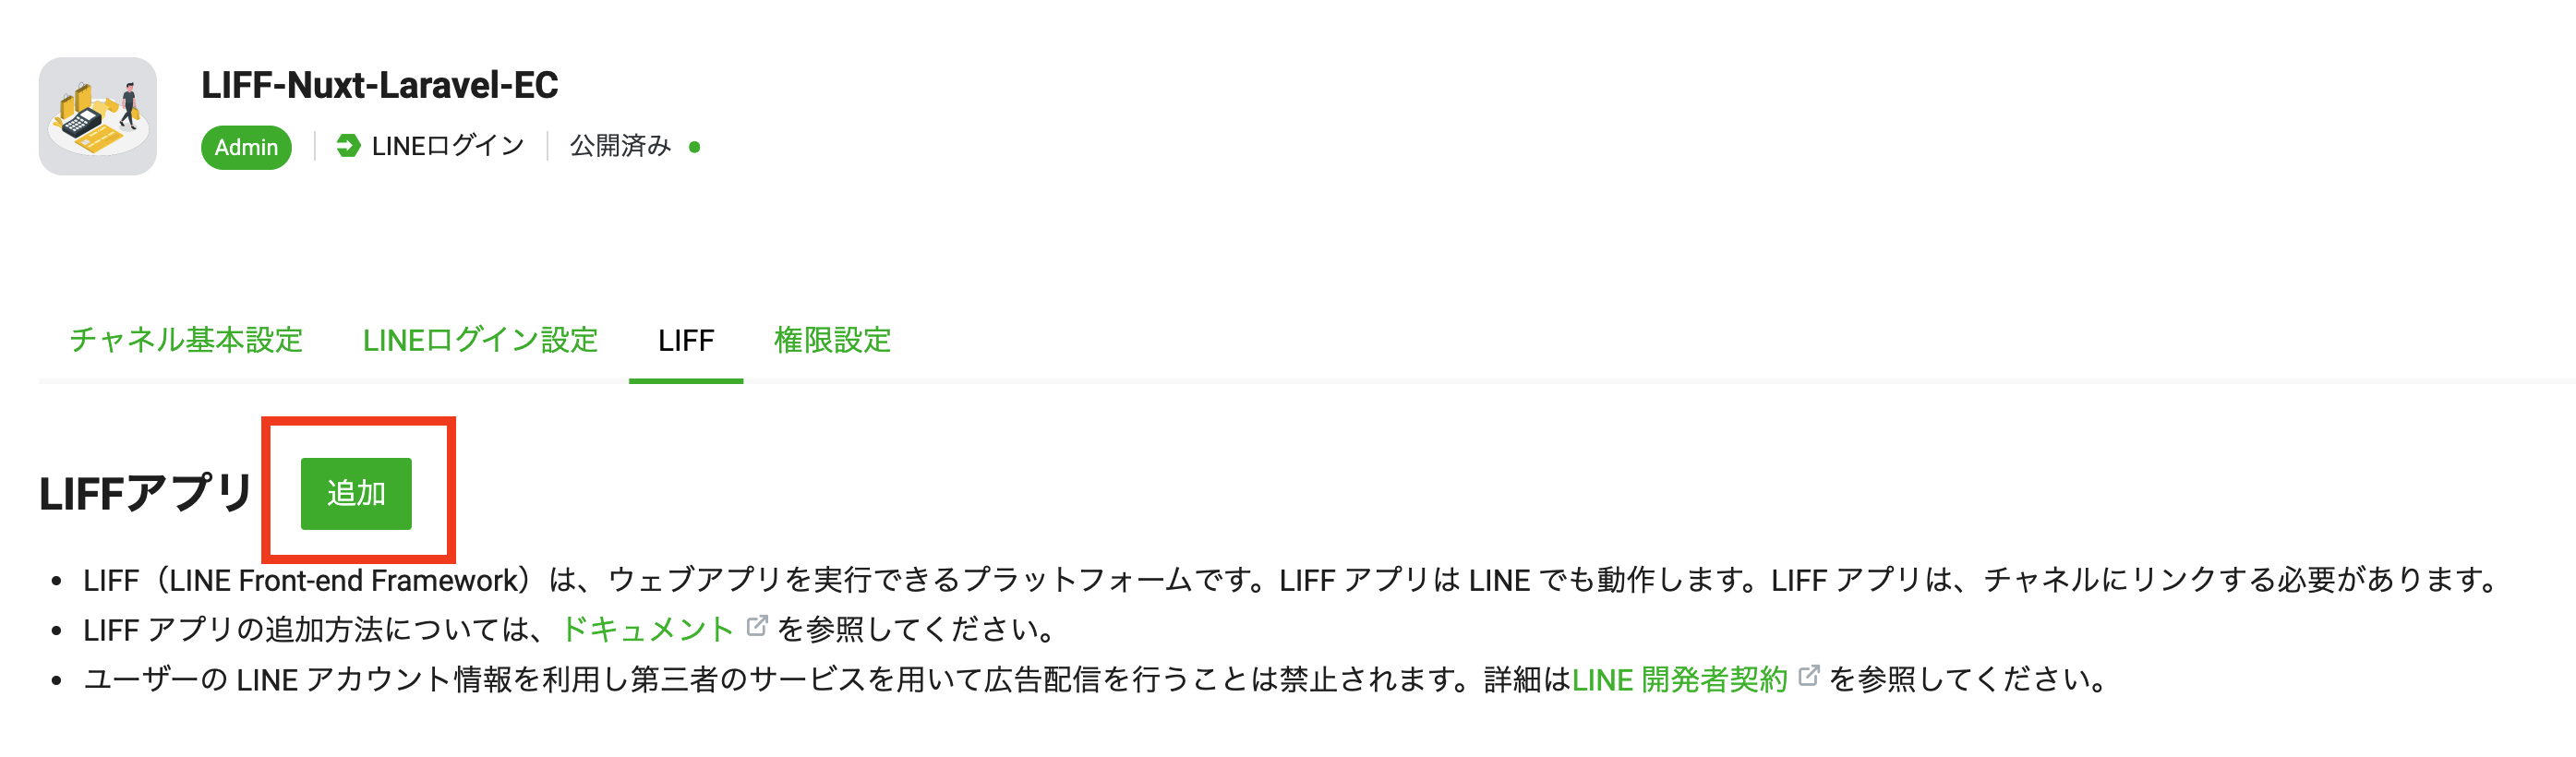
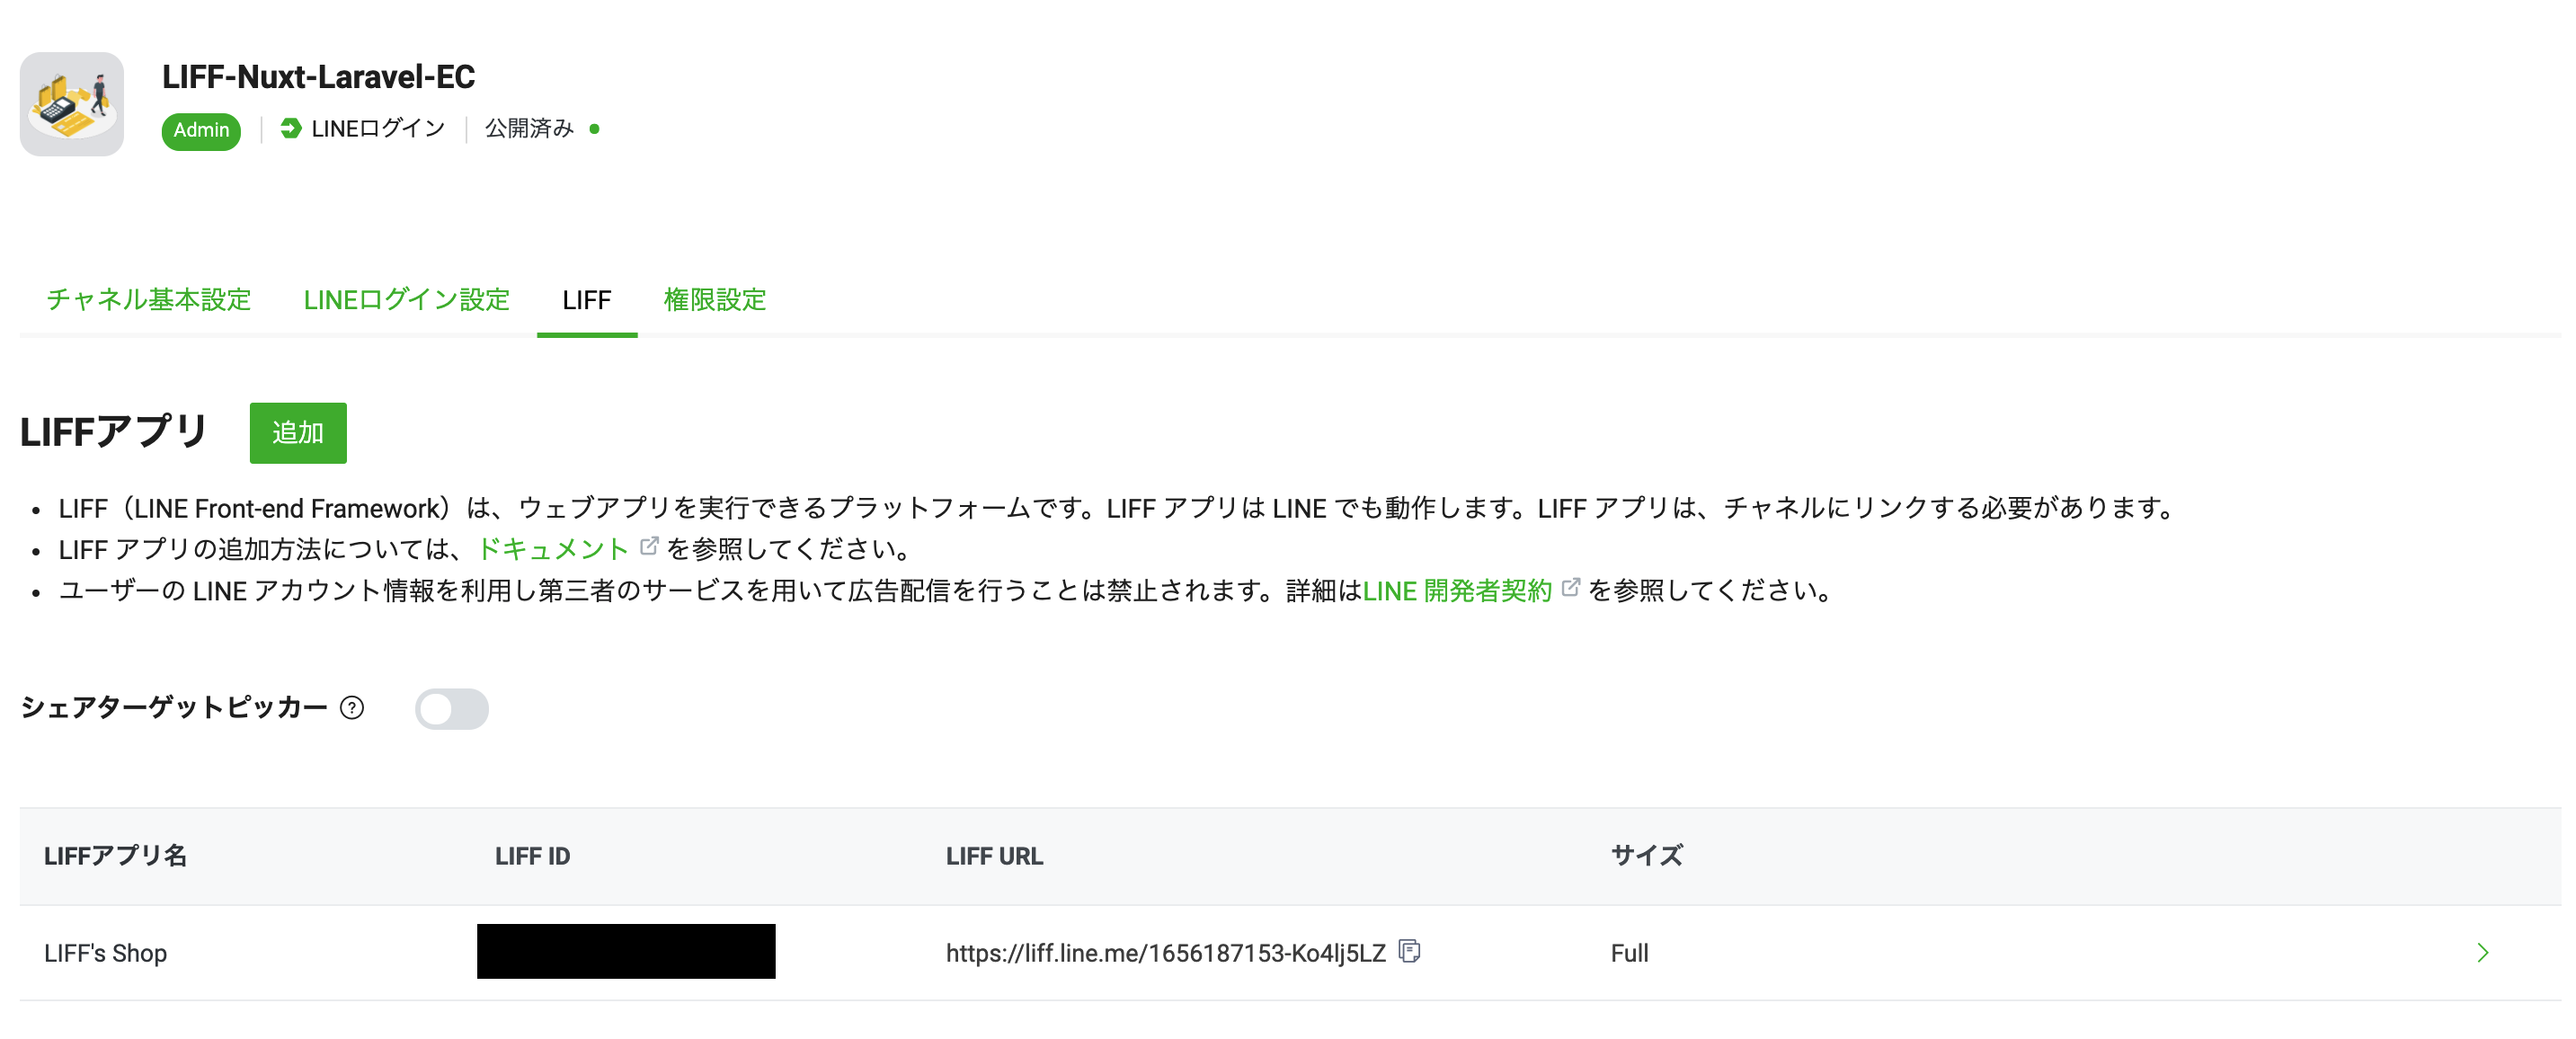
ではLIFFアプリを追加しましょう!
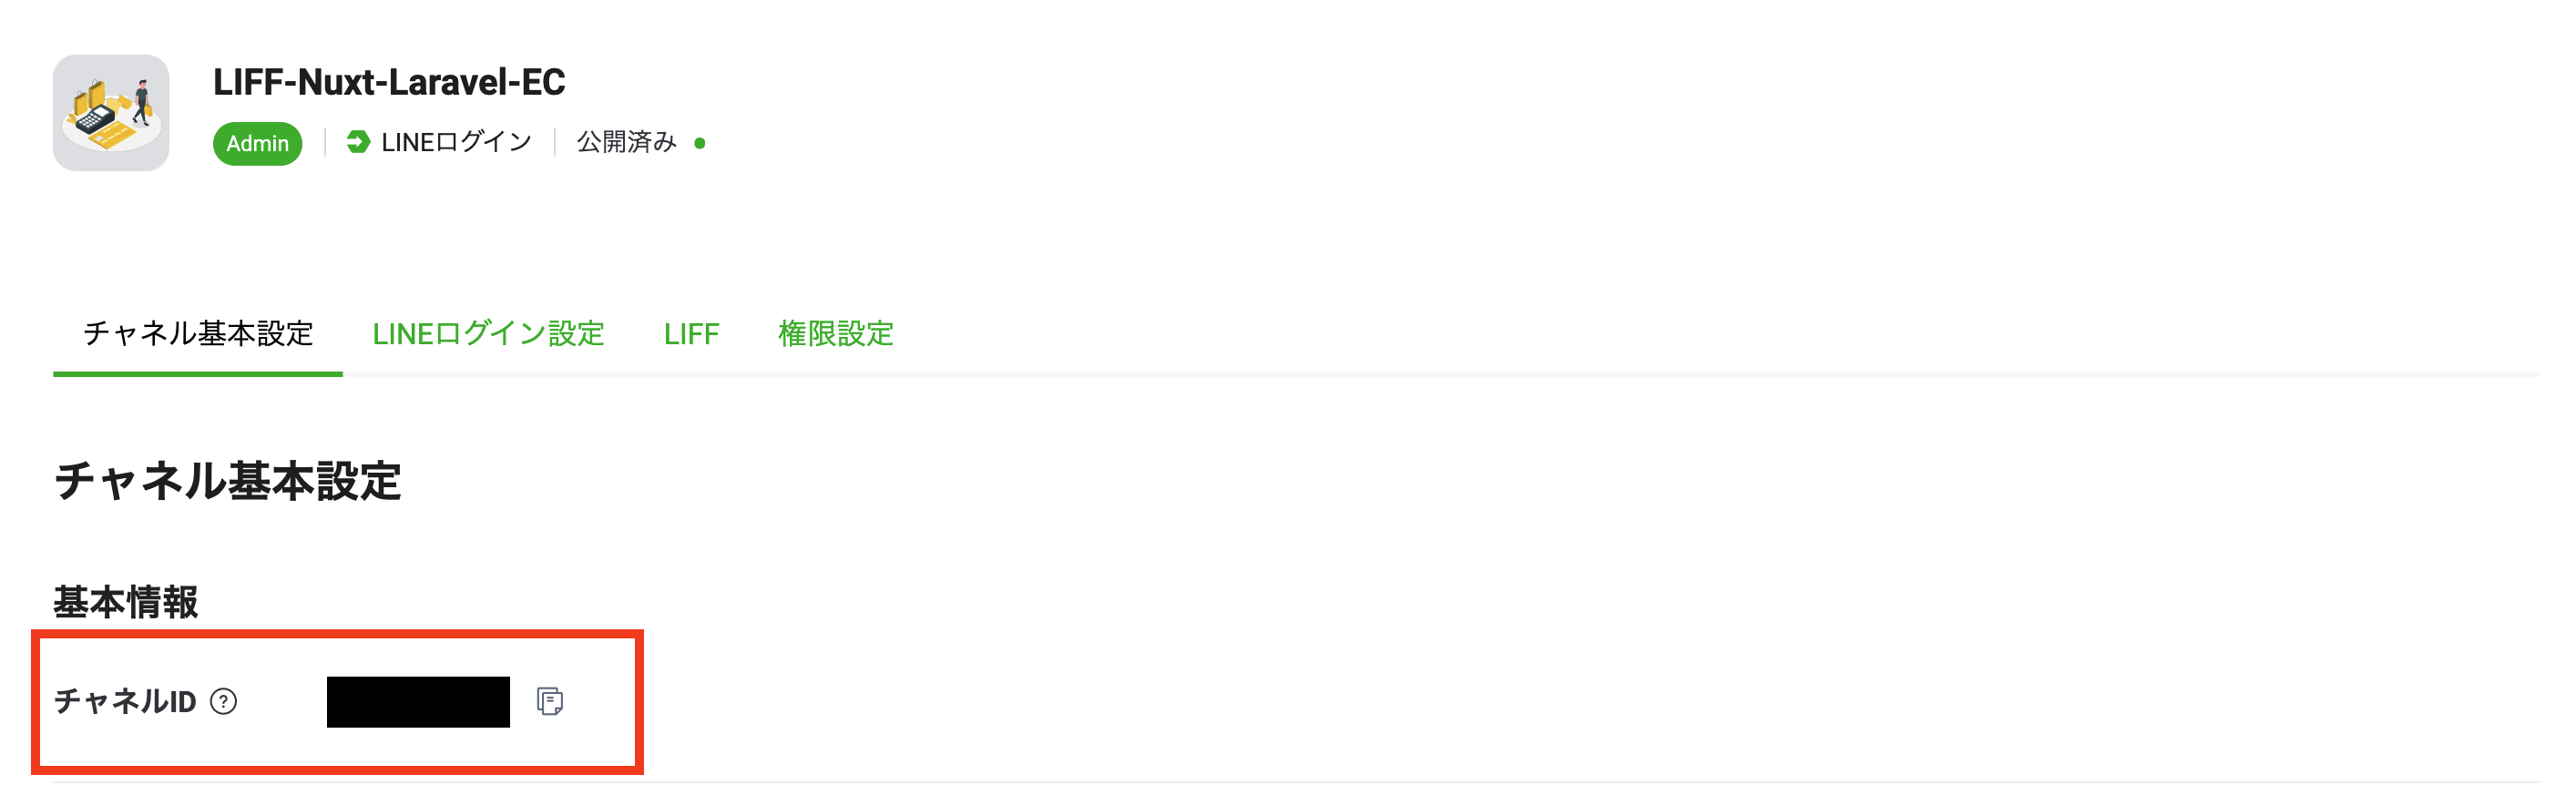
基本情報の設定は以下のように行います。
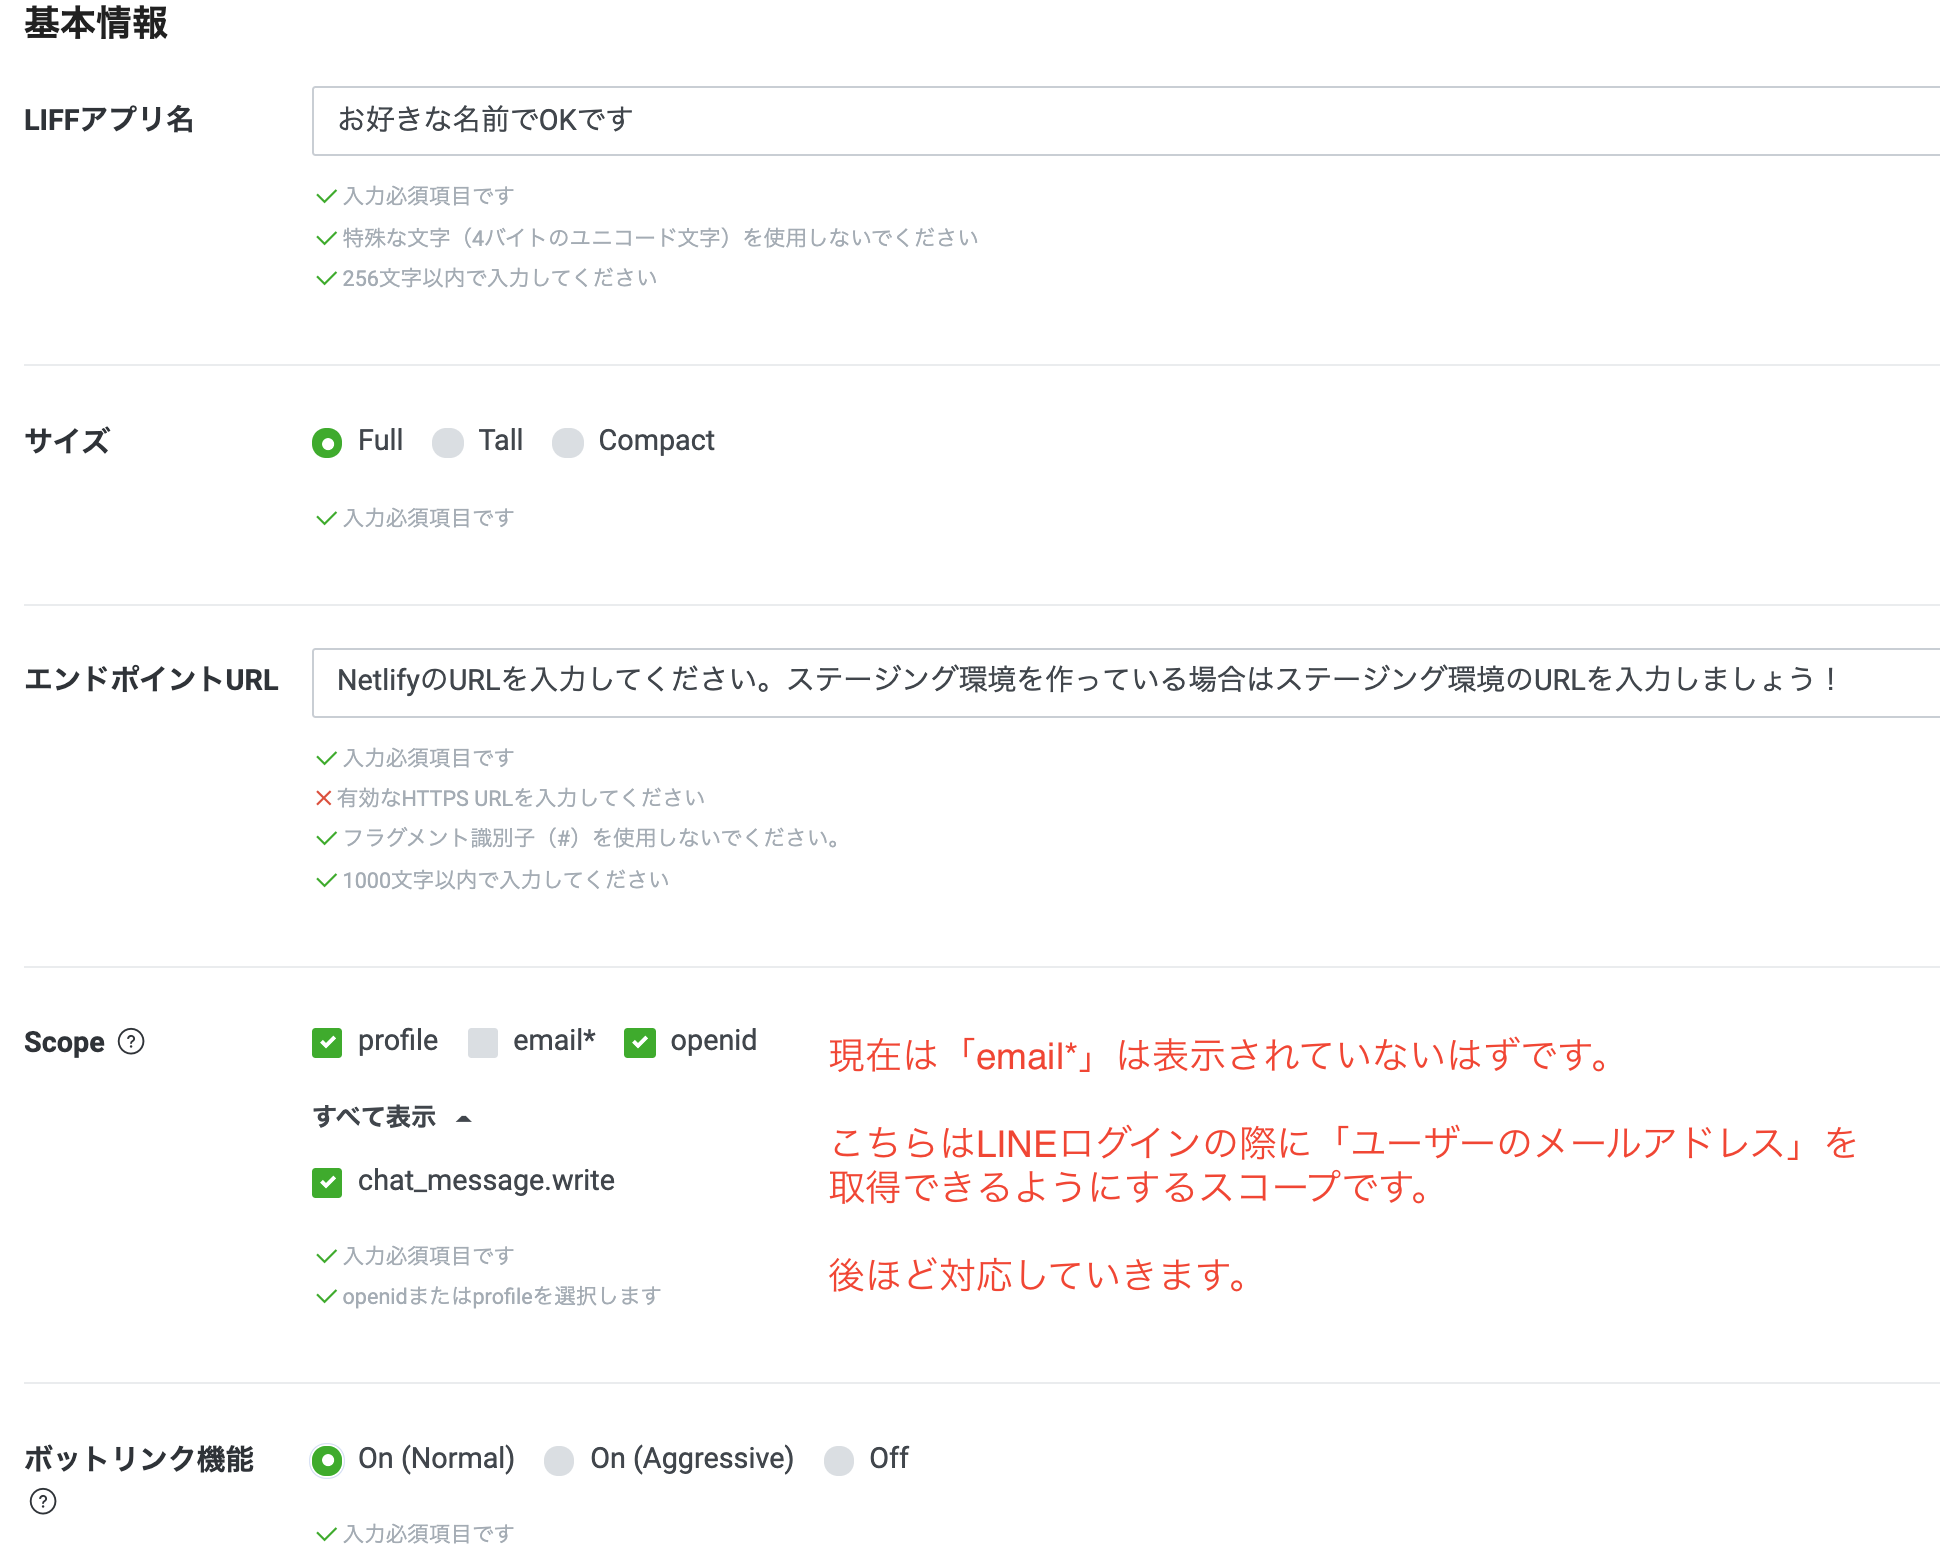
これでLIFFアプリの作成ができました!

Netlifyに.envを登録する
先ほど作成したLIFFアプリのチャネルIDとLIFF IDを.envに登録します。
それでは登録を行います。

LIFFアプリのタイトルを設定する
サイトタイトルをつけますが、こちらは任意の名前でOKです。
私は、LIFF's Shopにしています。
require('dotenv').config();
const { API_URL } = process.env;

export default {
  target: 'static',
  head: {
+   title: "LIFF's Shop",
    htmlAttrs: {
      lang: 'ja',
    },
    meta: [
      { charset: 'utf-8' },
      { name: 'viewport', content: 'width=device-width, initial-scale=1' },
      { hid: 'description', name: 'description', content: '' },
    ],
    link: [{ rel: 'icon', type: 'image/x-icon', href: '/favicon.ico' }],
  },

  plugins: [],

  components: true,

  buildModules: [],

  watchers: {
    webpack: {
      poll: true,
    },
  },

  modules: ['@nuxtjs/axios', '@nuxtjs/proxy', '@nuxtjs/dotenv', '@nuxtjs/style-resources'],

  env: {
    API_URL,
  },

  proxy: {
    '/api': process.env.API_URL,
  },

  axios: {
    baseURL: process.env.API_URL,
    browserBaseURL: process.env.API_URL,
  },

  build: {},
};
LIFFアプリにLIFF SDKを組み込む
npmパッケージもあるのですがうまくいかないことも多いのでSDKを使います。
require('dotenv').config();
const { API_URL } = process.env;

export default {
  target: 'static',
  head: {
    title: "LIFF's Shop",
    htmlAttrs: {
      lang: 'ja',
    },
    meta: [
      { charset: 'utf-8' },
      { name: 'viewport', content: 'width=device-width, initial-scale=1' },
      { hid: 'description', name: 'description', content: '' },
    ],
    link: [{ rel: 'icon', type: 'image/x-icon', href: '/favicon.ico' }],
+   script: [{ src: 'https://static.line-scdn.net/liff/edge/2/sdk.js' }],
  },

  plugins: [],

  components: true,

  buildModules: [],

  watchers: {
    webpack: {
      poll: true,
    },
  },

  modules: ['@nuxtjs/axios', '@nuxtjs/proxy', '@nuxtjs/dotenv', '@nuxtjs/style-resources'],

  env: {
    API_URL,
  },

  proxy: {
    '/api': process.env.API_URL,
  },

  axios: {
    baseURL: process.env.API_URL,
    browserBaseURL: process.env.API_URL,
  },

  build: {},
};
.envのLIFF_IDなどをnuxt.config.jsで読み取れるようにする
先ほどNetlifyに登録したenvをフロントエンドで使えるようにしましょう!
require('dotenv').config();
+ const { API_URL, LIFF_ID, LIFF_CHANNEL_ID, MICROCMS_API_KEY } = process.env;

export default {
  target: 'static',
  head: {
    title: "LIFF's Shop",
    htmlAttrs: {
      lang: 'ja',
    },
    meta: [
      { charset: 'utf-8' },
      { name: 'viewport', content: 'width=device-width, initial-scale=1' },
      { hid: 'description', name: 'description', content: '' },
    ],
    link: [{ rel: 'icon', type: 'image/x-icon', href: '/favicon.ico' }],
    script: [{ src: 'https://static.line-scdn.net/liff/edge/2/sdk.js' }],
  },

  css: [{ src: '@/assets/styles/style.scss', lang: 'scss' }],

  styleResources: {
    scss: ['@/assets/styles/style.scss'],
  },

  plugins: [],

  components: true,

  buildModules: [],

  watchers: {
    webpack: {
      poll: true,
    },
  },

  modules: ['@nuxtjs/axios', '@nuxtjs/proxy', '@nuxtjs/dotenv', '@nuxtjs/style-resources'],

  env: {
    API_URL,
    LIFF_ID,
+   LIFF_CHANNEL_ID,
+   MICROCMS_API_KEY,
  },

  proxy: {
    '/api': process.env.API_URL,
  },

  axios: {
    baseURL: process.env.API_URL,
    browserBaseURL: process.env.API_URL,
  },

  build: {},
};
リセットCSSを導入する
いろいろ選択肢がありますが私は、css-wipeを使っています。
html5doctorのHTML5 Resetをベースに作られたスタイルシートです。
「box-sizing: border-box;」が定義されており、すべてのmargin, padding, borderが消されています。
導入方法はめちゃくちゃ簡単です。
$ npm install css-wipe --save
layoutのCSSに1行入れるだけでOKです。
<style lang="scss">
+   @import 'css-wipe';
</style>
エラー発生
ここまでをコミットした場合以下のエラーが発生するはずです。
発生しなかった人はそのままスルーで!
Node Sass version 6.0.1 is incompatible with ^4.0.0 || ^5.0.0.
「node-sassのバージョン6はたけーぞ、4か5に下げろや」と怒られるはずなので、対応しましょう。
$ npm uninstall -D node-sass
$ npm install -D node-sass@5.0.0
これでOKです。
再度コミットしてください!
多分エラーは消えるはずです。
LIFFアプリを初期化する
liff.init()メソッドを実行すると、LIFFアプリが初期化され、LIFFアプリからLIFF SDKのほかのメソッドを実行できるようになります。
アクセスした際に初期化されるようにしたいので、pages/index.vue内で読み込むことにしましょう。
<template>
  <div>
  </div>
</template>

<script>
export default {
+ async mounted() {
+   await liff.init({
+     liffId: process.env.LIFF_ID,
+   });
+ },
};
</script>
まずはフロントエンド側のデザインをやっていきましょう!
完成予想図は以下のような感じです。

構成としては4つのブロックになっています。
| ブロック |
|---|
| ヘッダー |
| ヒーロー |
| 会員登録 |
| 商品 |
必要なコンポーネントです。
| Atoms | Molecules | Template |
|---|---|---|
| FailAlert | Header | Cancel |
| Heading | Hero | Index |
| LinkButton | Registration | Success |
| SuccessAlert |
それでは必要なコンポーネントを作りつつ、そのコンポーネントをなぜ使用するのかも解説していきます。
ただその前に今回は変数定義用のscssファイルを作りましょう。
今回は使用する色に限りがあるのでこちらをscssで管理していきます。
$color_black: #2a2b2f;
$color_white: #fff;
$color_deep_gray: #979797;
$color_gray: #bfbfbe;
$color_yellow: #f5c500;
$color_success: #4caf51;
$color_fail: #e57472;
@import "utility/color";
では最後にnuxt.config.jsに読み込みましょう。
require('dotenv').config();
const { API_URL, LIFF_ID, LIFF_CHANNEL_ID } = process.env;

export default {
  target: 'static',
  head: {
    title: "LIFF's Shop",
    htmlAttrs: {
      lang: 'ja',
    },
    meta: [
      { charset: 'utf-8' },
      { name: 'viewport', content: 'width=device-width, initial-scale=1' },
      { hid: 'description', name: 'description', content: '' },
    ],
    link: [{ rel: 'icon', type: 'image/x-icon', href: '/favicon.ico' }],
    script: [{ src: 'https://static.line-scdn.net/liff/edge/2/sdk.js' }],
  },

+ css: [{ src: '@/assets/styles/style.scss', lang: 'scss' }],

+ styleResources: {
+   scss: ['@/assets/styles/style.scss'],
+ },

  plugins: [],

  components: true,

  buildModules: [],

  watchers: {
    webpack: {
      poll: true,
    },
  },

  modules: ['@nuxtjs/axios', '@nuxtjs/proxy', '@nuxtjs/dotenv', '@nuxtjs/style-resources'],

  env: {
    API_URL,
    LIFF_ID,
    LIFF_CHANNEL_ID,
  },

  proxy: {
    '/api': process.env.API_URL,
  },

  axios: {
    baseURL: process.env.API_URL,
    browserBaseURL: process.env.API_URL,
  },

  build: {},
};
これでOKです。
それではコンポーネントの作成に移ります!
⚠️注意点
完成形のコードをすべて記載しました。
API側のやり取りなど解説は後ほど行うこととします。
なのでこちらはすべてコピペしていただければOKです。
FailAlert.vue
なぜ作るのか
こちらは会員登録に失敗したときに表示されるアラートです。
要件としては3秒間表示されて勝手に消えるようにします。
では作っていきます
<template>
  <div class="alert">
    <p class="alert-title">ログインに失敗しました</p>
  </div>
</template>

<script>
export default {};
</script>

<style lang="scss" scoped>
.alert {
  position: fixed;
  z-index: 100;
  background: $color_fail;
  width: 100%;
  max-width: 390px;
  height: 50px;
  display: flex;
  justify-content: center;
  align-items: center;

  &-title {
    font-size: 12px;
    color: $color_white;
  }
}
</style>
Heading.vue
なぜ作るのか
見出しとして使用します。
では作っていきます
<template>
  <div class="heading">
    <h2 class="heading-main">{{ main }}</h2>
    <p class="heading-sub">{{ sub }}</p>
  </div>
</template>

<script>
export default {
  props: {
    main: {
      type: String,
      required: true,
    },
    sub: {
      type: String,
      required: true,
    },
  },
};
</script>

<style lang="scss" scoped>
.heading {
  margin: 60px 0 30px 0;
  text-align: center;
  &-main {
    font-size: 32px;
    margin-bottom: 10px;
  }

  &-sub {
    font-size: 16px;
  }
}
</style>
LinkButton.vue
なぜ作るのか
ページ移動を伴うボタンです。
TOPページに戻るために使用します。
では作っていきます
<template>
  <div class="button">
    <nuxt-link to="/" class="button-btn">トップに戻る</nuxt-link>
  </div>
</template>

<script>
export default {};
</script>

<style lang="scss" scoped>
.button {
  margin: 40px auto 0 auto;
  width: 200px;
  height: 40px;
  background: $color_yellow;
  border-color: transparent;
  &-btn {
    line-height: 40px;
    font-size: 18px;
    color: $color_black;
    text-decoration: none;
    font-weight: bold;
  }
}
</style>
SuccessAlert.vue
なぜ作るのか
こちらは会員登録に成功したときに表示されるアラートです。
要件としては3秒間表示されて勝手に消えるようにします。
では作っていきます
<template>
  <div class="alert">
    <p class="alert-title">ログインに成功しました</p>
  </div>
</template>

<script>
export default {};
</script>

<style lang="scss" scoped>
.alert {
  position: fixed;
  z-index: 100;
  background: $color_success;
  width: 100%;
  max-width: 390px;
  height: 50px;
  display: flex;
  justify-content: center;
  align-items: center;

  &-title {
    font-size: 12px;
    color: $color_white;
  }
}
</style>
これでAtomsは完成です。
次に、Moleculesを作成していきます。
Header.vue
なぜ作るのか
サイトのヘッダーデザインです。
では作っていきます
<template>
  <header class="header">
    <p class="header-title">LIFF's Shop</p>
  </header>
</template>

<script>
export default {};
</script>

<style lang="scss" scoped>
.header {
  position: fixed;
  background: $color_black;
  width: 100%;
  max-width: 390px;
  height: 50px;
  display: flex;
  justify-content: center;
  align-items: center;

  &-title {
    font-size: 20px;
    color: $color_white;
    font-weight: bold;
  }
}
</style>
Hero.vue
なぜ作るのか
サイトのヒーローデザインです。
では作っていきます
<template>
  <div>
    <div class="blank-space"></div>
    <div class="hero">
      <img class="hero-img" src="@/assets/images/top.png" alt="ヒーロー" />
    </div>
  </div>
</template>

<script>
export default {};
</script>

<style lang="scss" scoped>
.blank-space {
  padding-top: 50px;
}

.hero {
  height: 300px;

  &-img {
    width: 390px;
    height: 300px;
  }
}
</style>
Registration.vue
なぜ作るのか
会員登録のデザインです。
こちらには会員登録したユーザーむけに、データの活用方法に関して記載しています。
こちらの記述をすることで、LIFFログインでメールアドレスを取得することができます。
では作っていきます
<template>
  <div class="registration">
    <Heading :main="'Registration'" :sub="'会員登録'" />
    <div class="registration-container">
      <p class="registration-container-text">
        本Webサービスでは、ログイン時の認証画面にて許可を頂いた場合のみ、あなたのLINEアカウントに登録されているメールアドレスを取得します。
      </p>
      <p class="registration-container-text">
        取得したメールアドレスは、HubSpotにユーザー登録するIDとして利用する目的以外では使用いたしません。また、法令に定められた場合を除き、第三者への提供はいたしません。
      </p>
      <div class="registration-container-image">
        <img src="@/assets/images/line.png" alt="LINEログイン" @click="childLineLogin" />
      </div>
    </div>
  </div>
</template>

<script>
// components
import Heading from '@/components/Atoms/Heading';
export default {
  components: {
    Heading,
  },
  props: {
    lineLogin: {
      type: Function,
      required: true,
    },
  },
  methods: {
    childLineLogin() {
      this.lineLogin();
    },
  },
};
</script>

<style lang="scss" scoped>
.registration-container {
  width: 250px;
  margin: 0 auto;
  background: $color_white;
  padding: 20px;

  &-text {
    font-size: 0.5rem;
    line-height: 1.5;
    padding-bottom: 10px;
  }

  &-image {
    padding-top: 20px;
    text-align: center;
  }
}
</style>
LINEログインの時に「ユーザーのメールアドレス」を取得できるようにしましょう
ということでここまでをgithubに、コミット、プッシュしましょう。
そしてこの情報取り扱いに関する記述をした部分をスクショしましょう!
それでは、LINEにメールアドレス取得権限を付与してもらいましょう。

結構すぐに権限がもらえるはずです。
画像認識等をしているんでしょうね〜〜
「申請済み」になったらOKなので、スコープを付与しましょう。

これでLINEログインの際にメールアドレスが取得できるようになりました!
これでMoleculesは完成です。
次に、Templateを作成していきます。
Cancel.vue
なぜ作るのか
Stripeの決済を行う際に、キャンセルページが必要なため作成します。
では作っていきます
<template>
  <div class="container">
    <Header />
    <div class="message">
      <p class="message-text">商品購入に失敗しました。</p>
      <p class="message-text">もう一度ご確認ください。</p>
      <LinkButton />
    </div>
  </div>
</template>

<script>
// components
import Header from '@/components/Molecules/Header';
import LinkButton from '@/components/Atoms/LinkButton';
export default {
  components: {
    Header,
    LinkButton,
  },
};
</script>

<style lang="scss">
.container {
  margin: 0 auto;
  background: $color_gray;
  height: 100vh;
  width: 100%;
  max-width: 390px;
  padding-bottom: 60px;
}
.message {
  padding-top: 70px;

  &-text {
    padding: 0 10px;
    line-height: 1.5;
  }
}
</style>
では、キャンセルページの作成をしましょう。
<template>
  <div>
    <Cancel />
  </div>
</template>

<script>
// components
import Cancel from '@/components/Template/Cancel';
export default {
  components: {
    Cancel,
  },
};
</script>
Index.vue
なぜ作るのか
TOPページです。
こちらでは、MicroCMSに登録した商品を受け取る処理を記載する必要があります。
なので、まずはMicroCMSの商品登録を行いましょう。
MicroCMSへ商品登録を行う
まずはアカウントを作成しましょう。
作成方法に関することは公式サイトのブログがわかりやすいのでこちらを参考にされてください。
下記のようなスキーマを作成していきます。
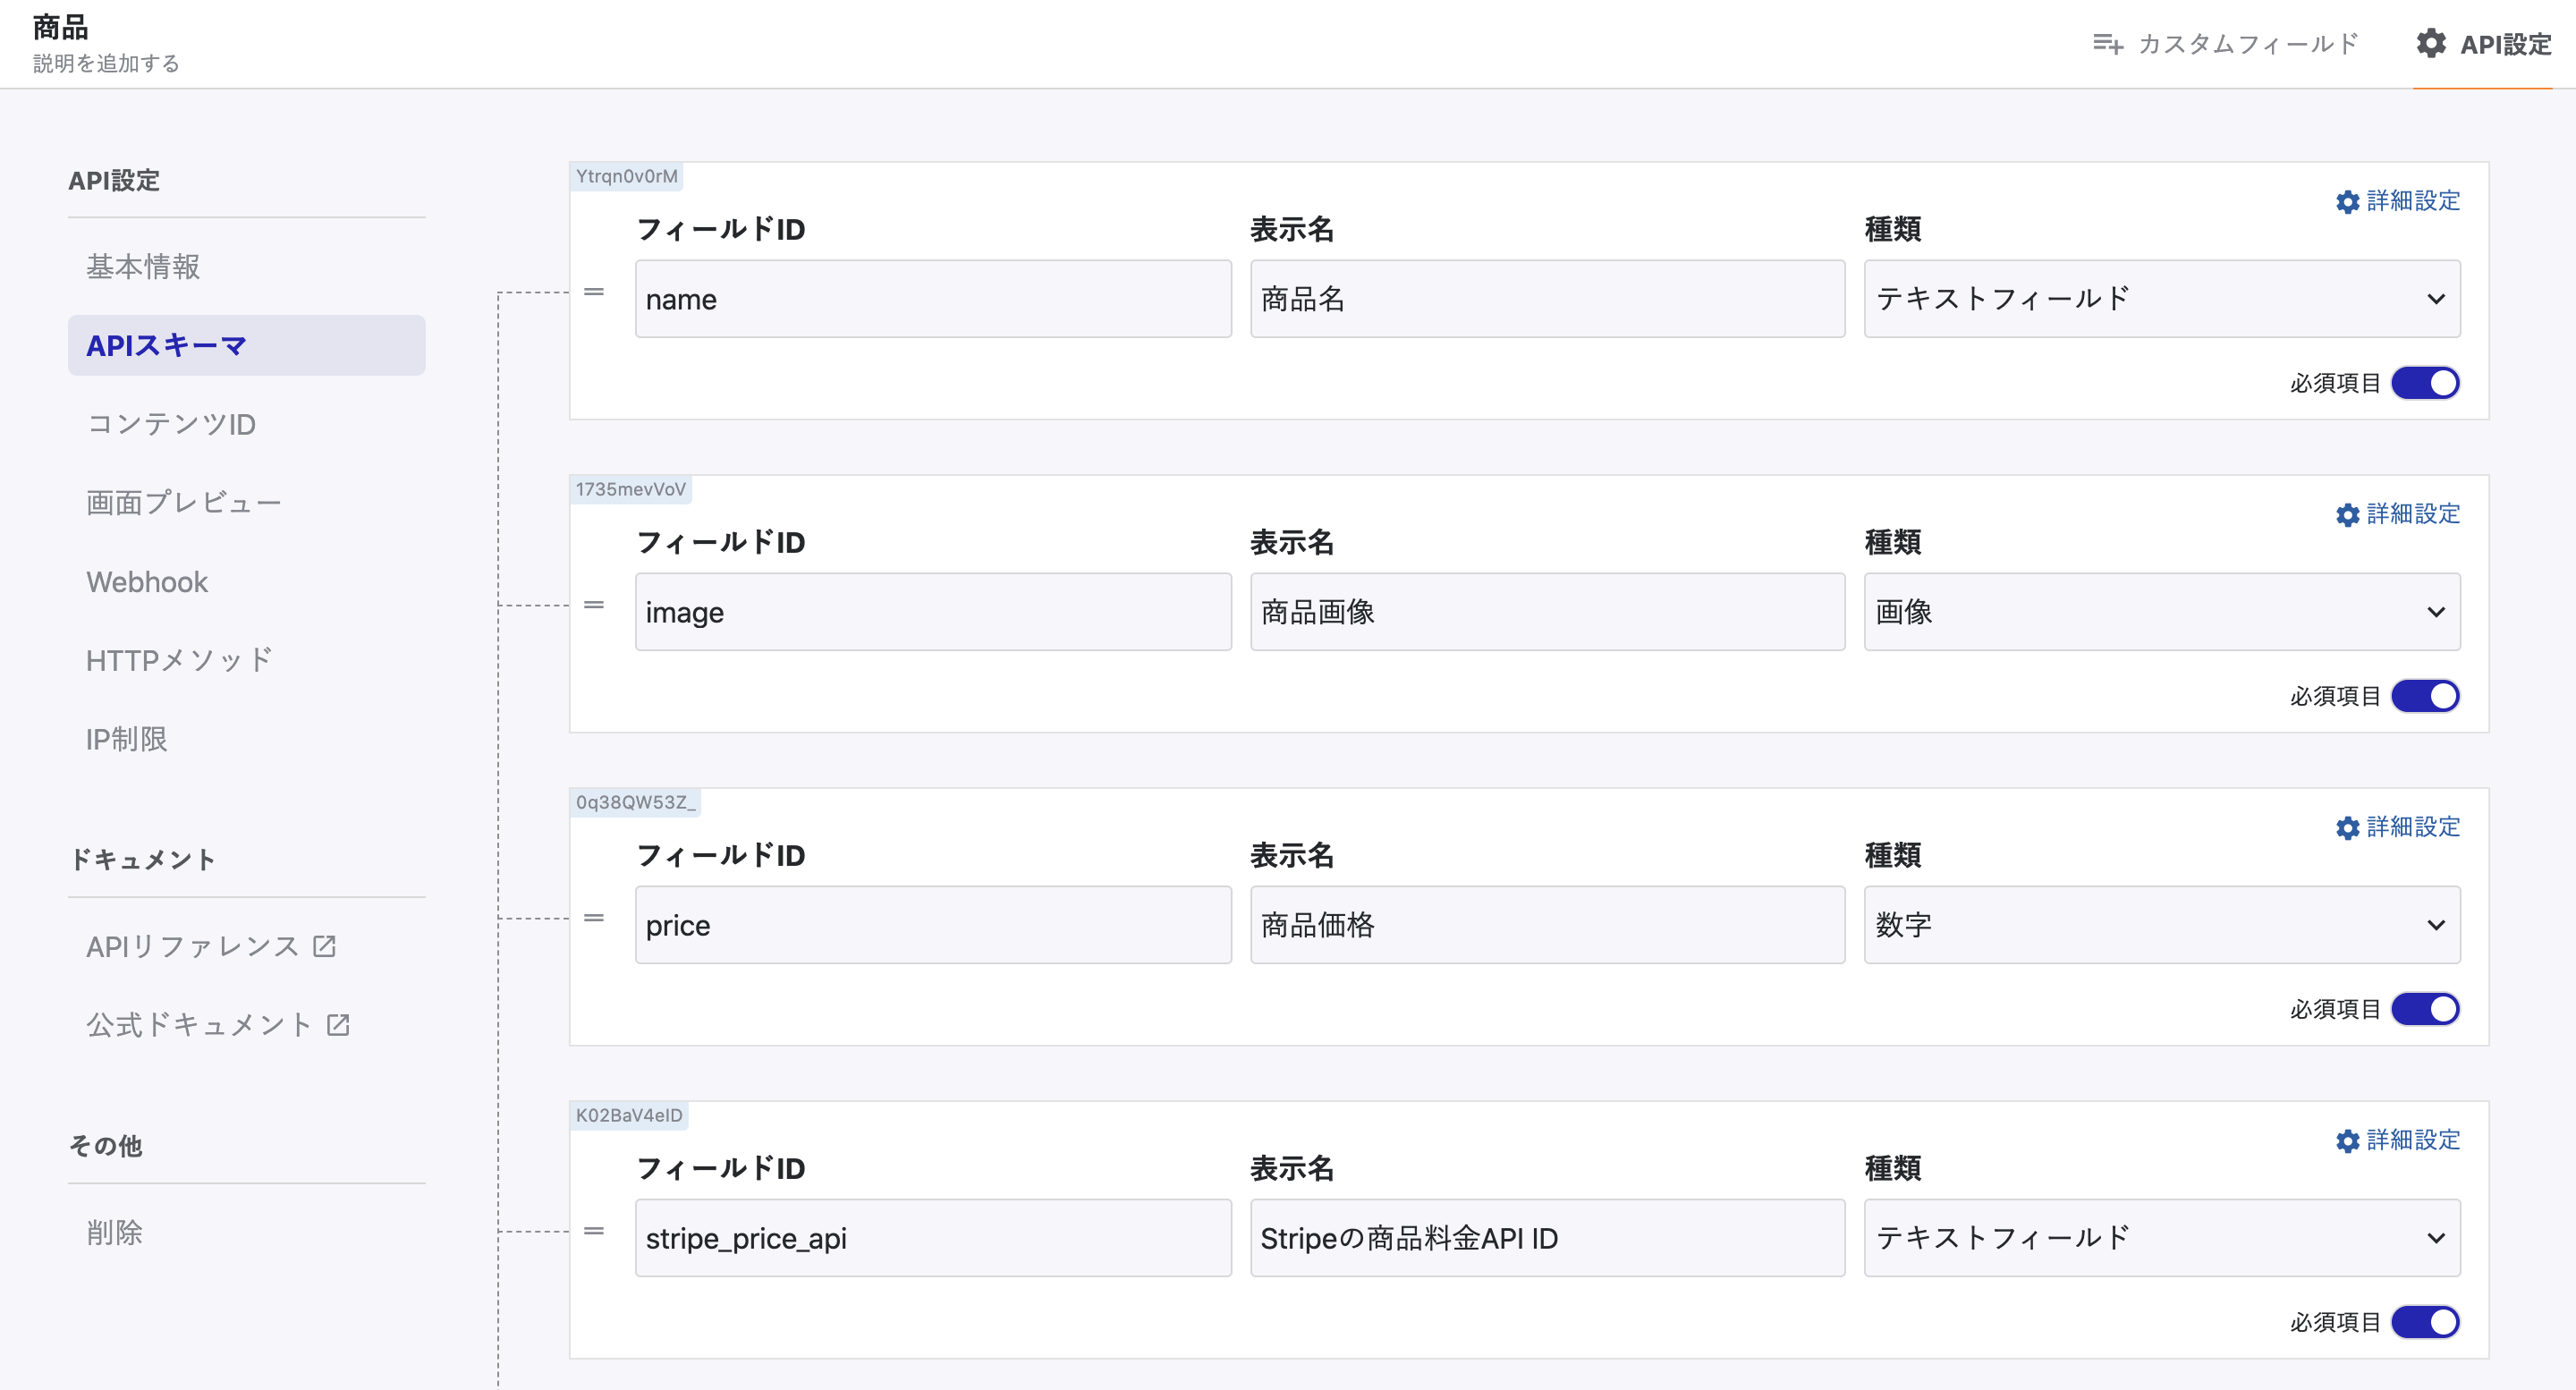
Stripeの商品料金API IDは後ほど取得しますので今は適当な値を埋めておきましょう。
ということでこんな感じで3つ程度商品登録をしましょう!

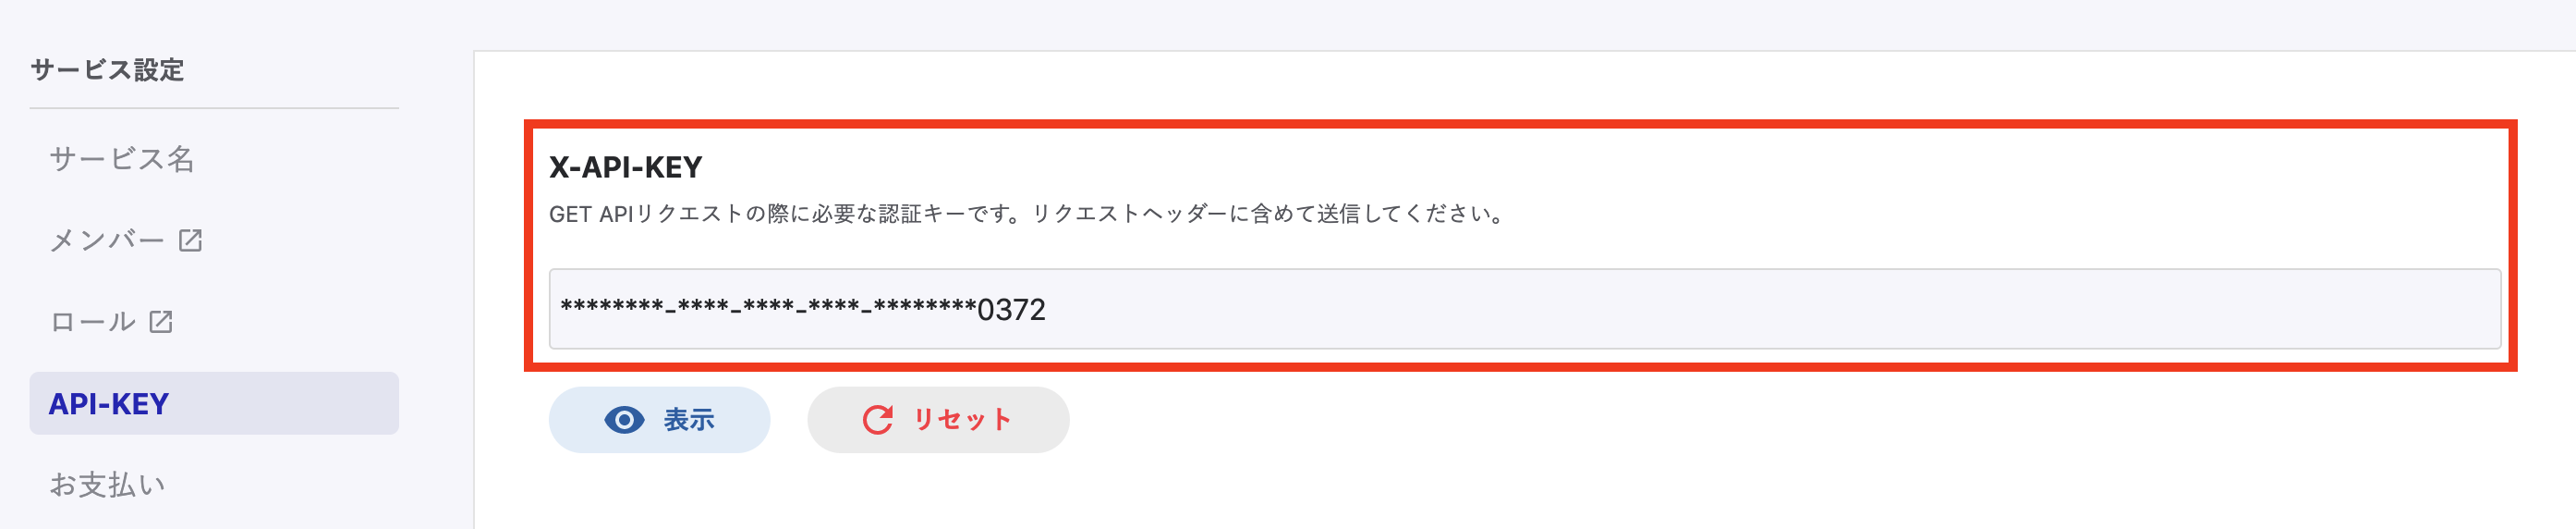
APIキーも必要になるので取得してNetlifyに登録しましょう。
では登録しましょう。

では作っていきます
MicroCMSのデータを取得していきましょう。
asyncDataはpagesディレクトリでないとできないのでまずはpages/index.vueを作成します。
<template>
  <div>
    <Index :products="products" />
  </div>
</template>

<script>
// components
import Index from '@/components/Template/Index';

export default {
  components: {
    Index,
  },
+ async asyncData({ $axios }) {
+   const products = await $axios.$get('https://liff-nuxt-laravel.microcms.io/api/v1/product', {
+     headers: { 'X-API-KEY': process.env.MICROCMS_API_KEY },
+   });
+   return { products };
  },
  data() {
    return {
      products: '',
    };
  },
  async mounted() {
    await liff.init({
      liffId: process.env.LIFF_ID,
    });
  },
};
</script>
では、Templateを作成します。
<template>
  <div class="container">
    <div v-if="isSuccess">
      <SuccessAlert />
    </div>
    <div v-if="isFail">
      <FailAlert />
    </div>
    <Header />
    <Hero />
    <Registration :lineLogin="lineLogin" />
    <div class="product">
      <Heading :main="'Product'" :sub="'商品'" />
      <div class="card">
        <div class="card-container" v-for="product in products.contents" :key="product.id">
          <img class="card-product-img" :src="product.image.url" />
          <p class="card-product-name">{{ product.name }}</p>
          <p class="card-product-price">¥{{ product.price }}</p>
          <div class="button">
            <button v-if="idToken" class="button-btn" @click="checkout(product)">購入する</button>
            <button v-else class="button-btn disabled" disabled>購入する</button>
          </div>
        </div>
      </div>
    </div>
  </div>
</template>

<script>
// components
import Heading from '@/components/Atoms/Heading';
import SuccessAlert from '@/components/Atoms/SuccessAlert';
import FailAlert from '@/components/Atoms/FailAlert';
import Header from '@/components/Molecules/Header';
import Hero from '@/components/Molecules/Hero';
import Registration from '@/components/Molecules/Registration';

export default {
  components: {
    Heading,
    SuccessAlert,
    FailAlert,
    Header,
    Hero,
    Registration,
  },
  props: {
    products: {
      type: Object,
      required: true,
    },
  },
  data() {
    return {
      idToken: '',
      isSuccess: false,
      isFail: false,
    };
  },
  updated() {
    setTimeout(() => {
      this.isSuccess = false;
    }, 3000);
    setTimeout(() => {
      this.isFail = false;
    }, 3000);
  },
  methods: {
    async lineLogin() {
      try {
        // IDトークン
        this.idToken = liff.getIDToken();
        if (this.idToken) {
          await this.$axios.$post('/hubspot/store', {
            idToken: this.idToken,
          });
          this.isSuccess = true;
        } else {
          this.isFail = true;
        }
      } catch (err) {
        alert(err);
        alert(err.response.data.error);
        alert(err.response.data.error_description);
      }
    },
    async checkout(product) {
      const url = await this.$axios.$post('/stripe/store', {
        productStripePriceApi: product.stripe_price_api,
        idToken: this.idToken,
      });
      if (url) {
        window.location.href = url;
      }
    },
  },
};
</script>

<style lang="scss">
.container {
  margin: 0 auto;
  background: $color_gray;
  width: 100%;
  max-width: 390px;
  padding-bottom: 60px;
}

.card {
  &-container {
    border-radius: 10px;
    background: $color_white;
    width: 250px;
    height: 300px;
    margin: 0 auto 30px auto;
  }

  &-product {
    &-img {
      border-radius: 10px 10px 0 0;
      width: 250px;
      height: 150px;
    }

    &-name {
      padding: 20px 0 0 20px;
    }

    &-price {
      padding: 20px 0 20px 20px;
      font-weight: bold;
    }
  }
}

.button {
  text-align: center;
  &-btn {
    display: inline-block;
    width: 200px;
    height: 40px;
    font-size: 18px;
    font-weight: bold;
    background: $color_yellow;
    border-color: transparent;

    &.disabled {
      color: $color_deep_gray;
      background: $color_gray;
    }
  }
}
</style>
本当はCardの部分もコンポーネント化してあげる方がいいのですが今回はデータのやり取りがめんどくさかったので諦めましたw
Success.vue
なぜ作るのか
Stripeの決済を行う際に、サクセスページが必要なため作成します。
では作っていきます
<template>
  <div class="container">
    <Header />
    <div class="message">
      <p class="message-text">ご購入ありがとうございます!</p>
      <p class="message-text">ご不明点がありましたらお気軽にご連絡ください。</p>
      <LinkButton />
    </div>
  </div>
</template>

<script>
// components
import Header from '@/components/Molecules/Header';
import LinkButton from '@/components/Atoms/LinkButton';
export default {
  components: {
    Header,
    LinkButton,
  },
};
</script>

<style lang="scss">
.container {
  margin: 0 auto;
  background: $color_gray;
  height: 100vh;
  width: 100%;
  max-width: 390px;
  padding-bottom: 60px;
}
.message {
  padding-top: 70px;

  &-text {
    padding: 0 10px;
    line-height: 1.5;
  }
}
</style>
では、サクセスページの作成をしましょう。
<template>
  <div>
    <Success />
  </div>
</template>

<script>
// components
import Success from '@/components/Template/Success';
export default {
  components: {
    Success,
  },
};
</script>
これでフロントエンドの開発は終了です。
ではこの後はLINEログインをやっていきましょう。
LINEログインでプロフィールを取得する
LIFFでのログインは、liff.getDecodedIDToken()が一番簡単です。
これで名前もメールアドレスもすべて取得することができます。
しかし、ユーザー情報をサーバーに送信しないでくださいとあるようにセキュリティの問題があります。
ということで、以下のように行います。
| フロントエンド | バックエンド |
|---|---|
| ①IDトークンを取得 | |
| ②IDトークンをサーバーに渡す | |
| ③IDトークンを検証して、ユーザーのプロフィールを取得する |
ということでやっていきましょう。
①IDトークンを取得
IDトークンの取得方法は簡単です。
<template>
  <div class="container">
    <Registration :lineLogin="lineLogin" />
  </div>
</template>

<script>
// components
import Registration from '@/components/Molecules/Registration';

export default {
  components: {
    Registration,
  },
  data() {
    return {
      idToken: '',
    };
  },
  methods: {
    async lineLogin() {
      try {
        // IDトークン
+       this.idToken = liff.getIDToken();
      } catch (err) {
        alert(err);
        alert(err.response.data.error);
        alert(err.response.data.error_description);
      }
    },
  },
};
</script>
<template>
  <div class="registration">
    <Heading :main="'Registration'" :sub="'会員登録'" />
    <div class="registration-container">
      <p class="registration-container-text">
        本Webサービスでは、ログイン時の認証画面にて許可を頂いた場合のみ、あなたのLINEアカウントに登録されているメールアドレスを取得します。
      </p>
      <p class="registration-container-text">
        取得したメールアドレスは、HubSpotにユーザー登録するIDとして利用する目的以外では使用いたしません。また、法令に定められた場合を除き、第三者への提供はいたしません。
      </p>
      <div class="registration-container-image">
        <img src="@/assets/images/line.png" alt="LINEログイン" @click="childLineLogin" />
      </div>
    </div>
  </div>
</template>

<script>
// components
import Heading from '@/components/Atoms/Heading';
export default {
  components: {
    Heading,
  },
  props: {
    lineLogin: {
      type: Function,
      required: true,
    },
  },
  methods: {
    childLineLogin() {
      this.lineLogin();
    },
  },
};
</script>
②IDトークンをサーバーに渡す
取得したIDトークンをLaravelに渡してあげます。
<template>
  <div class="container">
    <div class="product">
      <Heading :main="'Product'" :sub="'商品'" />
      <div class="card">
        <div class="card-container" v-for="product in products.contents" :key="product.id">
          <img class="card-product-img" :src="product.image.url" />
          <p class="card-product-name">{{ product.name }}</p>
          <p class="card-product-price">¥{{ product.price }}</p>
          <div class="button">
            <button v-if="idToken" class="button-btn" @click="checkout(product)">購入する</button>
            <button v-else class="button-btn disabled" disabled>購入する</button>
          </div>
        </div>
      </div>
    </div>
  </div>
</template>

<script>
// components
import Heading from '@/components/Atoms/Heading';

export default {
  components: {
    Heading,
  },
  props: {
    products: {
      type: Object,
      required: true,
    },
  },
  data() {
    return {
      idToken: '',
    };
  },
  methods: {
    async lineLogin() {
      try {
        // IDトークン
        this.idToken = liff.getIDToken();
+       if (this.idToken) {
+         await this.$axios.$post('/hubspot/store', {
+           idToken: this.idToken,
+         });
+       }
      } catch (err) {
        alert(err);
        alert(err.response.data.error);
        alert(err.response.data.error_description);
      }
    },
  },
};
</script>
③IDトークンを検証して、ユーザーのプロフィールを取得する
プロフィールを取得するには、ルーティングとコントローラーの2つが必要になります。
ルーティング
<?php

use Illuminate\Http\Request;

/*
|--------------------------------------------------------------------------
| API Routes
|--------------------------------------------------------------------------
*/

Route::get("/", function () {
  return "Hello World!";
});

// HubSpotにユーザーを登録する
+ Route::post("/hubspot/store", "HubSpotController@store");
コントローラー
コントローラーを作成しましょう。
$ php artisan make:controller HubSpotController --resource
また、Guzzleを使用するのでGuzzleをインストールしましょう。
$ composer require guzzlehttp/guzzle
次に、.envを使うのでconfigからアクセスさせましょう。
env()を使ってはいけない理由などは以下の記事を見てみてください。
<?php

return [
  "line_client_id" => env("LINE_CLIENT_ID"),
];
また、Herokuの.envの値も確認しておきましょう。
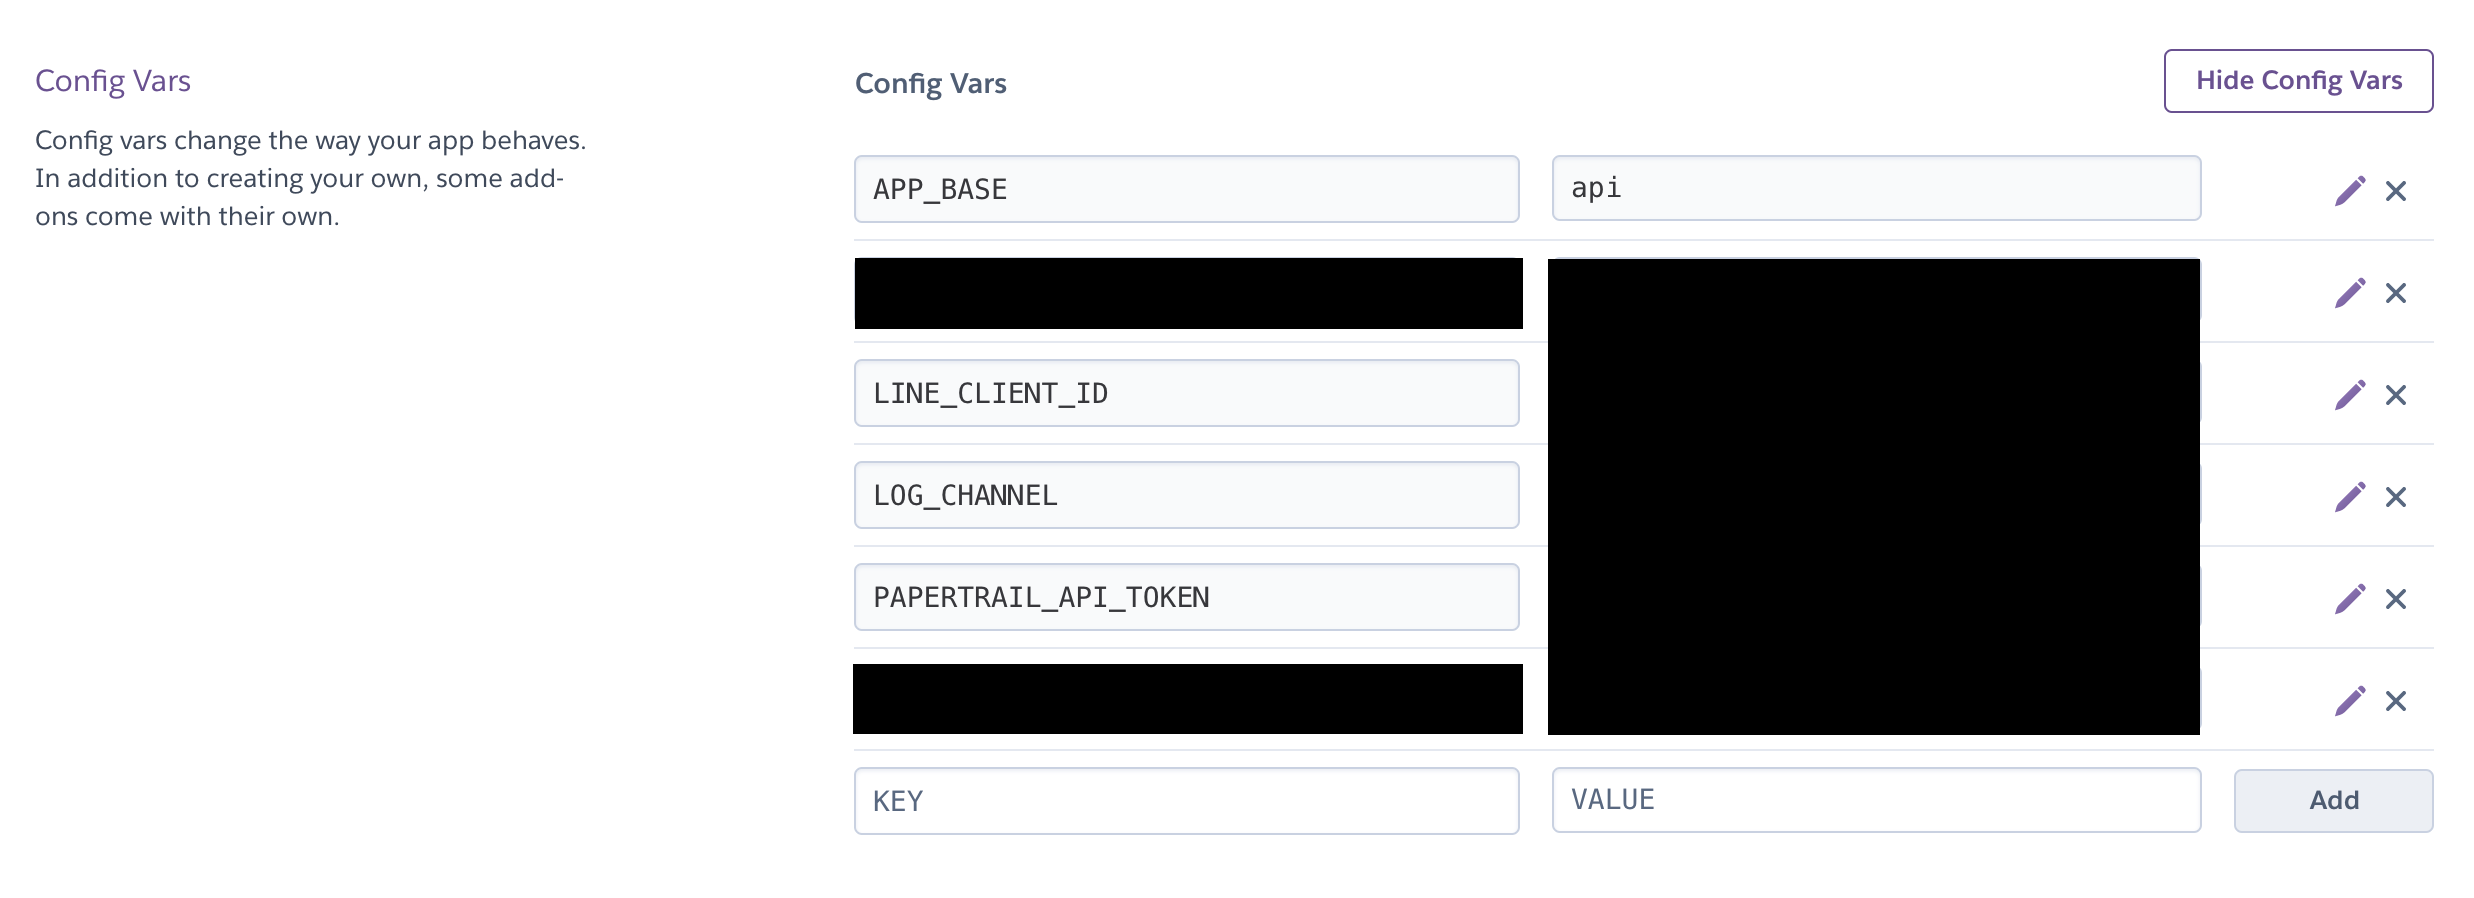
.envの値をコントローラー内で取得しましょう。
<?php

namespace App\Http\Controllers;

use Illuminate\Http\Request;
use GuzzleHttp\Client;

// Log
use Illuminate\Support\Facades\Log;

class HubSpotController extends Controller
{
  public function store(Request $request)
  {
    try {
      // request
      $idToken = $request->input("idToken");
      Log::info($idToken);

      // env
+     $clientID = config("env.line_client_id");
      Log::info($clientID);
    } catch (\GuzzleHttp\Exception\BadResponseException $e) {
      Log::info($e);
      return $e->getResponse()->getBody()->getContents();
    }
  }
}
では、IDトークンを検証してユーザーのプロフィールとメールアドレスを取得しましょう!
<?php

namespace App\Http\Controllers;

use Illuminate\Http\Request;
use GuzzleHttp\Client;

// Log
use Illuminate\Support\Facades\Log;

class HubSpotController extends Controller
{
  public function store(Request $request)
  {
    try {
      // request
      $idToken = $request->input("idToken");
      Log::info($idToken);

      // env
      $clientID = config("env.line_client_id");
      Log::info($clientID);

      // guzzle
+     $client = new Client();
+     $response = $client->request("POST", "https://api.line.me/oauth2/v2.1/verify", [
+       "form_params" => [
+         "id_token" => $idToken,
+         "client_id" => $clientID
+       ]
+     ]);
    } catch (\GuzzleHttp\Exception\BadResponseException $e) {
      Log::info($e);
      return $e->getResponse()->getBody()->getContents();
    }
  }
}
では次にこの取得した名前やメールアドレスをHubSpotに登録させましょう。
まずはHubSpotのAPIを取得しましょう。

このAPIをHerokuの.envに入力しましょう。

次に、.envを使うのでconfigからアクセスさせましょう。
<?php

return [
  "line_client_id" => env("LINE_CLIENT_ID"),
+ "hubspot_api_key" => env("HUBSPOT_API_KEY"),
];
最後にコントローラーを作成します。
LINEログイン情報を使用してHubSpotのコンタクトを作成するので、POST /crm/v3/objects/contactsを使います。
今回は、cURLコマンドで作成します。
<?php

namespace App\Http\Controllers;

use Illuminate\Http\Request;
use GuzzleHttp\Client;

// Log
use Illuminate\Support\Facades\Log;

class HubSpotController extends Controller
{
  public function store(Request $request)
  {
    try {
      // request
      $idToken = $request->input("idToken");

      // env
      $clientID = config("env.line_client_id");
+     $HubSpotApiKey = config("env.hubspot_api_key");

      // guzzle
      $client = new Client();
      $response = $client->request("POST", "https://api.line.me/oauth2/v2.1/verify", [
        "form_params" => [
          "id_token" => $idToken,
          "client_id" => $clientID
        ]
      ]);

      // HubSpot Value
+     $profile = json_decode($response->getBody()->getContents(), true);
+     $profileName = $profile["name"];
+     $profileEmail = $profile["email"];
      // Log::info($profile["name"]);
      // Log::info($profile["email"]);

      // Register HubSpot
+     $data = array(
+       "properties" => [
+         "email" => $profileEmail,
+         "firstname" => $profileName
+       ]
+     );

+     $formParams = json_encode($data, JSON_UNESCAPED_UNICODE);
      // Log::info($formParams);

      // cURL
+     $curl = curl_init();
+     curl_setopt_array($curl, array(
+       CURLOPT_URL => "https://api.hubapi.com/crm/v3/objects/contacts?hapikey=" . $HubSpotApiKey,
+       CURLOPT_RETURNTRANSFER => true,
+       CURLOPT_ENCODING => "",
+       CURLOPT_MAXREDIRS => 10,
+       CURLOPT_TIMEOUT => 30,
+       CURLOPT_HTTP_VERSION => CURL_HTTP_VERSION_1_1,
+       CURLOPT_CUSTOMREQUEST => "POST",
+       CURLOPT_POSTFIELDS => $formParams,
+       CURLOPT_HTTPHEADER => array(
+         "accept: application/json",
+         "content-type: application/json"
+       ),
+     ));
+     $response = curl_exec($curl);
+     $err = curl_error($curl);
+     curl_close($curl);

+     if ($err) {
+       Log::info($err);
+     } else {
+       Log::info($response);
+     }
    } catch (\GuzzleHttp\Exception\BadResponseException $e) {
      Log::info($e);
      return $e->getResponse()->getBody()->getContents();
    }
  }
}
これでHubSpotにユーザー登録が可能になりました。
それでは最後にStripeを使って決済を行いましょう。
Stripeで決済を作成する
Stripeで決済を作成するには以下のように進めていきます。
| フロントエンド | バックエンド | サービス |
|---|---|---|
| ①Stripeに商品登録を行う | ||
| ②StripeのAPIを取得する | ||
| ③IDトークンとStripeの商品IDをバックエンドに渡す | ||
| ④IDトークンを検証して、ユーザーのプロフィールを取得する | ||
| ⑤Stripeで決済処理を行う | ||
| ⑥決済画面をフロントエンドに渡す | ||
| ⑦決済画面へページ移動させる |
①Stripeに商品登録を行う
「商品を追加」から商品を登録します。
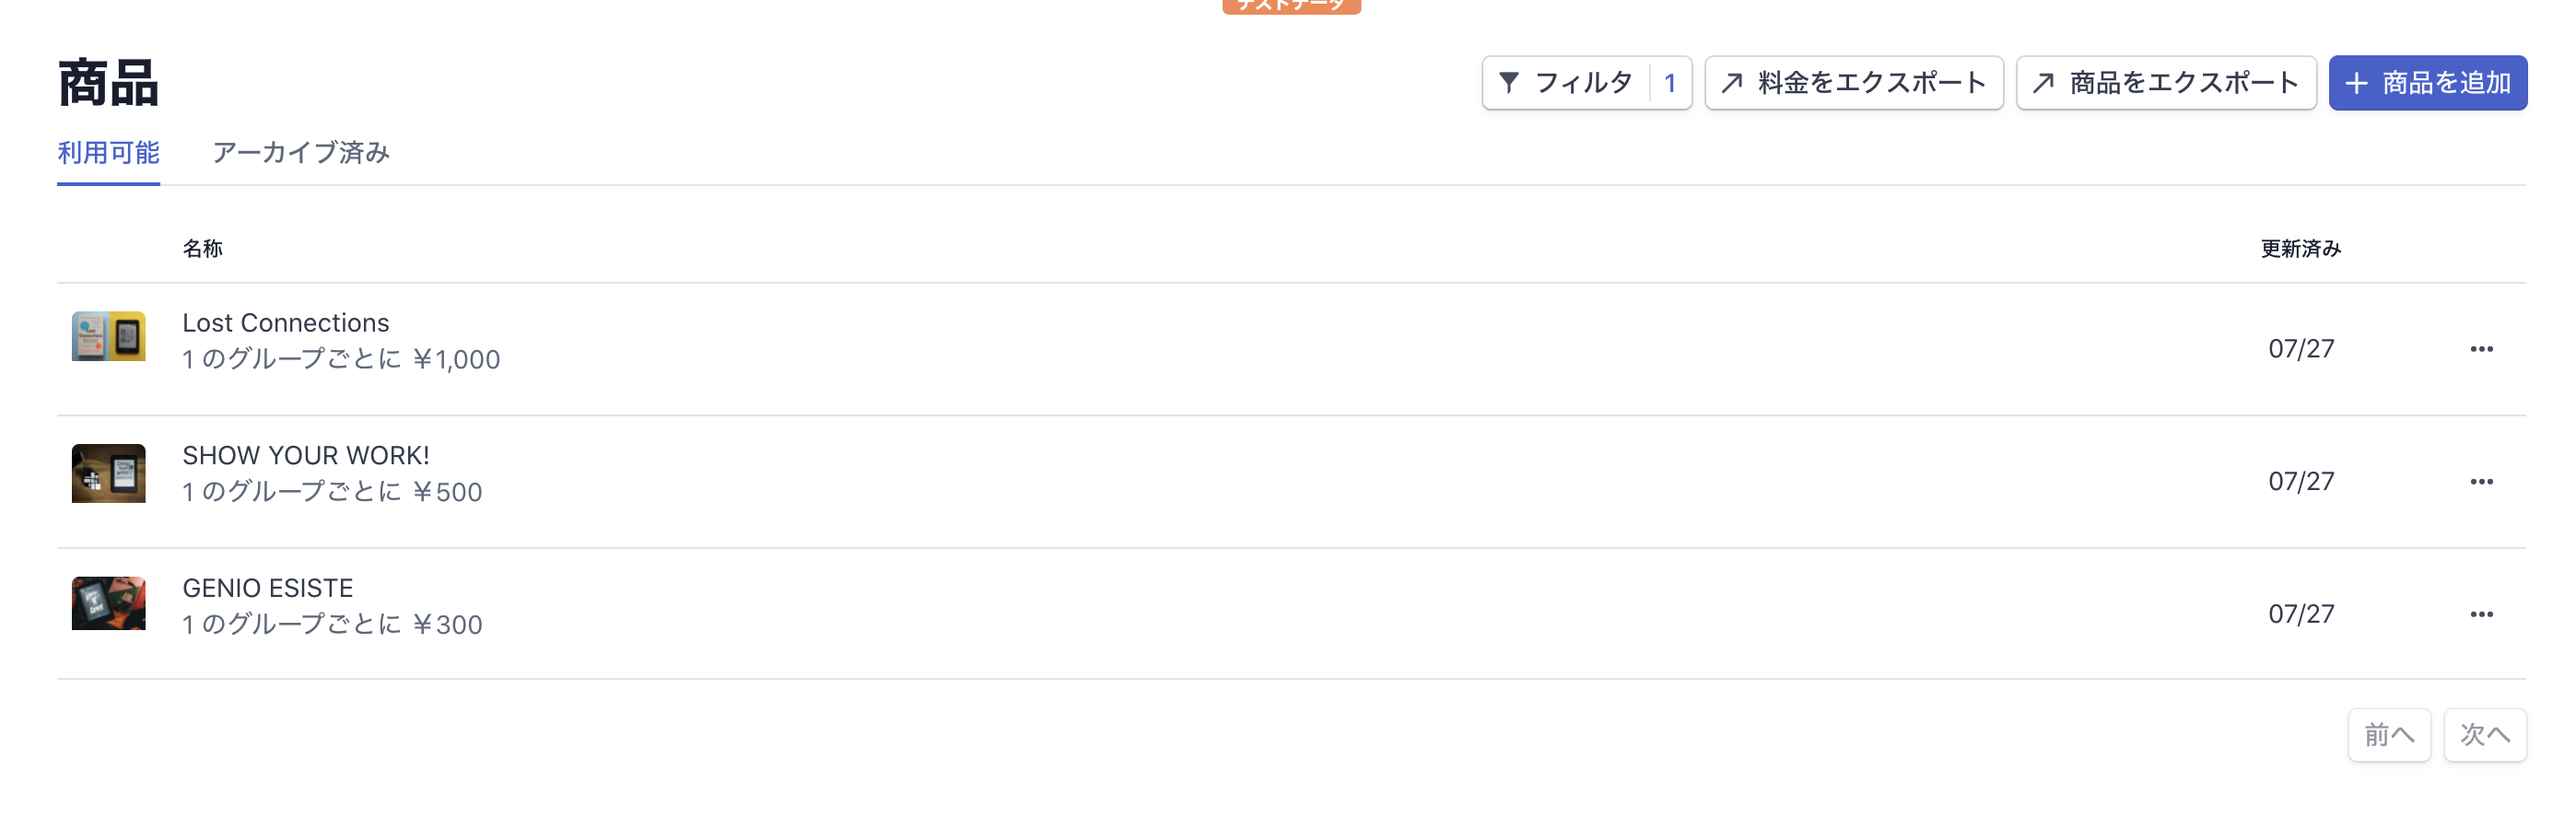
商品詳細ページにAPI IDがあるのでこちらをMicro CMSに入力しましょう。

②StripeのAPIを取得する
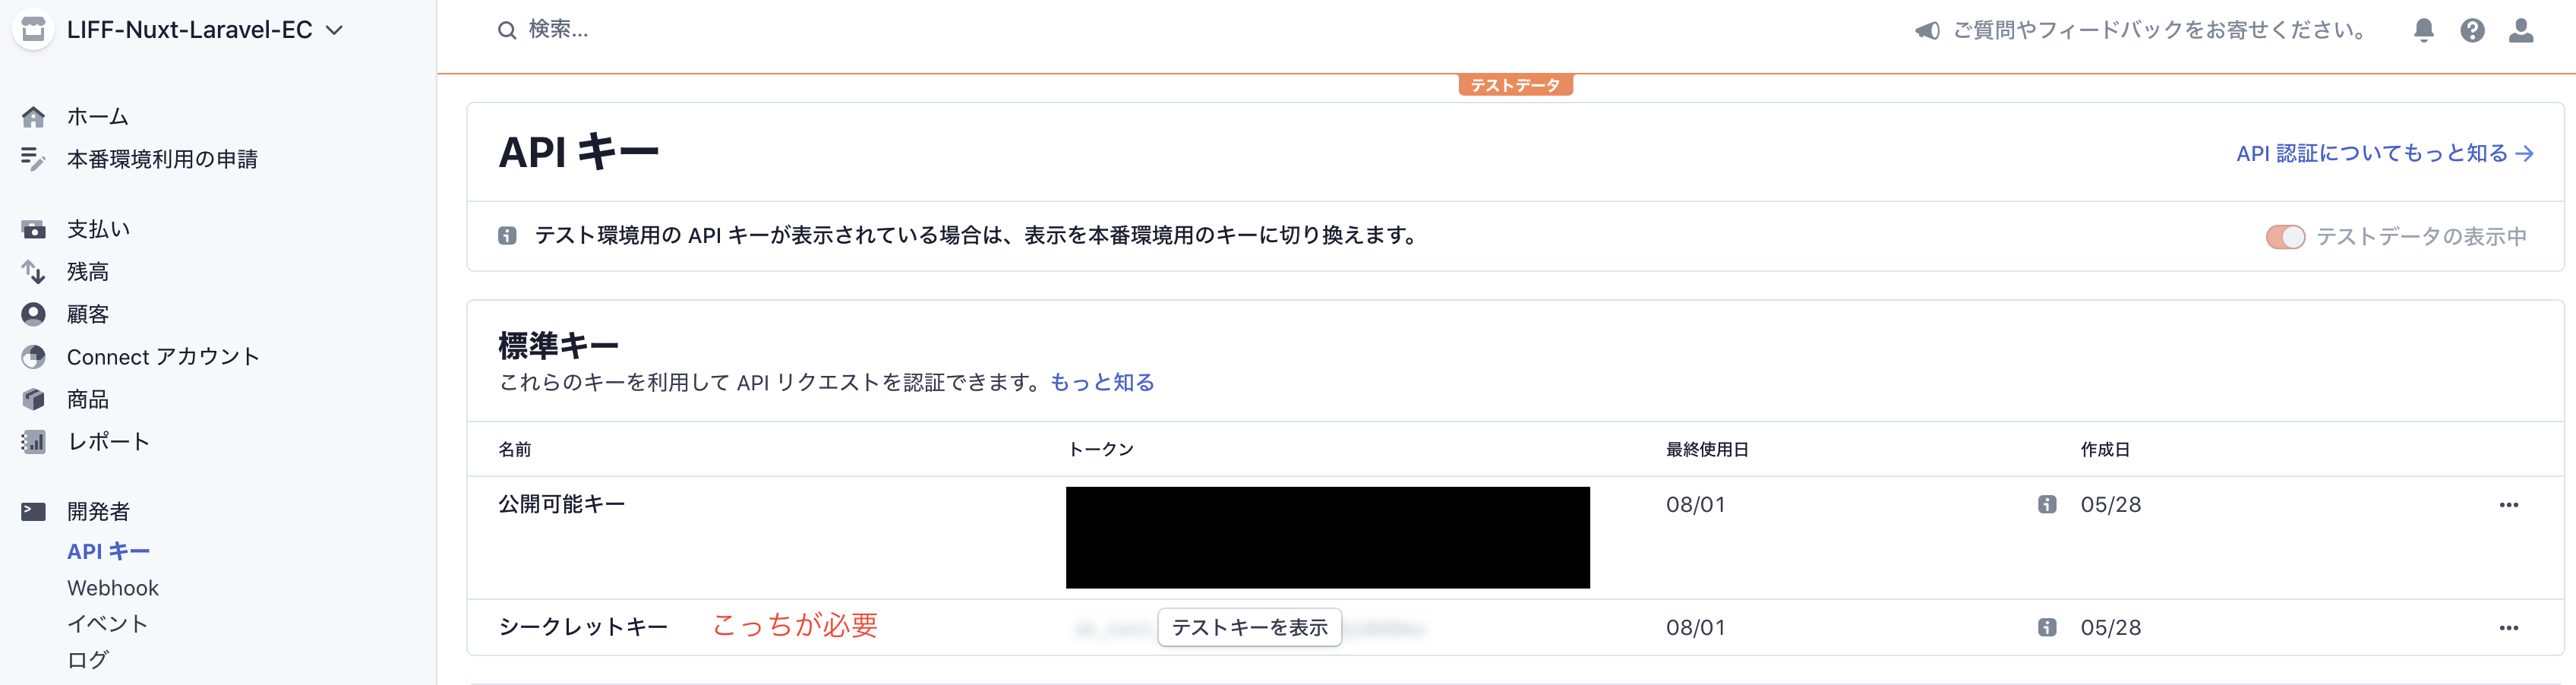
APIが取得できたらこれをHerokuに登録します。

これでOKです!
③IDトークンとStripeの商品IDをバックエンドに渡す
<template>
  <div class="container">
    <div class="product">
      <Heading :main="'Product'" :sub="'商品'" />
      <div class="card">
        <div class="card-container" v-for="product in products.contents" :key="product.id">
          <img class="card-product-img" :src="product.image.url" />
          <p class="card-product-name">{{ product.name }}</p>
          <p class="card-product-price">¥{{ product.price }}</p>
          <div class="button">
            <button v-if="idToken" class="button-btn" @click="checkout(product)">購入する</button>
            <button v-else class="button-btn disabled" disabled>購入する</button>
          </div>
        </div>
      </div>
    </div>
  </div>
</template>

<script>
// components
import Heading from '@/components/Atoms/Heading';

export default {
  components: {
    Heading,
  },
  props: {
    products: {
      type: Object,
      required: true,
    },
  },
  data() {
    return {
      idToken: '',
    };
  },
  methods: {
    async lineLogin() {
      try {
        // IDトークン
        this.idToken = liff.getIDToken();
        if (this.idToken) {
          await this.$axios.$post('/hubspot/store', {
            idToken: this.idToken,
          });
        }
      } catch (err) {
        alert(err);
        alert(err.response.data.error);
        alert(err.response.data.error_description);
      }
    },
+   async checkout(product) {
+     const url = await this.$axios.$post('/stripe/store', {
+       productStripePriceApi: product.stripe_price_api,
+       idToken: this.idToken,
+     });
+   },
  },
};
</script>
④IDトークンを検証して、ユーザーのプロフィールを取得する
これは先ほどやったことと全く同じですね。
まずはルーティングから作成しましょう。
<?php

use Illuminate\Http\Request;

/*
|--------------------------------------------------------------------------
| API Routes
|--------------------------------------------------------------------------
*/

Route::get("/", function () {
  return "Hello World!";
});

// HubSpotにユーザーを登録する
Route::post("/hubspot/store", "HubSpotController@store");

// Stripeを使って決済を行う
+ Route::post("/stripe/store", "PayloadController@store");
では次にコントローラーの作成をしましょう。
$ php artisan make:controller PayloadController --resource
コントローラーの記述をしていきます。
<?php

namespace App\Http\Controllers;

use Illuminate\Http\Request;
// guzzle
use GuzzleHttp\Client;

class PayloadController extends Controller
{
  public function store(Request $request)
  {
    // line
+   $idToken = $request->input("idToken");

    // env
+   $clientID = config("env.line_client_id");

    // guzzle
+   $client = new Client();
+   $response = $client->request("POST", "https://api.line.me/oauth2/v2.1/verify", [
+     "form_params" => [
+       "id_token" => $idToken,
+       "client_id" => $clientID
+     ]
+   ]);

+   $profile = json_decode($response->getBody()->getContents(), true);
+   $profileEmail = $profile["email"];
  }
}
⑤Stripeで決済処理を行う
Stripeで決済処理を行うには、checkoutを使用します。
公式サイトに具体的なやり方が書いてあるのでこちらに倣ってやっていきます。
まずはライブラリをインストールします
$ composer require stripe/stripe-php
checkoutセッションを作成する
<?php

namespace App\Http\Controllers;

use Illuminate\Http\Request;
// stripe
use Stripe\Stripe;
use Stripe\Checkout\Session;
// guzzle
use GuzzleHttp\Client;

class PayloadController extends Controller
{
  public function store(Request $request)
  {
    // $request
    // line
    $idToken = $request->input("idToken");
    // product
+   $productStripePriceApi = $request->input("productStripePriceApi");

    // env
    $clientID = config("env.line_client_id");
+   $stripeApiKey = config("env.stripe_api_key");

    // guzzle
    $client = new Client();
    $response = $client->request("POST", "https://api.line.me/oauth2/v2.1/verify", [
      "form_params" => [
        "id_token" => $idToken,
        "client_id" => $clientID
      ]
    ]);

    $profile = json_decode($response->getBody()->getContents(), true);
    $profileEmail = $profile["email"];

    // API
+   Stripe::setApiKey($stripeApiKey);

    // header
+   header('Content-Type: application/json');

    // domain
+   $domain = "https://liff-nuxt-laravel-ec.netlify.app";

    // checkout
+   $checkout_session = Session::create([
+     'customer_email' => $profileEmail,
+     'payment_method_types' => ['card'],
+     'line_items' => [[
+       'price' => $productStripePriceApi,
+       'quantity' => 1,
+     ]],
+     'mode' => 'payment',
+     'success_url' => $domain . '/success',
+     'cancel_url' => $domain . '/cancel',
+   ]);
  }
}
⑥決済画面をフロントエンドに渡す
公式サイトではリダイレクト処理で決済画面へ移動させていますが、
ページ移動などはフロントエンドで処理したいのでURLをフロントエンド側に渡しましょう。
<?php

namespace App\Http\Controllers;

use Illuminate\Http\Request;
// stripe
use Stripe\Stripe;
use Stripe\Checkout\Session;
// guzzle
use GuzzleHttp\Client;

class PayloadController extends Controller
{
  public function store(Request $request)
  {
    // $request
    // line
    $idToken = $request->input("idToken");
    // product
    $productStripePriceApi = $request->input("productStripePriceApi");

    // env
    $clientID = config("env.line_client_id");
    $stripeApiKey = config("env.stripe_api_key");

    // guzzle
    $client = new Client();
    $response = $client->request("POST", "https://api.line.me/oauth2/v2.1/verify", [
      "form_params" => [
        "id_token" => $idToken,
        "client_id" => $clientID
      ]
    ]);

    $profile = json_decode($response->getBody()->getContents(), true);
    $profileEmail = $profile["email"];

    // API
    Stripe::setApiKey($stripeApiKey);

    // header
    header('Content-Type: application/json');

    // domain
    $domain = "https://liff-nuxt-laravel-ec.netlify.app";

    // checkout
    $checkout_session = Session::create([
      'customer_email' => $profileEmail,
      'payment_method_types' => ['card'],
      'line_items' => [[
        'price' => $productStripePriceApi,
        'quantity' => 1,
      ]],
      'mode' => 'payment',
      'success_url' => $domain . '/success',
      'cancel_url' => $domain . '/cancel',
    ]);

    // return redirect($checkout_session->url, 303, [], true);
+   return $checkout_session->url;
  }
}
⑦決済画面へページ移動させる
これで決済画面ページへ移動されます。
<template>
  <div class="container">
    <div class="product">
      <Heading :main="'Product'" :sub="'商品'" />
      <div class="card">
        <div class="card-container" v-for="product in products.contents" :key="product.id">
          <img class="card-product-img" :src="product.image.url" />
          <p class="card-product-name">{{ product.name }}</p>
          <p class="card-product-price">¥{{ product.price }}</p>
          <div class="button">
            <button v-if="idToken" class="button-btn" @click="checkout(product)">購入する</button>
            <button v-else class="button-btn disabled" disabled>購入する</button>
          </div>
        </div>
      </div>
    </div>
  </div>
</template>

<script>
// components
import Heading from '@/components/Atoms/Heading';

export default {
  components: {
    Heading,
  },
  props: {
    products: {
      type: Object,
      required: true,
    },
  },
  data() {
    return {
      idToken: '',
    };
  },
  methods: {
    async lineLogin() {
      try {
        // IDトークン
        this.idToken = liff.getIDToken();
        if (this.idToken) {
          await this.$axios.$post('/hubspot/store', {
            idToken: this.idToken,
          });
        }
      } catch (err) {
        alert(err);
        alert(err.response.data.error);
        alert(err.response.data.error_description);
      }
    },
    async checkout(product) {
      const url = await this.$axios.$post('/stripe/store', {
        productStripePriceApi: product.stripe_price_api,
        idToken: this.idToken,
      });
+     if (url) {
+       window.location.href = url;
+     }
    },
  },
};
</script>
これで完成です!
お疲れ様でした^ ^
終わりに
せっかくCRMのHubSpotを入れたので、商品購入のログなども残せるようにしたいなーと思います。
この辺も今後チャレンジしていきたいと思います。
また、HubSpotにはLINE接続するアプリもあるので同様の機能が自分自身で準備できるかも試してみたいです。
ここまで読んでいただきありがとうございました!