Dockerについて勉強するついでにPythonとNeo4jの開発環境を作ろうと思ったので記事にしてみました。
docker-composeを用いて、Neo4jのコンテナとPythonのコンテナを用意し、開発環境を作ります。
今回のプログラムはgithubで公開してます。
目次
・前提条件
・要素技術
・ディレクトリ構成
・Dockerfile
・docker-compose
・コンテナ作成
・動作テスト
前提条件
本稿はVisual Studio Code上でRemote-Containersを用いることを前提としています。
各version
Python: 3.10.5
Neo4j: 4.2.5
neo4j-driver: 4.4.4
要素技術
本稿ではDockerとNeo4jを利用しています。
Docker
Dockerはコンテナ型の仮想化技術です。ホスト型の仮想化より軽量で動作します。開発環境の共有を容易にしてくれます。
Neo4j
Neo4jはオープンソースのグラフデータベースです。直感的に理解しやすいクエリ言語Cypherを用いていたり、Djangoなど様々なフレームワークに対応しています。
ディレクトリ構成
neo4j_docker/
       ├ src/
       |   ├ neo4j_test.py
       |   └ search_test.py
       ├ python_docker/
       |     ├ Dockerfile
       |     └ requirements.txt
       └ docker-compose.yml
Dockerfile
Python用のDockerfileを作成します。
FROM python:3.10.5

COPY requirements.txt ./
RUN apt-get update
RUN pip install --upgrade pip
RUN pip install --upgrade setuptools
RUN pip install -r requirements.txt
requirements.txtにはこのコンテナにインストールしたいモジュールを書いておきます。
今回はneo4j-driverを用いてNeo4jにアクセスするのでそれを書いておきます。
neo4j-driver
docker-compose
Neo4jのコンテナとPythonのコンテナをそれぞれ記述します。
docker-composeを用いることで複数のコンテナの構築・管理を一括で管理でき、コンテナ間のネットワークも設定できます。
composeはデフォルトで単一ネットワークに設定してくれるみたいです。
version: '3'

services:
  neo4j:
    image: neo4j:4.2.5
    container_name: my_neo4j
    ports:
      - 7474:7474
      - 7687:7687
    volumes:
      - ./neo4j/data:/data

  python:
    build: ./python_docker
    container_name: my_python3
    tty: true
neo4jコンテナ
Docker-Hubより、neo4j 4.2.5をpullし、コンテナ名をmy_neo4jとしました。
Neo4jで扱うportを指定しておきます。
また、データベースをneo4j/data/に保存します。
pythonコンテナ
Dockerfileのpathを指定し、Dockerfileよりコンテナを作成します。コンテナ名をmy_python3としました。
コンテナ作成
Visual Studio CodeのRemote-Containersを用いてコンテナを作成します。
Remote-Containersが何か、どう実行するのかは上記の記事をみてください。
作成されたroot-dockerコンテナを起動し、http://localhost:7474/browser にアクセスします。
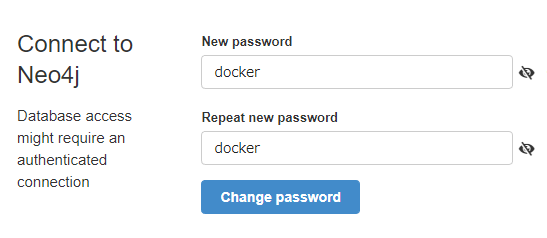
初回ログインをしてpasswordを変更します。
今回は"docker"にしました。
これで準備は整ったので動作確認していきます。
動作テスト
Neo4j公式のテストプログラムを用いて正常に動作するか検証します。
from neo4j import GraphDatabase

class HelloWorldExample:

    def __init__(self, uri, user, password):
        self.driver = GraphDatabase.driver(uri, auth=(user, password))

    def close(self):
        self.driver.close()

    def print_greeting(self, message):
        with self.driver.session() as session:
            greeting = session.write_transaction(self._create_and_return_greeting, message)
            print(greeting)

    @staticmethod
    def _create_and_return_greeting(tx, message):
        result = tx.run("CREATE (a:Greeting) "
                        "SET a.message = $message "
                        "RETURN a.message + ', from node ' + id(a)", message=message)
        return result.single()[0]


if __name__ == "__main__":
    greeter = HelloWorldExample("bolt://my_neo4j:7687", "neo4j", "docker")  # HelloWorldExample(url, user, password)
    greeter.print_greeting("hello, world")
    greeter.close()
通常、Neo4jへのアクセスするurlは、
"bolt://localhost:7687"
ですが、ここでは
"bolt://{コンテナ名}:7687"
になっていることに注意してください。
(ここが分からず、2時間が死んだ)
workspace# python src/neo4j_test.py
hello, world, from node 0
正常にノードが作成できました!
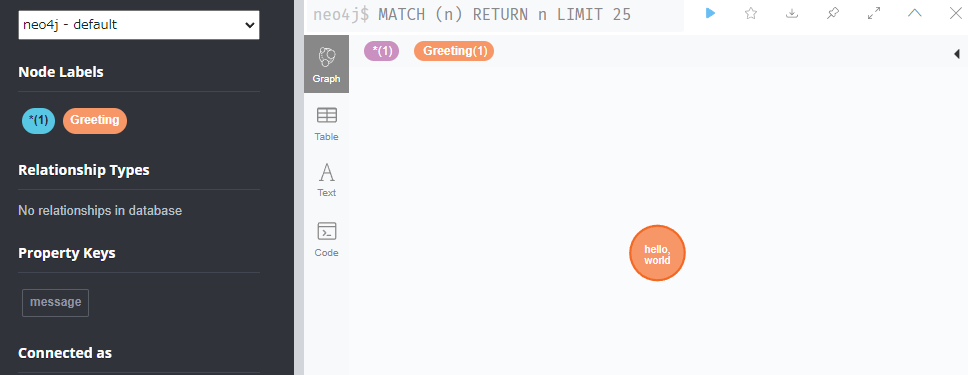
ついでに検索も試してみようと思います。
from neo4j import GraphDatabase

driver = GraphDatabase.driver('bolt://my_neo4j:7687', auth=('neo4j', 'docker'))
session = driver.session()
for i in session.run('MATCH (n) RETURN n LIMIT 25'):
    print(i['n'])
session.close()
workspace# python src/search_test.py
<Node id=0 labels=frozenset({'Greeting'}) properties={'message': 'hello, world'}>
検索も正常にできました!
おわりに
PythonとNeo4jの開発環境をDockerで作成しました。
コンテナ間の通信は結構難しそうでしたが、composeかなり便利だなと感じました。
間違っている箇所、改善箇所等ありましたら、ぜひ教えてください。
参考にしたサイト様