背景
インフラエンジニア 「このterraformコードのPR、レビューお願いします。」
インフラエンジニア 「変更点はplan結果↓を見てください。」
An execution plan has been generated and is shown below.
Resource actions are indicated with the following symbols:
  + create
  ~ update in-place
  - destroy
-/+ destroy and then create replacement

Terraform will perform the following actions:

  # aws_instance.example1 will be created
  + resource "aws_instance" "example1" {
      + ami                          = "ami-abc123"
      + instance_type                = "t2.micro"
      + key_name                     = "example_key"
      + vpc_security_group_ids       = (known after apply)
      + subnet_id                    = "subnet-123456"
      + associate_public_ip_address  = true
      + tags = {
          + "Name" = "example1"
        }
    }

  # aws_instance.example2 will be updated in-place
  ~ resource "aws_instance" "example2" {
      ~ instance_type                = "t2.micro" -> "t2.small"
        ami                          = "ami-abc123"
        key_name                     = "example_key"
        vpc_security_group_ids       = "sg-abc123"
        subnet_id                    = "subnet-123456"
        associate_public_ip_address  = true
        tags = {
            "Name" = "example2"
        }
    }

  # aws_instance.example3 will be destroyed
  - resource "aws_instance" "example3" {
      - ami                          = "ami-abc123" -> null
      - instance_type                = "t2.micro" -> null
      - key_name                     = "example_key" -> null
      - vpc_security_group_ids       = "sg-abc123" -> null
      - subnet_id                    = "subnet-123456" -> null
      - associate_public_ip_address  = true -> null
      - tags = {
            "Name" = "example3"
        } -> null
    }

  # aws_instance.example4 must be replaced
-/+ resource "aws_instance" "example4" {
      ~ ami                          = "ami-abc123" -> "ami-def456" # forces replacement
      ~ instance_type                = "t2.micro" -> "t2.small"
        key_name                     = "example_key"
        vpc_security_group_ids       = "sg-abc123"
        subnet_id                    = "subnet-123456"
        associate_public_ip_address  = true
        tags = {
            "Name" = "example4"
        }
    }

Plan: 2 to add, 1 to change, 2 to destroy.
どこを見ればいいのか...
チームメンバーから、terraformコードのレビューをお願いされるとき、上の例のようなやり取りが発生することがあるかと思うのですが、このレビューが初学者には意外と難しいです。
具体的には、上記のようなplan結果を見て、以下の観点を素早く把握するのが難しいなと自分は思ってしまいます。
- この変更によってどのような影響があるのか
- この変更で気を付けるべき点はどこか
そこで、plan結果をChatGPTくん(gpt-3.5 or gpt-4)に説明してもらう機能を作ってみました。
Demo
特定のブランチで以下のようにTerraformファイルを修正したとします。
この差分をコミットして、リモートリポジトリにpushします。
resource "aws_codecommit_repository" "sample_1" {
  repository_name = "sample-1"
}
- resource "aws_codecommit_repository" "sample_2" {
-   repository_name = "sample_2"
- }

+ resource "aws_codecommit_repository" "sample_qiita_article" {
+   repository_name = "sample-qiita-article"
+   description = "This repository is for the article of Qiita."
+   default_branch = "mastar"
+ }
すると、CodePipelineが画像のように起動します。
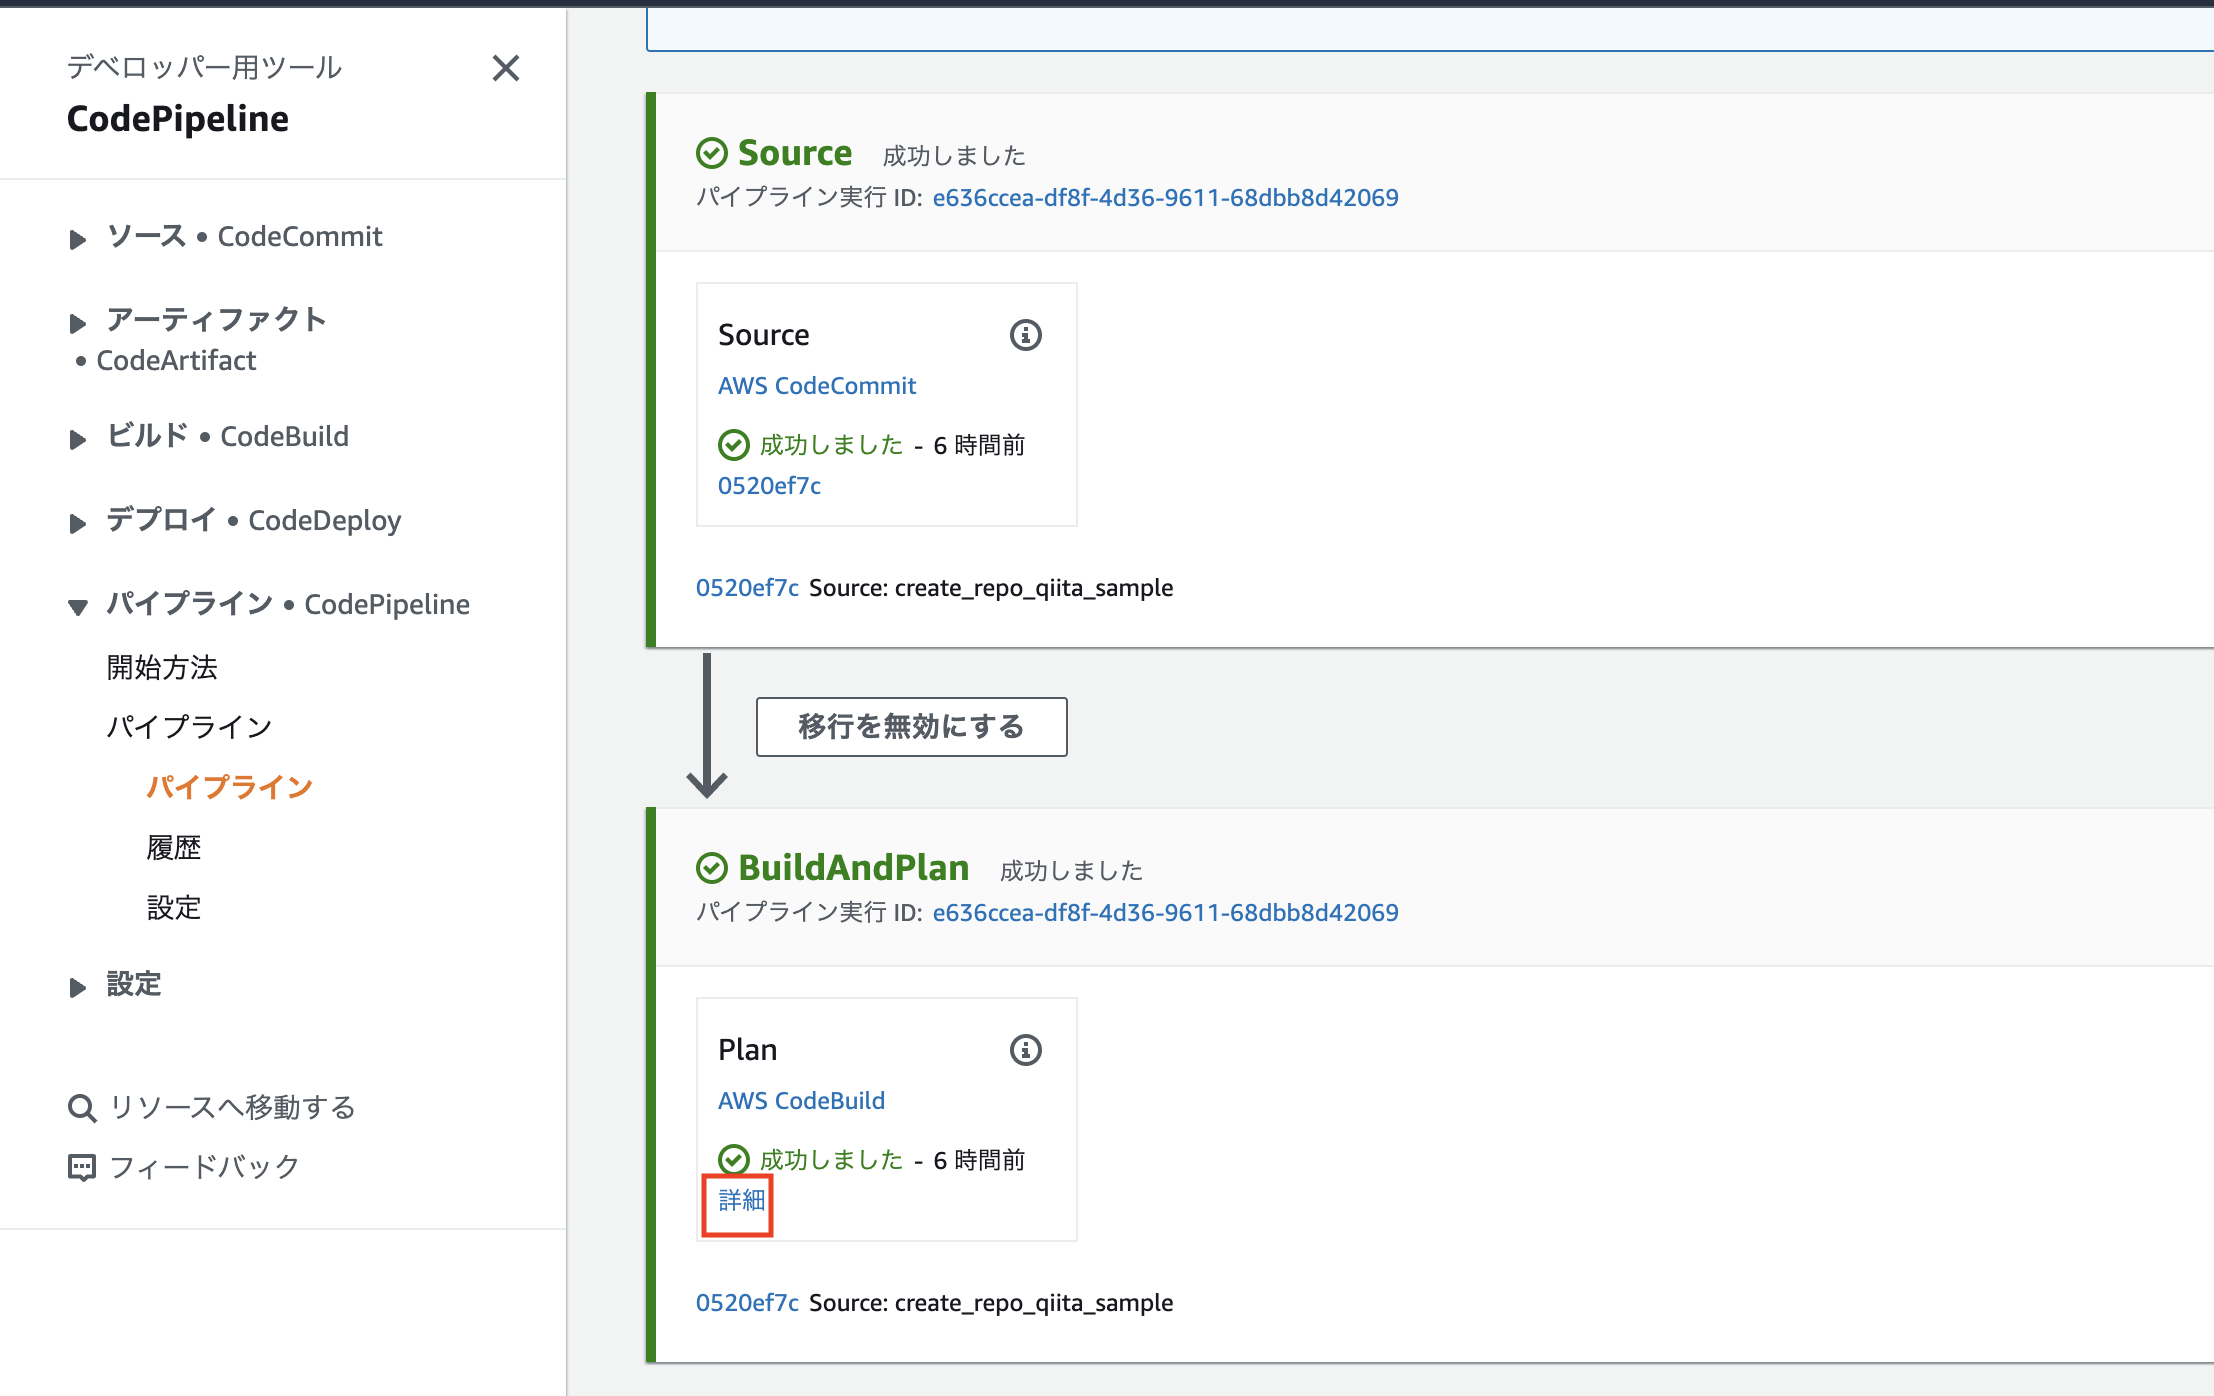
「詳細」ボタンを押すと、GPTが説明してくれたログが以下のように確認できます。
> Entering new  chain...
Prompt after formatting:
System:
            あなたはterraformのplan結果を解釈し、噛み砕いて初心者にもわかりやすく説明することができます。
            下記のplan結果を読み解いて、どのような変更が加わるか、どのような点に注意すべきかを500文字程度で説明してください。

Human:
            ```:plan結果

An execution plan has been generated and is shown below.
Resource actions are indicated with the following symbols:
  + create
  - destroy

Terraform will perform the following actions:

  # aws_codecommit_repository.sample_2 will be destroyed
  - resource "aws_codecommit_repository" "sample_2" {
      - arn             = "arn:aws:codecommit:ap-northeast-1:any_account_id:sample-2" -> null
      - clone_url_http  = "https://git-codecommit.ap-northeast-1.amazonaws.com/v1/repos/sample-2" -> null
      - clone_url_ssh   = "ssh://git-codecommit.ap-northeast-1.amazonaws.com/v1/repos/sample-2" -> null
      - id              = "sample-2" -> null
      - repository_id   = "sample_repository_id" -> null
      - repository_name = "sample-2" -> null
      - tags            = {} -> null
      - tags_all        = {} -> null
    }

  # aws_codecommit_repository.sample_qiita_article will be created
  + resource "aws_codecommit_repository" "sample_qiita_article" {
      + arn             = (known after apply)
      + clone_url_http  = (known after apply)
      + clone_url_ssh   = (known after apply)
      + default_branch  = "master"
      + description     = "This repository is for the article of Qiita."
      + id              = (known after apply)
      + repository_id   = (known after apply)
      + repository_name = "sample-qiita-article"
      + tags_all        = (known after apply)
    }

Plan: 1 to add, 0 to change, 1 to destroy.

            ```


> Finished chain.
ChatGPTからひとこと:
このplan結果では、Terraformが以下の変更を加えることを示しています。

1. `aws_codecommit_repository.sample_2`というリポジトリが削除されます。
   - 削除されるリポジトリの詳細情報(ARN、clone URLなど)が表示されています。
   - このリポジトリに関連するリソースはすべて削除されます。

2. `aws_codecommit_repository.sample_qiita_article`というリポジトリが作成されます。
   - このリポジトリにはまだ詳細情報がわからないため、apply後にARNやclone URLなどが表示されます。
   - リポジトリのデフォルトブランチは"master"に設定され、Qiitaの記事用のリポジトリであることが説明されています。

プランの結果は、1つのリポジトリが削除され、もう1つのリポジトリが作成されることを示しています。変更を適用する前に、これらの変更が意図したものであることを確認してください。また、削除されるリポジトリに関連するリソースがある場合は注意が必要です。
仕組み詳細
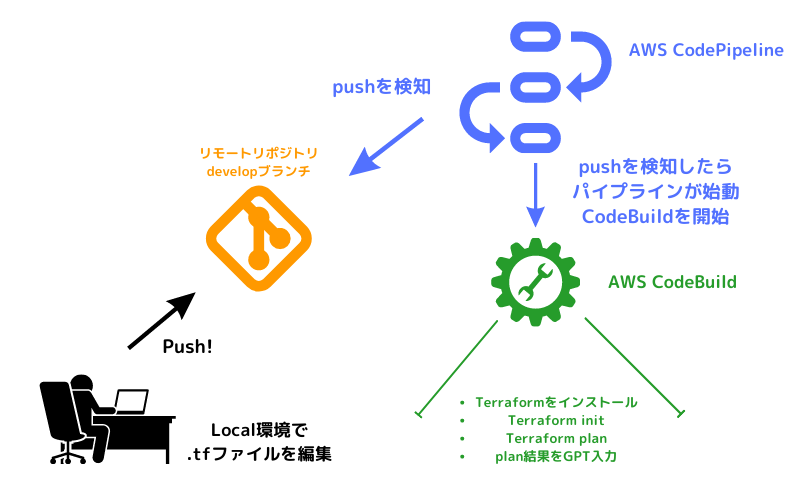
GitHub or CodeCommit等にTerraformファイルの変更をpushした際に、AWS CodeBuildが実行され、terraform plan → plan結果をChatGPTに入力 → レスポンス表示をやってもらう。という流れになります。
これによって、例えばPRのエビデンスでplan結果をコピペして自分で説明を記述せずとも、CodeBuildのログを貼り付けるだけで済むようになります。
実装サンプル
階層図
.
└── main.tf/
    └── gpt_plan/
        ├── buildspec_plan.yml
        ├── explain_plan_result.py
        └── install_terraform.sh
CodeBuild実装部分
resource "aws_codebuild_project" "terraform_plan" {
  name          = "gpt_plan_build_sample"
  service_role  = your_codebuild_role
  build_timeout = "5" # minutes

  artifacts {
    type = "NO_ARTIFACTS"
  }
  environment {
    compute_type                = "BUILD_GENERAL1_SMALL"
    image                       = "aws/codebuild/standard:5.0"
    type                        = "LINUX_CONTAINER"
    image_pull_credentials_type = "CODEBUILD"
  }
  # CodePipelineから実行する場合にはCodePipelineのconfigurationが優先される
  source {
    type            = "CODECOMMIT" # or GITGUB, S3, etc.
    location        = "https://git-codecommit.ap-northeast-1.amazonaws.com/your_repository_location"
    git_clone_depth = 1
    buildspec       = "gpt_plan/buildspec_plan.yml"
  }
}
version: 0.2

env:
  parameter-store:
    OPENAI_API_KEY: "openai_api_key"

phases:
  install:
    runtime-versions:
      python: 3.8
    commands:
      - chmod +x gpt_plan/install_terraform.sh
      - ./gpt_plan/install_terraform.sh
  build:
    commands:
      - terraform init
      - terraform plan -out=plan_result.txt
  post_build:
    on-failure: CONTINUE
    commands:
      # ANSIエスケープコードと呼ばれる、SHELL上で文字色等を装飾するためのコードをsedで削除してからplan_result_fmt.txtに出力
      - terraform show plan_result.txt | sed 's/\x1b\[[0-9;]*m//g' > plan_result_fmt.txt
      - pip install langchain
      - pip install openai
      - python -m gpt_plan.explain_plan_result plan_result_fmt.txt
#!/bin/bash
apt-get update
apt-get install -y unzip
curl -o /tmp/terraform.zip -LO https://releases.hashicorp.com/terraform/0.14.5/terraform_0.14.5_linux_amd64.zip # versionはお好みで指定
unzip /tmp/terraform.zip -d /usr/local/bin/
terraform --version
Codepipeline実装部分
resource "aws_codepipeline" "gpt_plan_pipeline_sample" {
    name     = "gpt_plan_pipeline_sample"
    role_arn = your_codepipeline_role

    artifact_store {
        location = aws_s3_bucket.artifact_store.bucket
        type     = "S3"
    }

    stage {
        name = "Source"

        action {
            name             = "Source"
            category         = "Source"
            owner            = "AWS"
            provider         = "CodeCommit"
            version          = "1"
            output_artifacts = ["source_output"]

            # codebuildのsourceよりもこちらが優先される
            configuration = {
                RepositoryName = your_repository_name # tf差分ファイルのpush先リポジトリを指定する
                BranchName     = "develop" # or master or main
            }
        }
    }

    stage {
        name = "BuildAndPlan"

        action {
            name             = "Plan"
            category         = "Build"
            owner            = "AWS"
            provider         = "CodeBuild"
            input_artifacts  = ["source_output"]
            version          = "1"

            configuration = {
                ProjectName = aws_codebuild_project.gpt_plan_build_sample.name
            }
        }
    }
}
Python ChatGPT input部分
import sys

from langchain.chat_models import ChatOpenAI
from langchain.chains import LLMChain

from langchain.prompts.chat import (
    ChatPromptTemplate,
    SystemMessagePromptTemplate,
    HumanMessagePromptTemplate,
)

if len(sys.argv) < 2:
    print("Usage: python explain_plan_result.py <plan_file>")
    sys.exit(1)


plan_file = sys.argv[1]


class Prompt:
    def pmt_tmpl(self) -> ChatPromptTemplate:
        sys_template = """
            あなたはterraformのplan結果を解釈し、噛み砕いて初心者にもわかりやすく説明することができます。
            下記のplan結果を読み解いて、どのような変更が加わるか、どのような点に注意すべきかを{summary_words}文字程度で説明してください。
        """
        sys_pmt = SystemMessagePromptTemplate.from_template(sys_template)
        human_template = """
            ```:plan結果
            {plan_result}
            ```
        """
        human_pmt = HumanMessagePromptTemplate.from_template(human_template)
        chat_pmt = ChatPromptTemplate.from_messages([sys_pmt, human_pmt])
        return chat_pmt

    def vairables(self, summary_words: int, plan_result: str) -> dict:
        return {
            "summary_words": summary_words,
            "plan_result": plan_result,
        }

def get_plan_result() -> str:
    with open(plan_file, "r") as f:
        plan_result: str = f.read()
    return plan_result


def explain_plan_result() -> None:
    llm = ChatOpenAI(model_name="gpt-3.5-turbo", temperature=0.5)
    pmt_cls = Prompt()
    prompt = pmt_cls.pmt_tmpl()
    chain = LLMChain(llm=llm, prompt=prompt, verbose=True)
    chain_input = pmt_cls.vairables(summary_words=500, plan_result=get_plan_result())
    llm_resp = chain.run(chain_input)
    print(f"ChatGPTからひとこと:\n{llm_resp}")


if __name__ == "__main__":
    explain_plan_result()
使用ケースの深掘り
terraformコードのPRを出す際に、この説明文も一緒に投げてみましょう。以下のようなケースでたまに役に立つのではないでしょうか。
- Terraformに明るくないレビュアーがいる場合
- レビュアーがTerraformに精通していなくても、この機能により変更点を理解する手助けができます。
- 他部署の人もレビューに参加していて、変更の要点を簡潔に説明したい場合
- 変更点を要約することで、プロジェクト全体を円滑に進めることができます。
感想
私が所属するプロジェクトに導入してみました。
簡単なplan結果だとあまり有用性は高くないですが、複雑なplan結果になるほど、理解の助けになることがあるかなと思いました。
また、レビューの際にChatGPTがどんなことを喋ってくれるのか少し楽しみになる、というメリットもあったかなと。(個人差あり)
細かな改良も続けていきつつ、どう役立っていってくれるのか、今後に期待していきたいと思います。