Remote motion recording in VRChat
Here are the links to the whole project package :
Standalone links :
ShaderMotion
World Constraints
Latest VRChat SDK2
Purpose of the guide
This is an attempt at making the process of creating better looking/interesting NPCs in VRChat worlds, which is currently very difficult to do aside from real mocap hardware or simply getting by with Mixamo/Unity free animations.
This whole setup relies on the ShaderMotion system to get bone data into a video file, which is then converted into an animation file.
On top of that, the system is combined with the world constraint which makes setting up animations in your world much easier.
Why remote mocap and not local ?
Local mocap would be much simpler to do, but would end up giving much worse looking results, which is what this tutorial aims at fixing.
This also prevents a lot of manual cleanup that would be required to solve the issues caused by the local recording tracker jitter.

Unity Setup
The scene is already provided in the unity package above, but we'll learn below how to make our own Actor model :
- First, add your avatar to the scene, then, in your Assets open the VRLabs folder, World Constraints and grab the prefab called worldSpace.
- Drop this prefab at the top of your model, then unpack this prefab (right click it and then unpack so that it all turns grey), take the object called Anchor inside of that prefab and move it at the top of your avatar. Open the Container object and delete the Cube object inside of it.
- Now click on your avatar and go to its animator component. On the top right corner you'll find a tin cog icon, left click it and in the list select CreateMeshRecorder. Take that newly created object and move it inside the Container object.
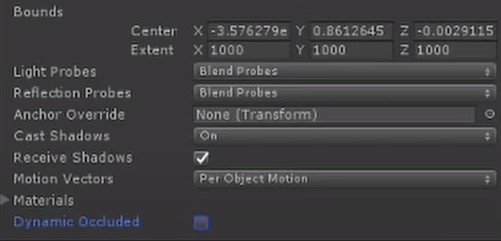
- Left click the Recorder object and change its Bounds Extent to X: 1000, Y : 1000, Z: 1000 and disable Dynamic Occluded.
That's it for the setup and you should be left with this :
Recording Requirements
- The recording window must be fullscreen and of 1600x900 resolution
This can be achieved by creating a shortcut of the VRChat.exe and adding the arguments "--no-vr --profile=1 -width 1600 -height 900" inside the properties as shown here:

- Those two changes made to the OBS settings
- Make sure the entire window is shown in OBS capture region
It's very easy to not pay attention and not realize that OBS's capture region scale is wrong or slightly off to one side, and that would result in worse/broken animation data output when generating the animation file at the end. You can automatically do so by right clicking your main scene and choosing "Resize output".
Expected capture result
The above is what you should be seeing from the perspective of the person doing the recording:
- The window is fullscreen, pixels all fit inside the window, none of them are cut, colors change when the actor is moving, the pixels never disappear from the screen regardless of actor's position based on camera (within 1000 unit range).
If all this is correct then start recording ! Make sure to give yourself the time between the start of the recording and the start of the acting, it'll make cleaning keyframes easier afterward.
Generating the animation file
Now that you've got your video file, watch it and make sure it plays correctly without any stutter, once that's done, open up your Unity project again and follow those steps:
-
In your Assets, open the shadermotion-dev folder, Example folder and load the Example scene.
-
Add your avatar to the example scene and give it a Motion Player (Script) component. For that component, add a Motion Dec in the Motion buffer.
-
In the hierarchy, open the Part5 object, select the VideoPlayer object and in its component, add the video you recorded into the Video Clip field.
-
Press Play and look at your avatar replaying the animation, if it looks correct, move forward with the next step.
-
Stop Play mode, and select on your model in the scene and left click the tiny cog once again on its animator component, chose RecordAnimation.
-
In the RecordAnimation Window, add a newly created animation file and set the framerate to whichever you prefer (60 for even smoother animations, but twice the file size), enter Play mode and press Start below the framerate slider to start generating keyframes !
-
Once the animation has finished playing, click Stop and leave Play mode. You can now hopefully see all the generated keyframes in your animation file !
If you were to run into any issue, feel free to reach out to me !


