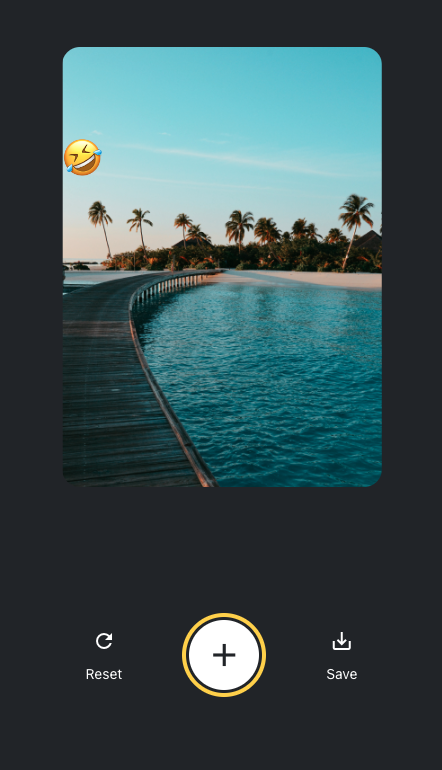
参考
モーダルの作成の章に入っていきます。
## モーダルを作成する
ボタンを表示するStateを作成する
App.jsへfalseで開始する、showAppOptionsStateを作成します。
const [showAppOptions, setShowAppOptions] = useState(false);
画像を選択後にtrueになるようにします。
const pickImageAsync = async () => {
  // ...rest of the code remains same

  if (!result.canceled) {
    setSelectedImage(result.assets[0].uri);
    setShowAppOptions(true);

  }
Use this photoのonPressでも、showAppOptionsStateがtrueになるようにします。
<Button label="Use this photo" onPress={() => setShowAppOptions(true)} />
ボタンを追加する
参考の画像を見ると、3つの要素で構成されています。
Reset/Saveは使い回しができそうです。
真ん中のボタンから構築します。
これまでやってきたコードと大きな変更はありません。
+ボタンはサンプルでは、MaterialIconsを使用しています。
import { View, Pressable, StyleSheet } from 'react-native';
import MaterialIcons from '@expo/vector-icons/MaterialIcons';

export default function CircleButton({ onPress }) {
  return (
    <View style={styles.circleButtonContainer}>
      <Pressable style={styles.circleButton} onPress={onPress}>
        <MaterialIcons name="add" size={38} color="#25292e" />
      </Pressable>
    </View>
  );
}

const styles = StyleSheet.create({
  circleButtonContainer: {
    width: 84,
    height: 84,
    marginHorizontal: 60,
    borderWidth: 4,
    borderColor: '#ffd33d',
    borderRadius: 42,
    padding: 3,
  },
  circleButton: {
    flex: 1,
    justifyContent: 'center',
    alignItems: 'center',
    borderRadius: 42,
    backgroundColor: '#fff',
  },
});
IconButtonはデザインが使い回せるので、アイコン/ラベル/押下時の挙動をpropsで渡せるようにしておきます。
import { Pressable, StyleSheet, Text } from 'react-native';
import MaterialIcons from '@expo/vector-icons/MaterialIcons';

export default function IconButton({ icon, label, onPress }) {
  return (
    <Pressable style={styles.iconButton} onPress={onPress}>
      <MaterialIcons name={icon} size={24} color="#fff" />
      <Text style={styles.iconButtonLabel}>{label}</Text>
    </Pressable>
  );
}

const styles = StyleSheet.create({
  iconButton: {
    justifyContent: 'center',
    alignItems: 'center',
  },
  iconButtonLabel: {
    color: '#fff',
    marginTop: 12,
  },
});
追加したComponentをApp.jsへ追加します。
また、押したときの処理を追加しやすいように空の関数を用意しておきます。
onResetはshowAppOpetionsをfalseにするようにしておきます。
// ... rest of the import statements
import CircleButton from './components/CircleButton';
import IconButton from './components/IconButton';

export default function App() {
  // ...rest of the code remains same
  const onReset = () => {
    setShowAppOptions(false);
  };

  const onAddSticker = () => {
    // we will implement this later
  };

  const onSaveImageAsync = async () => {
    // we will implement this later
  };

  return (
    <View style={styles.container}>
      /* ...rest of the code remains same */
      {showAppOptions ? (
        <View style={styles.optionsContainer}>
          <View style={styles.optionsRow}>
            <IconButton icon="refresh" label="Reset" onPress={onReset} />
            <CircleButton onPress={onAddSticker} />
            <IconButton icon="save-alt" label="Save" onPress={onSaveImageAsync} />
          </View>
        </View>
      ) : (
        /* ...rest of the code remains same */
      )}
      <StatusBar style="auto" />
    </View>
  );
}
ここまでのコードで、2個目のボタンを押すことでボタン表示部分がOption画面に切り替わるようになりました。
Resetで閉じることができます。
絵文字ピッカーモーダルを作成する
Componentフォルダへ、EmojiPickerを作成します。
下記のコードでは、下記のようなことが実装されています。
- ModalのTitleと閉じるボタンが表示される。
- propsでisVisibleを受け取り、 Modaleのvisibleにわたすことで表示/非表示をコントロールします
- transparentは、モーダルが画面全体になるかどうかを判定しています。
- animationTypeでは、モーダルの表示方法を決めています。
- Emoji
import { Modal, View, Text, Pressable, StyleSheet } from 'react-native';
import MaterialIcons from '@expo/vector-icons/MaterialIcons';

export default function EmojiPicker({ isVisible, children, onClose }) {
  return (
    <Modal animationType="slide" transparent={true} visible={isVisible}>
      <View style={styles.modalContent}>
        <View style={styles.titleContainer}>
          <Text style={styles.title}>Choose a sticker</Text>
          <Pressable onPress={onClose}>
            <MaterialIcons name="close" color="#fff" size={22} />
          </Pressable>
        </View>
        {children}
      </View>
    </Modal>
  );
}
モーダルを実装し終えたので、App.jsで+ボタンを押したさいに、isVisibleがtrueになる処理を追加します。
import EmojiPicker from "./components/EmojiPicker";

export default function App() {
  const [isModalVisible, setIsModalVisible] = useState(false);
  const onAddSticker = () => {
    setIsModalVisible(true);
  };

  const onModalClose = () => {
    setIsModalVisible(false);
  };

  return (
    <View style={styles.container}>
      /* ...rest of the code remains same */
      <EmojiPicker isVisible={isModalVisible} onClose={onModalClose}>
        {/* A list of emoji component will go here */}
      </EmojiPicker>
      <StatusBar style="auto" />
    </View>
  );
}
絵文字の一覧をモーダルへ表示します
モーダルの中に、水平リストを実装します。
スクロールで表示したい要素は、ReactNativeではFlatListを利用して実装します。
export default function EmojiList({ onSelect, onCloseModal }) {
  const [emoji] = useState([
    require('../assets/images/emoji1.png'),
  ]);

  return (
    <FlatList
      horizontal
      showsHorizontalScrollIndicator={Platform.OS === 'web'}
      data={emoji}
      contentContainerStyle={styles.listContainer}
      renderItem={({ item, index }) => {
        return (
          <Pressable
            onPress={() => {
              onSelect(item);
              onCloseModal();
            }}>
            <Image source={item} key={index} style={styles.image} />
          </Pressable>
        );
      }}
    />
  );
}
App.jsへEmojiListを表示するようにします。
export default function App() {
  const [pickedEmoji, setPickedEmoji] = useState(null);
  // ...rest of the code remain same

  return (
    <View style={styles.container}>
      /* rest of the code remains unchanged */
      <EmojiPicker isVisible={isModalVisible} onClose={onModalClose}>
        <EmojiList onSelect={setPickedEmoji} onCloseModal={onModalClose} />
      </EmojiPicker>
上記の実装で、Emojiのリストを水平に表示することができました。
モーダルに絵文字を表示します
Emojiを表示するComponentを作成します。
このコンポーネントは、画像サイズと絵文字のsrcの2つのpropsを受け取ります。
import { View, Image } from 'react-native';

export default function EmojiSticker({ imageSize, stickerSource }) {
  return (
    <View style={{ top: -350 }}>
      <Image
        source={stickerSource}
        resizeMode="contain"
        style={{ width: imageSize, height: imageSize }}
      />
    </View>
  );
}
絵文字が選択されたら、選択した絵文字が画像の上に表示されるようにします。
// ...rest of the import statements
import EmojiSticker from './components/EmojiSticker';
export default function App() {
<View style={styles.imageContainer}>
<ImageViewer placeholderImageSource={PlaceholderImage} selectedImage={selectedImage} />
{pickedEmoji !== null ? <EmojiSticker imageSize={40} stickerSource={pickedEmoji} /> : null}
</View>
}


