keras.preprocessing.imageにある画像の読み込みや操作などを色々試しました。
画像の読み込み
load_img関数を使用して画像を読むこむことができる。
画像はPIL形式で読み込まれるので、NNの訓練用、予測用などで使う際はnumpyのarray型に変換する必要がある。
import keras
keras.preprocessing.image.load_img(
    path, grayscale=False, color_mode="rgb", target_size=None, interpolation="nearest"
)
| 引数 | 説明 | 指定方法 |
|---|---|---|
| path | 画像のパス(絶対でも相対でもいい) | パスの文字列 |
| grayscale | グレースケールの設定だが公式で非推奨であり、color_modeで指定するべき | True or False |
| color_mode | 読み込んだ画像のフォーマットを指定できる。'grayscale','rgb','rgba'があり、デフォルトは'rgb' | 'grayscale' か 'rgb' か 'rgba' |
| target_size | 読み込む画像の大きさをintのタプルで指定する | ( width , height ) |
| interpolation | 画像の補完方法。元画像とtarget_sizeに差異があるときに画像を補完する。"nearest", "bilinear", "bicubic", "lanczos", "box", "hamming"の種類の補完方法がサポートされている。デフォルトでは"nearest" | "nearest" か "bilinear" か "bicubic" か "lanczos" か "box" か "hamming" |
実践
from keras.preprocessing.image import load_img
import matplotlib.pyplot as plt

# 基本的にはpath,color_code,target_sizeをしておけば良い
# 読み込み自体はここだけで完了!
img = load_img("taiju.jpg", color_mode='rgb', target_size=(700,700))
array = img_to_array(img)
gray_img = load_img("taiju.jpg", color_mode='grayscale', target_size=(28,28))
gray_array = img_to_array(gray_img)

testlist=[]
testlist.append(array)
testlist.append(gray_array)
imglist=[]
imglist.append(img)
imglist.append(gray_img)

# mnistを利用したニューラルネットワークなどで使う際の形式
print("arrayの形式:",array.shape)
print("gray_arrayの形式:",gray_array.shape)
# matplotを使った画像の表示
for i in range(2):
  plt.subplot(1,5,i+1)
  plt.imshow(imglist[i],'gray')
plt.show
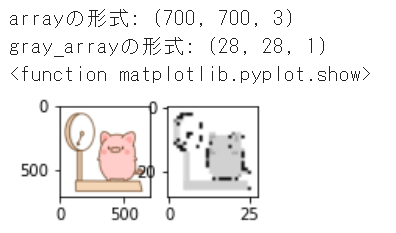
これを実行すると以下のようになります。

一つ目の画像は**img = load_img("taiju.jpg", color_mode='rgb', target_size=(700,700))で読んだ画像であり、フルカラーの縦横700pixelの元画像サイズで読み込んでいるため鮮明に表示されています。
二つ目の画像はgray_img = load_img("taiju.jpg", color_mode='grayscale', target_size=(28,28))**で読んだ画像で、グレースケールに変換されて縦横28pixelに縮小されて表示されています。そのため不鮮明で荒く画像が見えます。
また、img_to_array関数を使うことでnumpyのarray型に変換でき、ニューラルネットワークで作成したモデルによる予測などにも活用できます。