Introduction
Hello, guys. I'd like to take a look at the online course of ROS Ignite Academy in this article or maybe could be a series of articles, I guess. Recently I have just subscribed to this online course and taken some courses. So far it is going well, but without taking notes it's going to be hard to look-back the learning path, isn't it? So I decided to take a time to log my learning here.
Reminder: I am not covering about the setting of ROS environment since it is given in the Academy. And I am super bad at writing for sure.
A brief summary of the course
ROS In 5 Days is the ideal course if you are new to ROS. Here you will learn ROS fast!!!
The objective of this course is to give you the basic tools and knowledge to be able to understand and create any basic ROS related project. You will be able to move robots, read their sensor data, make the robots perform intelligent tasks, see visual representations of complex data such as Point Clouds and debug errors in the programs. At the end of this course, we will feel comfortable about the following subjects:
- ROS Basic Structure
- ROS Topics
- ROS Services
- ROS Actions
- ROS Debugging Tools
I think this is enough talking about the course logistic. Let's dive into it.
How to take a course?
I am not afraid that it is confusing for you to understand this interfance though, let me breily mention.
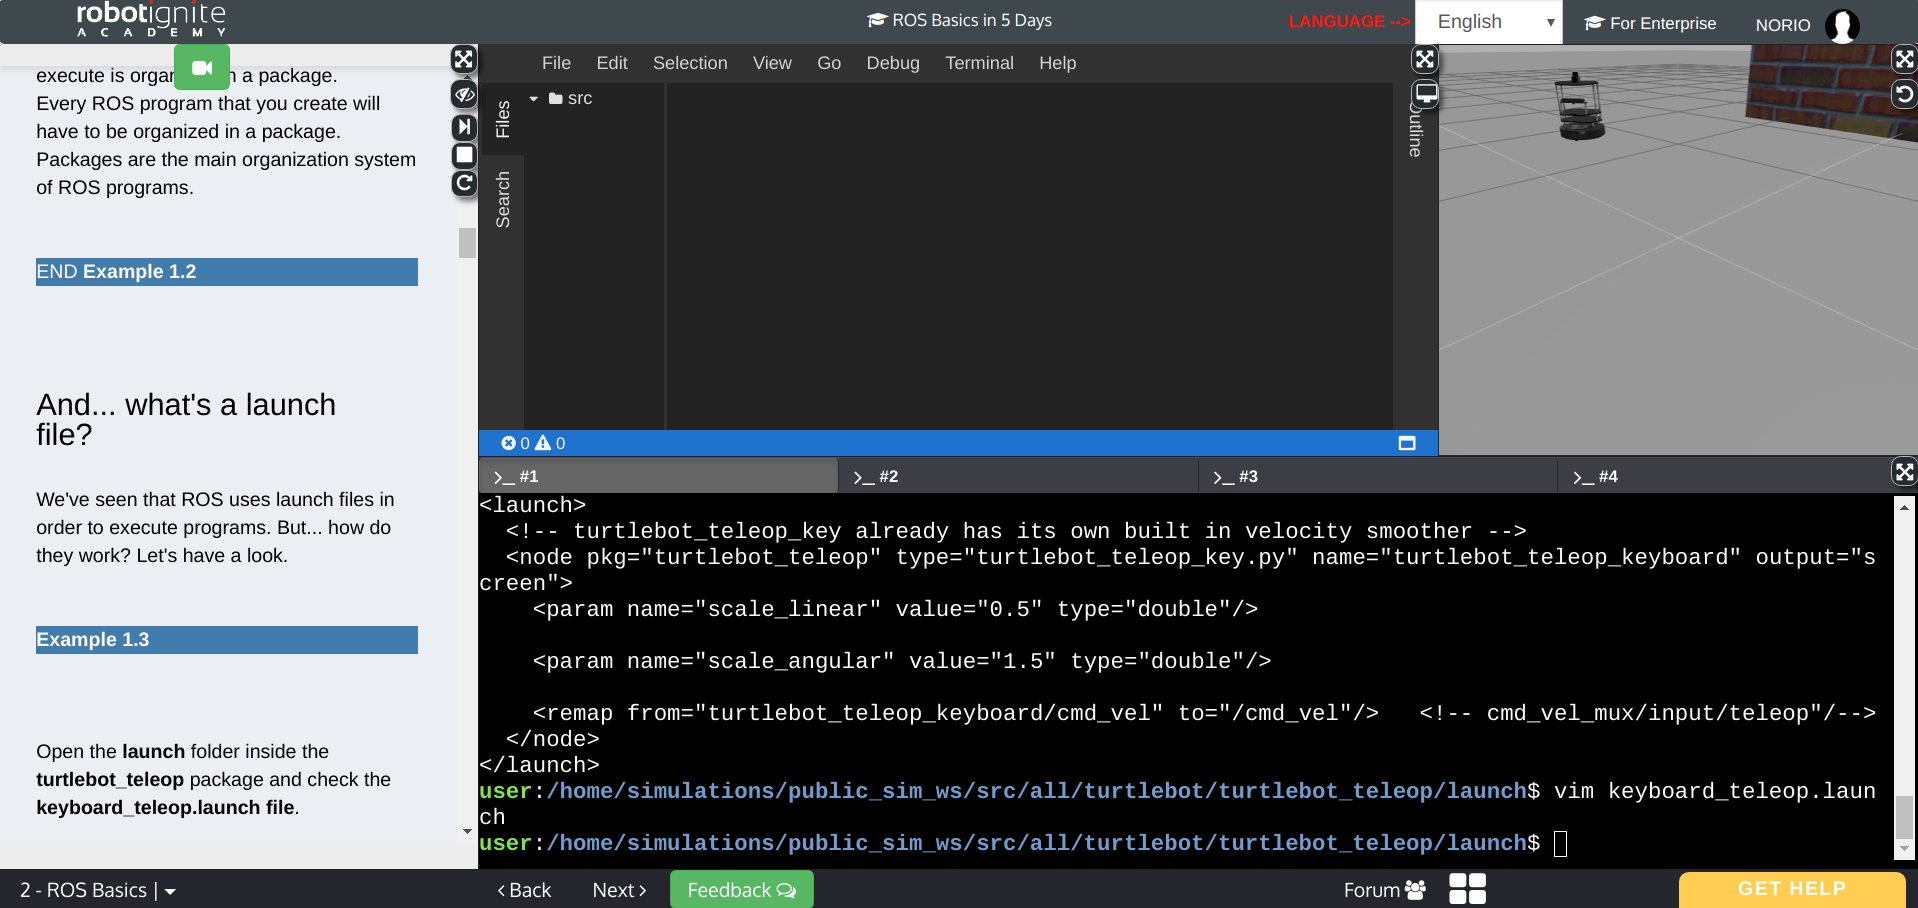
The courses are organised through this web-interface, and on the left-handside(in shaded blue region), it is a jupyter notebook. So if you are taking the python course then they prepare the material in Jupyter notebook manner. And at the bottom, we have terminals' windows. Also we have the editor above then finaly we have a Gazebo window. So during a lecture, they will ask you to execute ROS commands on a terminal or program a package or something and build followed by execution. So, good thing is they provide everything you need to start through this simple browser-interface. Hmm, Brilliant!!
Lecture Notes
0: Course Preview
In this unit, I think most of us an exact beginner regarding ROS or maybe you might have watched some videos on Youtube and understood to some extend at this point. Anyway, This Unit is a Preview of the ROS in 5 Days Course. You'll get a glimpse of what you'll learn during the Course with an introduction to the different parts, and also by seeing some simple examples of each part.
What you need to learn in ROS:
- Basic concept of ROS
- Topics
- Services
- Actions: this confused me a bit at this point, but now I got the difference between
servicesandactions. They are similar in the sense of executing something like a motion on a robot. But they are different behind the scene. Indeed, by calling a service, you need to wait until the service has ended before doing a thing you intended, whereas in actions, this is a hitting API on a server, so you can expect the response as soon as possible. - Debugging Tools: Rviz
0.5: A Guide for ROS in 5 Days
In this unit, again they walk you through on the course logistic and show some robots which you will use through the course.
- Parrot Drone
- Kobuki
- Husky
- Sphero
- BB-8
- Wam Arm
According to them, the course consists of two different components.
- Learn ROS programming several robots
- Apply what you learnt to a Robot Project
In the first part, you will learn;
- Unit 1: How ROS Basic Structure works
- Unit 2&3: What are ROS Topics and how to use them
- Unit 4&5: What are ROS Services and how to use them
- Unit 7&8: What are ROS Actions and how to use them
- Unit 9: How to use ROS Debugging Tools for finding errors in your programs, especially Rviz.
And in the second part, you will learn
- Create topic publishers and subscribers for moving the sphero and reading the IMU(Inertial Measurement Unit) data and the odometry data
- Create a service that, when used, it reads the IMU and tells you which way to go
- Create an action that, when used, it records the odometry and tells you what distance has the Sphero moved
- Create a global program that reads/writes into topics, uses the service and action that you created to make the robot get out of the maze
1: Basic Concepts
You will learn
- How to structure and launch ROS programs (packages and launch files)
- How to create basic ROS programs (Python based)
- Basic ROS concepts: Nodes, Parameter Server, Environment Variables, Roscore
ROSlaunch is the command used to launch a ROS program.
$ roslaunch <package_name> <launch_file>
ROS package architecture
- launch folder: contains launch
- src folder: source files
- CMakeLists.txt: list of cmake rules for compilation
- package.xml: package information and dependencies
Navigate to a specific ROS folder,
$ roscd <package_name>

# for example
$ roscd turtlebot_teleop # ROS version of change directory
$ cd launch
$ cat keyboard_teleop.launch

# outcome
<launch>
  <!-- turtlebot_teleop_key already has its own built in velocity smoother -->
  <node pkg="turtlebot_teleop" type="turtlebot_teleop_key.py" name="turtlebot_teleop_keyboard"  output="screen">
    <param name="scale_linear" value="0.5" type="double"/>
    <param name="scale_angular" value="1.5" type="double"/>
    <remap from="turtlebot_teleop_keyboard/cmd_vel" to="/cmd_vel"/>   <!-- cmd_vel_mux/input/teleop"/-->
  </node>
</launch>
Launch file structure
- launch
    - node
        - `pkg="package_name"`
        - `type="python_file_name.py"`: name of the program that we want to execute
        - `name="node_name"`: name of the ROS node that will launch our python file
        - `output="type_of_output"`: through which channel you will print the output of the python file
Create your ROS package
$ catkin_create_pkg <package_name> <package_dependecies>
# output
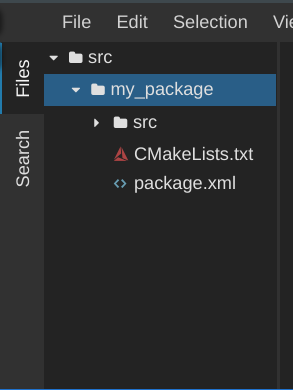
Created file my_package/CMakeLists.txt
Created file my_package/package.xml
Created folder my_package/src
Successfully created files in /home/user/catkin_ws/src/my_package. Please adjust the values in package.xml.
# you can check if our package has been successfully created
$ rospack list | grep my_package
# output
my_package /home/user/catkin_ws/src/my_package
wow!! instantly, these files appeared on my screen.
Then you follow the procedure below
- Create in the src directory in
your packagea Python/C++ file that will be executed - Create a launch directory inside the package and Create a new launch file inside the launch directory
How to check current ROS node
$ rosnode list
Compile a package:
This command will compile your whole src directory, and it needs to be issued in your catkin_ws directory in order to work. This is MANDATORY. If you try to compile from another directory, it won't work.
# to compile whole src directory
$ catkin_make

# to specify packages you want to compile
$ catkin_make --only-pkg-with-deps `your_package`
Parameter Server
A Parameter Server is a dictionary that ROS uses to store parameters. These parameters can be used by nodes at runtime and are normally used for static data, such as configuration parameters.
# to get a list of all params on current the master node
$ rosparam list

# to get a value of a particular param
$ rosparam get <parameter_name>

# to set a value to a parameter
# Note: check the format of a value/values in advance!!
$ rosparam set <parameter_name> <value>
Environment Variables
ROS uses a set of Linux system environment variables in order to work properly. You can check these variables by typing:
$ export | grep ROS

# in the case of this lecture's server, I got;
declare -x ROSLISP_PACKAGE_DIRECTORIES="/home/user/catkin_ws/devel/share/common-lisp"
declare -x ROS_DISTRO="kinetic"
declare -x ROS_ETC_DIR="/opt/ros/kinetic/etc/ros"
declare -x ROS_MASTER_URI="http://localhost:11311"
declare -x ROS_PACKAGE_PATH="/home/user/catkin_ws/src:/opt/ros/kinetic/share:/opt/ros/kinetic/stacks"
declare -x ROS_ROOT="/opt/ros/kinetic/share/ros"
References:
- ROS Packages: http://wiki.ros.org/Packages
- Ros Nodes: http://wiki.ros.org/Nodes
- Parameter Server: http://wiki.ros.org/Parameter%20Server
- Roscore: http://wiki.ros.org/roscore
- ROS Environment Variables: http://wiki.ros.org/ROS/EnvironmentVariables
2: Topics
In this unit, you will learn
- What are ROS topics and how to manage them
- What is a publisher and how to create one
- What are topic messages and how they work
Publisher
Nodes use topics to publish information for other nodes so that they can communicate. You can find out, at any time, the number of topics in the system by doing a rostopic list. You can also check for a specific topic.
# list all alive topics
$ rostopic list

# check the info regarding a particular topic
$ rostopic info /<topic_name>

# see the actual output from a particular topic
$ rostopic echo /<topic_name>
So in a simple term,
- A publisher is a node that keeps publishing a message into a topic.
- A topic is a channel that acts as a pipe, where other ROS nodes can either publish or read information.
Messages
As you may have noticed, topics handle information through messages. And nodes exchange messages each other within a pre-defined network(a collection of nodes, which are publishers and subscribers). Messages are defined in .msg files, which are located inside a msg directory of a package.
$ rosmsg show <message_type> # for example: std_msgs/Int32
2: Topics
You will learn in this unit;
- What is a Subscriber and how to create one
- How to create your own message
Subscriber
A subscriber is a node that reads information from a topic
# publish a information
$ rostopic pub <topic_name> <message_type> <value>
How to define your custom Message
- Create a directory named 'msg' inside your package
- Inside this directory, create a file named Name_of_your_message.msg (more information down)
- Modify CMakeLists.txt file (more information down)
- Modify package.xml file (more information down)
- Compile
- Use in code
3: Services in ROS
You will learn;
- What a service is
- How to manage services of a robot
- How to call a service
The difference between Services and Actions
- Services are Synchronous. When your ROS program calls a service, your program can't continue until it receives a result from the service.
- Actions are Asynchronous. It's like launching a new thread. When your ROS program calls an action, your program can perform other tasks while the action is being performed in another thread.
Check the current services
# list all running services
$ rosservice list

# check the status of a service
$ rosservice info /name_of_your_service

# check the content of the message of the service
$ rossrv show name_of_the_package/Name_of_Service_message
- Service message files have the extension of
.srv. Note that Topic message files have the extension of.msg - Service message files are defined inside a
srvdirectory, likewise Topic message files are stored inmsgdirectory - Service messages have two parts:
- Request: how to call a service
- Response: how a service will respond
How to make a Service
A ROS service provides a certain functionality of your robot. A ROS service is composed of 2 parts
- Service server: this is what provides the functionality.
- Service client: this is what calles the functionality provided by the server.
Note that ROS services are synchronous. This means that whatever you call a service server, you have to wait until the service has finished before you can do other stuff with your robot.
4: ROS Actions
What you will learn:
- What is a ROS action
- How to manage the actions of a robot
- How to call an action server
Actions are very similar to services. When you call an action, you are calling a functionality that another node is providing. Just the same as with services. The difference is that when your node calls a service, it must wait until the service finishes. When your node calls an action, it doesn't necessarily have to wait for the action to complete.
Hence, an action is an asynchronous call to another node's functionality.
Calling an action server
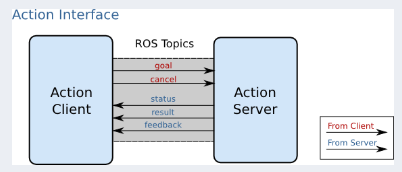
And each action server has five APIs in default below;
- cancel
- feedback
- goal
- result
- status
# check the action server's APIs
rostopic list
Actions provide feedback
Due to the fact that calling an action server does not interrupt your thread, action servers provide a message called the feedback. The feedback is a message that the action server generates every once in a while to indicate how the action is going (informing the caller of the status of the requested action). It is generated while the action is in progress.
How to call an action server
The way you call an action server is by implementing an action client.