モチベーション
世の中にはlocalhostのみにHTTPのAPIやWeb画面を提供しているサービスがあります。
それは開発用のHTTPサーバだったりと、リモートからのアクセスを意図していないサービスだったりするでしょう。
ただ、非常にレアケースですがどうしてもそのようなHTTPサーバに対して、リモートからアクセスしたい場面があります。
例えば、Visual Studioで開発用のIISサーバを起動したが、そのサーバに対してRasberryPIのPythonクライアントからアクセスしたいみたいなケースです。
そのような場合、どうやってアクセスするか?について考えた記事です。
この記事は特定のサービスを対象として記載したものではありません。
悪いことには使わないようにしましょう。開発目的です!

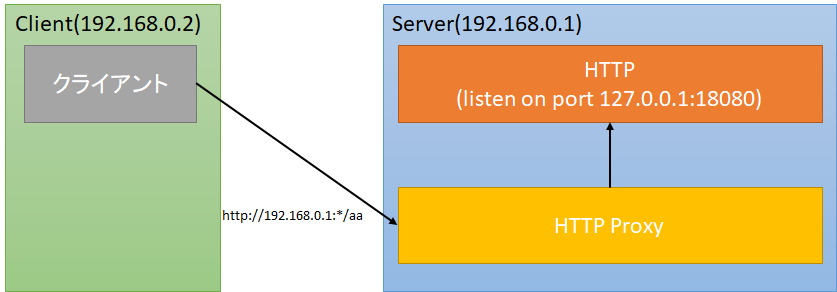
方法案1.HTTPプロキシを建てる
リモートサーバ上に、HTTPプロキシを立てます。簡単な解決法ですね。

プロキシはリモートからのHTTPリクエストを代替して、ローカルのHTTPサーバへアクセスします。
リモートのHTTPサーバからは、localhostからアクセスしているように見えるので、サーバ上からはリモートからアクセスされていると判断できません。
単純です。これでアクセス可能になります。
ただ、これではオーバーヘッド的にもつまらないので一工夫考えてみます。
方法案2.ポートフォワーディング
ここでは、プライベートIP 192.168.0.1:19080にきたTCP通信を、127.0.0.1:18080へ転送します。
Windowsの場合
追加
netsh interface portproxy add v4tov4 listenport=19080 listenaddr=192.168.0.1 connectport=18080 connectaddress=127.0.0.1
削除
netsh interface portproxy delete v4tov4 listenport=19080 listenaddr=192.168.0.1
設定確認
netsh interface portproxy show all
Linuxの場合
iptablesやredirあたりでフォワード転送しましょう。
iptablesの場合、DNATとSNATどちらも設定しないといけないので注意
redir -n 192.168.0.1:19080 127.0.0.1:18080
Hostヘッダの書換
これでアクセス可能と思いきや、HTTP1.1のプロトコル上、Hostヘッダにホスト部が記録されるためそこのチェックで弾かれる場合があります。
HTTP 400 Bad Request「Invalid Hostname」のパターンです。
プロキシとは違い、ポート転送ではパケットだけ転送されるのでHTTPヘッダやリクエスト先URLがそのままになってしまっています。
curl http://192.168.0.1:19080 -v
出力
*   Trying 192.168.0.1...
* TCP_NODELAY set
* Connected to 192.168.0.1 (192.168.0.1) port 18080 (#0)
> GET / HTTP/1.1
> Host: 192.168.0.1:19080
> User-Agent: curl/7.61.1
> Accept: */*
>
< HTTP/1.1 400 Bad Request
< Content-Type: text/html; charset=us-ascii
< Server: Microsoft-HTTPAPI/2.0
< Date: Sun, 11 Apr 2021 21:44:11 GMT
< Connection: close
< Content-Length: 334
<
<!DOCTYPE HTML PUBLIC "-//W3C//DTD HTML 4.01//EN""http://www.w3.org/TR/html4/strict.dtd">
<HTML><HEAD><TITLE>Bad Request</TITLE>
<META HTTP-EQUIV="Content-Type" Content="text/html; charset=us-ascii"></HEAD>
<BODY><h2>Bad Request - Invalid Hostname</h2>
<hr><p>HTTP Error 400. The request hostname is invalid.</p>
</BODY></HTML>
* Closing connection 0
上記はcurlの場合ですが、通常のHTTPクライアントでも同様です。
Hostヘッダに「192.168.0.1:19080」が記載されてしまっているので、これを「localhost:18080」に置換してやる必要があります。
- クライアント側にlocalhost:18080 -> 192.168.0.1:19080のポート転送設定をしたうえで、クライアント上のlocalhost:18080にアクセスする
- HTTPクライアントでHostヘッダをカスタマイズする」
他には思いつきませんでした。ここでは後者について記載します。
curlの場合
-H引数で、Hostヘッダを指定してあげましょう。普通に書き換えられます。
curl http://192.168.0.1:19080/ -H "Host:localhost:18080"
aiohttpの場合
普通にClientSessionのheadersにHostを追加してあげます。
aiohttp.ClientSession(headers={"Host": "localhost:18080"})
websocketsの場合
引数のextra_headersはHostヘッダの書換に対応していません。
そのため、カスタムWebSocketClientProtocolクラスを用意して、Host設定部分をカスタマイズする必要があります。
from typing import Optional, Sequence

from websockets import WebSocketClientProtocol
from websockets.exceptions import (
    InvalidHeader,
    InvalidStatusCode,
    RedirectHandshake,
)
from websockets.extensions.base import ClientExtensionFactory
from websockets.handshake import build_request, check_response
from websockets.headers import (
    build_authorization_basic,
    build_extension,
    build_subprotocol,
)
from websockets.http import USER_AGENT, Headers, HeadersLike
from websockets.typing import Origin, Subprotocol
from websockets.uri import WebSocketURI


class WebSocketProtocolLocal(WebSocketClientProtocol):
    async def handshake(
            self,
            wsuri: WebSocketURI,
            origin: Optional[Origin] = None,
            available_extensions: Optional[Sequence[ClientExtensionFactory]] = None,
            available_subprotocols: Optional[Sequence[Subprotocol]] = None,
            extra_headers: Optional[HeadersLike] = None,
    ) -> None:
        request_headers = Headers()

        if wsuri.port == (443 if wsuri.secure else 80):  # pragma: no cover
            request_headers["Host"] = "localhost"
        else:
            request_headers["Host"] = f"localhost:18080"

        if wsuri.user_info:
            request_headers["Authorization"] = build_authorization_basic(
                *wsuri.user_info
            )

        if origin is not None:
            request_headers["Origin"] = origin

        key = build_request(request_headers)

        if available_extensions is not None:
            extensions_header = build_extension(
                [
                    (extension_factory.name, extension_factory.get_request_params())
                    for extension_factory in available_extensions
                ]
            )
            request_headers["Sec-WebSocket-Extensions"] = extensions_header

        if available_subprotocols is not None:
            protocol_header = build_subprotocol(available_subprotocols)
            request_headers["Sec-WebSocket-Protocol"] = protocol_header

        request_headers.setdefault("User-Agent", USER_AGENT)

        self.write_http_request(wsuri.resource_name, request_headers)

        status_code, response_headers = await self.read_http_response()
        if status_code in (301, 302, 303, 307, 308):
            if "Location" not in response_headers:
                raise InvalidHeader("Location")
            raise RedirectHandshake(response_headers["Location"])
        elif status_code != 101:
            raise InvalidStatusCode(status_code)

        check_response(response_headers, key)

        self.extensions = self.process_extensions(
            response_headers, available_extensions
        )

        self.subprotocol = self.process_subprotocol(
            response_headers, available_subprotocols
        )

        self.connection_open()
connect時にcreate_protocol引数で、上記クラスを指定します。
async with websockets.connect(self.endpoint, ping_interval=None,create_protocol=WebSocketProtocolLocal) as ws:
                    print('Connected', self.endpoint)
方法案3. トンネリングサービスを使う
ngrok, serveo, localhost.runといった外部サーバを経由してポート転送を行うサービスがあるようです。
オーバーヘッドが大きいのと、どちらにせよHostヘッダ書換は必要な気がするので、本記事では記載しません。
