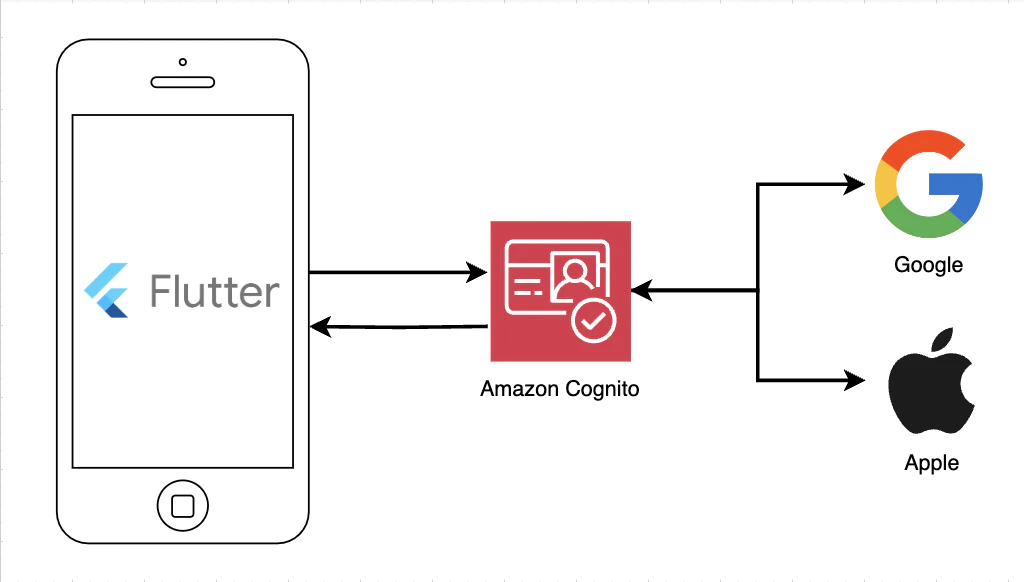
今回実装してみた内容
モバイルアプリ(Flutter)x Amazon Cognito x ソーシャルプロバイダー(Apple, Google)
ざっくり図で表すとこんな感じ
モバイルアプリ x Amazon Cognito x ソーシャルプロバイダー認証 には大きく3つの実装方法があるかなと思います。
- ネイティブSDK+Cognito連携:アプリからネイティブの認証機能を用いて、トークンをCognitoに渡して認証
- Hosted UI:マネージドログインを使用した認証
- AWS Amplify:AWS Amplifyを利用した認証
| 方法 | カスタマイズ性 | 実装の容易さ | ソーシャルログイン連携 | セキュリティ |
|---|---|---|---|---|
| ネイティブSDK+Cognito連携 | ◎(自由自在) | △(やや複雑) | 手動で実装(自由度高) | アプリ実装に依存 |
| Hosted UI | △(限られる) | ◎(超簡単) | AWSマネージドで簡単 | AWSが管理 |
| AWS Amplify | ○(ある程度可) | ◎(簡単) | Hosted UI / ネイティブ 両方対応 | AWSが管理 |
→今回はHosted UIを使用した認証の実装をしました
スマホで、以下のような画面(マネージドログイン)に遷移し、認証することを目指します。

お願い
- いつでも見返せるようにいいねをお願いします🙇
- 間違っているポイント、質問などございましたら、お気軽にコメントしてください。
- 手順が多く、長編となっております。
Amazon Cognitoを用いたシンプルなログイン実装方法
目次
はじめに
Amazon Cognitoは、ウェブおよびモバイルアプリケーションの認証、認可、ユーザー管理を提供するAWSのサービスです。このサービスを使用することで、ユーザー登録やサインイン機能を簡単に実装でき、さらにGoogle、Apple、Facebookなどのソーシャルアイデンティティプロバイダーと連携することもできます。
AWS側
ユーザープールを作成
-
AWSにログインし、Cognitoの画面に移動します。
-
右上の「ユーザープールを作成」ボタンをクリックします。

-
以下のように記入し、ユーザープールを作成します。
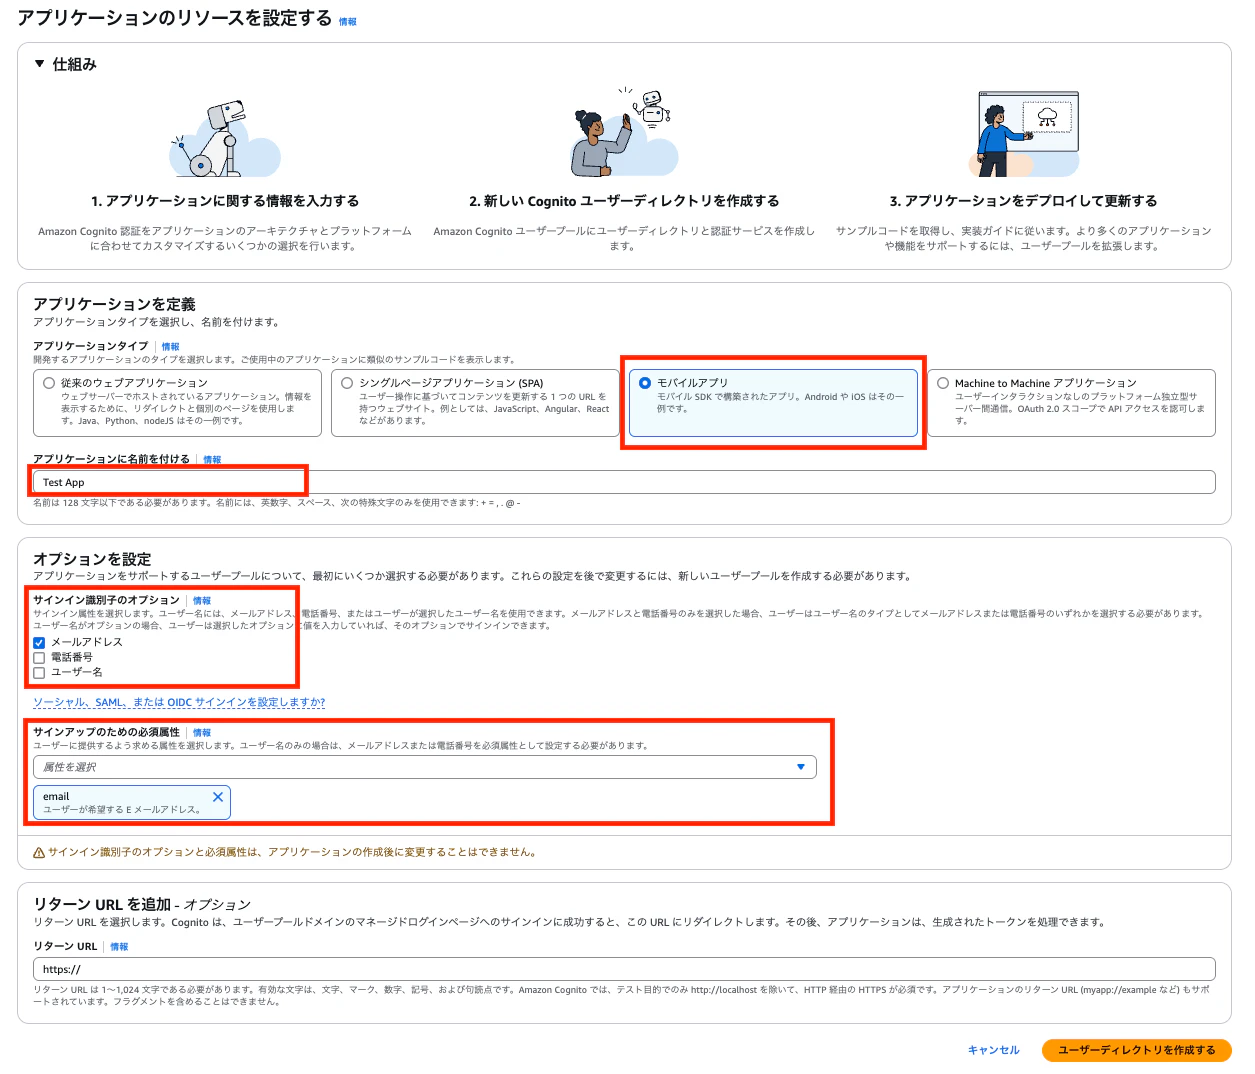
項目の解説
| 項目 | 解説 |
|---|---|
| アプリケーションタイプ | 開発するアプリケーションのタイプ |
| アプリケーションに名前を付ける | アプリの名前 |
| サインイン識別子のオプション | ユーザーがログインする際に使用する識別子 |
| サインアップのための必須属性 | ユーザーが登録時に入力する必要がある情報 |
注意
サインイン識別子のオプションとサインアップのための必須属性は後から変更不可です。
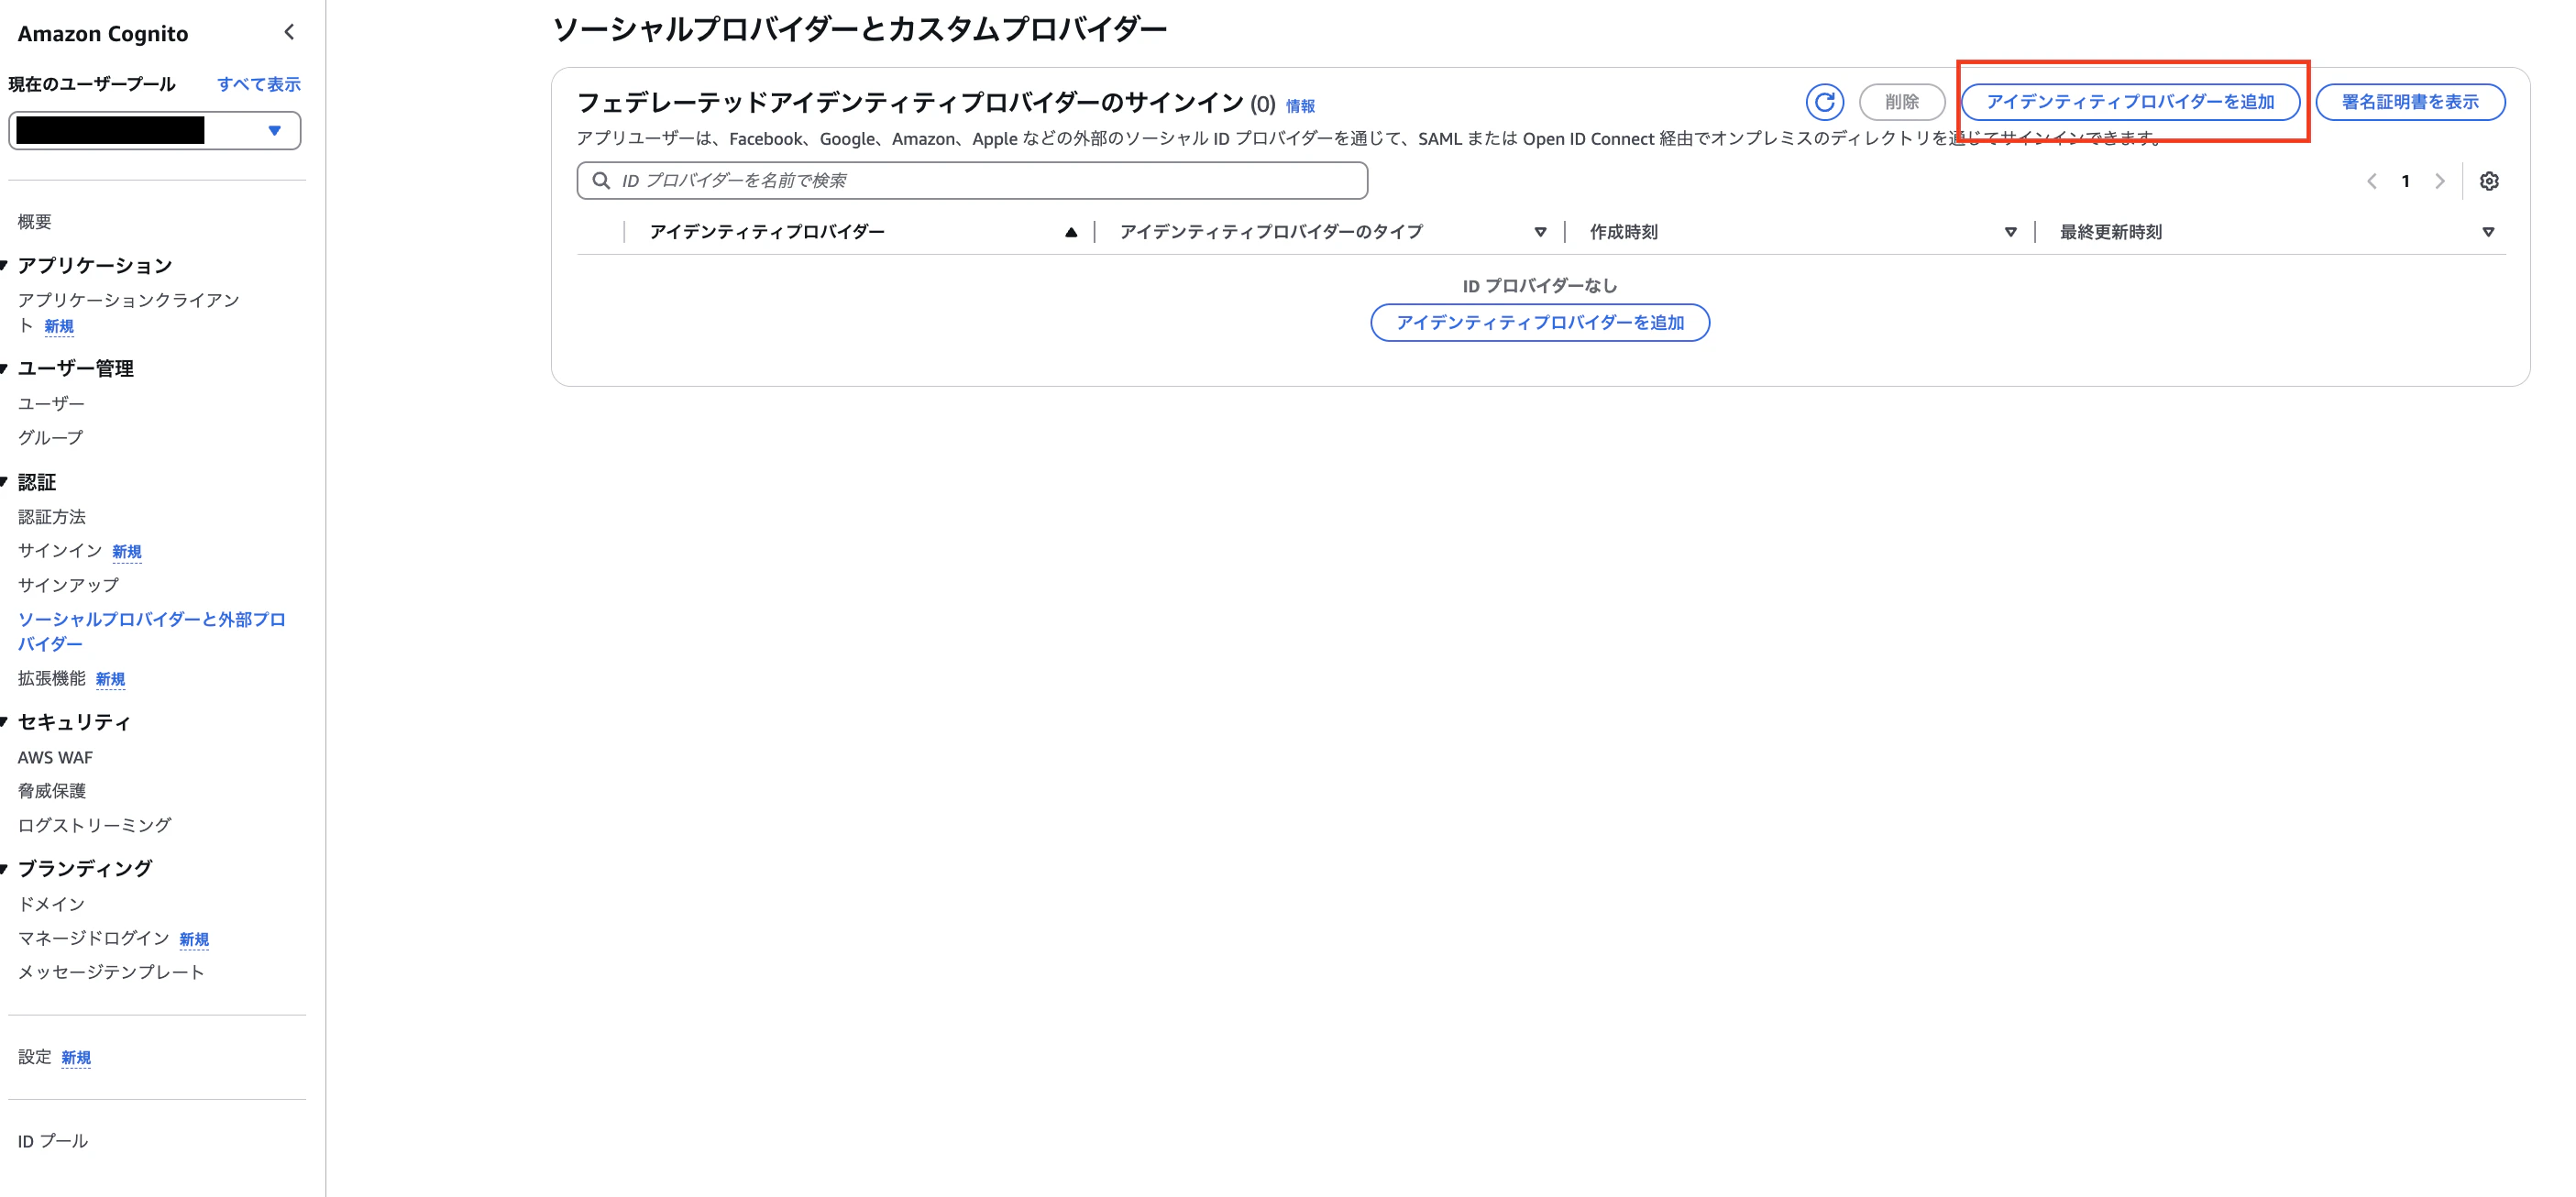
ソーシャルプロバイダーとカスタムプロバイダーの設定
-
各ソーシャルプロバイダー側で必要な設定を行い、クライアントIDなどを取得します。ここの説明は公式が丁寧にされているので、省きます。
公式ページはこちら

-
右上のボタンからアイデンティティプロバイダーを追加します。
-
以下の項目を埋めます。
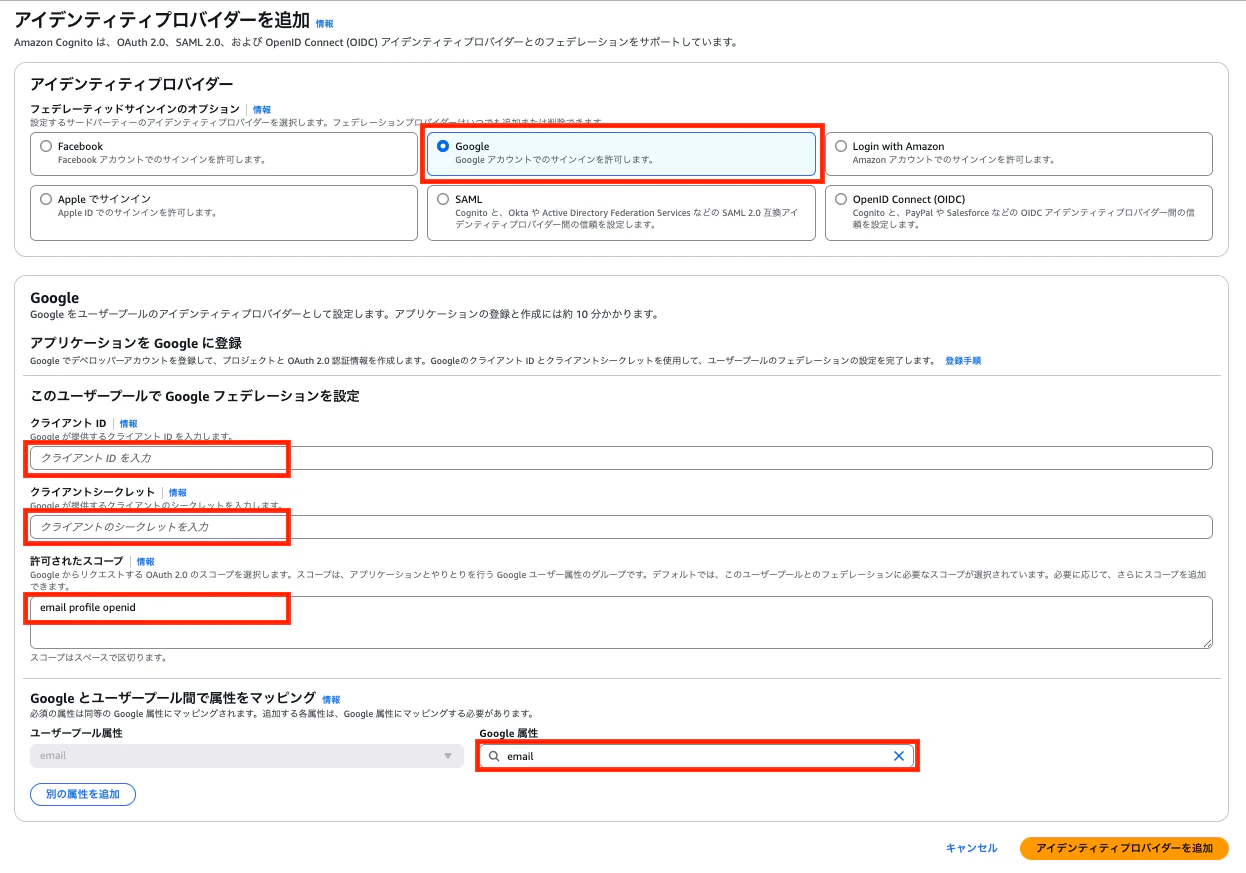
項目の解説
| 項目 | 解説 |
|---|---|
| クライアントID | Google API Consoleで取得したクライアントID |
| クライアントシークレット | Google API Consoleで取得したクライアントシークレット |
| 許可されたスコープ | Googleから取得したい情報(例:email profile openid) |
| Googleとユーザープール間で属性をマッピング | GoogleとCognitoのユーザー属性を対応付ける設定 |
Apple
-
右上のボタンからアイデンティティプロバイダーを追加します。
-
以下の項目を埋めます。
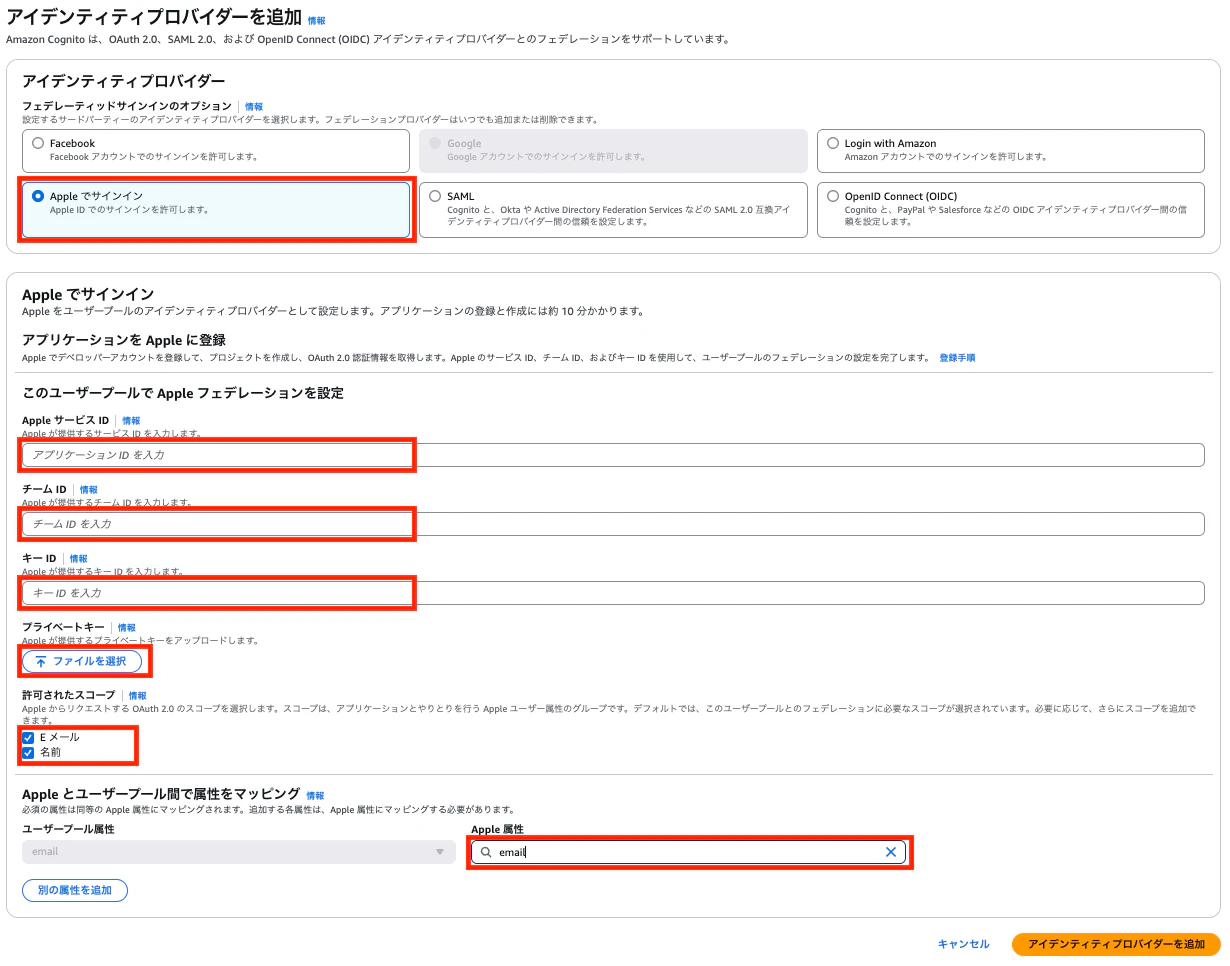
項目の解説
| 項目 | 解説 |
|---|---|
| AppleサービスID | Apple DeveloperでService ID登録時に設定したID |
| チームID | Apple DeveloperのチームID |
| キーID | Apple Developerで生成されたKey ID |
| プライベートキー | Apple Developerで生成された.p8ファイルをアップロード |
| 許可されたスコープ | Appleから取得したい要素 |
| Appleとユーザープール間で属性をマッピング | AppleとCognitoのユーザー属性を対応付ける設定 |
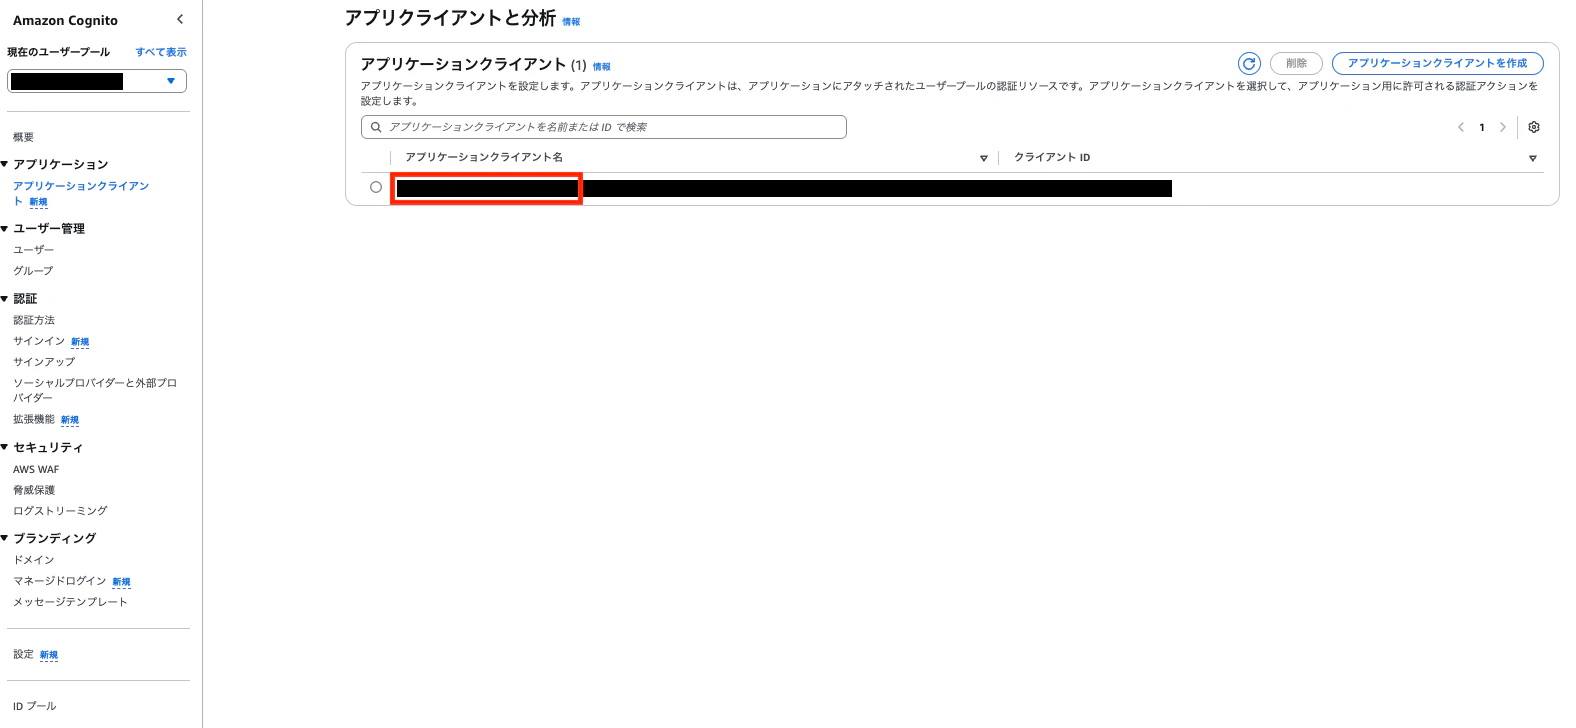
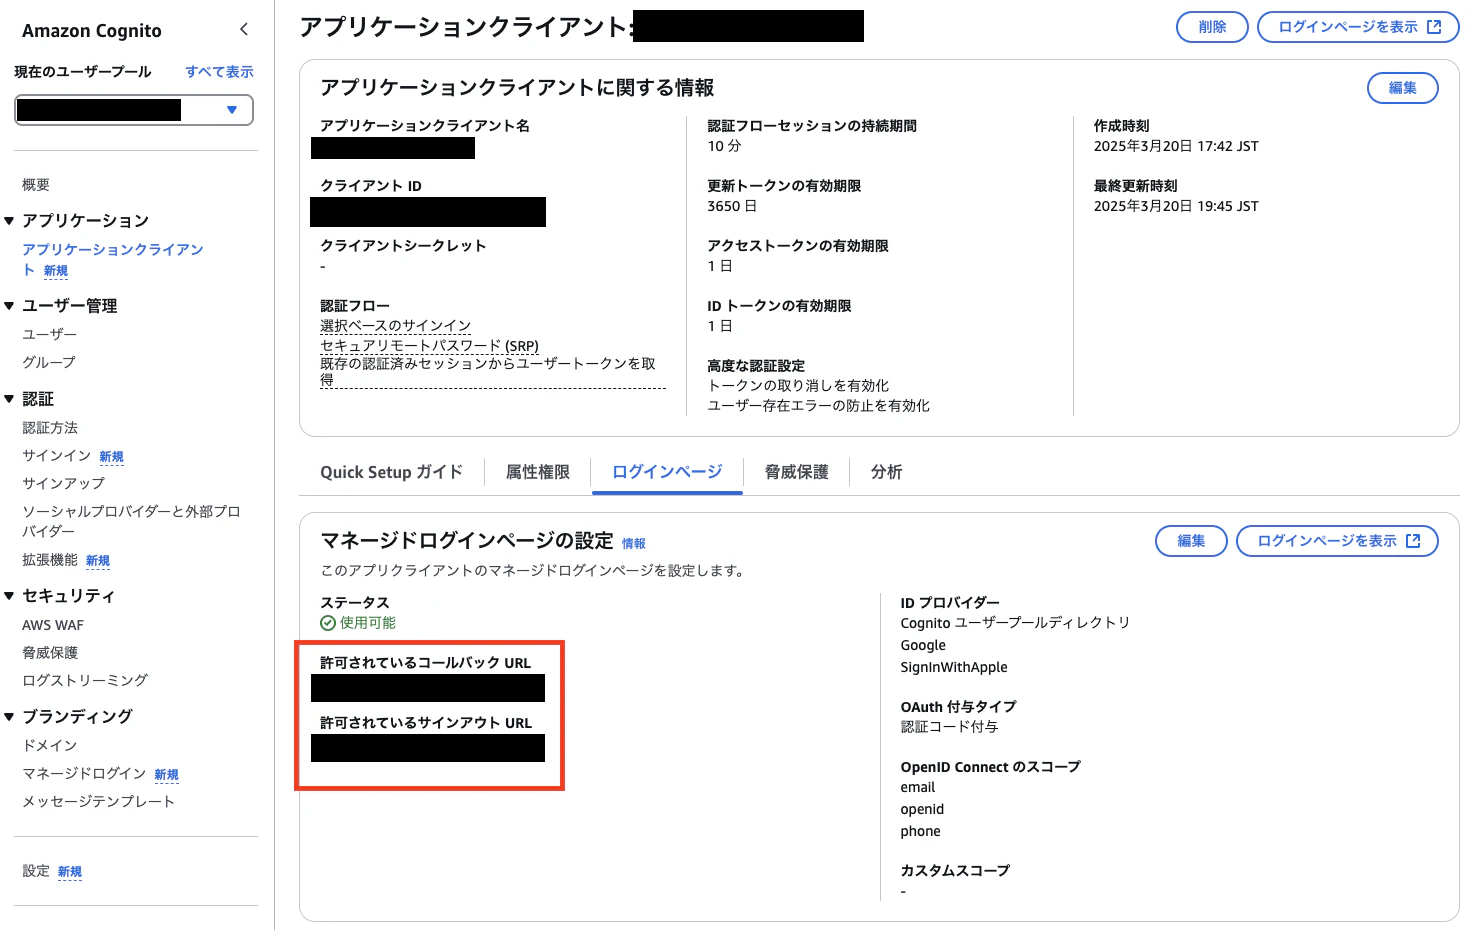
アプリケーションクライアントの設定
-
アプリを選択します。
-
ログインページの中の編集を押下します。
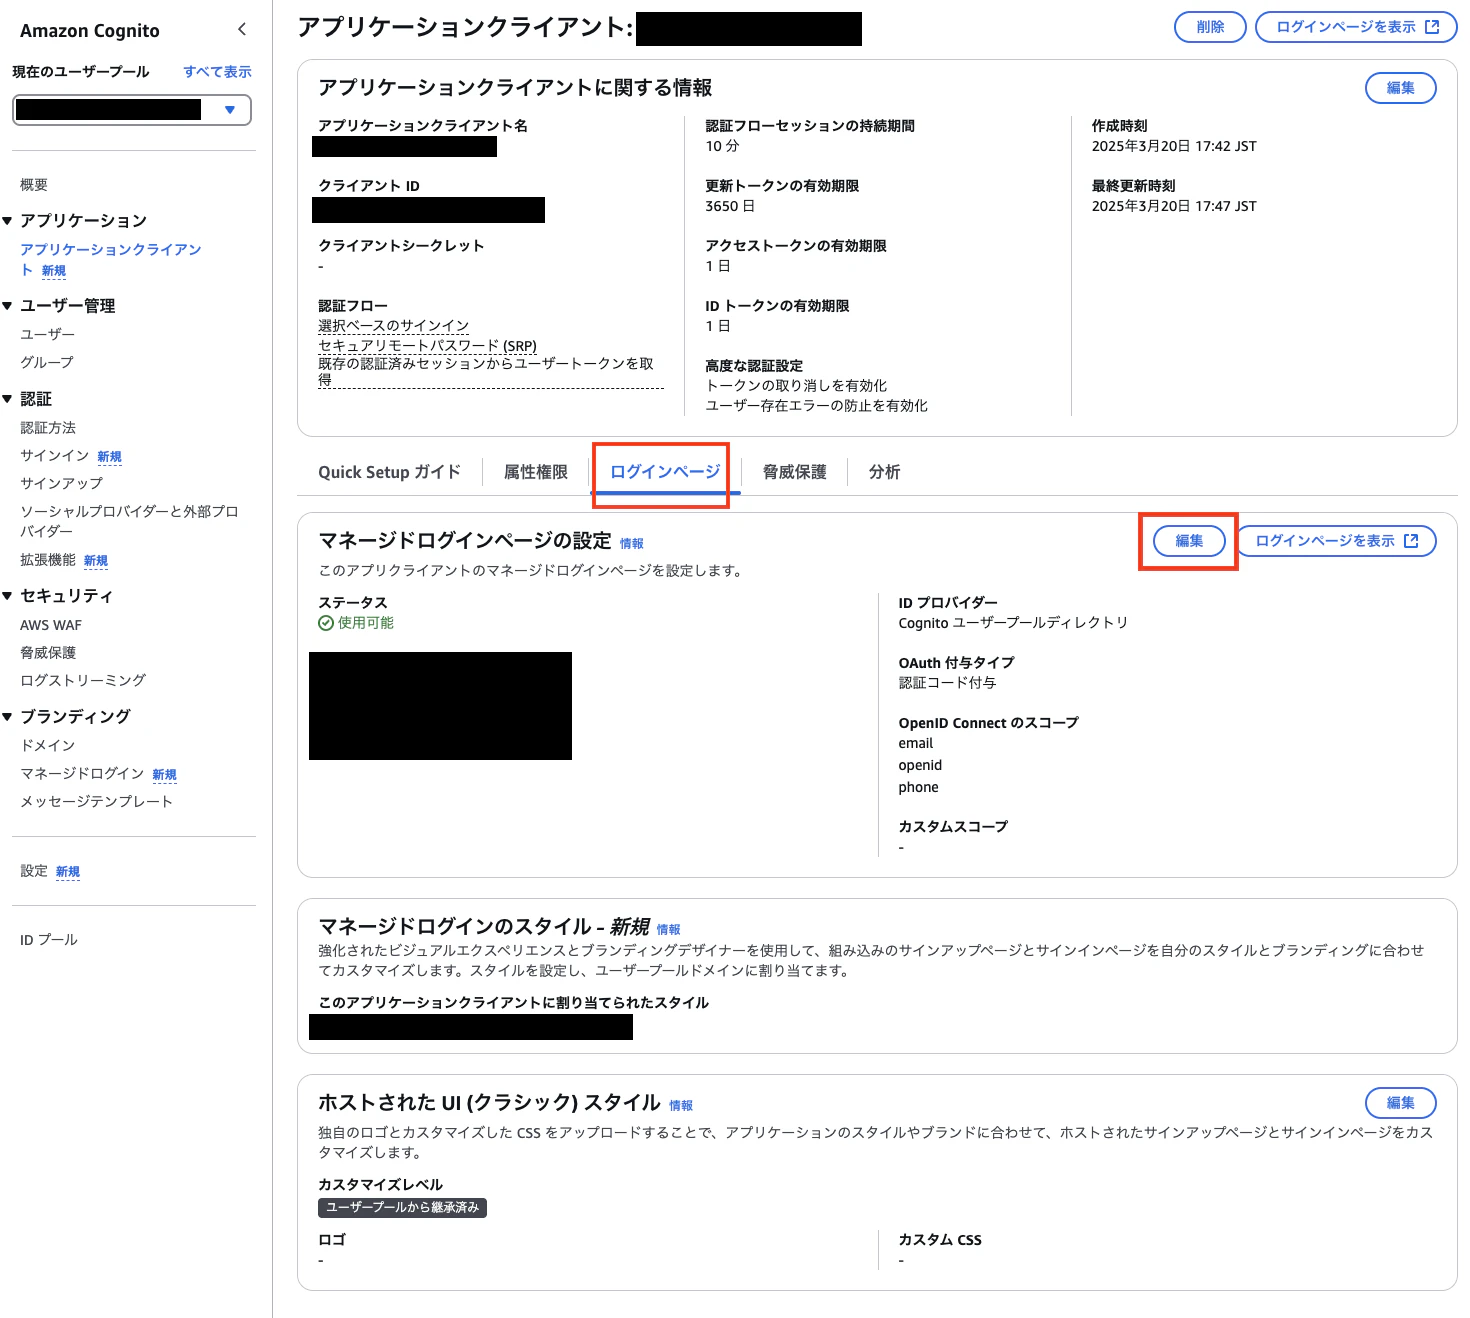
-
以下の項目を埋めます。
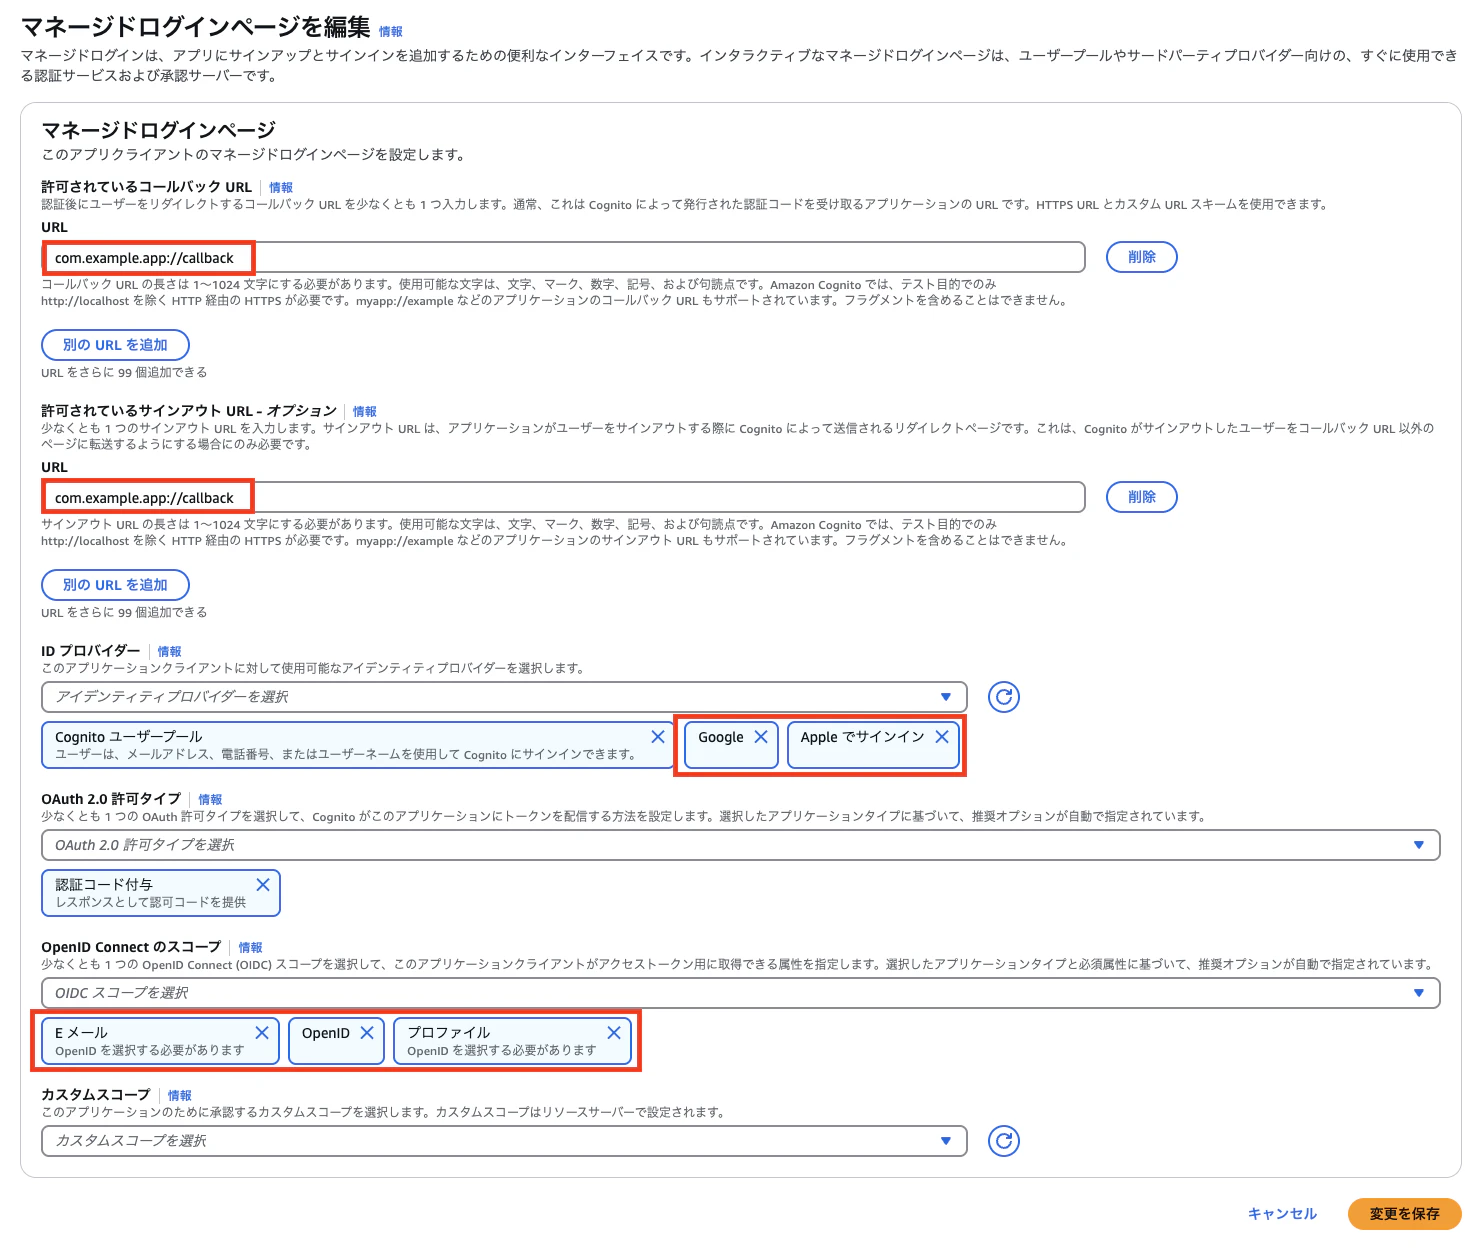
項目の解説
| 項目 | 解説 |
|---|---|
| 許可されているコールバックURL | サインイン後にリダイレクトされるURL(例:com.example.app://callback) |
| 許可されているサインアウトURL | ログアウト後にリダイレクトされるURL(例:com.example.app://callback) |
| ID プロパイダー | 使用するIDプロバイダー(例:Google、Apple) |
| OpenID Connectedのスコープ | OpenID Connectで要求するスコープ |
※OpenID Connectedのスコープ:openidは必須です。IDトークンを取得するために必要なスコープ。これが無いと「認証(ログイン)」が動作しないため。
※許可されているサインアウトURLはコールバックURLと同じで問題ないです
おまけ(ここの部分はやらなくても問題ないです)
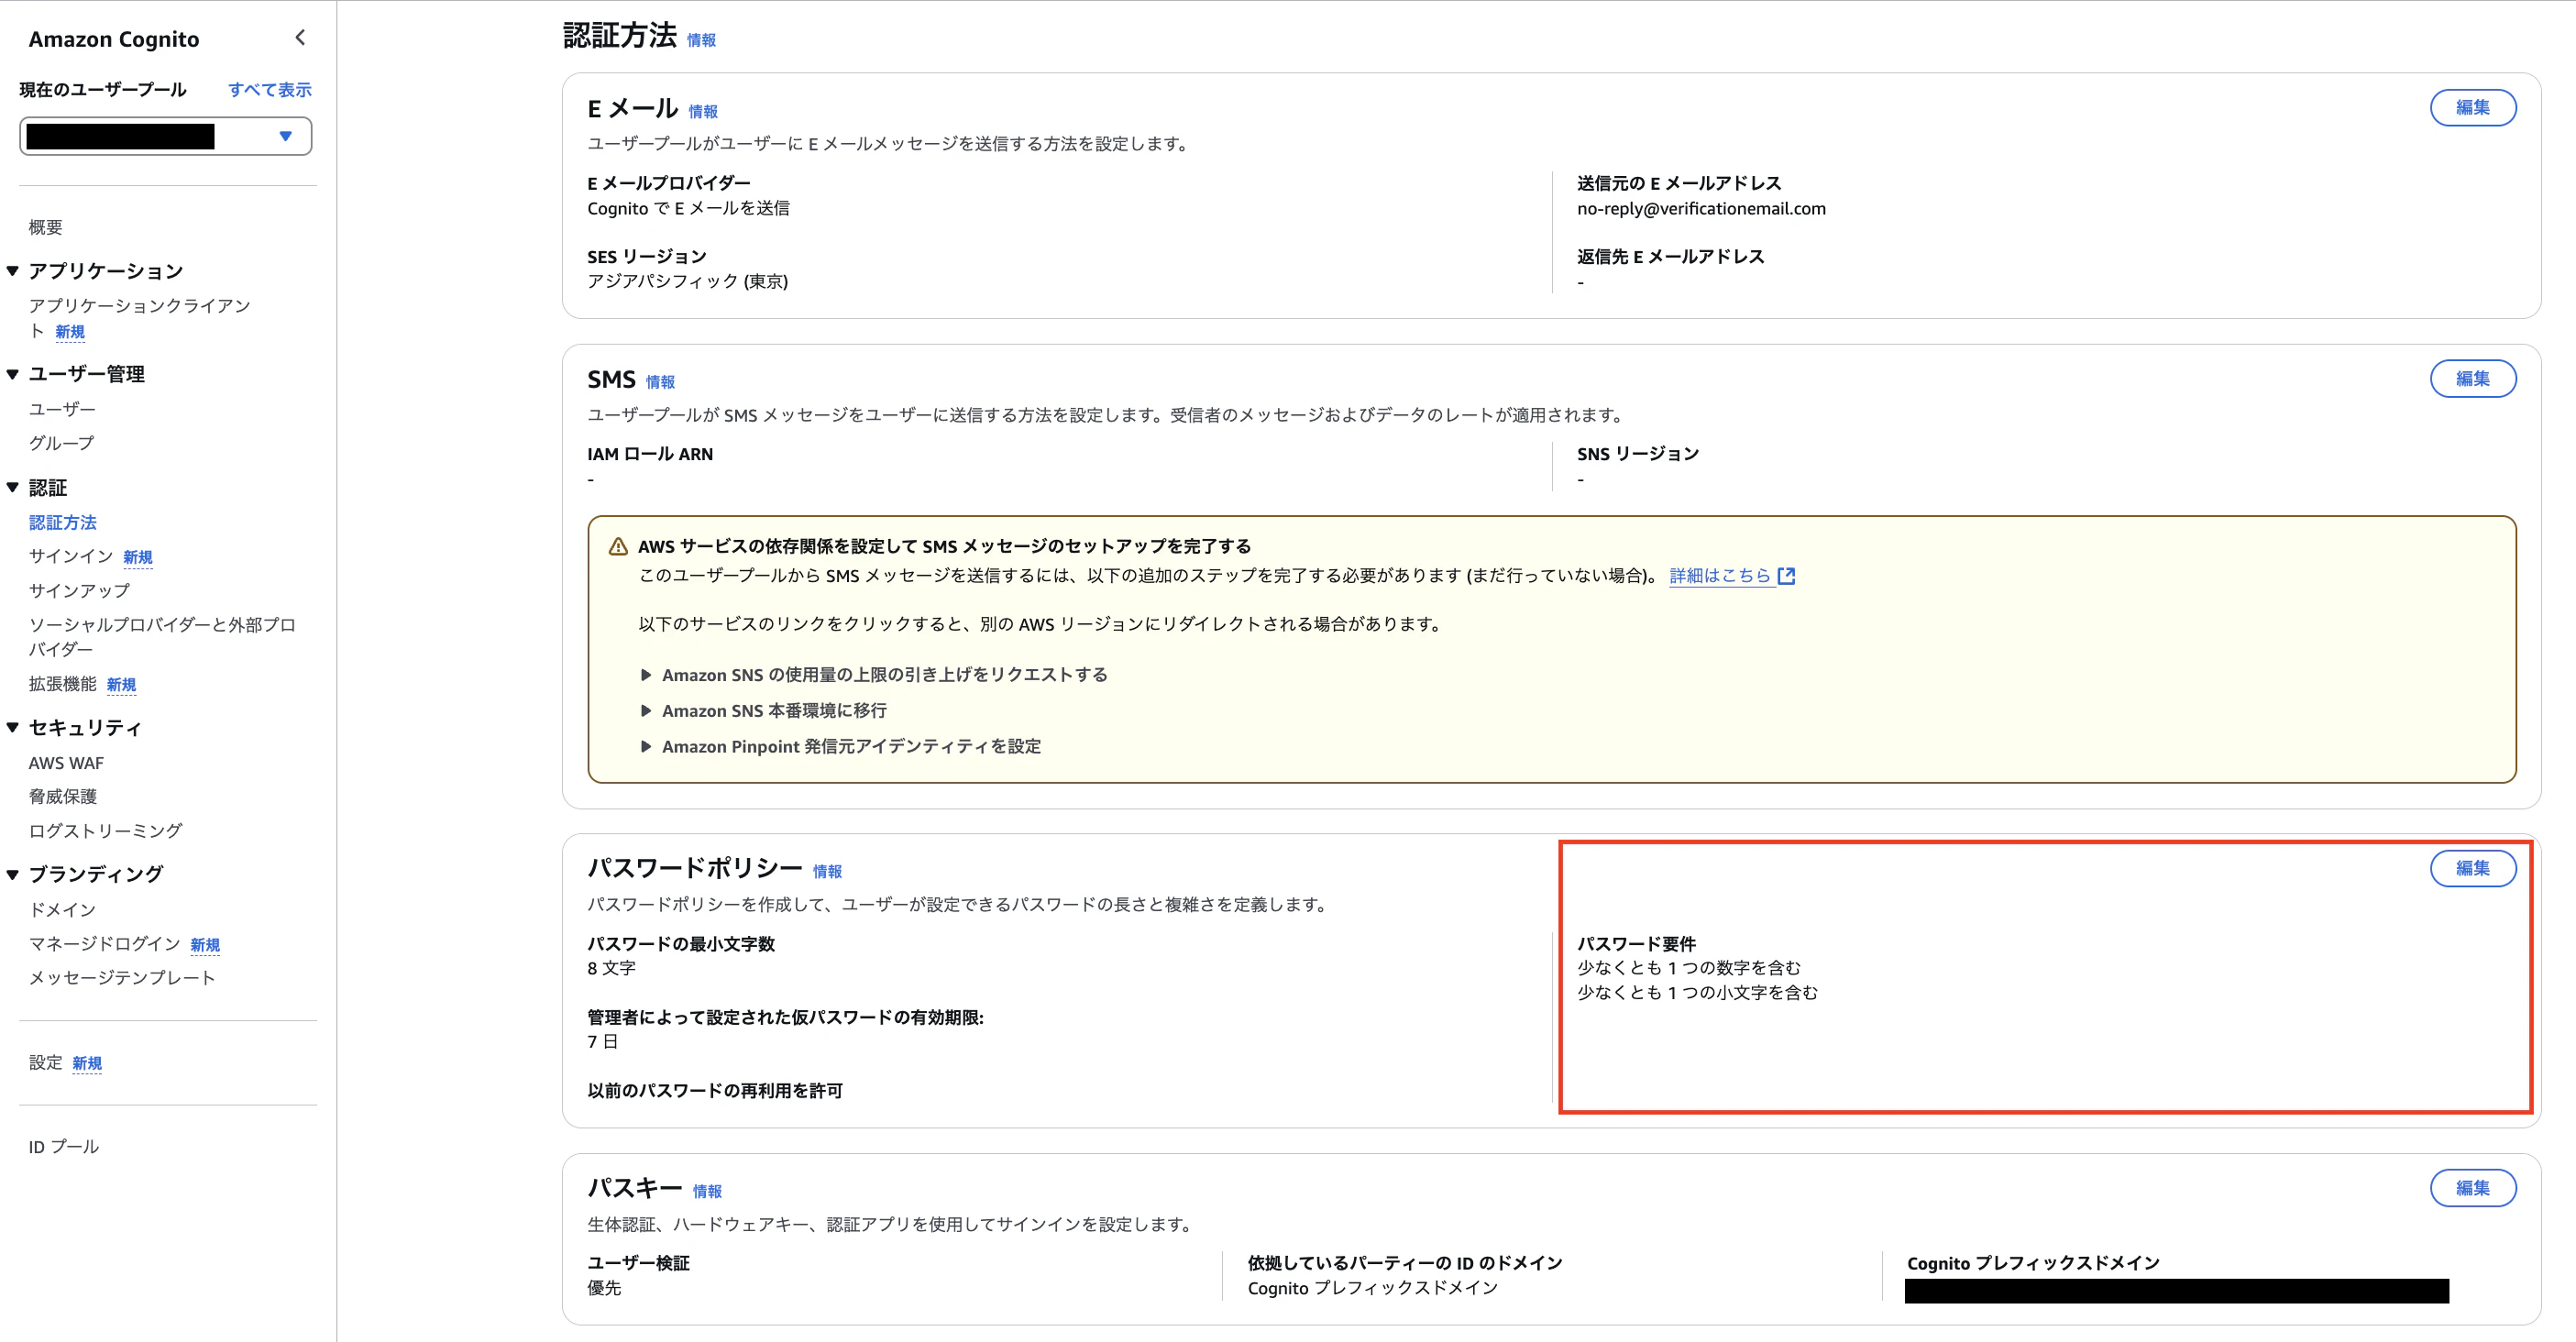
認証方法のカスタマイズ
以下のページで認証方法をお好みにカスタマイズします。
私はパスワード要件を緩くしました。
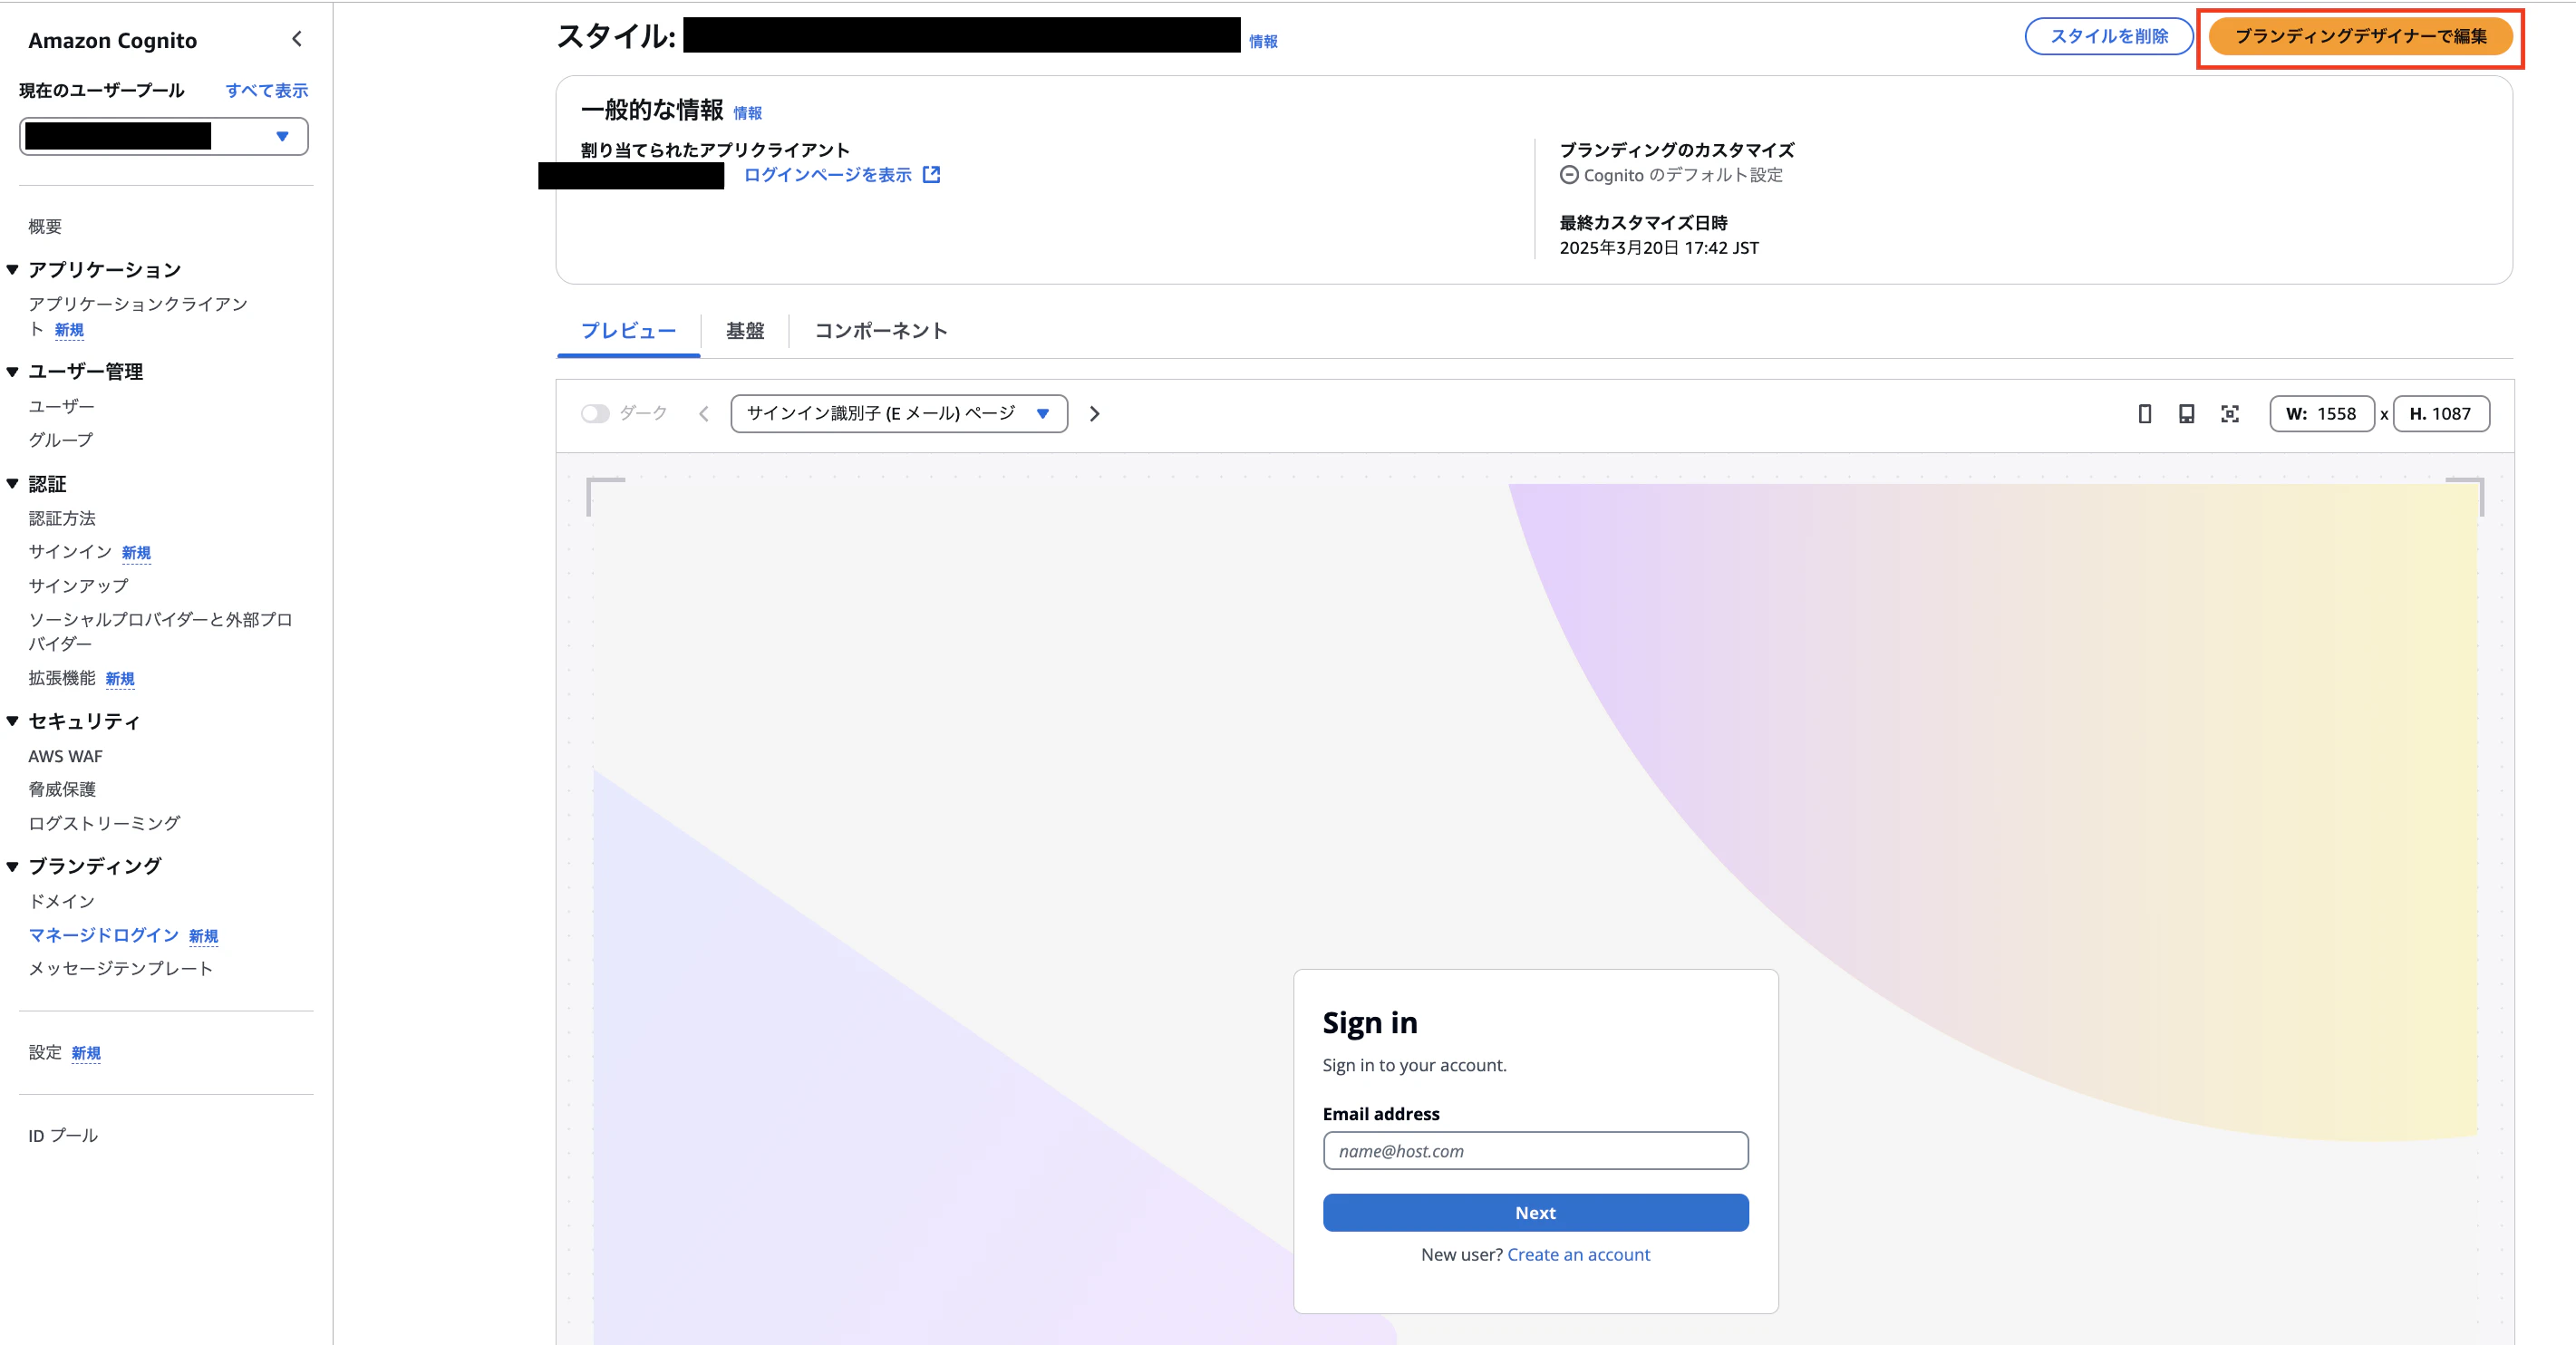
マネージドログイン画面のカスタマイズ
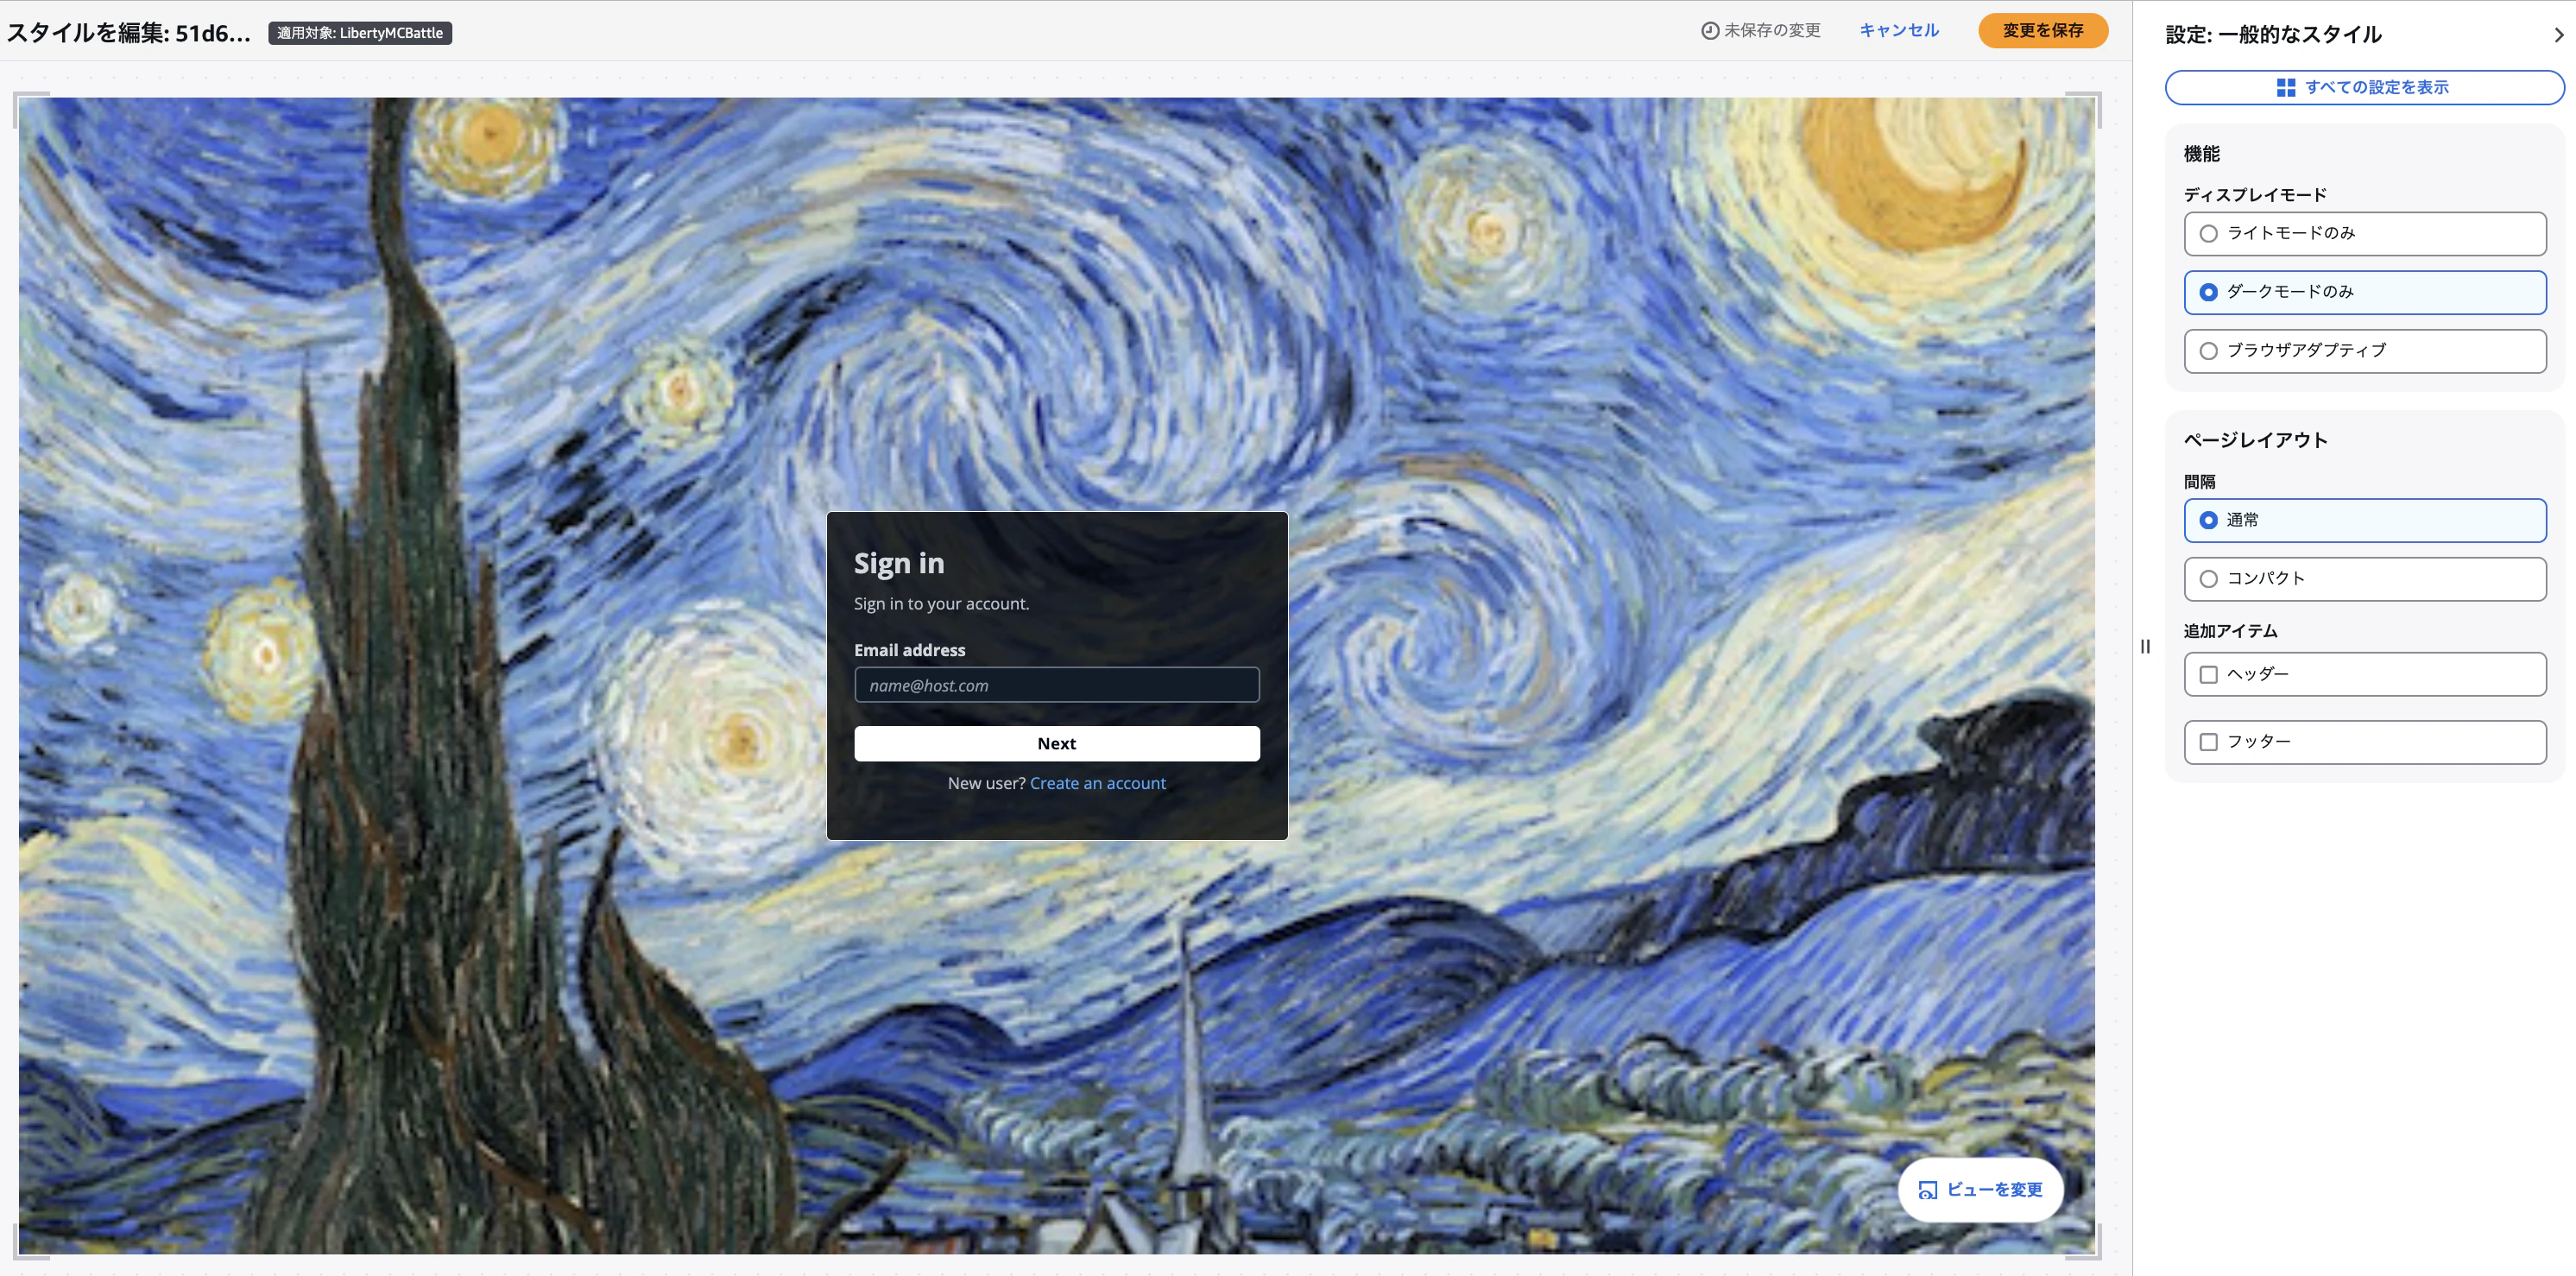
右上のボタンでマネージドログイン画面をオシャレにしましょう。
このように自由にカスタムできます。
メッセージテンプレート作成
認証時に送られてくるメールをオシャレにしましょう!
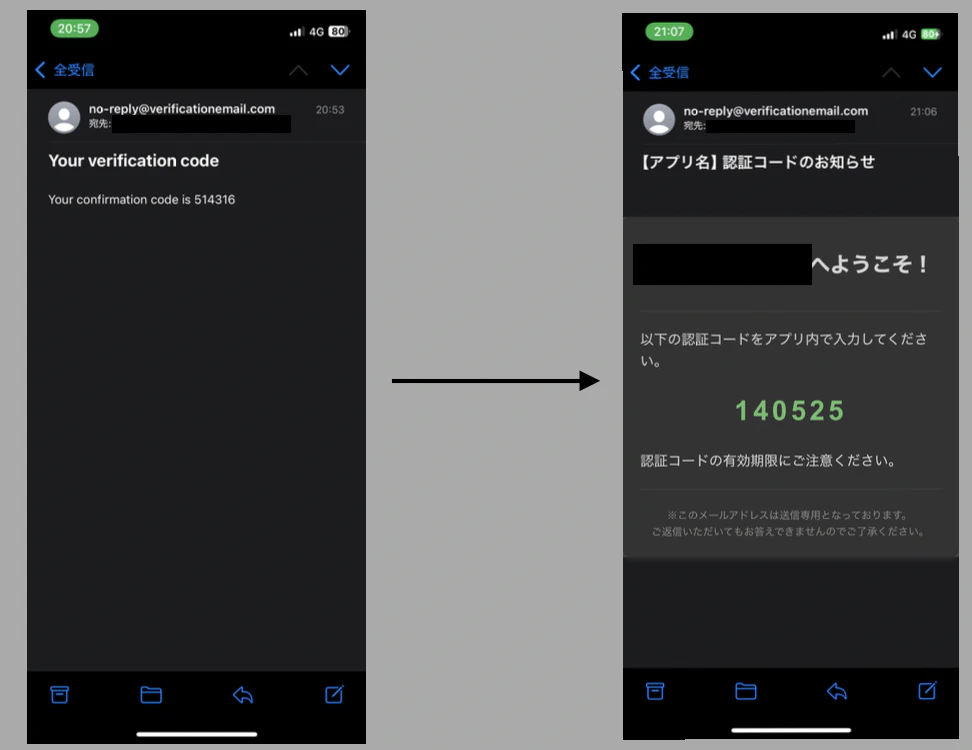
メッセージテンプレートを設定します。
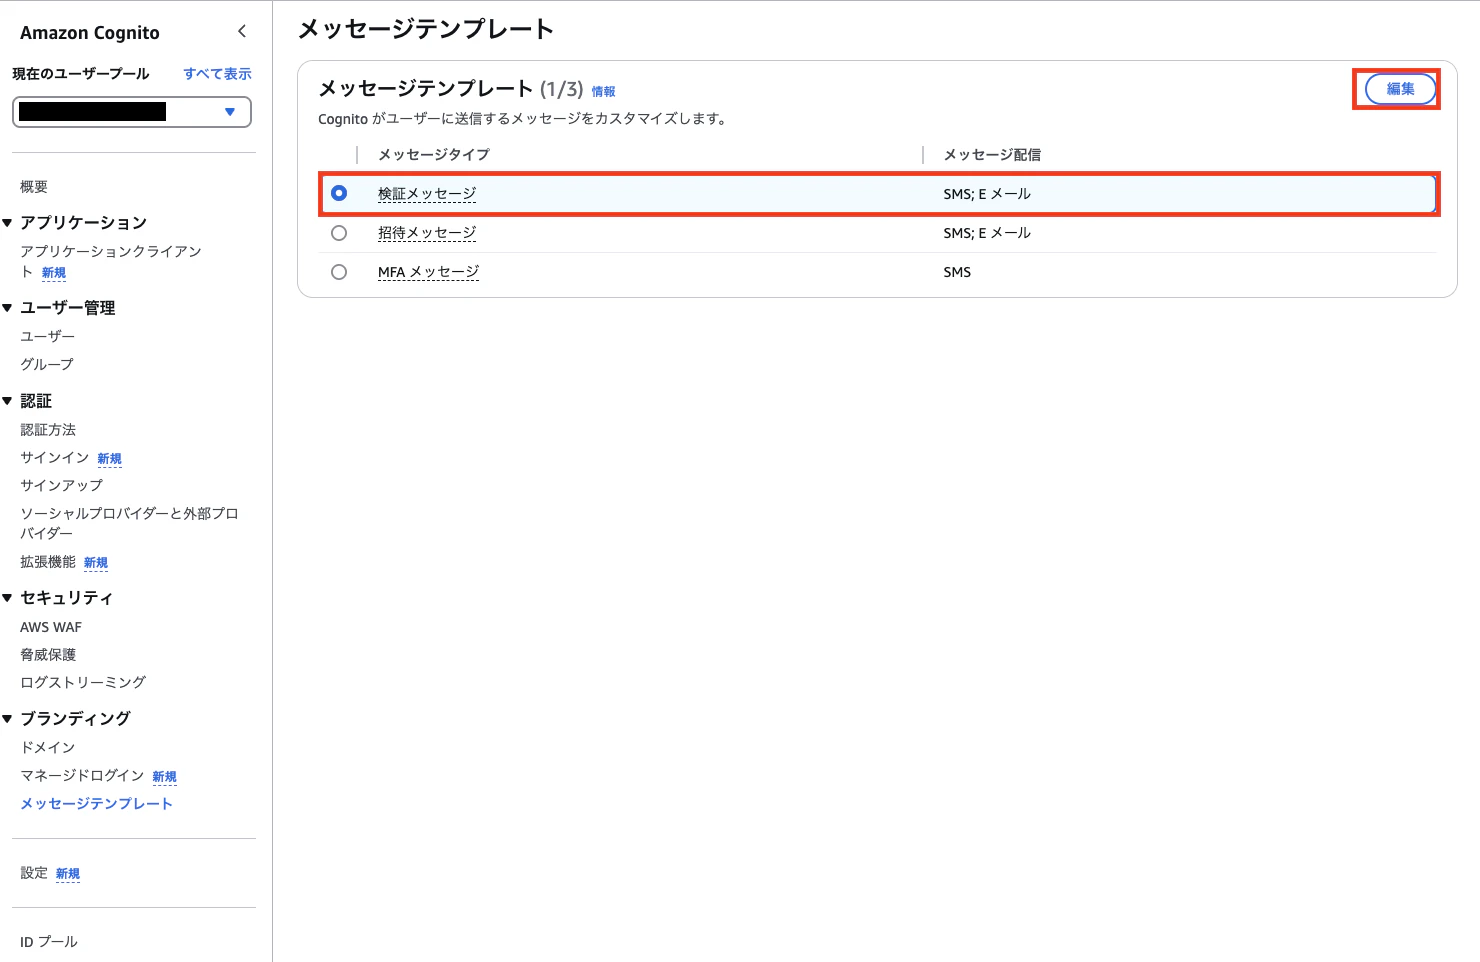
E メールメッセージではhtmlを設定できます。
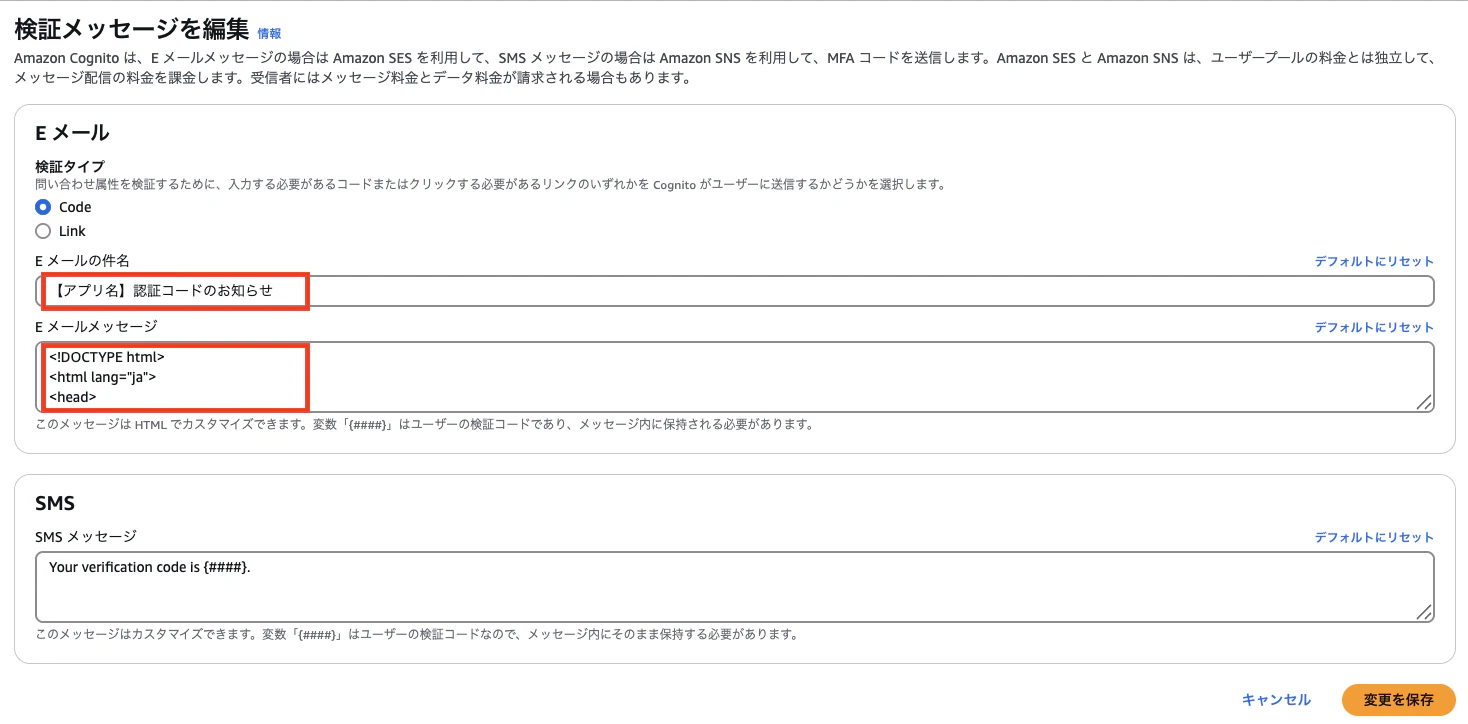
E メールメッセージの例
<!DOCTYPE html>
<html lang="ja">
<head>
  <meta charset="UTF-8">
  <meta name="viewport" content="width=device-width, initial-scale=1.0">
  <title>認証コードのご案内</title>
  <style>
    body {
      font-family: Arial, sans-serif;
      background-color: #f5f5f5;
      color: #333333;
      margin: 0;
      padding: 0;
    }
    .container {
      background-color: #ffffff;
      max-width: 600px;
      margin: 40px auto;
      padding: 20px;
      border-radius: 8px;
      box-shadow: 0 2px 6px rgba(0,0,0,0.1);
    }
    .header {
      text-align: center;
      padding-bottom: 20px;
      border-bottom: 1px solid #eeeeee;
    }
    .header h1 {
      color: #333333;
      font-size: 24px;
    }
    .content {
      margin: 20px 0;
      font-size: 16px;
      line-height: 1.6;
    }
    .code {
      font-size: 32px;
      font-weight: bold;
      color: #4CAF50;
      text-align: center;
      margin: 20px 0;
      letter-spacing: 4px;
    }
    .footer {
      font-size: 12px;
      color: #999999;
      text-align: center;
      border-top: 1px solid #eeeeee;
      padding-top: 20px;
    }
  </style>
</head>
<body>
  <div class="container">
    <div class="header">
      <h1>「アプリ名」へようこそ!</h1>
    </div>
    <div class="content">
      <p>以下の認証コードをアプリ内で入力してください。</p>
      <div class="code">{####}</div>
      <p>認証コードの有効期限にご注意ください。</p>
    </div>
    <div class="footer">
      ※このメールアドレスは送信専用となっております。<br>
      ご返信いただいてもお答えできませんのでご了承ください。
    </div>
  </div>
</body>
</html>
アプリ側
以下の実装をします。
- OAuthを使ったソーシャルログイン
- Google認証によるログイン
- Apple IDによるログイン
- 認証情報の安全な管理
- トークンの安全な保存(flutter_secure_storage使用)
- アクセストークンの有効期限管理
- リフレッシュトークンによる自動再認証
- ユーザー情報の取得
- メールアドレス、ニックネームなどのプロフィール情報の取得
- OAuthプロバイダーからのユーザー情報の取得
- セッション管理
- ログイン状態の確認機能
- 適切なセッション終了(ログアウト)処理
必要な設定
OAuthフローを使ったCognito認証とログアウトを正しく機能させるためには、iOS(Info.plist)とAndroid(AndroidManifest.xml)の両方に適切な設定が必要です。
iOS側
<!-- Info.plist -->
..

<key>CFBundleURLTypes</key>
<array>
  <dict>
    <key>CFBundleTypeRole</key>
    <string>Editor</string>
    <key>CFBundleURLName</key>
    <string>com.example.app</string>
    <key>CFBundleURLSchemes</key>
    <array>
      <string>com.example.app</string>
    </array>
  </dict>
</array>

..
※CFBundleURLSchemesの値は、CognitoConfig.redirectUriで指定しているURLスキーム部分(com.example.app)と一致させる必要があります。
Android側
<!-- AndroidManifest.xml -->
..

      <!-- OAuth用のディープリンク設定 -->
      <intent-filter>
        <action android:name="android.intent.action.VIEW" />
        <category android:name="android.intent.category.DEFAULT" />
        <category android:name="android.intent.category.BROWSABLE" />
        <data
          android:scheme="com.example.app"
          android:host="callback" />
      </intent-filter>

..
ライブラリ
以下のライブラリを使って実装しました。
flutter_secure_storage: ^9.0.0
flutter_appauth: ^9.0.0
http: ^1.1.0
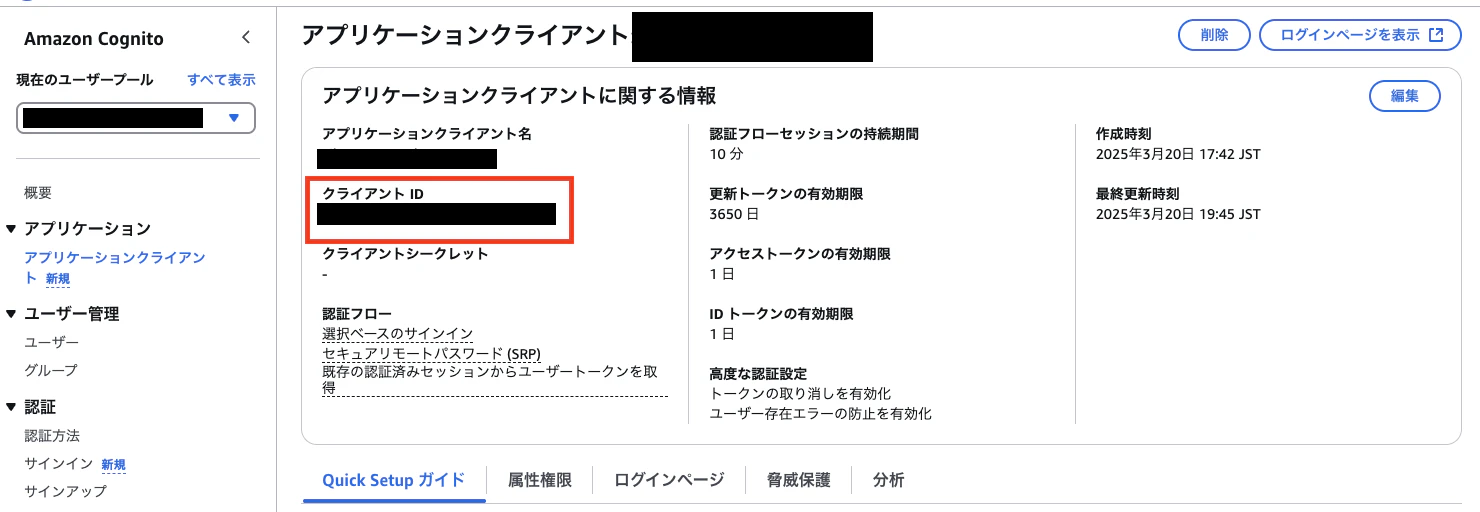
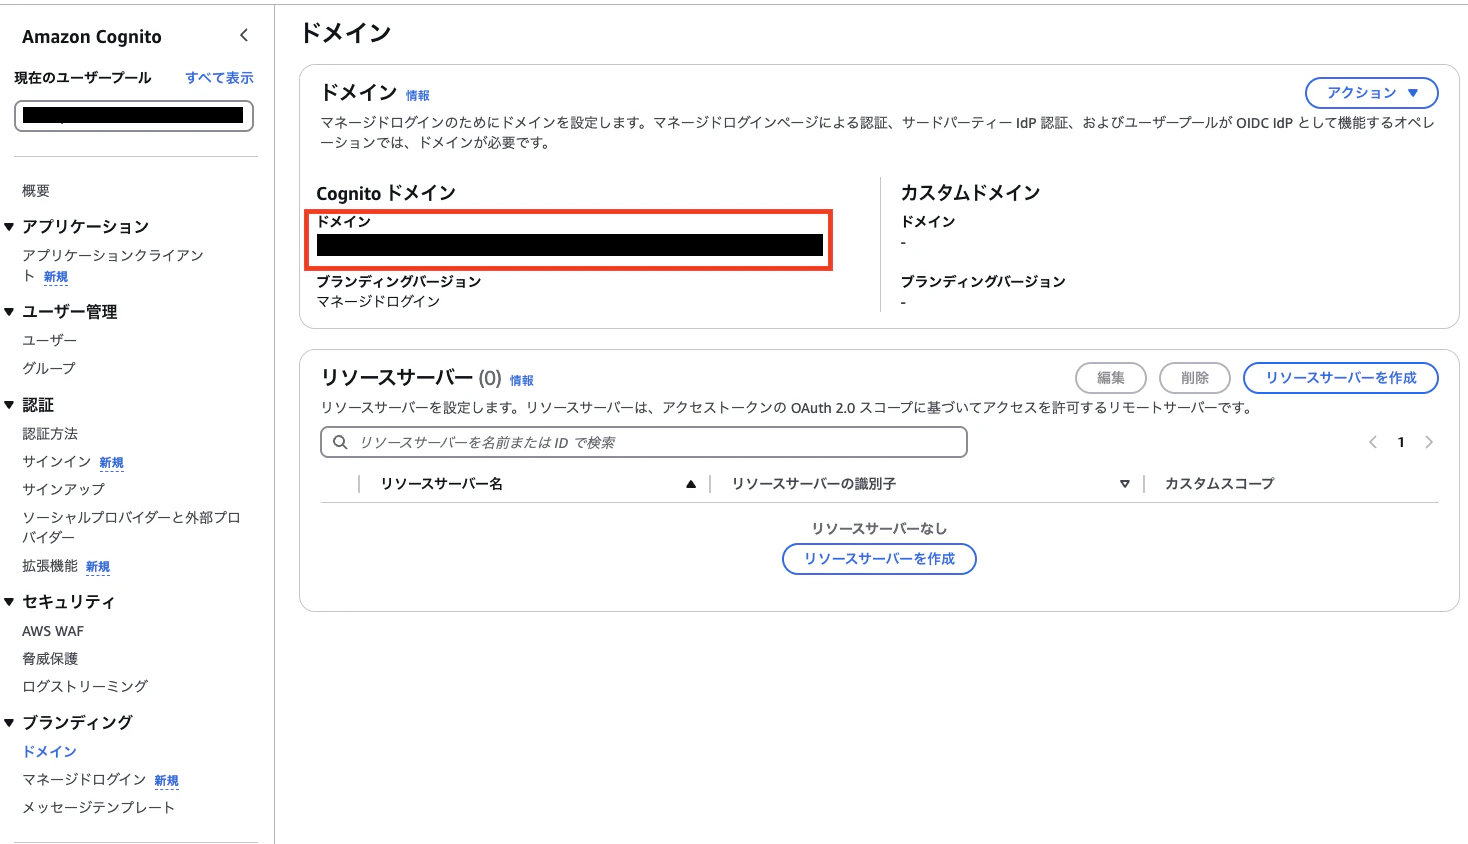
configクラス
適当な場所に以下を定義します。(例:my_app/core/config/cognito_config.dart)
class CognitoConfig {
  static const String clientId = '';
  static const String hostedUiDomain = ''; // Cognitoのドメイン https://を抜いて
  static const String redirectUri = '';  // CognitoのリダイレクトURI
}
clientIdはここ
hostedUiDomainはここ(※https//を抜いて)
redirectUriはここ
認証処理をまとめたクラス
適当な場所に以下を定義します。(例:my_app/services/auth_service.dart)
認証処理
import 'package:my_app/core/config/cognito_config.dart';
import 'package:flutter_secure_storage/flutter_secure_storage.dart';
import 'package:flutter_appauth/flutter_appauth.dart';

class Result {
  final bool success;
  final String message;

  Result({
    required this.success,
    this.message = '',
  });
}

class AuthService {
  static final _storage = FlutterSecureStorage();
  static final _appAuth = FlutterAppAuth();

  // ============================
  // = 認証に関わるコード =
  // ============================
  static Future<Result> authenticateWithCognito() async {
    try {
      final result = await _appAuth.authorizeAndExchangeCode(
        AuthorizationTokenRequest(
          CognitoConfig.clientId,
          CognitoConfig.redirectUri,
          serviceConfiguration: AuthorizationServiceConfiguration(
            authorizationEndpoint: 'https://${CognitoConfig.hostedUiDomain}/oauth2/authorize',
            tokenEndpoint: 'https://${CognitoConfig.hostedUiDomain}/oauth2/token',
          ),
          scopes: ['openid', 'email', 'profile'],
          additionalParameters: {
            'lang': 'ja',
          },
        ),
      );

      await _persistTokens({
        'id_token': result.idToken,
        'access_token': result.accessToken,
        'refresh_token': result.refreshToken,
      });
      return Result(success: true, message: 'ログインしました');
    } catch (e) {
      print('認証エラー: $e');
      return Result(success: false, message: 'ログインに失敗しました');
    }
  }

  // ============================
  // = トークン保存に関わるコード =
  // ============================
  static Future<void> _persistTokens(Map<String, dynamic> tokens) async {
    await _storage.write(key: 'id_token', value: tokens['id_token']);
    await _storage.write(key: 'access_token', value: tokens['access_token']);
    await _storage.write(key: 'refresh_token', value: tokens['refresh_token']);
  }

  ..
}
その他の便利な関数
..

  // ===========================
  // = サインアウトに関わるコード =
  // ===========================
  static Future<Result> signOut() async {
    try {
      // 1. OAuthセッションのクリア
      try {
        final tokens = await getTokens();
        final idToken = tokens['id_token'];

        if (idToken != null) {
          // AppAuthのセッションをクリア
          await _appAuth.endSession(
            EndSessionRequest(
              idTokenHint: idToken,
              postLogoutRedirectUrl: CognitoConfig.redirectUri,
              serviceConfiguration: AuthorizationServiceConfiguration(
                authorizationEndpoint: 'https://${CognitoConfig.hostedUiDomain}/oauth2/authorize',
                tokenEndpoint: 'https://${CognitoConfig.hostedUiDomain}/oauth2/token',
                endSessionEndpoint: 'https://${CognitoConfig.hostedUiDomain}/logout',
              ),
              additionalParameters: {
                'client_id': CognitoConfig.clientId,
                'logout_uri': CognitoConfig.redirectUri,
              },
            ),
          );
          print('OAuthセッションをクリアしました');
        }
      } catch (e) {
        print('OAuthセッションクリアエラー: $e');
        // エラーが発生してもログアウト処理は続行
      }

      // 2. 保存されたセッション情報を削除
      await _storage.deleteAll();
      print('ログアウト完了: ストレージをクリア');
      return Result(success: true, message: 'サインアウトに成功しました');

    } catch (e) {
      print('サインアウトエラー: $e');
      // エラーが発生してもストレージは削除を試みる
      await _storage.deleteAll();
      return Result(success: false, message: 'サインアウトに失敗しました');
    }
  }


  // ============================
  // = ログイン状態確認に関わるコード =
  // ============================
  static Future<Result> isSignin() async {
    try {
      final tokens = await getTokens();
      final accessToken = tokens['access_token'];

      if (accessToken == null) {
        return Result(success: false, message: 'ログインが必要です');
      }

      try {
        // アクセストークンでユーザー情報を取得
        await getUserInfo(accessToken);
        return Result(success: true, message: 'ログイン中');
      } catch (e) {
        // アクセストークンが無効な場合、リフレッシュを試みる
        final refreshToken = tokens['refresh_token'];
        if (refreshToken != null) {
          try {
            final newTokens = await refreshTokens(refreshToken);
            await _persistTokens(newTokens);
            return Result(success: true, message: 'トークンを更新しました');
          } catch (e) {
            await signOut(); // リフレッシュに失敗した場合はログアウト
            return Result(success: false, message: '再ログインが必要です');
          }
        }
      }

      return Result(success: false, message: 'ログインが必要です');
    } catch (e) {
      return Result(success: false, message: 'エラーが発生しました');
    }
  }

  static Future<Map<String, String?>> getTokens() async {
    return {
      'id_token': await _storage.read(key: 'id_token'),
      'access_token': await _storage.read(key: 'access_token'),
      'refresh_token': await _storage.read(key: 'refresh_token'),
    };
  }

  static Future<Map<String, dynamic>> refreshTokens(String refreshToken) async {
    try {
      // FlutterAppAuthを使用してトークンをリフレッシュ
      final TokenResponse? response = await _appAuth.token(
        TokenRequest(
          CognitoConfig.clientId,
          CognitoConfig.redirectUri,
          refreshToken: refreshToken,
          grantType: 'refresh_token',
          serviceConfiguration: AuthorizationServiceConfiguration(
            authorizationEndpoint: 'https://${CognitoConfig.hostedUiDomain}/oauth2/authorize',
            tokenEndpoint: 'https://${CognitoConfig.hostedUiDomain}/oauth2/token',
          ),
        ),
      );

      if (response != null && response.accessToken != null) {
        // 更新されたトークン情報を返す
        return {
          'id_token': response.idToken,
          'access_token': response.accessToken,
          'refresh_token': response.refreshToken ?? refreshToken, // 新しいリフレッシュトークンがなければ古いものを使用
        };
      }

      throw Exception('トークンの更新に失敗しました: レスポンスが空です');
    } catch (e) {
      print('トークン更新エラー: $e');
      throw Exception('トークンの更新に失敗しました: $e');
    }
  }

  static Future<Map<String, dynamic>> getUserInfo(String accessToken) async {
    final response = await http.get(
      Uri.parse('https://${CognitoConfig.hostedUiDomain}/oauth2/userInfo'),
      headers: {
        'Authorization': 'Bearer $accessToken',
      },
    );

    if (response.statusCode == 200) {
      return json.decode(response.body);
    }
    throw Exception('ユーザー情報の取得に失敗しました');
  }

..
認証の呼び出し先
以下のように適当な画面で呼び出します。
import 'package:my_app/services/auth_service.dart';

..
..

PrimaryButton(
  text: '認証する',
  onPressed: () async {
    final result = await AuthService.authenticateWithCognito();
    if (result.success) {
      print("認証成功")
    } else {
      print("認証失敗")
    }
  },
)

..
ここまで実装すると、以下の認証が表示されるようになるはずです。
まとめ
Amazon Cognitoのマネージドログインを活用することで、セキュアかつスムーズなログイン体験を簡単にアプリに導入できました。
複雑なOAuth2.0認証の処理はAWSに任せつつ、ユーザー管理やトークン取得をシンプルに実装可能でした。ぜひ、いいね👍をお願いします。