Transit Gatewayを使用したVPC間の通信をTerraformで実装してみた
VPC間の通信をTerraformで実装していきます。
構成
以下のような構成を実装します。

VPC 作成
まずはVPCです。
今回はEC2にセッションマネージャーで接続してpingコマンドで疎通確認を行うため、InternetGatewayをVPC1に配置しています。
よりセキュアな構成にする場合は、ssmエンドポイントもしくはInstance Connectエンドポイントを使用して構築する必要があります。
# VPC1の作成
resource "aws_vpc" "vpc1" {
  provider = aws.network1

  cidr_block = "10.0.0.0/16"
  tags = {
    Name = "vpc-1"
  }
}

# VPC2の作成
resource "aws_vpc" "vpc2" {
  provider = aws.network1

  cidr_block = "10.1.0.0/16"
  tags = {
    Name = "vpc-2"
  }
}

# IGWの作成(SessionManagerで接続するため)
resource "aws_internet_gateway" "igw1" {
  provider = aws.network1
  vpc_id = aws_vpc.vpc1.id

  tags = {
    Name = "vpc1-igw"
  }
}

# VPC1用のルートテーブルの作成
resource "aws_route_table" "vpc1-rtb" {
  provider = aws.network1
  vpc_id = aws_vpc.vpc1.id

  route {
    cidr_block = "0.0.0.0/0"
    gateway_id = aws_internet_gateway.igw1.id
  }

  route {
    cidr_block         = "10.1.0.0/24"
    transit_gateway_id = aws_ec2_transit_gateway.tgw.id
  }

  tags = {
    Name = "vpc1-route-table"
  }
}

# VPC2用のルートテーブルの作成
resource "aws_route_table" "vpc2-rtb" {
  provider = aws.network1
  vpc_id = aws_vpc.vpc2.id

  # ローカルトラフィックは Transit Gateway へ
  route {
    cidr_block         = "10.0.0.0/24"
    transit_gateway_id = aws_ec2_transit_gateway.tgw.id
  }

  tags = {
    Name = "vpc2-route-table"
  }
}

# VPC1のサブネットの作成
resource "aws_subnet" "vpc1-subnet" {
  provider = aws.network1
  vpc_id                  = aws_vpc.vpc1.id
  cidr_block              = "10.0.0.0/24"
  map_public_ip_on_launch = true

  tags = {
    Name = "vpc1-subnet"
  }
}

# VPC2のサブネットの作成
resource "aws_subnet" "vpc2-subnet" {
  provider = aws.network1
  vpc_id                  = aws_vpc.vpc2.id
  cidr_block              = "10.1.0.0/24"
  map_public_ip_on_launch = true

  tags = {
    Name = "vpc2-subnet"
  }
}

# VPC1のサブネットとルートテーブルの関連付け
resource "aws_route_table_association" "rtb-association1" {
  provider = aws.network1
  subnet_id      = aws_subnet.vpc1-subnet.id
  route_table_id = aws_route_table.vpc1-rtb.id
}

# VPC2のサブネットとルートテーブルの関連付け
resource "aws_route_table_association" "rtb-association2" {
  provider = aws.network1
  subnet_id      = aws_subnet.vpc2-subnet.id
  route_table_id = aws_route_table.vpc2-rtb.id
}
Transit Gateway 作成
次はTransit Gatewayです。
デフォルトルート伝播・関連付けを使用すれば、ルートテーブル・関連付けの作成は必要ありませんが、今回は勉強のために手動で作成しています。
# Transit Gatewayの作成
resource "aws_ec2_transit_gateway" "tgw" {
  provider = aws.network1
  amazon_side_asn = 64512
  default_route_table_association = "disable"
  default_route_table_propagation = "disable"

  tags = {
    Name = "tgw"
  }
}

# VPC1用のアタッチメント
resource "aws_ec2_transit_gateway_vpc_attachment" "tgw_attach1" {
  provider = aws.network1
  transit_gateway_id = aws_ec2_transit_gateway.tgw.id
  vpc_id             = aws_vpc.vpc1.id
  subnet_ids         = [aws_subnet.vpc1-subnet.id]

  tags = {
    Name = "vpc1-attachment"
  }
}

# VPC2用のアタッチメント
resource "aws_ec2_transit_gateway_vpc_attachment" "tgw_attach2" {
  provider = aws.network1
  transit_gateway_id = aws_ec2_transit_gateway.tgw.id
  vpc_id             = aws_vpc.vpc2.id
  subnet_ids         = [aws_subnet.vpc2-subnet.id]

  tags = {
    Name = "vpc2-attachment"
  }
}

# Transit Gatewayのルートテーブル作成
resource "aws_ec2_transit_gateway_route_table" "tgw_rt" {
  provider           = aws.network1
  transit_gateway_id = aws_ec2_transit_gateway.tgw.id
  tags = {
    Name = "tgw-route-table"
  }
}

# 10.1.0.0/16 (VPC2) を tgw_attach2 に向ける
resource "aws_ec2_transit_gateway_route" "route_to_vpc2" {
  provider                     = aws.network1
  destination_cidr_block       = "10.1.0.0/16"
  transit_gateway_route_table_id = aws_ec2_transit_gateway_route_table.tgw_rt.id
  transit_gateway_attachment_id = aws_ec2_transit_gateway_vpc_attachment.tgw_attach2.id
}

# 10.0.0.0/16 (VPC1) を tgw_attach1 に向ける
resource "aws_ec2_transit_gateway_route" "route_to_vpc1" {
  provider                     = aws.network1
  destination_cidr_block       = "10.0.0.0/16"
  transit_gateway_route_table_id = aws_ec2_transit_gateway_route_table.tgw_rt.id
  transit_gateway_attachment_id = aws_ec2_transit_gateway_vpc_attachment.tgw_attach1.id
}

# Transit GatewayのVPCアタッチメントとルートテーブルの関連付け
resource "aws_ec2_transit_gateway_route_table_association" "tgw_rt_assoc1" {
  provider               = aws.network1
  transit_gateway_route_table_id = aws_ec2_transit_gateway_route_table.tgw_rt.id
  transit_gateway_attachment_id = aws_ec2_transit_gateway_vpc_attachment.tgw_attach1.id
}

resource "aws_ec2_transit_gateway_route_table_association" "tgw_rt_assoc2" {
  provider               = aws.network1
  transit_gateway_route_table_id = aws_ec2_transit_gateway_route_table.tgw_rt.id
  transit_gateway_attachment_id = aws_ec2_transit_gateway_vpc_attachment.tgw_attach2.id
}
EC2 作成
最後にEC2です。
AMIはAmazon Linux 2023を指定しています。
ec2-vpc1にアタッチしているロールは予め作成しておいたロールで、AmazonSSMManagedInstanceCoreポリシーのみアタッチしています。
# VPC1 のセキュリティグループ
resource "aws_security_group" "ec2_sg1" {
  provider = aws.network1
  vpc_id   = aws_vpc.vpc1.id

  # ICMP
  ingress {
    from_port   = -1
    to_port     = -1
    protocol    = "icmp"
    cidr_blocks = ["10.1.0.0/24"]
  }

  # 全てのアウトバウンド通信を許可
  egress {
    from_port   = 0
    to_port     = 0
    protocol    = "-1"
    cidr_blocks = ["0.0.0.0/0"]
  }

  tags = {
    Name = "ec2-security-group1"
  }
}

# VPC2 のセキュリティグループ
resource "aws_security_group" "ec2_sg2" {
  provider = aws.network1
  vpc_id   = aws_vpc.vpc2.id

  # ICMP
  ingress {
    from_port   = -1
    to_port     = -1
    protocol    = "icmp"
    cidr_blocks = ["10.0.0.0/24"]
  }

  # 全てのアウトバウンド通信を許可
  egress {
    from_port   = 0
    to_port     = 0
    protocol    = "-1"
    cidr_blocks = ["0.0.0.0/0"]
  }

  tags = {
    Name = "ec2-security-group2"
  }
}

# VPC1のEC2インスタンス
resource "aws_instance" "ec2_vpc1" {
  provider = aws.network1
  ami                    = "ami-05b10e08d247fb927"
  instance_type          = "t2.micro"
  subnet_id              = aws_subnet.vpc1-subnet.id
  vpc_security_group_ids = [aws_security_group.ec2_sg1.id]
  associate_public_ip_address = true
  iam_instance_profile   = "ec2-role"
  tags = {
    Name = "EC2-VPC1"
  }
}

# VPC2のEC2インスタンス
resource "aws_instance" "ec2_vpc2" {
  provider = aws.network1
  ami                    = "ami-05b10e08d247fb927"
  instance_type          = "t2.micro"
  subnet_id              = aws_subnet.vpc2-subnet.id
  associate_public_ip_address = false
  iam_instance_profile   = "ec2-role"
  tags = {
    Name = "EC2-VPC2"
  }
}
疎通確認
では、最後にEC2に接続して、疎通確認を行います。
ec2_vpc2のPrivateIPに対してpingコマンドを実行すると、疎通が取れていることが確認できます。

おまけ
vpc2への宛先をBlackholeに設定して疎通が取れなくなることを確認する。
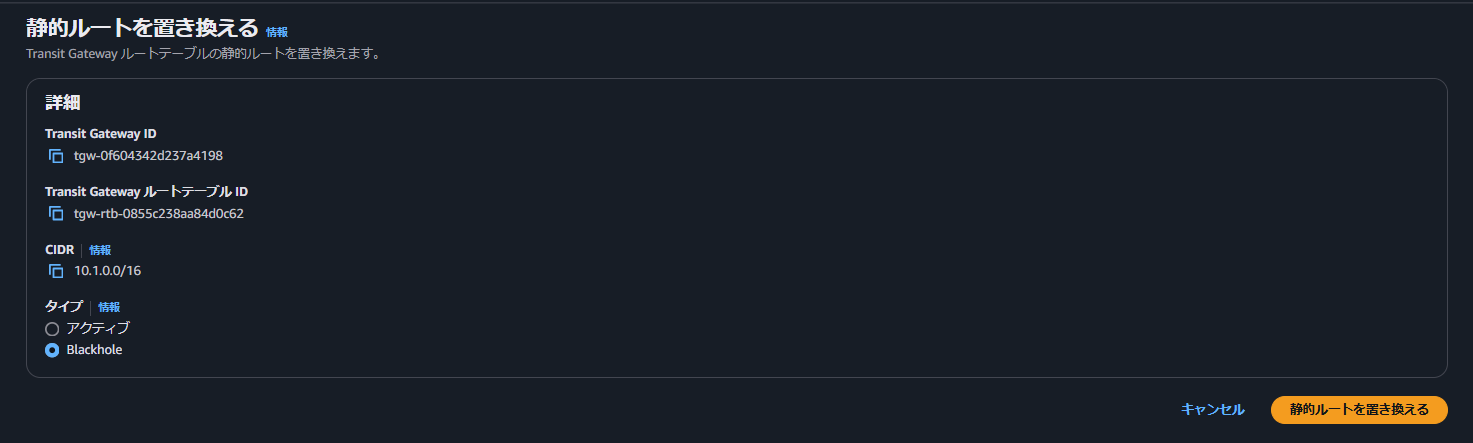
再度ec2_vpc2に対してpingコマンドを実行すると、到達できなくなっていることが確認できました。

最後に
次回はInspection VPCを跨いだVPC間の通信を実装します。