docker-compose で MySQL の Master/Slave 構成を学ぶ
Kubernetes上で公式の StatefulSetの使用例を見ながらMySQLのMaster/Slave構成を作ろうとして、いろいろ壁が多すぎたので事前に予備知識を獲得しておく。
今回の目標としては
- Master/Slave の作り方
-
xtrabackupの動き -
ncatの動き
あたりを明らかにしていく。
構成
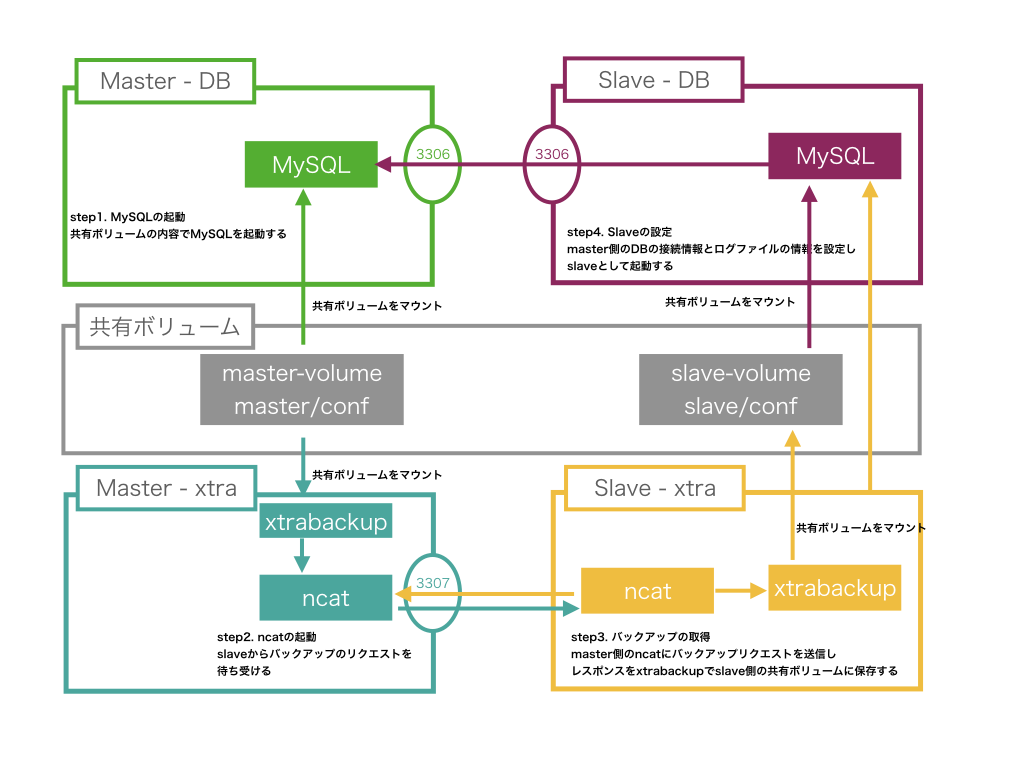
- master側、slave側でそれぞれMySQLサービスとxtrabackupサービスを実行する。
- mysqlサービスとxtrabackupサービスは同じデータディレクトリと設定ファイルをマウントしている。
- 1Podあたりmysqlコンテナとxtrabackupコンテナを起動するサイドカー構成をイメージしている。
今回使うdocker-composeはこちら
version: '3.4'

# mysqlの共通設定
x-template: &mysql-template
  image: mysql:5.7
  environment:
    MYSQL_DATABASE: sample
    MYSQL_ROOT_USER: root
    MYSQL_ROOT_PASSWORD: pass

# xtrabackupの共通設定
x-template: &xtra-template
  image: gcr.io/google-samples/xtrabackup:1.0
  tty: true

# volumeの作成
volumes:
  master-volume:
    driver: local
  slave-volume:
    driver: local

services:
  # master側のMySQLサービス
  master:
    <<: *mysql-template
    volumes:
      - master-volume:/var/lib/mysql # データディレクトリ
      - ./master/conf:/etc/mysql # 設定ファイル
  # master側バックアップを取得、送信するためのxtrabackupサービス
  master-xtra:
    <<: *xtra-template
    volumes:
      - master-volume:/var/lib/mysql
      - ./master/conf:/etc/mysql # 設定ファイル
    # ncat でバックアップリクエストを受け付ける
    entrypoint: >
      ncat --listen --keep-open --send-only --max-conns=1 3307 -c
      "xtrabackup --backup --slave-info --stream=xbstream --host=master --user=root --password=pass"

  # slave側のMySQLサービス
  slave:
    <<: *mysql-template
    volumes:
      - slave-volume:/var/lib/mysql
      - ./slave/conf:/etc/mysql/conf.d
  # slave側バックアップを作成するためのxtrabackupサービス
  slave-xtra:
    <<: *xtra-template
    volumes:
      - slave-volume:/var/lib/mysql
      - ./slave/conf:/etc/mysql/conf.d
confはまぁ、よしなに作成する。
Step1. Masterの起動
まずはmaster側MySQLを起動する。
普通に起動しちゃってOK。
docker-compose up -d master
Step2. ncatの起動
xtrabackupサービスでmaster側MySQLのデータディレクトリをマウントしておくことで、xtrabackupでバックアップを取得することができる。
slave側にバックアップを送信できるようにncatでリクエストを受け付けて、slave側からのリクエストをトリガーにバックアップを取得・送信する。
master側のxtrabackupサービスを起動するとncatがフォアグラウンドでリクエストを待ち受ける。
docker-compose up -d master-xtra
ncatのコマンドについてはこんな感じ?
| オプション | 内容 |
|---|---|
| --listen | listenモードで起動 |
| --send-only | データ送信のみ |
| --max-conns=1 | 最大同時接続数1 |
| 3307 | ポート番号 |
| -c | 指定コマンドの実行 |
Step3. バックアップの取得
slaveの作成にあたっては、作成時点の内容でmasterのデータのバックアップを
取得・リストアしてから差分のログを適用しておく。
master側のncatにリクエストを送ってバックアップデータを送ってもらう。
取得した結果をslave側のデータディレクトリに保存する。
slave側のxtrabackupサービスを起動して
docker-compose up -d slave-xtra
slave-xtraに接続して
docker-compose exec slave-xtra bash
バックアップを取得して、ログを適用しておく。
ncat --recv-only master-xtra 3307 | xbstream -x -C /var/lib/mysql/
xtrabackup --prepare --target-dir=/var/lib/mysql
これでバックアップの取得・リストアが完了した。
Step4. Slaveの起動
slaveのMySQLを起動しておく
docker-compose up -d slave
取得したバックアップからslaveの起動に必要な情報を取得する。
docker-compose exec slave-xtra bash
cat /var/lib/mysql/xtrabackup_binlog_info
内容は、
バイナリログ名 [[:space:]] ログポジション
LOG_INFO=(`cat /var/lib/mysql/xtrabackup_binlog_info`)
slaveの設定をする
mysql -u root -ppass -h slave <<EOF
    CHANGE MASTER TO MASTER_LOG_FILE='${LOG_INFO[0]}',
    MASTER_LOG_POS=${LOG_INFO[1]},
    MASTER_HOST='master',
    MASTER_USER='root',
    MASTER_PASSWORD='pass',
    MASTER_CONNECT_RETRY=10;
    START SLAVE;
EOF
これでslaveが動くはずなので、適当にmaster側を更新して
mysql -u root -ppass -h master -D sample -e 'create table test(id int(5)); insert into test values(1)';
slave側で確認する
mysql -u root -ppass -h slave -D sample -e 'select * from test;'
できた!
次はKubeでちゃんと動くか確かめないと・・・
