概要
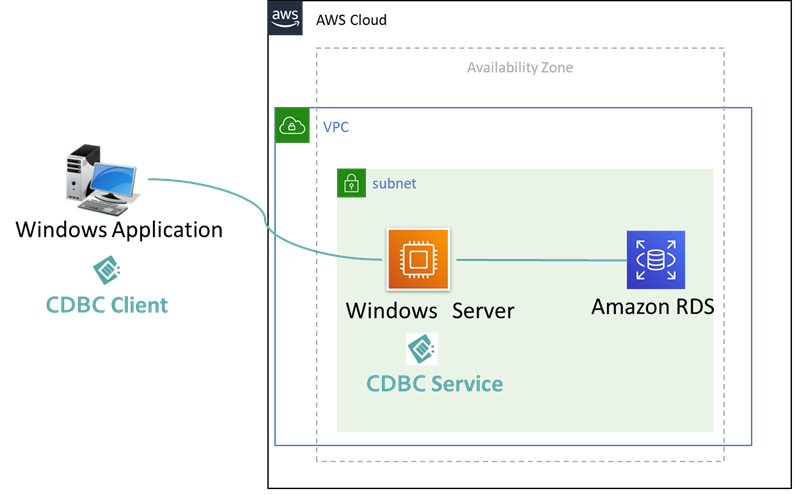
CDBCを使って.net アプリケーションからRDSへ接続の構築手順。今回はOracle Databaseへの接続例。
※Cdbc (Cloud Database Connectivity) は.net アプリケーションからCloud Databaseに接続するための.NETライブラリ。公式ページ:https://www.cdbc.cloud/
構成図
構築手順
※Cdbcの構築設定手順を記述します、VPC,EC2,RDS,ACLなどの部分を割愛させてください。
1. Cdbc Service 構築
1.1 Install IIS
下記の公式資料を参照
https://www.cdbc.cloud/setupservice/installiis/
WCF使用なので下記の作業必須です。
Step 7:
"WCF Services" - "HTTP activation" 有効化
Step 9
"application development"の"ASP.NET 4.6" 有効化
1.2 CDBCサービスをデプロイ
下記の公式資料を参照
https://www.cdbc.cloud/setupservice/deployservice/
2. Cdbc Service 設定
最小限3箇所設定すれば Cdbc Service 動作します。
公式資料:
https://www.cdbc.cloud/setupservice/configservice/
2.1 ユーザー認証関連設定 (userAuthentication)
2.1.1 authMethod
認証方法の設定。
| authMethod | 説明 |
|---|---|
| None | ユーザー認証なし。 ※疎通テストやプライベート接続など以外の場合非推奨 |
| Basic | IIS 基本認証使った場合Basicに設定。 |
| UserPsk | ユーザー事前共有キー方式認証。 ※authenticatedUsersに定義してuserIdとuserPskのリストを使って認証 |
2.1.2 authenticatedUsers
authenticatedUsersは、userIdとuserPskのペアのリスト。
※authMethod="UserPsk"の場合のみauthenticatedUsersを設定します。
各属性の説明:
https://www.cdbc.cloud/setupservice/configservice/#authenticatedusers
2.1.3 設定例: (authMethod="UserPsk")
    <userAuthentication authMethod="UserPsk">
      <authenticatedUsers>
        <add userId="testuser" userPsk="xxC2FxmyF2rY2K8f" comment=""/>
      </authenticatedUsers>
  </userAuthentication>
2.2 アプリケーション認証関連設定 (clientApplicationAuthentication)
2.2.1 authMethod
アプリケーション認証方法の設定。
| authMethod | 説明 |
|---|---|
| None | アプリケーション認証なし。 |
| ApplicationPsk | アプリケーション事前共有キー方式認証。 ※authenticatedApplicationsに定義してapplicationIdとapplicationPskのリストを使って認証 |
2.2.2 authenticatedApplications
authenticatedApplicationsは、applicationIdとapplicationPskのペアのリスト。
※authMethod="ApplicationPsk"の場合のみauthenticatedApplicationsを設定します。
各属性の説明:
https://www.cdbc.cloud/setupservice/configservice/#authenticatedapplications
2.2.3 設定例: (authMethod="ApplicationPsk")
<clientApplicationAuthentication authMethod="ApplicationPsk">
      <authenticatedApplications>
        <add applicationId="testappli" applicationPsk="EoQSKkfReZMO685E" comment="" />
      </authenticatedApplications>
</clientApplicationAuthentication>
2.3 接続文字列を設定 (connectionStrings)
接続するデータベースの接続文字列を設定。
例:
    <connectionStrings>
      <add name="oracletest"
           connectionString="Data Source=(DESCRIPTION =(ADDRESS_LIST =(ADDRESS = (PROTOCOL = TCP)(HOST =  dev01.********.ap-northeast-1.rds.amazonaws.com)(PORT = 1521)))(CONNECT_DATA =(SERVICE_NAME = ORCL)));Persist Security Info=True;User ID=****;Password=****;"
           providerName="Oracle.DataAccess.Client"/>
    </connectionStrings>
3. Clientアプリケーション作成
3.1 サンプルアプリ作成
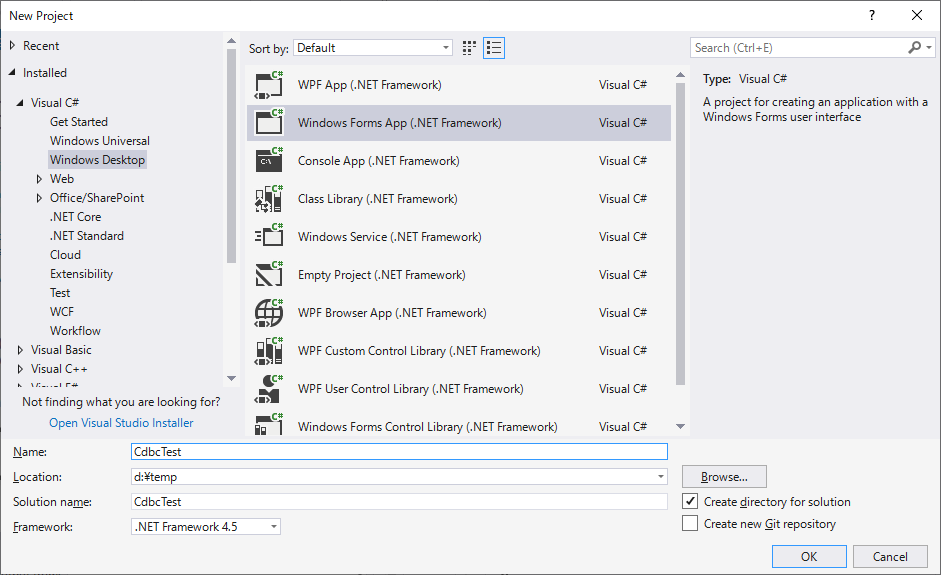
3.1.1 Visual Studio 起動、CdbcTest を作成 (Windows Form application)
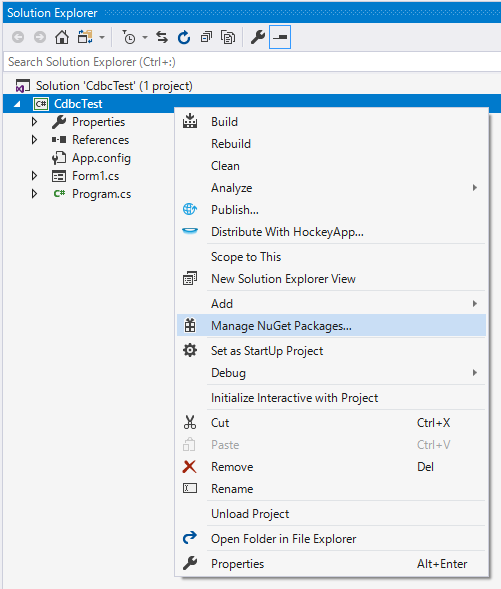
3.1.2 NugetからCdbc.Data最新版をインストール

3.2 サンプルアプリ設定
3.2.1 app.config 設定
app.configにsystem.serviceModelセッションを追加。
サンプル設定から変更する必要があるのはendpointのaddressだけ。
※今回IIS匿名認証、http接続のケースで設定する。そのたのケースのサンプルは下記のページを参照
IIS匿名認証:
https://www.cdbc.cloud/examples/configuration/anonymousauthconfig/
IIS基本認証:
https://www.cdbc.cloud/examples/configuration/basicauthconfig/
サンプル
  <system.serviceModel>
    <bindings>
      <basicHttpBinding>
        <binding name="CdbcService" maxReceivedMessageSize="5798464" />
      </basicHttpBinding>
    </bindings>
    <client>
      <endpoint address="http://*************/CdbcService/CDBCService.svc"
                binding="basicHttpBinding"
                bindingConfiguration="CdbcService"
                contract="CdbcService.ICdbcService"
                name="CdbcService.ICdbcService"  />
    </client>
  </system.serviceModel>
3.3 動作確認
3.3.1 テスト用コード (c#)
           CdbcConnection conn = new CdbcConnection();

            conn.DatabaseProduct = Cdbc.Common.Data.Type.DatabaseProductType.Oracle;
            conn.ConnectionString = "oracletest";

            conn.UserId = "testuser";
            conn.UserPsk = "xxC2FxmyF2rY2K8f";

            conn.ApplicationId = "testappli";
            conn.ApplicationPsk = "EoQSKkfReZMO685E";

            conn.Open();

            CdbcCommand cmd = new CdbcCommand("select banner from v$version", conn);

            try
            {
                CdbcDataAdapter adap = new CdbcDataAdapter(cmd);
                DataSet ds = new DataSet();
                adap.Fill(ds);

                if (ds.Tables.Count > 0 && ds.Tables[0].Rows.Count > 0)
                {
                    for (int iRow=0;iRow< ds.Tables[0].Rows.Count; iRow++)
                    {
                        Console.WriteLine( ds.Tables[0].Rows[iRow][0]);
                    }
                }
            }
            catch (Exception ex)
            {
                Console.WriteLine("Exception:");
                Console.WriteLine(ex.Message);
            }
下記の属性をService側の設定に合わせる
| 属性 | 値 |
|---|---|
| conn.DatabaseProduct | Cdbc.Common.Data.Type.DatabaseProductType.Oracle |
| conn.ConnectionString | "oracletest" |
| conn.UserId | "testuser" |
| conn.UserPsk | "xxC2FxmyF2rY2K8f" |
| conn.ApplicationId | "testappli" |
| conn.ApplicationPsk | "EoQSKkfReZMO685E" |
3.3.2 結果

select banner from v$version の実行結果を表示されていること確認できました。