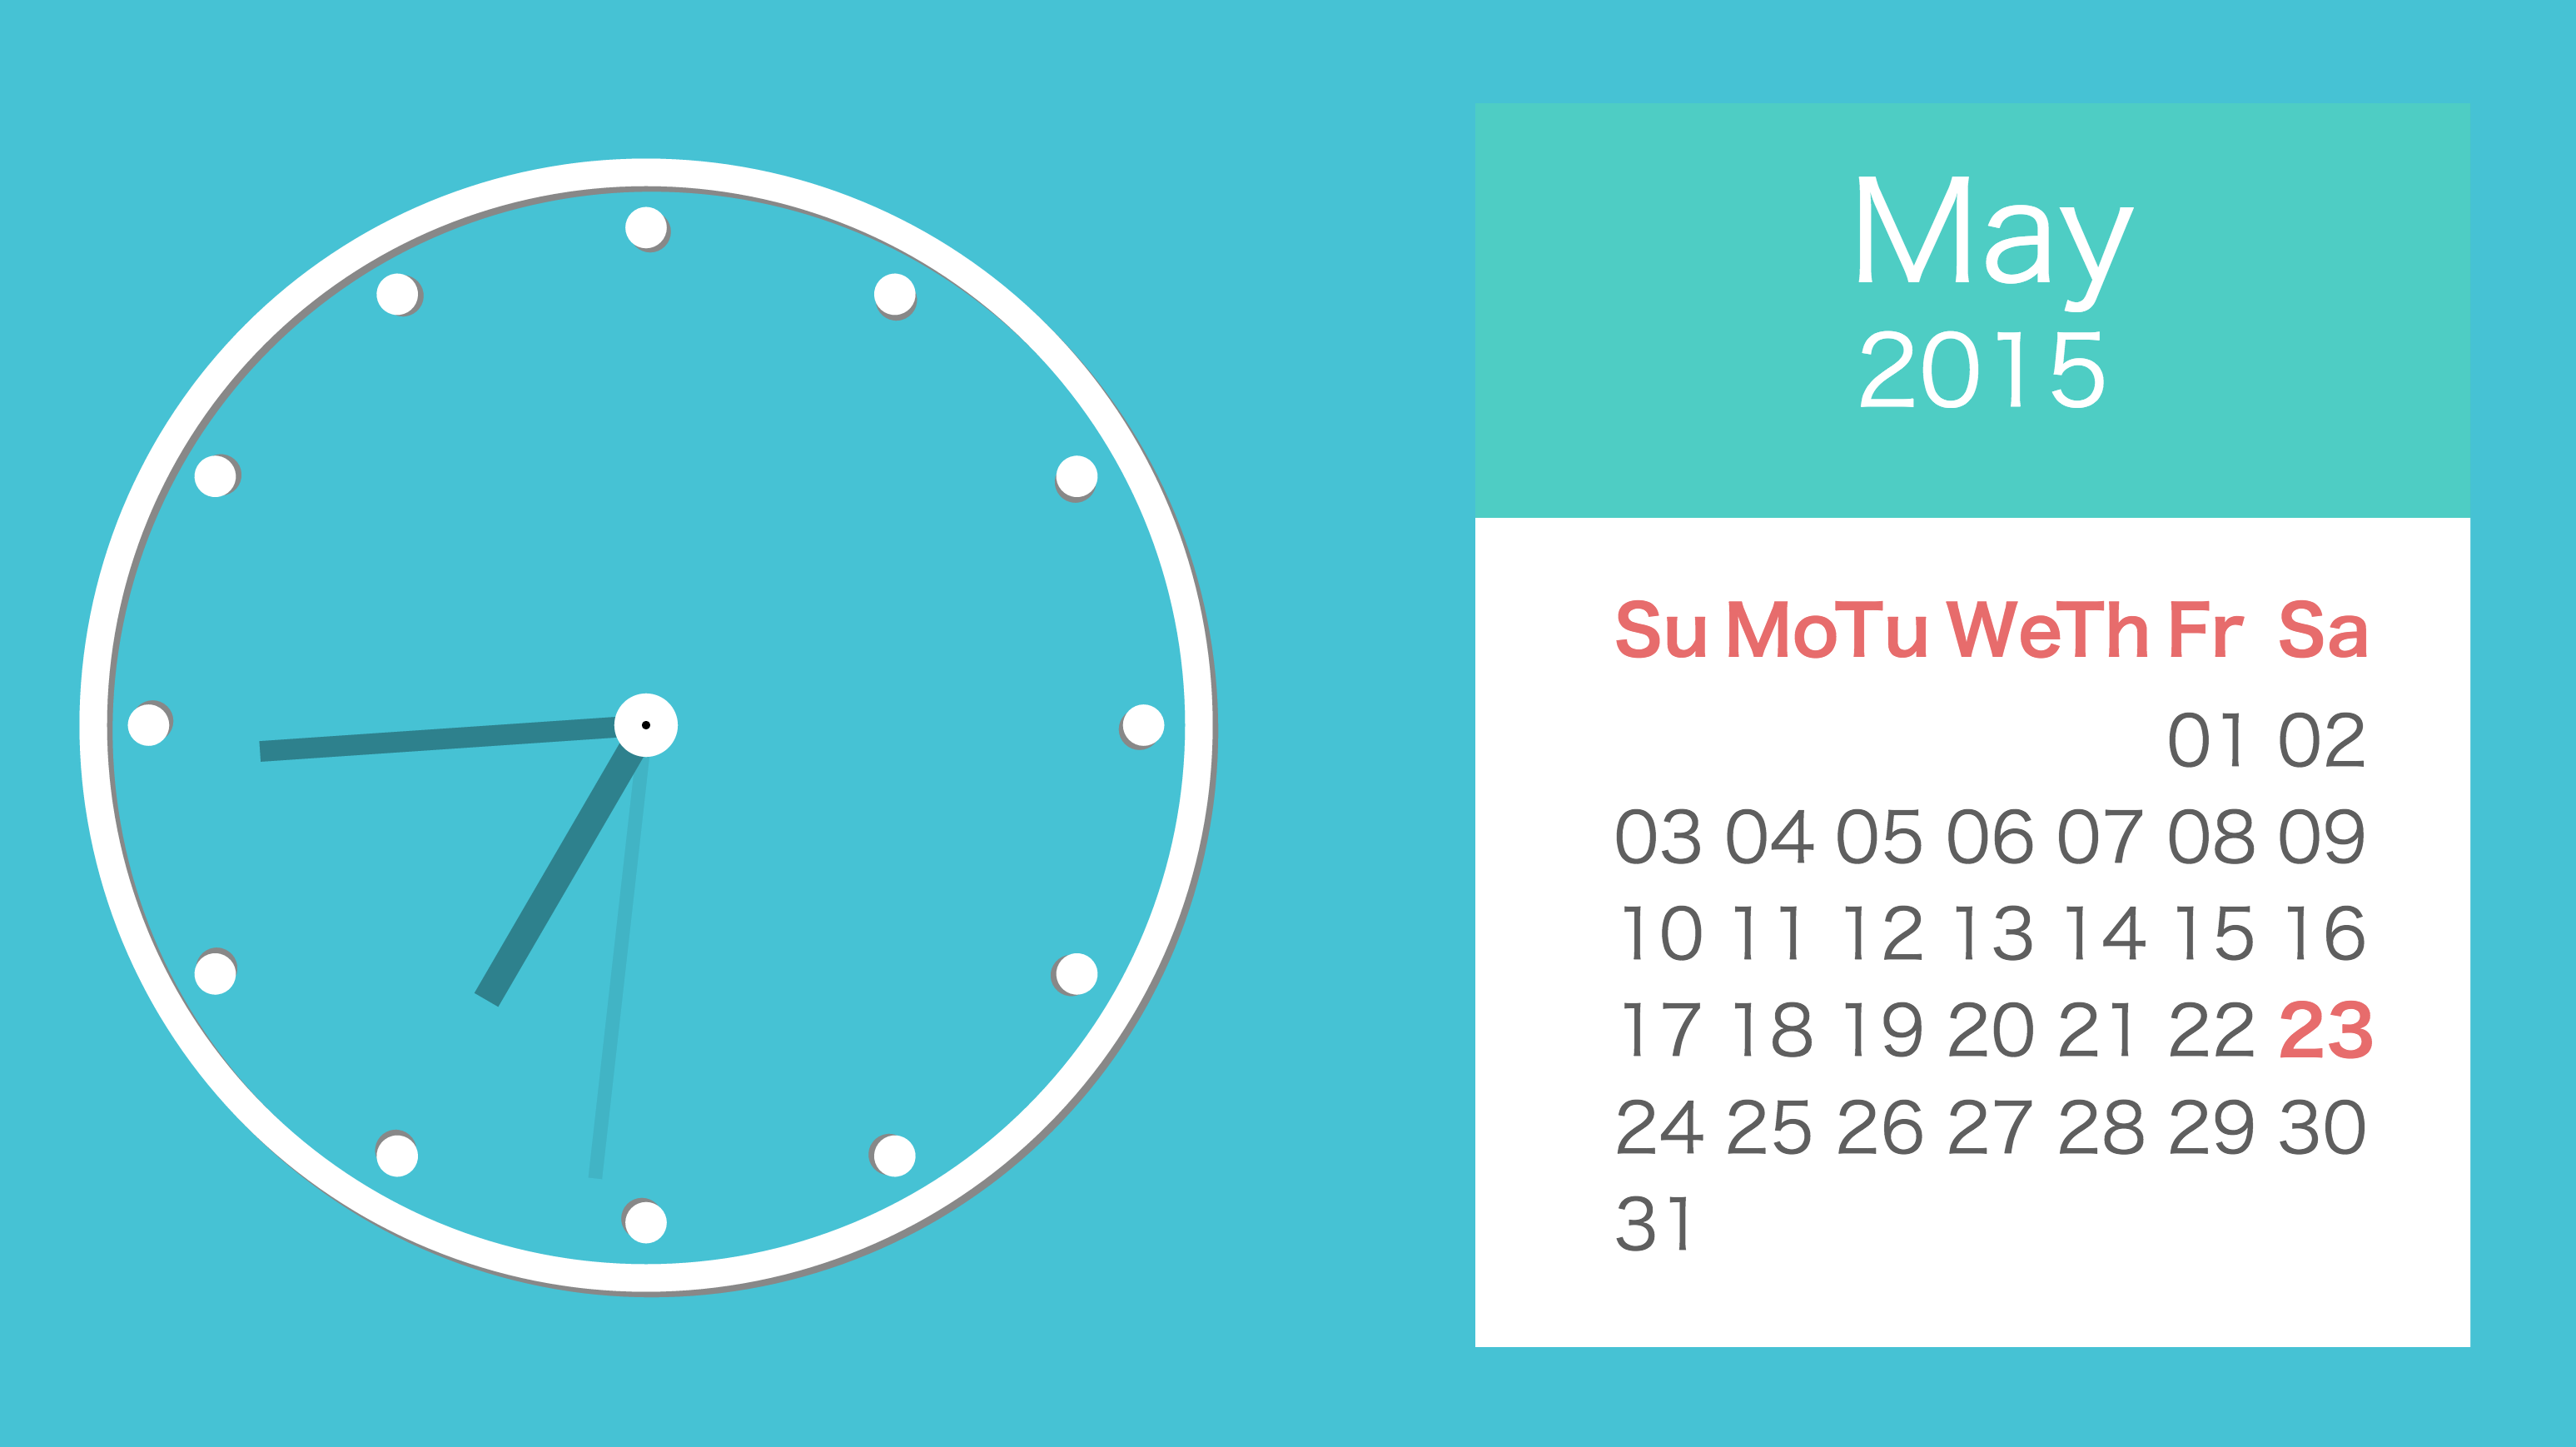
SVGとHTMLを使って簡潔に、マテリアルデザイン風の時計やカレンダーを作成しましょう。
簡単なSVGで書いているので、ぜひSVGの参考に見てみてください。
もうわかってるという人は、一番下のソースコードリンクからどうぞ。
##製作フロー##
- 時計部分のSVGパーツ
- 秒針パーツ(id:secondHand)
- 分針パーツ(id:minuteHand)
- 時針パーツ(id:hourHand)
- 時間の目盛りパーツ(id:hourScale)
- 時計本体パーツ(id:clock)
- カレンダー部分のSVGパーツ
- 週のラベルパーツ(id:calendarWeek)
- 日付パーツ(id:calendarDay)
- カレンダー本体パーツ(id:calendar)
- SVGパーツの呼び出しと位置調整
- 現在時刻を適用させるスクリプト
##時計部分のSVGパーツ##
###秒針パーツ(id:secondHand)###
秒針のパーツは高さ330で、幅10の線とした。後々の組み合わせの際の座標の関係を考え、y1の高さを-330にすることで、中心座標より上側に凸な線になるようにした。また、アニメーションとして、60秒で0から360度で一周回転するようにした。
<g id="secondHand">
	<line id="secondHandLine" x1="0" y1="-330" x2="0" y2="0" stroke="#41B4C5" stroke-width="10" transform="rotate(0)"/>
		<animateTransform
			attributeName="transform"
			attributeType="XML"
			type="rotate"
			from="0" to="360"
			dur="60s"
			repeatCount="indefinite"/>
</g>
###分針パーツ(id:minuteHand)###
分針パーツは、高さ280で、幅15の線でとした。秒針同様に上に飛び出すようにy1の値をマイナスにした。また、アニメーションは分針のため、60分で一周するようにした。
<g id="minuteHand">
	<line id="minuteHandLine" x1="0" y1="-280" x2="0" y2="0" stroke="#2E818D" stroke-width="15" transform="rotate(0)"/>
	<animateTransform
		attributeName="transform"
		attributeType="XML"
		type="rotate"
		from="0" to="360"
		dur="60min"
		repeatCount="indefinite"/>
</g>
###時針パーツ(id:hourHand)###
時針パーツは、高さ230で、幅20の線とした。秒針同様に上に飛び出すようにy1の値をマイナスにした。また、アニメーションは時間のため、12時間で一周するようにした。
<g id="hourHand">
	<line id="hourHandLine" x1="0" y1="-230" x2="0" y2="0" stroke="#2E818D" stroke-width="20" transform="rotate(0)"/>
	<animateTransform
		attributeName="transform"
		attributeType="XML"
		type="rotate"
		from="0" to="360"
		dur="12h"
		repeatCount="indefinite"/>
</g>
###時間の目盛りパーツ(id:hourScale)###
時計の文字盤で時間の区切りを表す目盛りは、円で表現するようにした。デザインとして、影をつけたようなデザインにするために、最初に灰色の円を描画し、そこに位置をずらして白い円を描くようにした。
<g id="hourScale">
	<circle id="hourScaleLine" cx="3" cy="-357" r="15" stroke="none" fill="#888"/>
	<circle id="hourScaleLine" cx="0" cy="-360" r="15" stroke="none" fill="#fff"/>
</g>
###時計本体パーツ(id:clock)###
ここでは、上記で定義してきたパーツの合成を行ないます。まず、時計の外枠になる円を描く、円は影も描画するため先に灰色の円を描画するようにしている。フレームの描画後、目盛りを12個30度ずつずらして配置する。また、針を3つ描画し、上から止め具として白い円を描画するようにする。
<g id="clock">
	<!-- フレーム部分 -->
	<circle cx="4" cy="4" r="400" fill="none" stroke="#888" stroke-width="20" />
	<circle cx="0" cy="0" r="400" fill="none" stroke="#fff" stroke-width="20" />
	<!--  時間表示 -->
	<use xlink:href="#hourScale" transform="rotate(0)" />
	<use xlink:href="#hourScale" transform="rotate(30)" />
	<use xlink:href="#hourScale" transform="rotate(60)" />
	<use xlink:href="#hourScale" transform="rotate(90)" />
	<use xlink:href="#hourScale" transform="rotate(120)" />
	<use xlink:href="#hourScale" transform="rotate(150)" />
	<use xlink:href="#hourScale" transform="rotate(180)" />
	<use xlink:href="#hourScale" transform="rotate(210)" />
	<use xlink:href="#hourScale" transform="rotate(240)" />
	<use xlink:href="#hourScale" transform="rotate(270)" />
	<use xlink:href="#hourScale" transform="rotate(300)" />
	<use xlink:href="#hourScale" transform="rotate(330)" />
	<!-- 針の部分 -->
	<use xlink:href="#secondHand" transform="translate(0, 0)" />
	<use xlink:href="#minuteHand" transform="translate(0, 0)" />
	<use xlink:href="#hourHand"   transform="translate(0, 0)" />
	<circle cx="0" cy="0" r="13" fill="" stroke="#fff" stroke-width="20" />
</g>
##カレンダー部分のSVGパーツ##
###週のラベルパーツ(id:calendarWeek)###
週のラベルは、固定の値で各曜日の英語の頭2文字をとって描くようにする。また、スタイルとしてフォントのスタイルを太字にするため、font-weightにboldを設定した。文字色は、赤色にし、普通の日付側と明確にわけるようにした。
<g id="calendarWeek">
	<text x="50"  y="0" font-size="50" fill="#E76C6C" font-weight="bold">Su</text>
	<text x="130" y="0" font-size="50" fill="#E76C6C" font-weight="bold">Mo</text>
	<text x="210" y="0" font-size="50" fill="#E76C6C" font-weight="bold">Tu</text>
	<text x="290" y="0" font-size="50" fill="#E76C6C" font-weight="bold">We</text>
	<text x="370" y="0" font-size="50" fill="#E76C6C" font-weight="bold">Th</text>
	<text x="450" y="0" font-size="50" fill="#E76C6C" font-weight="bold">Fr</text>
	<text x="530" y="0" font-size="50" fill="#E76C6C" font-weight="bold">Sa</text>
</g>
###日付パーツ(id:calendarDay)###
日付のパーツは、もし月の最初の日の曜日が金曜日以降で31日終わりであった場合は、6週分の表示領域が必要なため、6週目に2日分の領域を用意するようにし、37日分の枠を作成した。また、Javascript側で有用な日付だけを設定するため、デフォルトでは空にしておく。
<g id="calendarDay">
	<text id="calendarDay1"  x="50"  y="0"   font-size="50" fill="#5f5f5f"></text>
	<text id="calendarDay2"  x="130" y="0"   font-size="50" fill="#5f5f5f"></text>
	<text id="calendarDay3"  x="210" y="0"   font-size="50" fill="#5f5f5f"></text>
	<text id="calendarDay4"  x="290" y="0"   font-size="50" fill="#5f5f5f"></text>
	<text id="calendarDay5"  x="370" y="0"   font-size="50" fill="#5f5f5f"></text>
	<text id="calendarDay6"  x="450" y="0"   font-size="50" fill="#5f5f5f"></text>
	<text id="calendarDay7"  x="530" y="0"   font-size="50" fill="#5f5f5f"></text>

	<text id="calendarDay8"  x="50"  y="70"  font-size="50" fill="#5f5f5f"></text>
	<text id="calendarDay9"  x="130" y="70"  font-size="50" fill="#5f5f5f"></text>
	<text id="calendarDay10" x="210" y="70"  font-size="50" fill="#5f5f5f"></text>
	<text id="calendarDay11" x="290" y="70"  font-size="50" fill="#5f5f5f"></text>
	<text id="calendarDay12" x="370" y="70"  font-size="50" fill="#5f5f5f"></text>
	<text id="calendarDay13" x="450" y="70"  font-size="50" fill="#5f5f5f"></text>
	<text id="calendarDay14" x="530" y="70"  font-size="50" fill="#5f5f5f"></text>

	<text id="calendarDay15" x="50"  y="140" font-size="50" fill="#5f5f5f"></text>
	<text id="calendarDay16" x="130" y="140" font-size="50" fill="#5f5f5f"></text>
	<text id="calendarDay17" x="210" y="140" font-size="50" fill="#5f5f5f"></text>
	<text id="calendarDay18" x="290" y="140" font-size="50" fill="#5f5f5f"></text>
	<text id="calendarDay19" x="370" y="140" font-size="50" fill="#5f5f5f"></text>
	<text id="calendarDay20" x="450" y="140" font-size="50" fill="#5f5f5f"></text>
	<text id="calendarDay21" x="530" y="140" font-size="50" fill="#5f5f5f"></text>

	<text id="calendarDay22" x="50"  y="210" font-size="50" fill="#5f5f5f"></text>
	<text id="calendarDay23" x="130" y="210" font-size="50" fill="#5f5f5f"></text>
	<text id="calendarDay24" x="210" y="210" font-size="50" fill="#5f5f5f"></text>
	<text id="calendarDay25" x="290" y="210" font-size="50" fill="#5f5f5f"></text>
	<text id="calendarDay26" x="370" y="210" font-size="50" fill="#5f5f5f"></text>
	<text id="calendarDay27" x="450" y="210" font-size="50" fill="#5f5f5f"></text>
	<text id="calendarDay28" x="530" y="210" font-size="50" fill="#5f5f5f"></text>

	<text id="calendarDay29" x="50"  y="280" font-size="50" fill="#5f5f5f"></text>
	<text id="calendarDay30" x="130" y="280" font-size="50" fill="#5f5f5f"></text>
	<text id="calendarDay31" x="210" y="280" font-size="50" fill="#5f5f5f"></text>
	<text id="calendarDay32" x="290" y="280" font-size="50" fill="#5f5f5f"></text>
	<text id="calendarDay33" x="370" y="280" font-size="50" fill="#5f5f5f"></text>
	<text id="calendarDay34" x="450" y="280" font-size="50" fill="#5f5f5f"></text>
	<text id="calendarDay35" x="530" y="280" font-size="50" fill="#5f5f5f"></text>

	<text id="calendarDay36" x="50"  y="350" font-size="50" fill="#5f5f5f"></text>
	<text id="calendarDay37" x="130" y="350" font-size="50" fill="#5f5f5f"></text>
</g>
###カレンダー本体パーツ(id:calendar)###
カレンダー本体は、まず背景として2つのパーツを白と緑の四角として描く。カレンダー上段には、月の表示と年の表示を描く。下段には、週のラベルと日付のラベルを表示する。
<g id="calendar">
	<!-- 背景 -->
	<rect x="0" y="0" width="720" height="300" fill="#4ECDC4"/>
	<rect x="0" y="300" width="720" height="600" fill="#fff"/>
	<!-- 月の表示 -->
	<text id="calendarMonth" x="270" y="130" font-size="100" fill="#fff"></text>
	<!-- 年の表示 -->
	<text id="calendarYear" x="275" y="220" font-size="70" fill="#fff"></text>
	<!-- 週のラベル表示 -->
	<use xlink:href="#calendarWeek" transform="translate(50, 400)" />
	<!-- 日付表示 -->
	<use xlink:href="#calendarDay" transform="translate(50, 480)" />
</g>
##SVGパーツの呼び出しと位置調整##
上記で定義した、時計とカレンダーを呼び出す。左側に時計を表示し、右側にカレンダーを表示する。
<!-- 呼び出し -->
<use xlink:href="#clock" transform="translate(500, 550)" />
<use xlink:href="#calendar" transform="translate(1100, 100)" />
##現在時刻を適用させるスクリプト##
スクリプトとして、行う処理は現在時刻の取得と時計の各針の初期値の設定。次に、カレンダーへの月と年の設定と、日付を表示するようのテキストタグへの対応する日付数字の代入、今日の日付のハイライトである。
現在の時刻を設定する際、JavascriptのDateオブジェクトから、秒数と分を取得し、角度を求めるため60でわり、360をかける。時間の場合だけ、午前と午後があるため、12の剰余を12で割った値に360をかけることにした。
カレンダーの表示について、カレンダーは月は英語で表示するために、1月から12月まで順に並べた英語名の月の配列を作成する。月の表示部分では、months[nowTime.getMonth()]によって、月名を取得し表示している。次に、年は西暦での取得のため、getFullYear()メソッドを使用して取得し、年表示の部分に表示を行う。
カレンダーの日付入力の部分では、まず初めに月の1日の曜日を求めるために、firstDay変数にその月の1日の曜日を代入している。次に、今月が何日までかを知るために、endDate変数に、来月の0日を設定し、その日付を取得している。Javascriptでは、0日がその一つ前の日になるため、このような使い方ができる。そして、dayCounter変数は、現在何日まで入力したかを管理する変数で、1に初期化するようにする。for分で、代入する予定のtextの数(42)分だけ、処理を回し、もし現在のカーソルが最初の曜日を越えれば、カレンダーに値を代入していく。そして、現在入力している値が今月の最終日を入力し終えたらこの日付の代入処理を中断させるために、breakをして、for文から抜け出すようにする。最後に、firstDayと現在の月を足し合わせた値のオブジェクトが現在の日付のため、そのオブジェクトの文字色を週と同じ赤にして、太字に変更するようにしました。
<!-- 現在時刻を表示する -->
<script type="text/javascript">
	var nowTime = new Date();
	document.getElementById('secondHandLine').setAttribute('transform', 'rotate(' + nowTime.getSeconds()/60*360 + ')');
	document.getElementById('minuteHandLine').setAttribute('transform', 'rotate(' + nowTime.getMinutes()/60*360 + ')');
	document.getElementById('hourHandLine').setAttribute('transform', 'rotate(' + (nowTime.getHours()%12)/12*360 + ')');
	var months = new Array('January', 'February', 'March', 'April', 'May', 'June', 'July', 'August', 'September', 'October', 'November', 'December');
	document.getElementById('calendarMonth').textContent = months[nowTime.getMonth()];
	document.getElementById('calendarYear').textContent = nowTime.getFullYear();
	var firstDay = new Date(nowTime.getFullYear(), nowTime.getMonth(),1).getDay();
	var endDate = new Date(nowTime.getFullYear(), nowTime.getMonth()+1,0).getDate();
	var dayCounter = 1;
	for(var i=0; i <= 37; i++) {
		if(i > firstDay) {
			document.getElementById('calendarDay' + i).textContent = (dayCounter < 10) ? '0' + dayCounter : dayCounter;
			dayCounter++;
			if(dayCounter > endDate) {
				break;
			}
		}
	}
	document.getElementById('calendarDay' + (firstDay + nowTime.getDate())).setAttribute('fill', '#E76C6C');
	document.getElementById('calendarDay' + (firstDay + nowTime.getDate())).setAttribute('font-weight', 'bold');
</script>
##実行##
##リンク##
