Thanks to @yuki_coffee, Japanese version is here.
In this article, I will introduce how to install and setup Oracle Property Graph Server and client in an Oracle Cloud Infrastructure Database System instance. We will also talk about how to configure them properly to make connection from the client to the property graph server and to the database server.
Besides the topic of setting up, we will also prepare 2 samples to experience the advantage of graph technology.
Environment
This is a list of environment components for this article.
- Oracle Property Graph Server 20.4
- Oracle Property Graph Client 20.4
- Oracle Database Software Edition: Enterprise Edition High Performance
- DB System Version: 19.9.0.0.0
- Oracle Linux 7.8 x64
- Oracle JDK 11
- Browser: Firefox
Oracle Property Graph Server and Client Installation
In this section, we will install the latest version of Oracle Graph Server and Client 20.4.
We can download the installation package from following page.
Oracle Graph Server and Client Downloads
Oracle JDK 11
From 20.4, Oracle Graph Server and Client use the same JDK version 11, so we only need to install JDK 11 as prerequisite.
Java SE Development Kit 11 Downloads
sudo rpm -i jdk-11.0.9_linux-x64_bin.rpm
java -version
opc@db19h graph]$
[Figure: java version]
Oracle Property Graph Server 20.4
Install
Execute following command to install Oracle Property graph Server.
sudo rpm -i oracle-graph-20.4.0.x86_64.rpm
There is no any response after we execute this command. We can start and check the Oracle Property Graph Server service with following commands.
sudo systemctl start pgx
systemctl status pgx
sudo systemctl stop pgx
[Figure: PGX start & status]
Configuration in Oracle Database
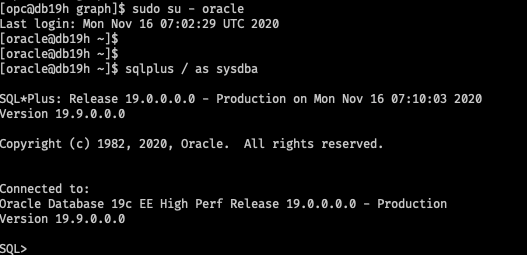
Switch user to oracle and connect to Oracle Database as sys.
sudo su - oracle
sqlplus / as sysdba
[Figure: connect to DB]
- PL/SQL Packages
Oracle Graph Server and Client will work with Oracle Database 12.2 onward. However, you must install the updated PL/SQL packages that are part of the Oracle Graph Server and Client download.
Download Oracle Graph Client for PL/SQL and unzip the file into a directory of your choice.
Login to the Oracle Database and execute following statements
-- Connect as SYSDBA
SQL> alter session set container=<YOUR_PDB_NAME>;
SQL> @opgremov.sql
SQL> @catopg.sql
Note: there are two directories in the unzipped directory, one for users with Oracle Database 18c or below, and one for users with Oracle Database 19c or above. As a database user with DBA privilges, follow the instructions in the README.md file in the appropriate directory (that matches your database version). This has to be done for every PDB you will use the graph feature in. The DBCS instance I created is 19c, so I should execute the scripts in 19c_and_above.
- user & roles
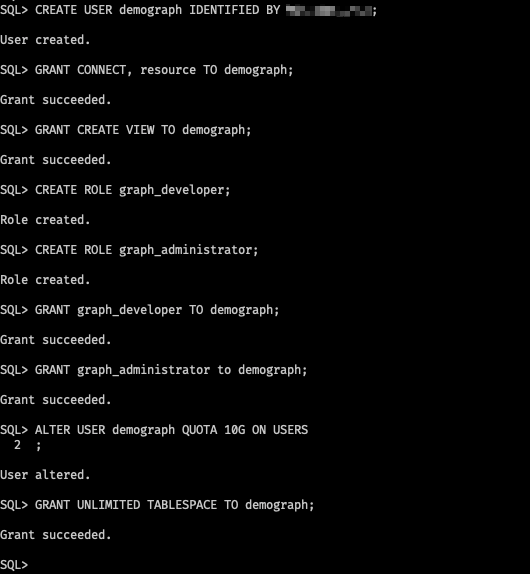
Create database user demograph in PDB pdb1, grant role and tablespace accordingly.
All the tables will be created and loaded into this schema demograph.
CREATE USER demograph IDENTIFIED BY <PASSWORD>;
GRANT CONNECT, resource TO demograph;
GRANT ALTER SESSION,CREATE PROCEDURE,CREATE SESSION,CREATE TABLE, CREATE TYPE, CREATE VIEW to demograph;

CREATE ROLE graph_developer;
CREATE ROLE graph_administrator;

GRANT graph_developer TO demograph;
GRANT graph_administrator to demograph;

ALTER USER demograph QUOTA 10G ON USERS

GRANT UNLIMITED TABLESPACE TO demograph;
[Figure: prepare DB user demograph]
Configuration in Oracle Property Graph Server
- Add a new system user
graph.
sudo useradd graph
sudo usermod -a -G oraclegraph graph
sudo passwd graph
- Add JDBC connection string in the configuration file
pgx.conf.
sudo vim /etc/oracle/graph/pgx.conf
jdbc:oracle:thin:@//db19h.sub11160238550.graphvcntokyo.oraclevcn.com:1521/pdb1.sub11160238550.graphvcntokyo.oraclevcn.com
We can get the connection string from the DBCS web console, or by command lsnrctl status to get the service name.
Since the user demograph was created in pdb1, so the connection string I am using here is to pdb1.
[Figure: JDBC in pgx.conf]
- Edit configuration file
server.conf
Set enable_tls to be false.
sudo vim /etc/oracle/graph/server.conf
[Figure: enable_tls in server.conf]
Restart PGX service
sudo systemctl restart pgx
sudo systemctl status pgx
[Figure: restart PGX service]
Oracle Property Graph Client 20.4
Install
Switch to user graph
sudo su - graph
Unzip the downloaded client package.
unzip oracle-graph-client-20.4.0.zip
Get auth token
To connect client to the Property Graph server, we need to get the auth token first.
We can use curl command to get the auth token in an easy way. The command is in following format.
curl -X POST -H 'Content-Type: application/json' -d '{"username": "<DB USER>", "password": "<PASSWORD>"}' <HOST URL>:7007/auth/token

# e.g. curl -X POST -H 'Content-Type: application/json' -d '{"username": "demograph", "password": "<PASSWORD>"}' http://db19h.sub11160238550.graphvcntokyo.oraclevcn.com:7007/auth/token
-
usernameandpasswordare the database userdemographand its password we created previously. -
HOST URLcan be extracted from the connection string.
[Figure: get PGX token]
The response is a JSON object actually, if we format it we can see that there are 3 items in the response. They represent the token content, token type and token expiration time respectively. What we need in next step is the content of access_token. Please also pay attention to the expiration time. 14400 means in 4 hours later, this token will be expired, the session created with this token will be expired as well.
{
  "access_token": "<ENCRYPTED CONTENT>",
  "token_type": "bearer",
  "expires_in": 14400
}
[Figure: access token content]
Connect to the Property Graph Server
Oracle Property Graph Client provides several ways to connect to the PGX server. We use Oracle Property Graph Client shell first in this sample.
Go to the bin directory of the unzipped client package.
cd /home/graph/oracle-graph-client-20.4.0/bin

./opg-jshell --base_url <HOST URL>:7007
# e.g. ./opg-jshell --base_url http://db19h.sub11160238550.graphvcntokyo.oraclevcn.com:7007
Note: for security reason, there is no any character display when you paste the token, so don't doubt yourself, just press enter should be fine.
[Figure: jshell to PGX server]
If you can see the command prompt changed to be opg-jshell>, then you have connected to the server successfully.
Graph Sample - HR
Prepare database schema HR
Download the HR create script from here and create HR schema in pdb1 user demograph
sqlplus demograph/<PASSWORD>@db19h.sub11160238550.graphvcntokyo.oraclevcn.com:1521/pdb1.sub11160238550.graphvcntokyo.oraclevcn.com

@HR_create_hr_objects.sql
Create property graph table
Execute following statements in jshell to create connection to the database.
var jdbcUrl = "jdbc:oracle:thin:@//db19h.sub11160238550.graphvcntokyo.oraclevcn.com:1521/pdb1.sub11160238550.graphvcntokyo.oraclevcn.com"
var user = "demograph"
var pass = "<PASSWORD>"
var conn = DriverManager.getConnection(jdbcUrl, user, pass)

conn.setAutoCommit(false)
[Figure: jshell connection]
Execute following statements to create a PGQL connection. Through this PGQL connection, we will execute the prepared script create.pgql to create property graph tables based on the database tables in HR schema we created previously.
You can get the create.pgql from here.
var pgql = PgqlConnection.getConnection(conn)
pgql.prepareStatement(Files.readString(Paths.get("/home/graph/create.pgql"))).execute()
[Figure: pgql connection]
[Figure: create.pgql]
Now, we have created some property graph tables, including VERTEX TABLES and EDGE TABLES.
Query from database
Execute following statements in jshell to define a lambda function query, we can use this function to perform queries later.
Consumer < String > query = q -> {
    try (var s = pgql.prepareStatement(q)) {
        s.execute();
        s.getResultSet().print();
    } catch (Exception e) {
        throw new RuntimeException(e);
    }
}
[Figure: lambda query]
Query the number of vertices in the hr graph with following statement.
query.accept("select count(v) from hr match (v)")
[Figure: query vertices]
Query the number of edge with following statement.
query.accept("select count(e) from hr match ()-[e]->()")
Query the information of the manager and sort them in descending order of the salary.
query.accept("select distinct m.FIRST_NAME, m.LAST_NAME,m.SALARY from hr match (v:EMPLOYEES)-[:WORKS_FOR]->(m:EMPLOYEES) order by m.SALARY desc")
[Figure: query manager info]
Query from memory
Loading the data into the property graph server can improve not only the query speed, but also enhance the query capability. By loading in memory, we can utilize more advanced algorithms to perform the queries. Therefore we can get more valuable results from the data.
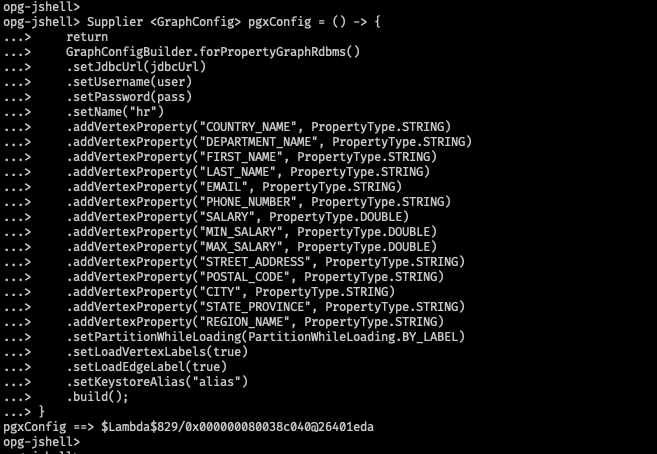
Execute following statement to define the graph structure in memory.
Supplier <GraphConfig> pgxConfig = () -> {
    return
    GraphConfigBuilder.forPropertyGraphRdbms()
    .setJdbcUrl(jdbcUrl)
    .setUsername(user)
    .setPassword(pass)
    .setName("hr")
    .addVertexProperty("COUNTRY_NAME", PropertyType.STRING)
    .addVertexProperty("DEPARTMENT_NAME", PropertyType.STRING)
    .addVertexProperty("FIRST_NAME", PropertyType.STRING)
    .addVertexProperty("LAST_NAME", PropertyType.STRING)
    .addVertexProperty("EMAIL", PropertyType.STRING)
    .addVertexProperty("PHONE_NUMBER", PropertyType.STRING)
    .addVertexProperty("SALARY", PropertyType.DOUBLE)
    .addVertexProperty("MIN_SALARY", PropertyType.DOUBLE)
    .addVertexProperty("MAX_SALARY", PropertyType.DOUBLE)
    .addVertexProperty("STREET_ADDRESS", PropertyType.STRING)
    .addVertexProperty("POSTAL_CODE", PropertyType.STRING)
    .addVertexProperty("CITY", PropertyType.STRING)
    .addVertexProperty("STATE_PROVINCE", PropertyType.STRING)
    .addVertexProperty("REGION_NAME", PropertyType.STRING)
    .setPartitionWhileLoading(PartitionWhileLoading.BY_LABEL)
    .setLoadVertexLabels(true)
    .setLoadEdgeLabel(true)
    .setKeystoreAlias("alias")
    .build();
}
[Figure: define graph structure in memory]
Execute following statement to create the graph in memory.
var graph = session.readGraphWithProperties(pgxConfig.get())
[Figure: create graph in memory]
Execute following statement to analyse the graph with pagerank algorithm.
analyst.pagerank(graph)
[Figure: analyze graph with pagerank]
Execute following statement to query and print out the first 10 employee information which are sorted in descending order of pagerank results.
session.queryPgql("select m.FIRST_NAME, m.LAST_NAME,m.pagerank from hr match (m:EMPLOYEES) order by m.pagerank desc limit 10").print().close()
[Figure: query pagerank result]
Graph Sample - Online Retail
In this section, we will create some database tables with online retail information and create graph in the property graph server accordingly.
We will also use keystore when connecting to the server. In this way, there will be no plaintext token being transferred through the network. The security could be ensured further.
Create Online Retail tables
Actually this section is just another version of the sample provided by Mr. Yamanaka who is the Oracle Product Manager in Asia-Pacific for spatial and graph technologies. We can download all the scripts used in this section from Mr. Yamanaka's github repository.
Below is a list of the files we need to download.
create_table.sqlcreate_table_normalized.sqlsqlldr.ctlconfig-tables-distinct.json
Please check the content of these files and update them according to your settings. In config-tables-distinct.json we need to pay attention to the JDBC connection string, username and keystore alias. In sqlldr.ctl, we need to pay attention to the input file path.
Regarding to the data that will be loaded into the database, please refer to the Download Dataset section on this page.
Basically, the steps to create the online retail tables are:
- download all the scripts mentioned above and prepare data.csv
- switch user to
oracleand login to pdb1 with database userdemograph - use
create_table.sqlto create thetransactionstable - use SQL*Loader to load the data.csv into
transactionstable - use
create_table_normalized.sqlto create related tables
Once the tables are created, the database table preparation is complete.
Prepare keystore
keytool is a Java utility to help us to manage the key and certificate. We will use this tool to generate the keystore.
Execute following commands to create a keystores directory and generate keystore accordingly.
cd
mkdir keystores && cd keystores
keytool -importpass -alias demograph -keystore keystore.p12
Input the password of this keystore when prompting Enter keystore password:, then input the password you want to store when prompting Enter the password to be stored:. In our case, it should be the password of database uesr demograph.
[Figure: generate keystore]
Connect with keystore
To connect from jshell to the database we still need the auth token. Let's get it first.
curl -X POST -H 'Content-Type: application/json' -d '{"username": "<DB USER>", "password": "<PASSWORD>"}' <HOST URL>:7007/auth/token

# e.g. curl -X POST -H 'Content-Type: application/json' -d '{"username": "demograph", "password": "<PASSWORD>"}' http://db19h.sub11160238550.graphvcntokyo.oraclevcn.com:7007/auth/token
Then, we can execute following command to connect to the server with the keystore.
cd /home/graph/oracle-graph-client-20.4.0/bin
./opg-jshell --base_url http://db19h.sub11160238550.graphvcntokyo.oraclevcn.com:7007 --secret_store /home/graph/keystores/keystore.p12
Input the auth token we got just now, and input the password of the keystore when prompting enter password for keystore /home/graph/keystores/keystore.p12:
[Figure: jshell connect with keystore ]
Create graph into PGX with pre-defined configuration file
Following statement uses the pre-defined configuration file config-tables-distinct.json to create a graph in the property graph server.
var graph = session.readGraphWithProperties("/home/graph/config-tables-distinct.json", "Online Retail");
[Figure: load Online Retail graph]
Execute following statement to query the purchase records of customer whose ID is cust_12353.
graph.queryPgql(" SELECT ID(c), ID(p), p.description FROM MATCH (c)-[has_purchased]->(p) WHERE ID(c) = 'cust_12353' ").print();
[Figure: query in online retail graph]
Following statement uses personalizedPagerank to analyse customer whose ID is cust_12353.
var vertex = graph.getVertex("cust_12353");
analyst.personalizedPagerank(graph, vertex)
[Figure: personoalizedPagerank]
Following statement queries the top10 products.
graph.queryPgql(
    "  SELECT ID(p), p.description, p.pagerank " +
    "  MATCH (p) " +
    "  WHERE LABEL(p) = 'Product' " +
    "    AND NOT EXISTS ( " +
    "     SELECT * " +
    "     MATCH (p)-[:purchased_by]->(a) " +
    "     WHERE ID(a) = 'cust_12353' " +
    "    ) " +
    "  ORDER BY p.pagerank DESC" +
    "  LIMIT 10"
).print();
[Figure: top10]
Query in GraphViz
Until now, we only query in the command line interface - jshell. Actually, we can also query in the built-in graphic interface - GraphViz.
GraphViz is a browser based interface, the URL to visit it is <HOST URL>:7007/ui.
On the login page, username is demograph in our case. You should know your password.
By execute following statement, we can get the session ID. If we input the session ID, we can visit the same graphs in that session, as long as you don't close the session.
session.getId();
[Figure: session ID]
[Figure: GraphViz Login]
After login, we should see a default page as below.
[Figure: GraphViz Query default]
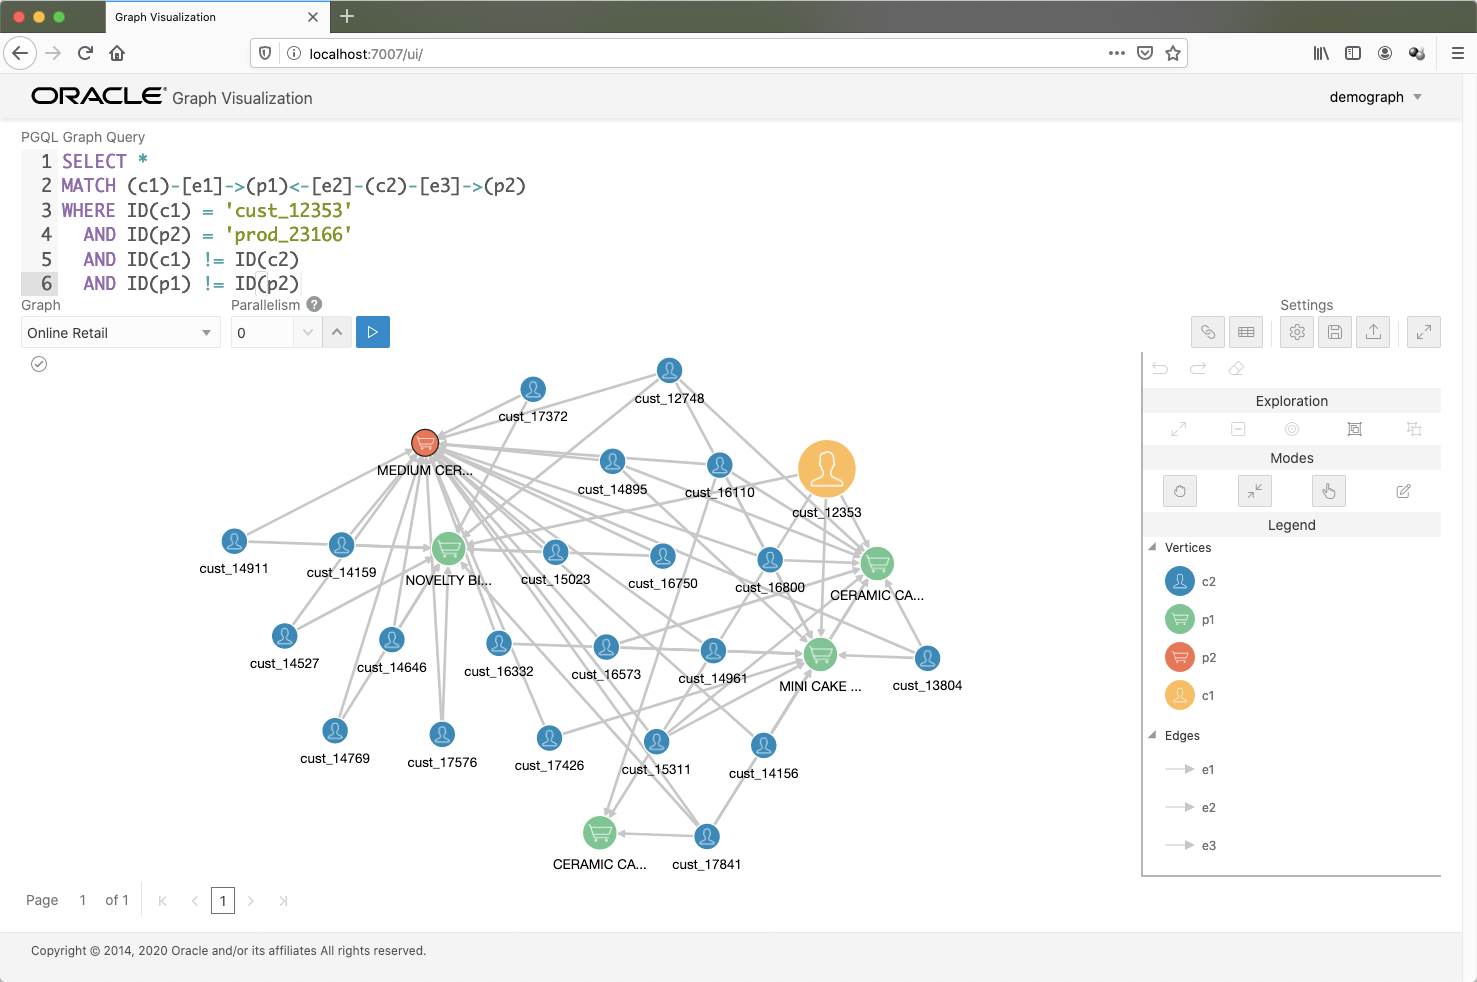
We can perform a complex query and GraphViz will show us a interactive graph of the query result.
SELECT *
MATCH (c1)-[e1]->(p1)<-[e2]-(c2)-[e3]->(p2)
WHERE ID(c1) = 'cust_12353'
  AND ID(p2) = 'prod_23166'
  AND ID(c1) != ID(c2)
  AND ID(p1) != ID(p2)
[Figure: GraphViz Query sample]
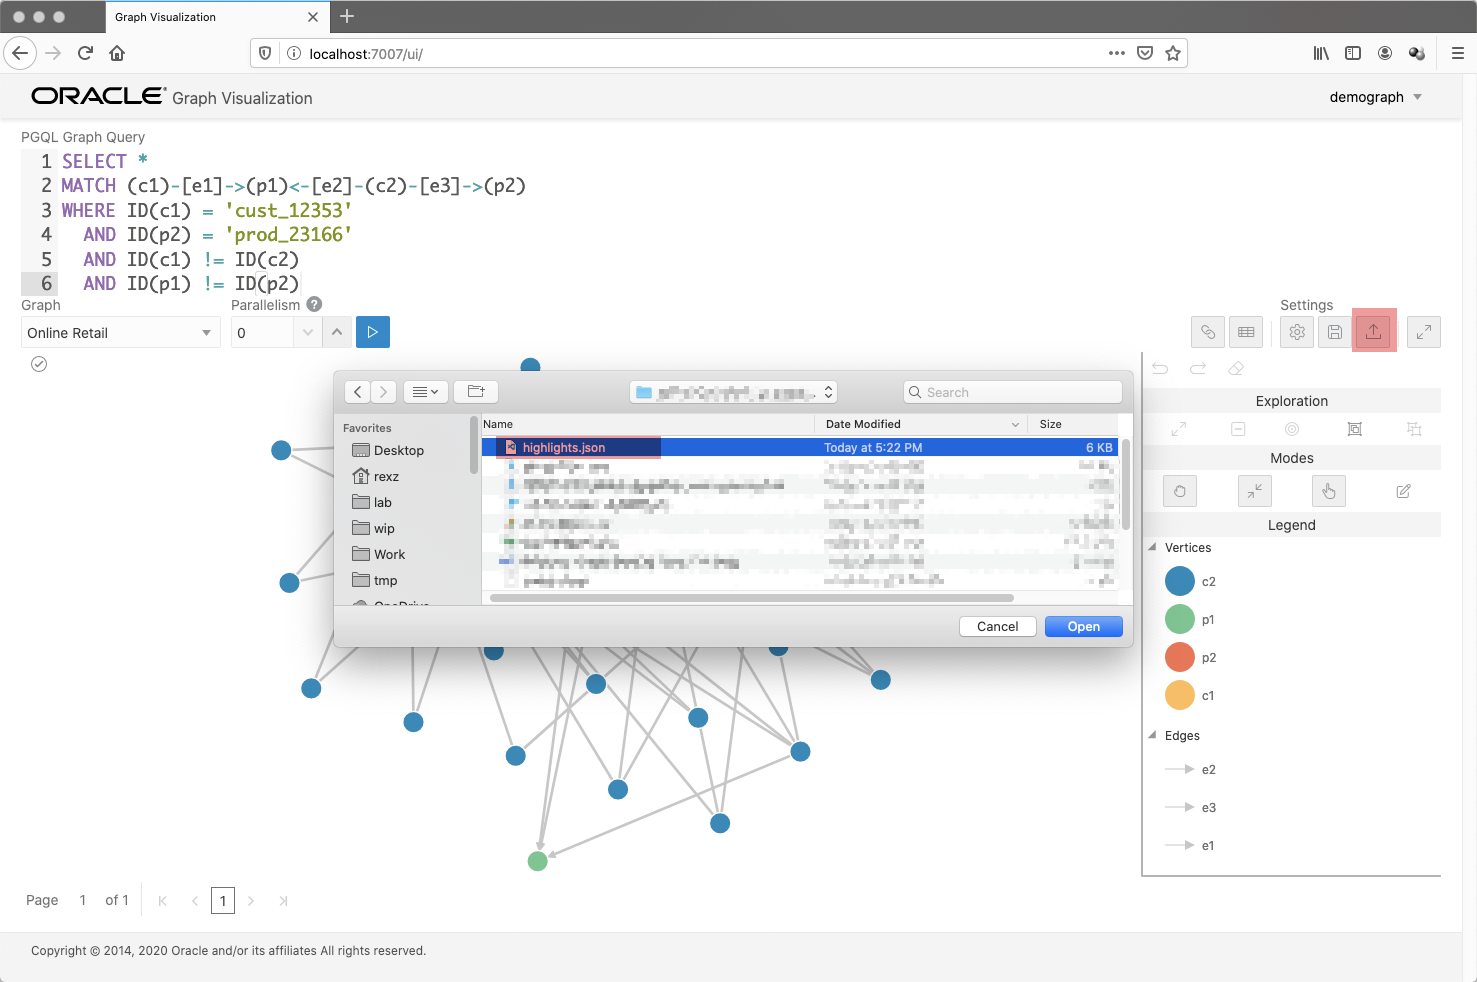
We can also upload custom settings to customize the output graph chart. For example, in the screenshot below, we upload a setting file called highlight.json to show the chart in a more intuitive way.
[Figure: GraphViz upload highlight.json]
[Figure: GraphViz highlight graph]
Conclusion
In this article, we introduced how to setup the Oracle Property Graph server and client in Oracle DBCS instance. But actually, we can definitely install the server and client on any other machines.
We also created 2 samples: HR and Online Retail to experience
- how to create graph
- how to query graph
- how to load graph into memory
- how to perform complex query
- how to use GraphViz
I hope that after reading this article, you can have a basic understanding of Oracle Property Graph technologies and can start to play with Oracle Property Graph server. If you have more interesting on it, please check the references below.


