やりたいこと
-
GoogleCloudBuildを利用 - ソースコードは
GitHubで管理 -
GitHubのリポジトリにタグPush→GoogleAppEngineにデプロイ -
CloudBuild⇆GitHubのSSH鍵はGoogleKeyManagementServiceを利用

前提
- GCP(Google Cloud Platform)のアカウントを所持している
- GCPにプロジェクトを作成できる
- GitHubのアカウントを所持している
- サンプルで利用する言語はGo言語
- 投稿者の環境はMacOS(intel, Catalina)
サンプルのディレクトリ構成
cloudbuild-helloworld
.
├── .github_cloudbuild.enc
├── .known_hosts
├── submodule # submodule
|   └── submodule_dummy.txt
├── app.yaml
├── cloudbuild.yaml
└── helloworld.go
事前準備
- GitHubにリポジトリの作成(private) ※既存のリポジトリを利用する場合は
Owner権限が必要 - GCPにプロジェクトを作成
Cloud KMS(Cloud Key Management Service API)の設定
- APIの有効化


- Keyringの作成(後述)
- Keyの作成(後述)
App Engine Applicationの作成(今回初めてGAEを使う人)
$ gcloud app create

Please choose the region where you want your App Engine application
located:

 [1] asia-east2    (supports standard and flexible and search_api)
 [2] asia-northeast1 (supports standard and flexible and search_api)
 [3] asia-northeast2 (supports standard and flexible and search_api)
 [4] asia-northeast3 (supports standard and flexible and search_api)
 [5] asia-south1   (supports standard and flexible and search_api)
 [6] asia-southeast2 (supports standard and flexible and search_api)
 [7] australia-southeast1 (supports standard and flexible and search_api)
 [8] europe-central2 (supports standard and flexible)
 [9] europe-west   (supports standard and flexible and search_api)
 [10] europe-west2  (supports standard and flexible and search_api)
 [11] europe-west3  (supports standard and flexible and search_api)
 [12] europe-west6  (supports standard and flexible and search_api)
 [13] northamerica-northeast1 (supports standard and flexible and search_api)
 [14] southamerica-east1 (supports standard and flexible and search_api)
 [15] us-central    (supports standard and flexible and search_api)
 [16] us-east1      (supports standard and flexible and search_api)
 [17] us-east4      (supports standard and flexible and search_api)
 [18] us-west2      (supports standard and flexible and search_api)
 [19] us-west3      (supports standard and flexible and search_api)
 [20] us-west4      (supports standard and flexible and search_api)
 [21] cancel
Please enter your numeric choice:  3 # 好きなロケーションのインデックスを入力する。この場合はasia-northeast2

Creating App Engine application in project [cloudbuild-qiita] and region [asia-northeast2]....done.
Success! The app is now created. Please use `gcloud app deploy` to deploy your first app.
App Engine Admin APIの設定
- APIの有効化


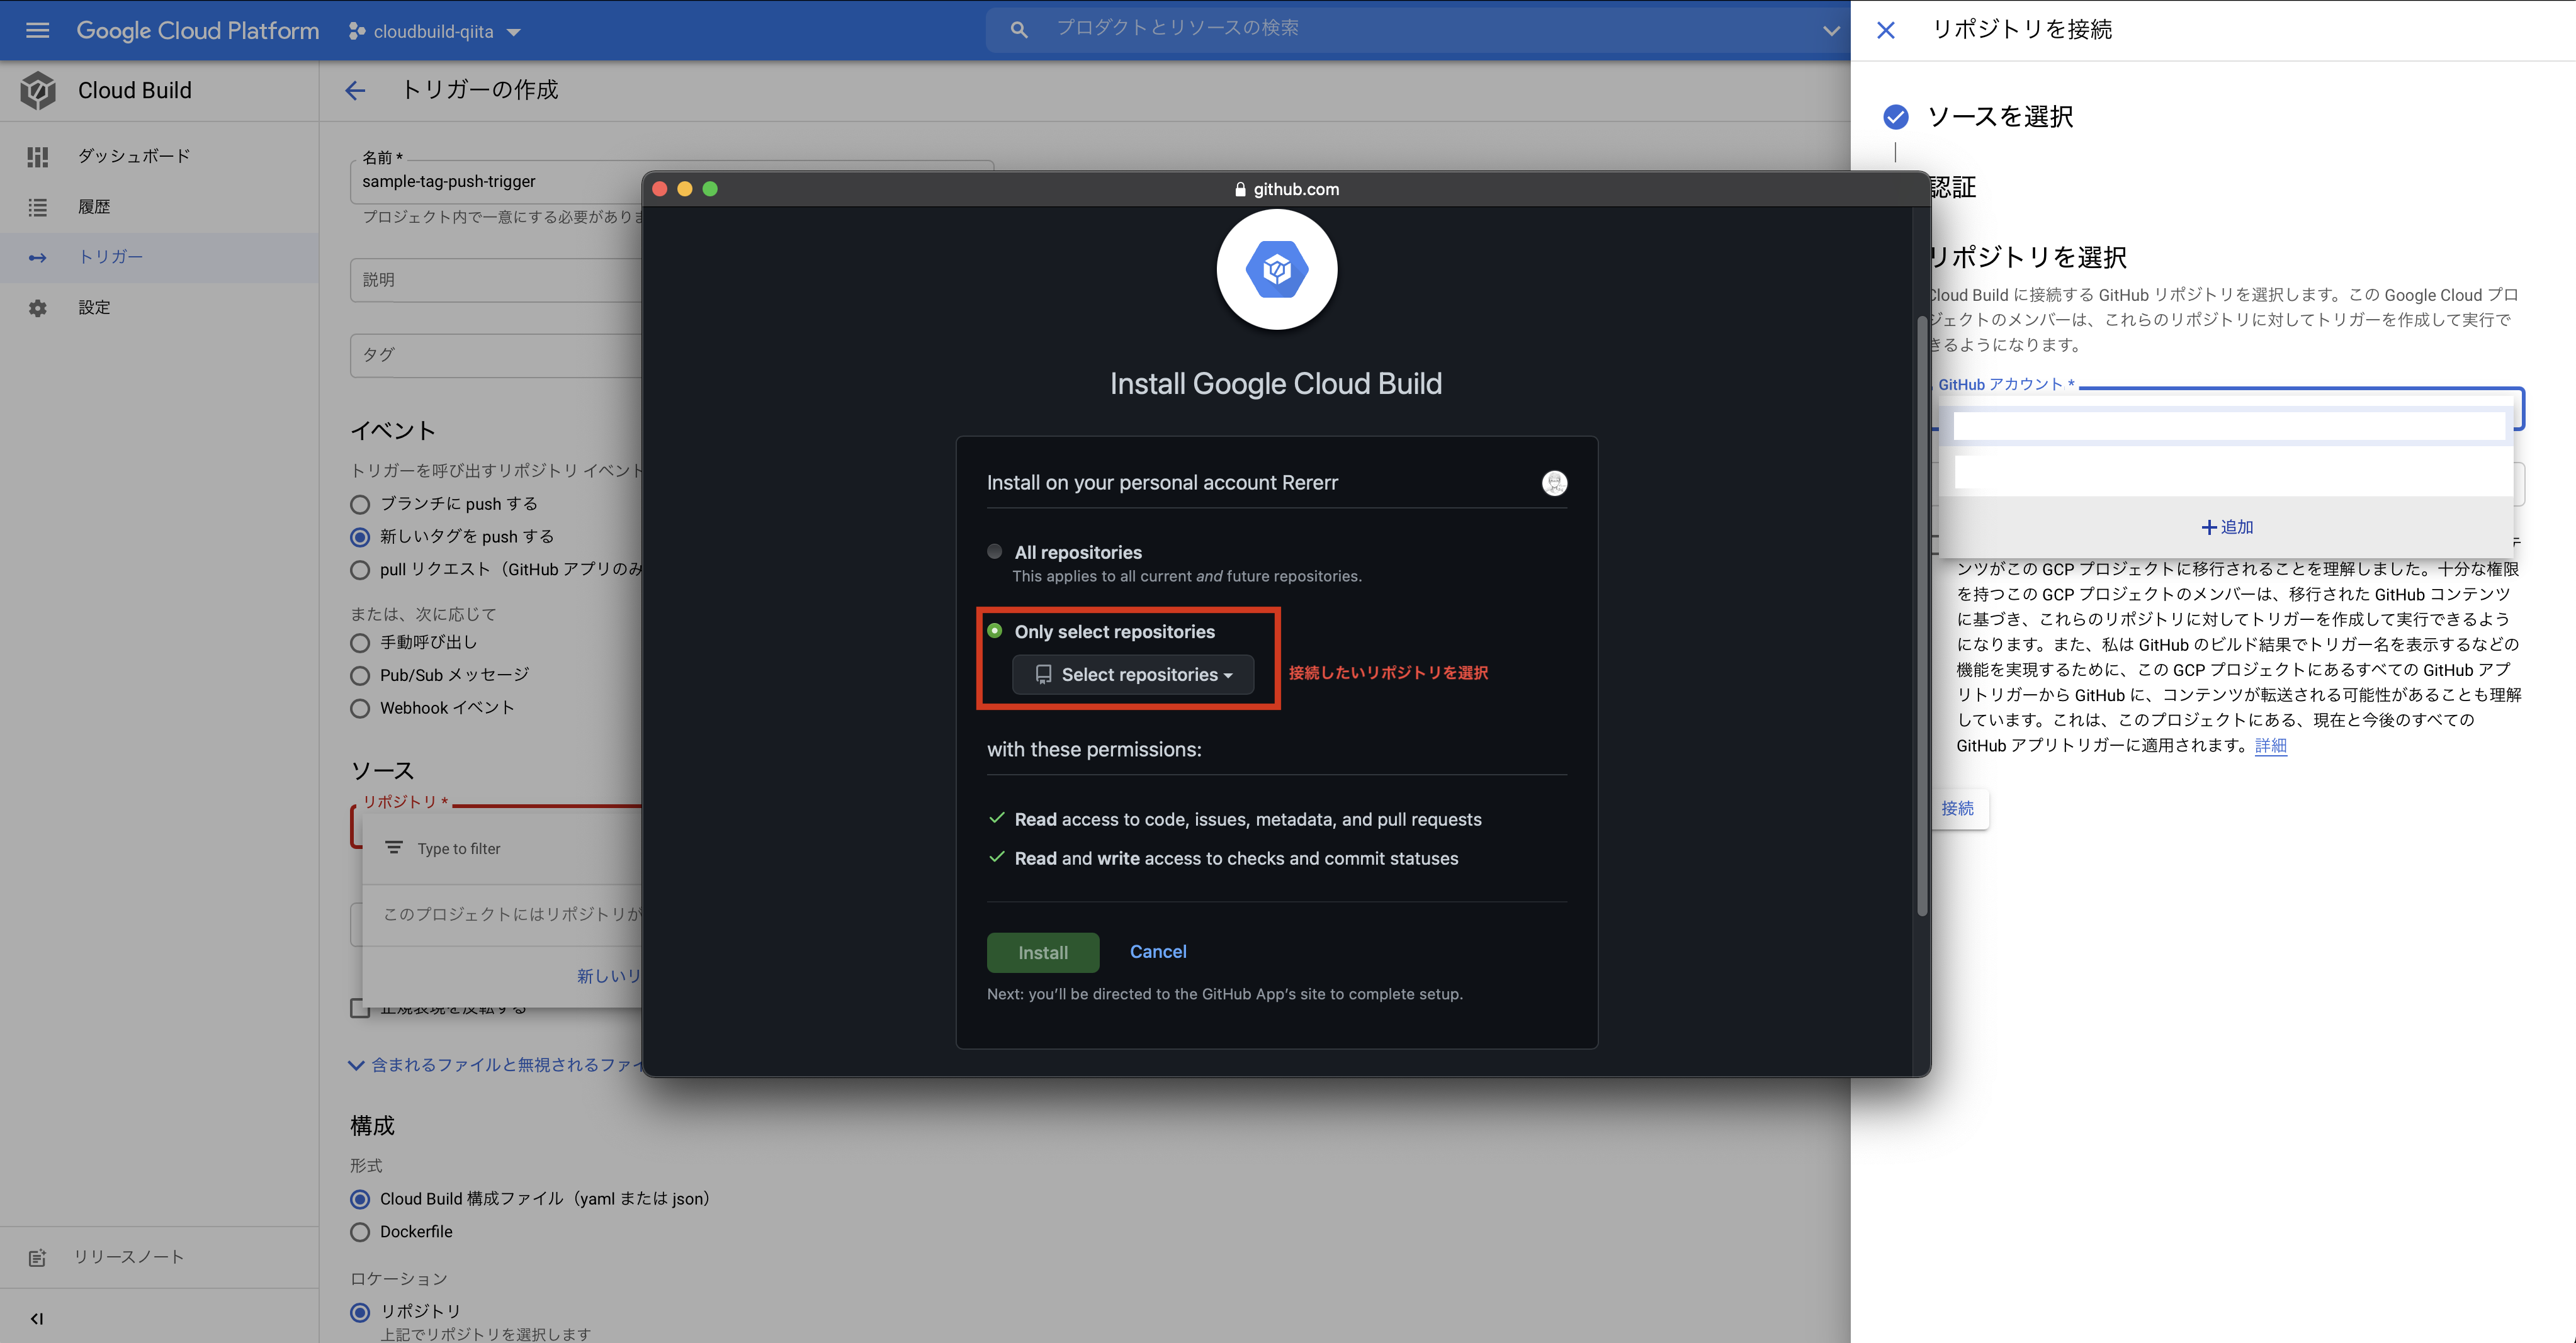
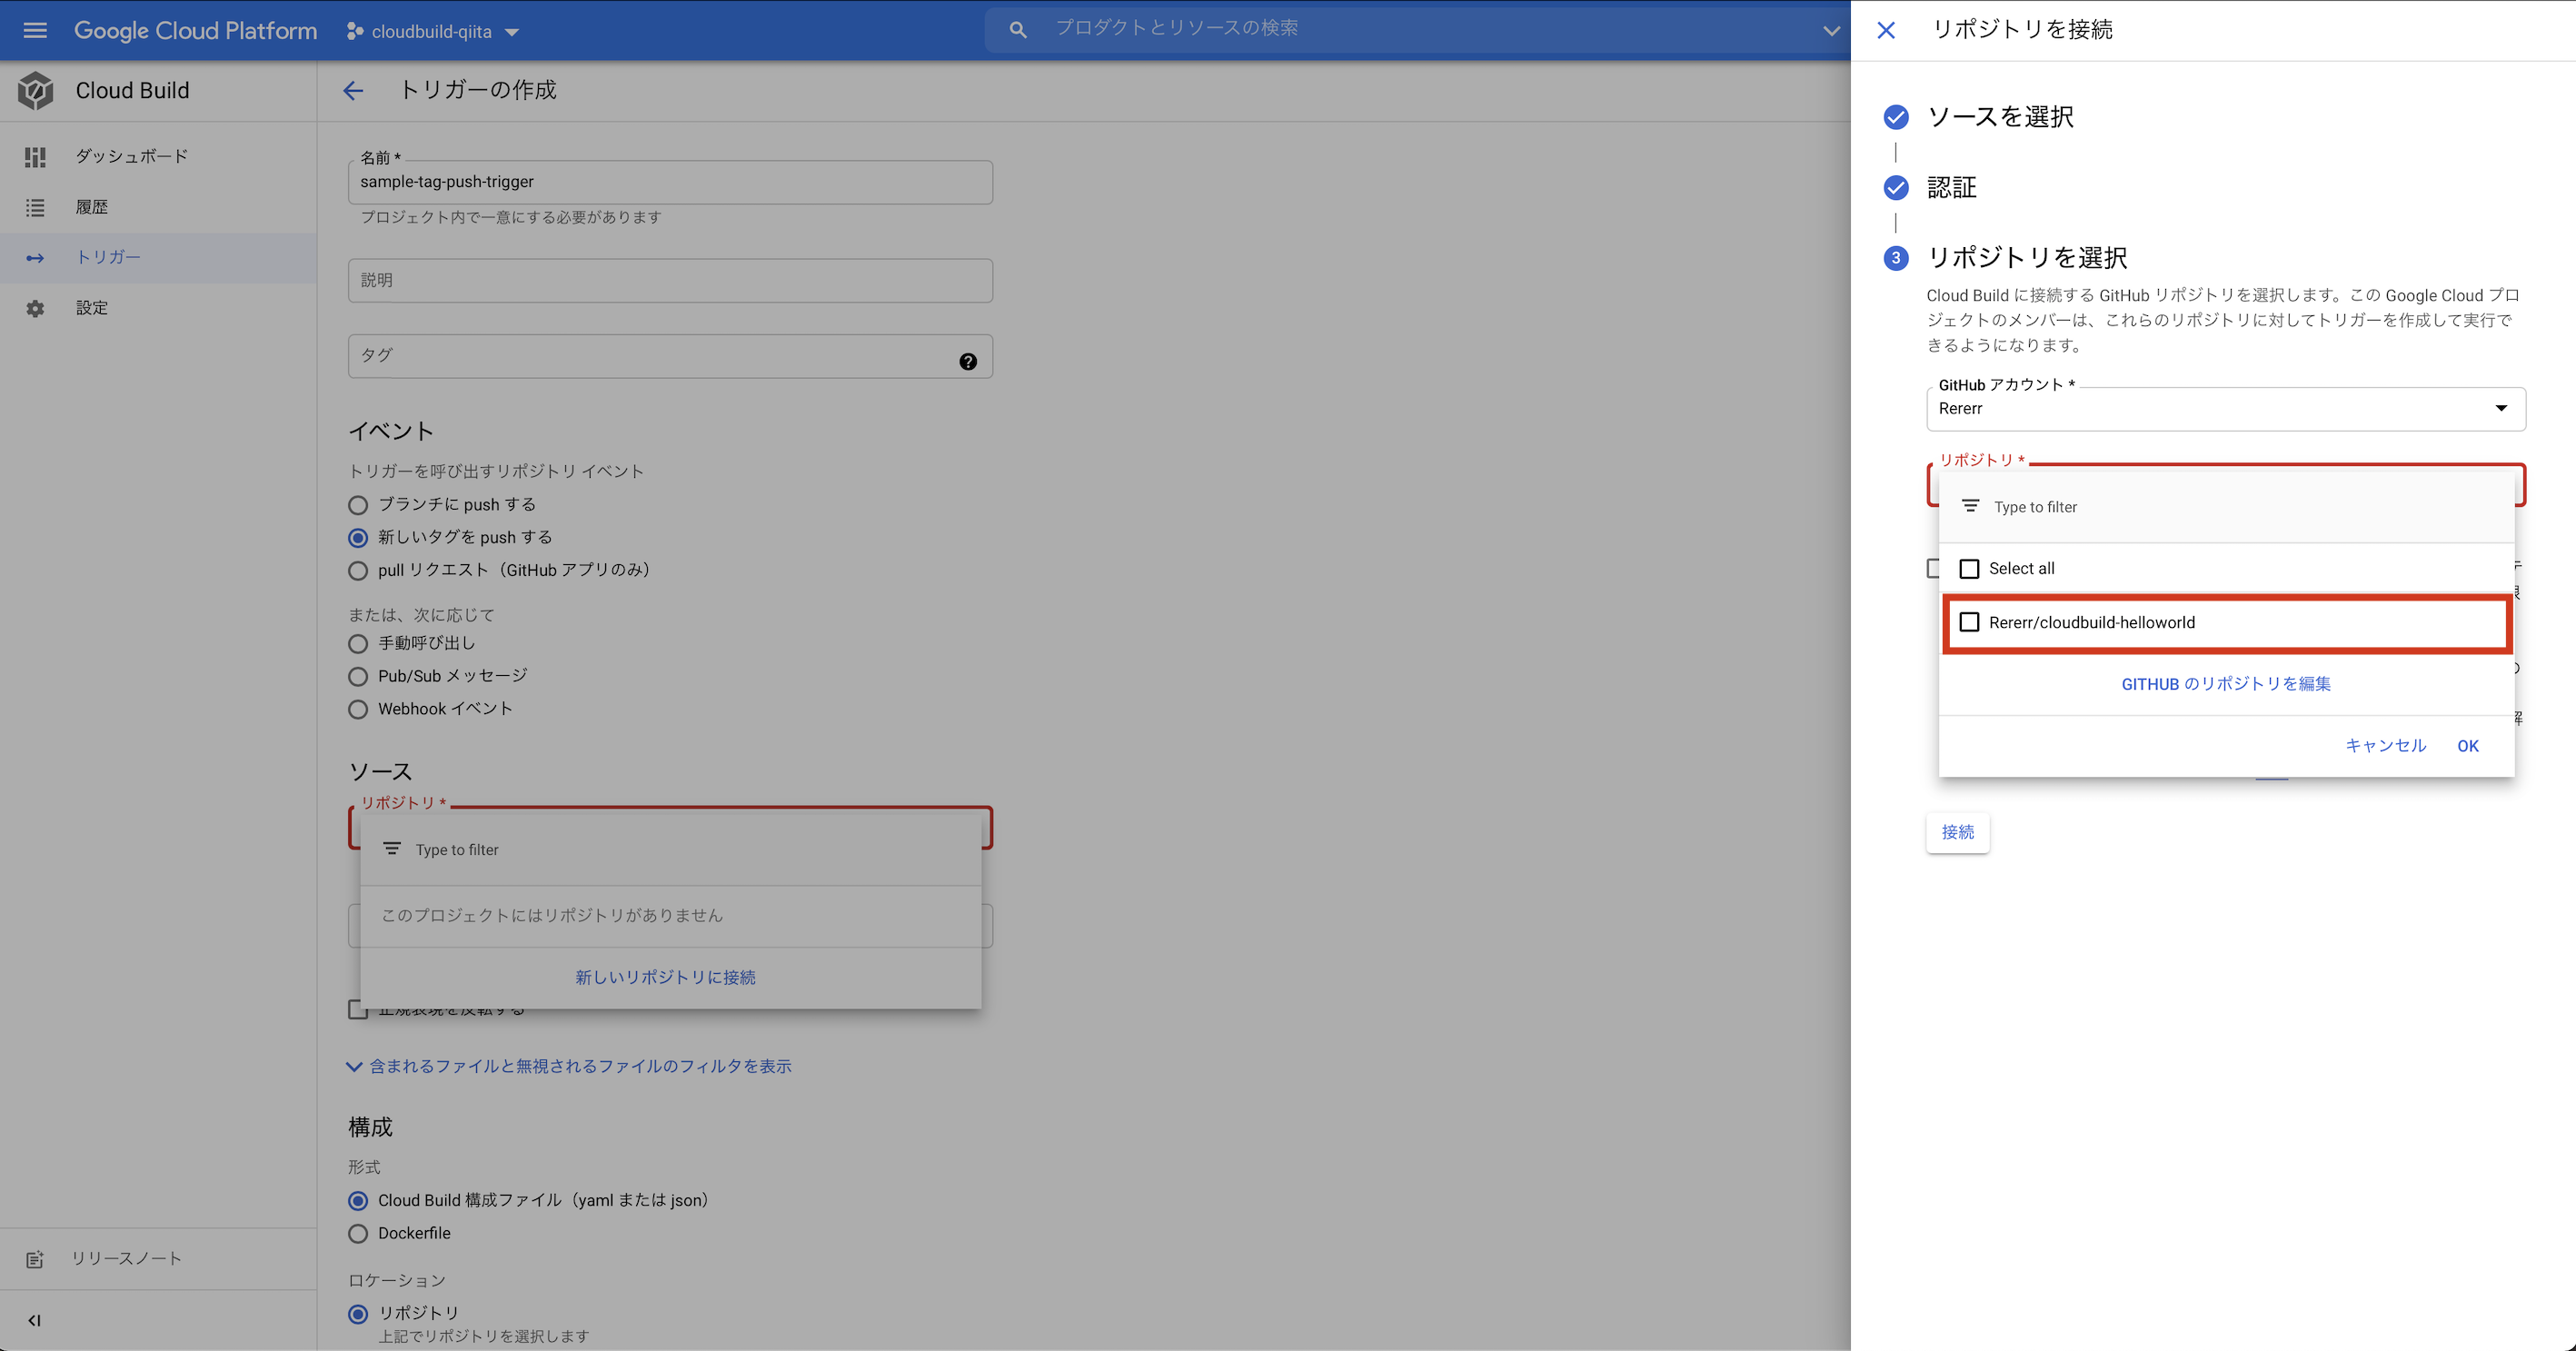
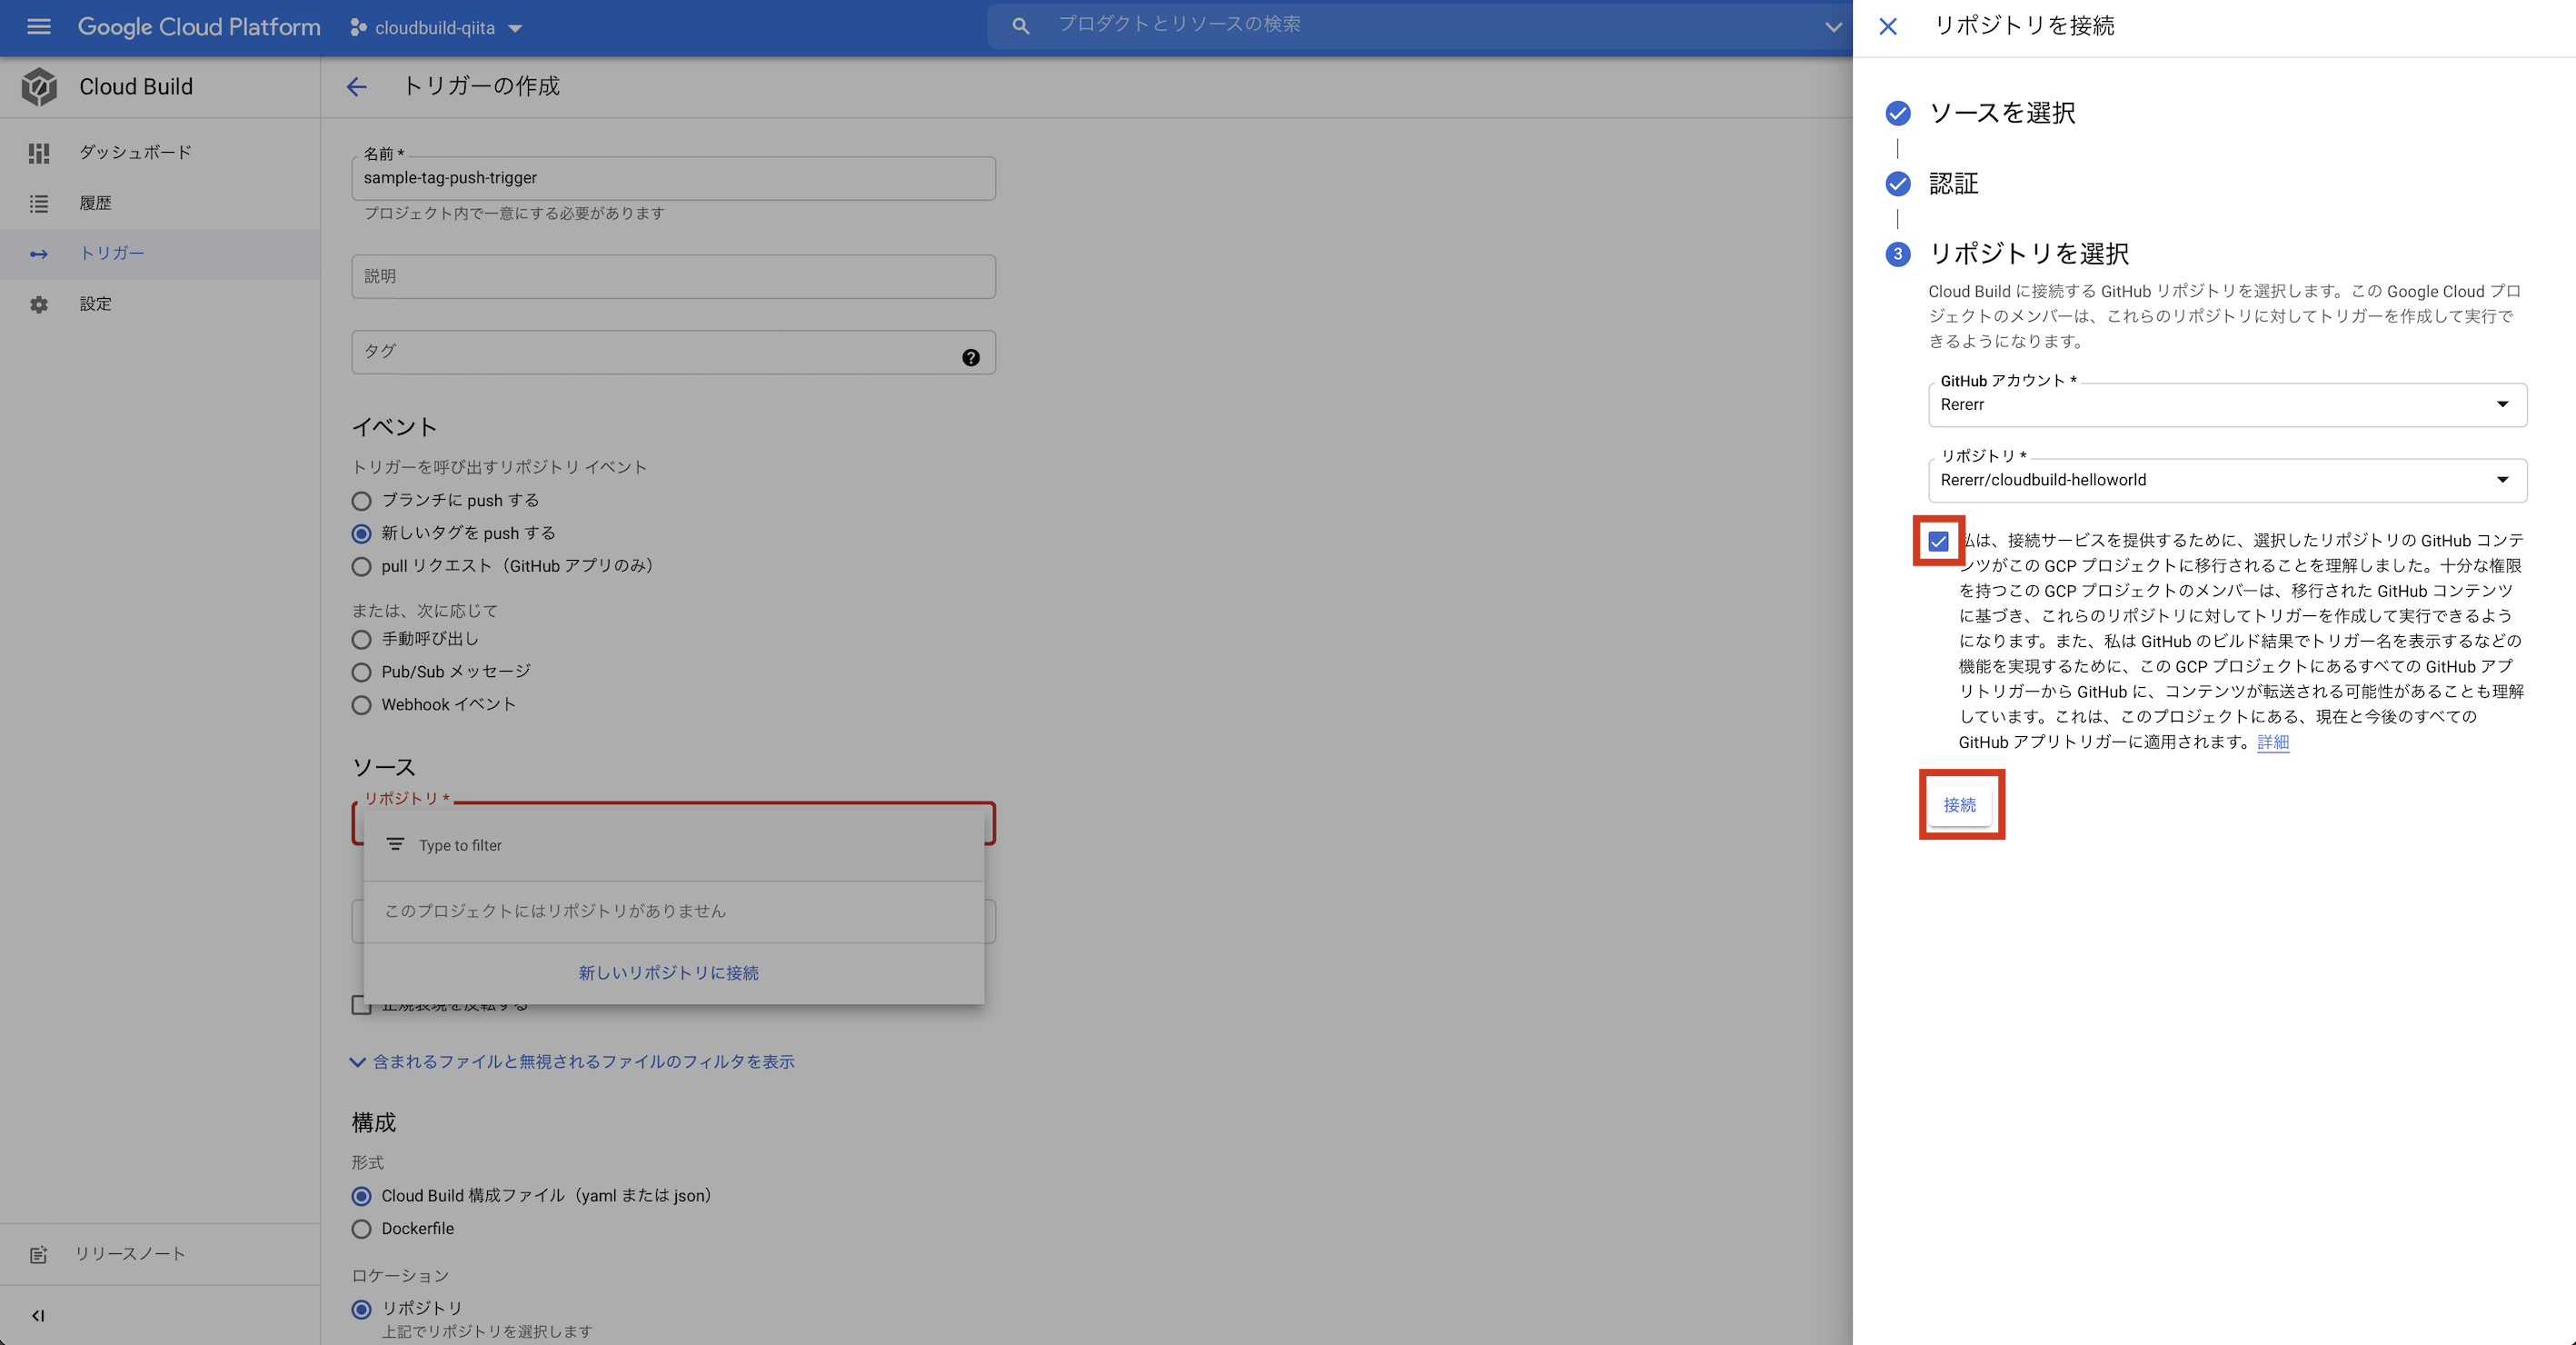
Cloud Buildの設定
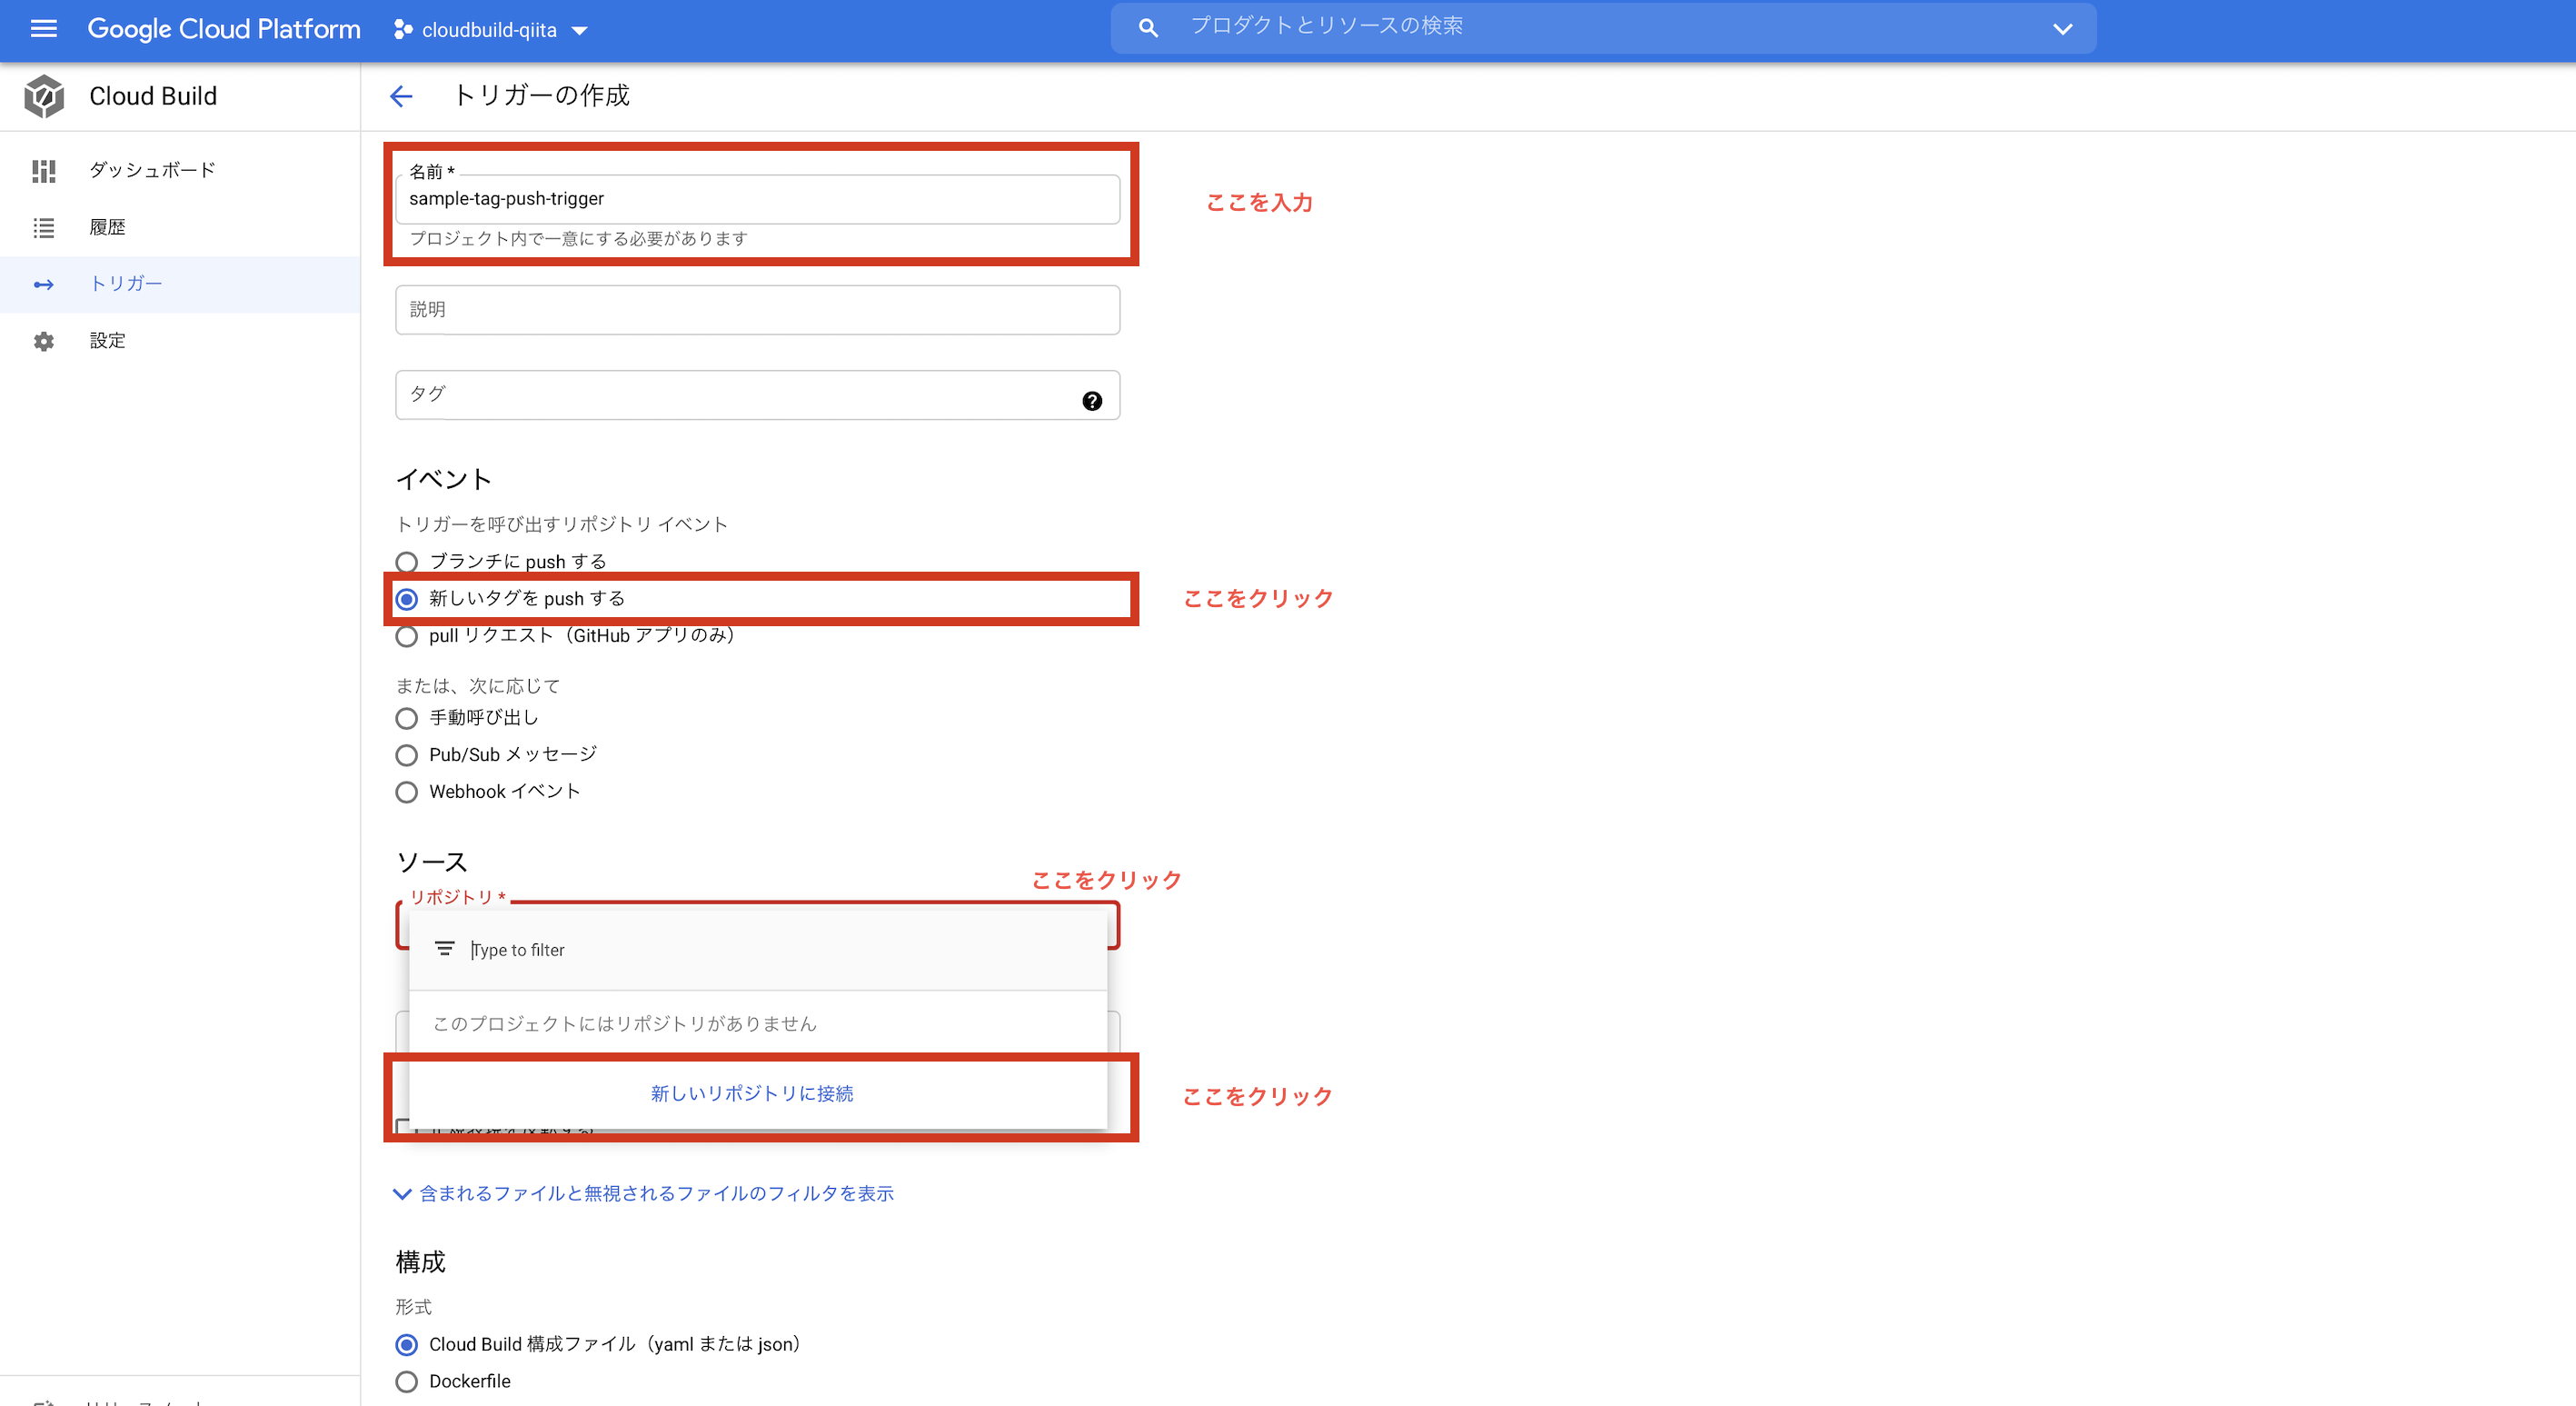
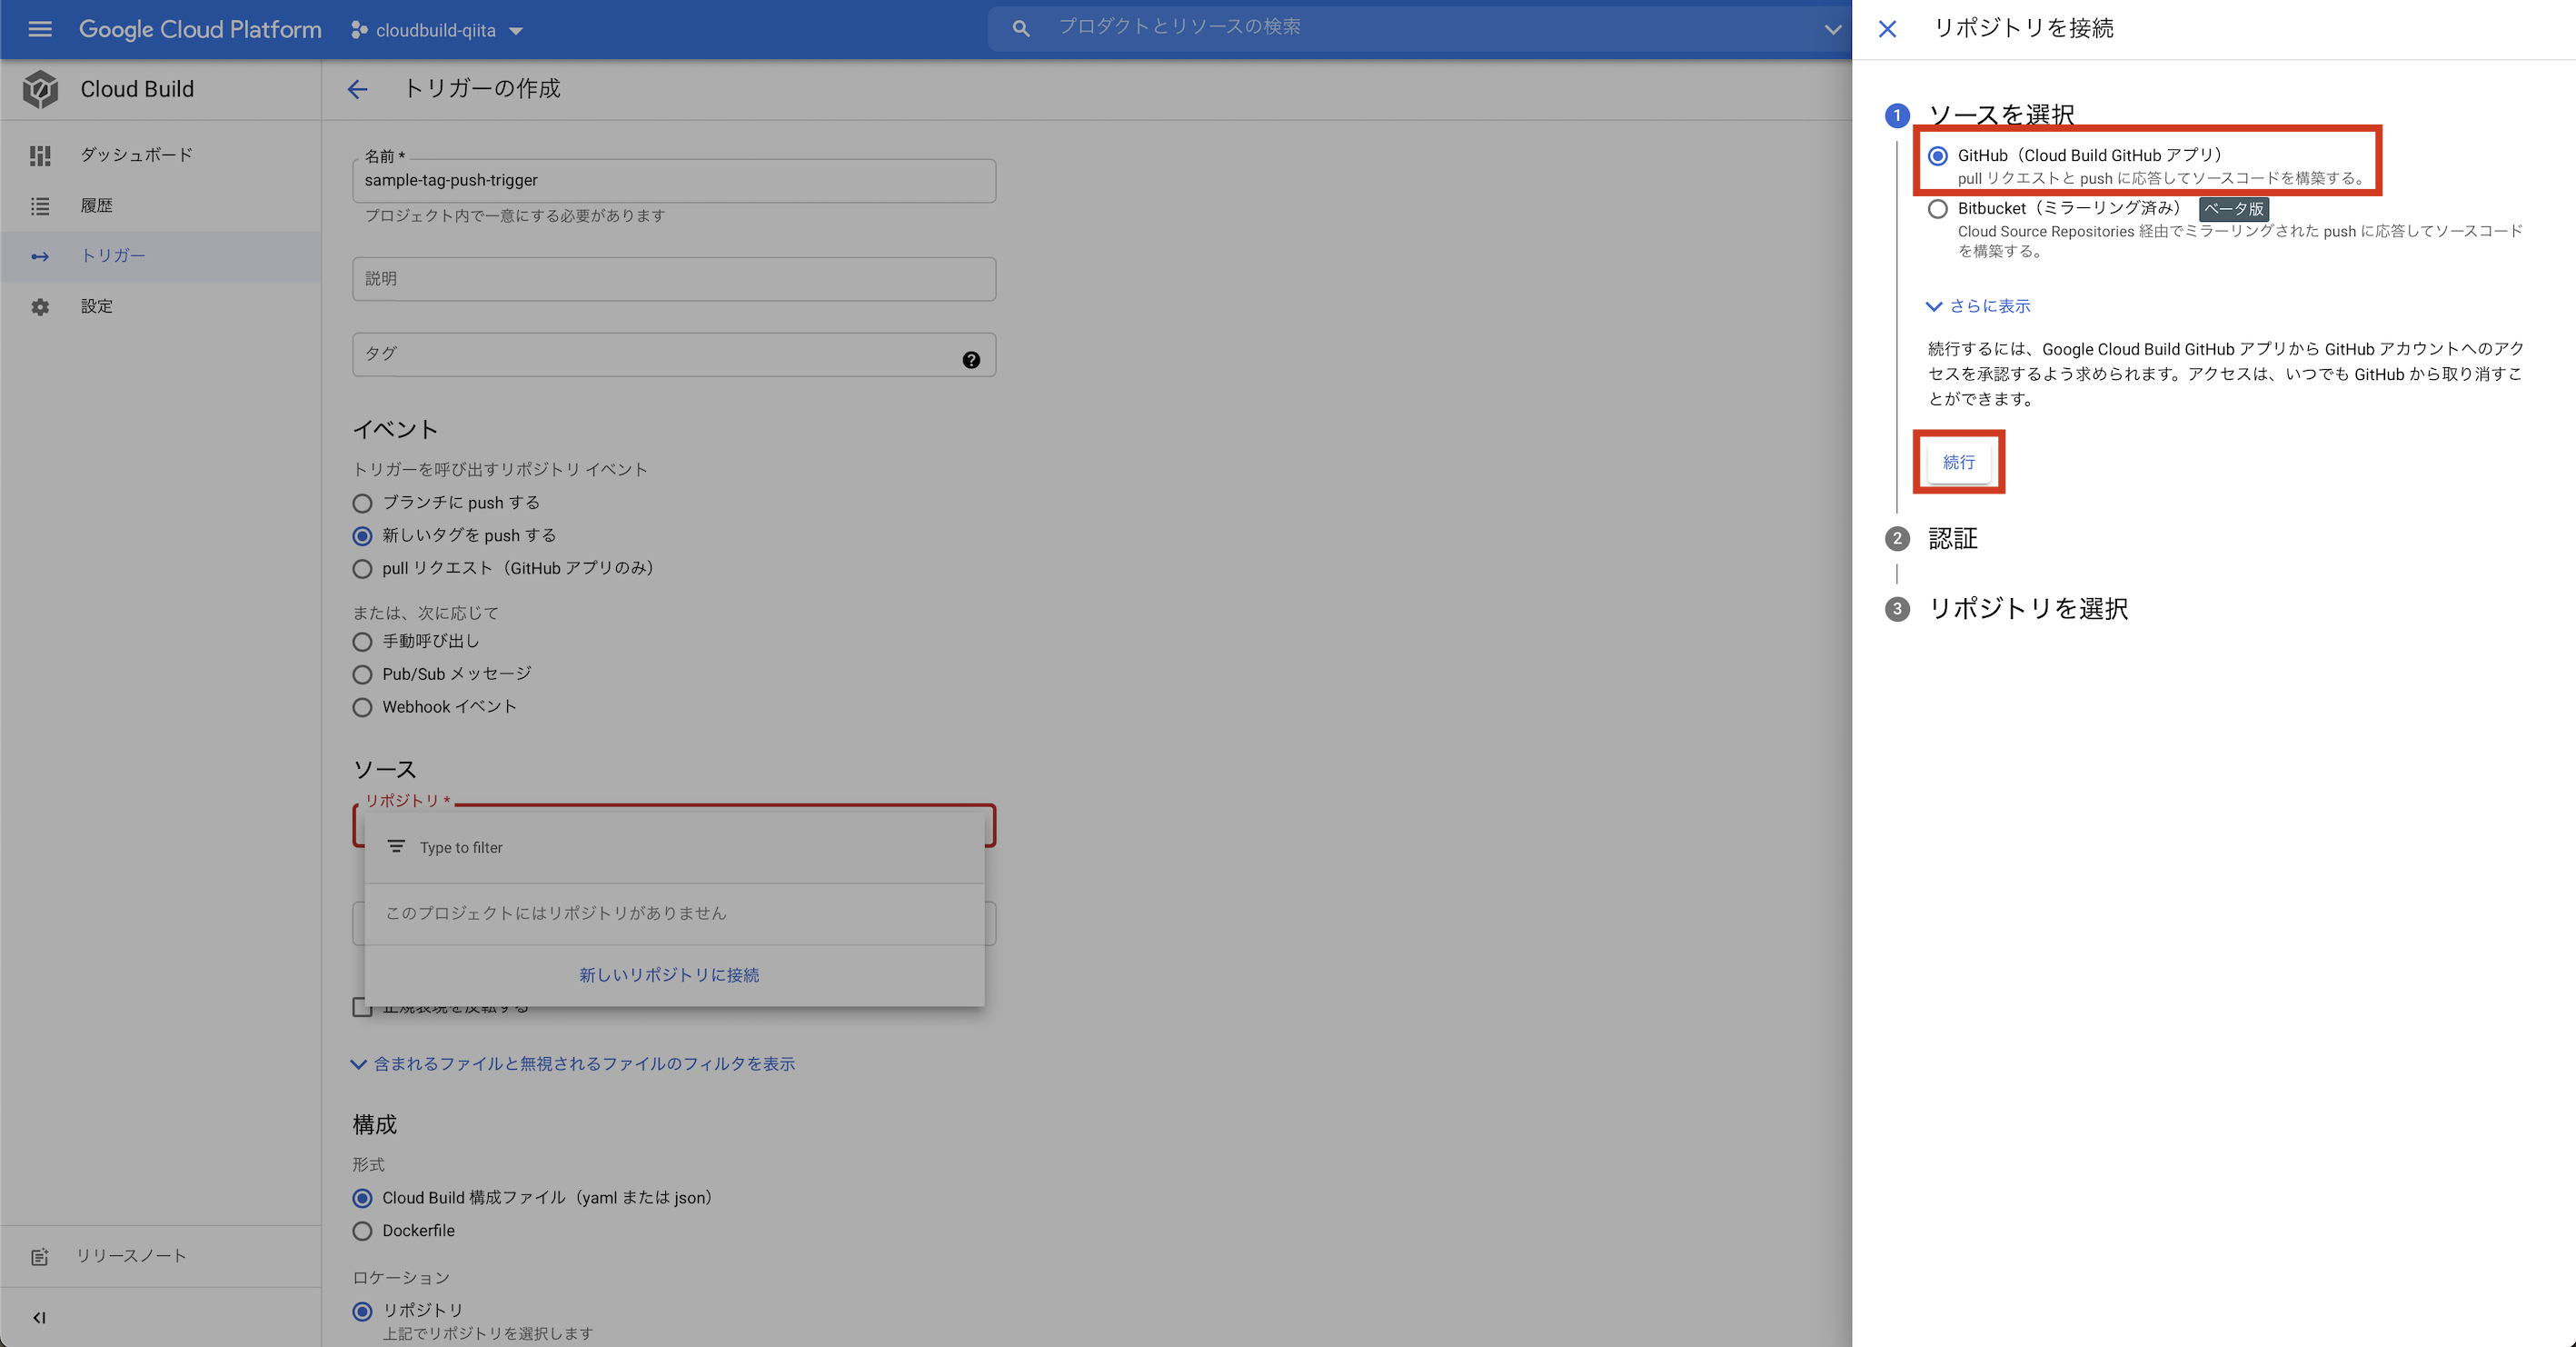
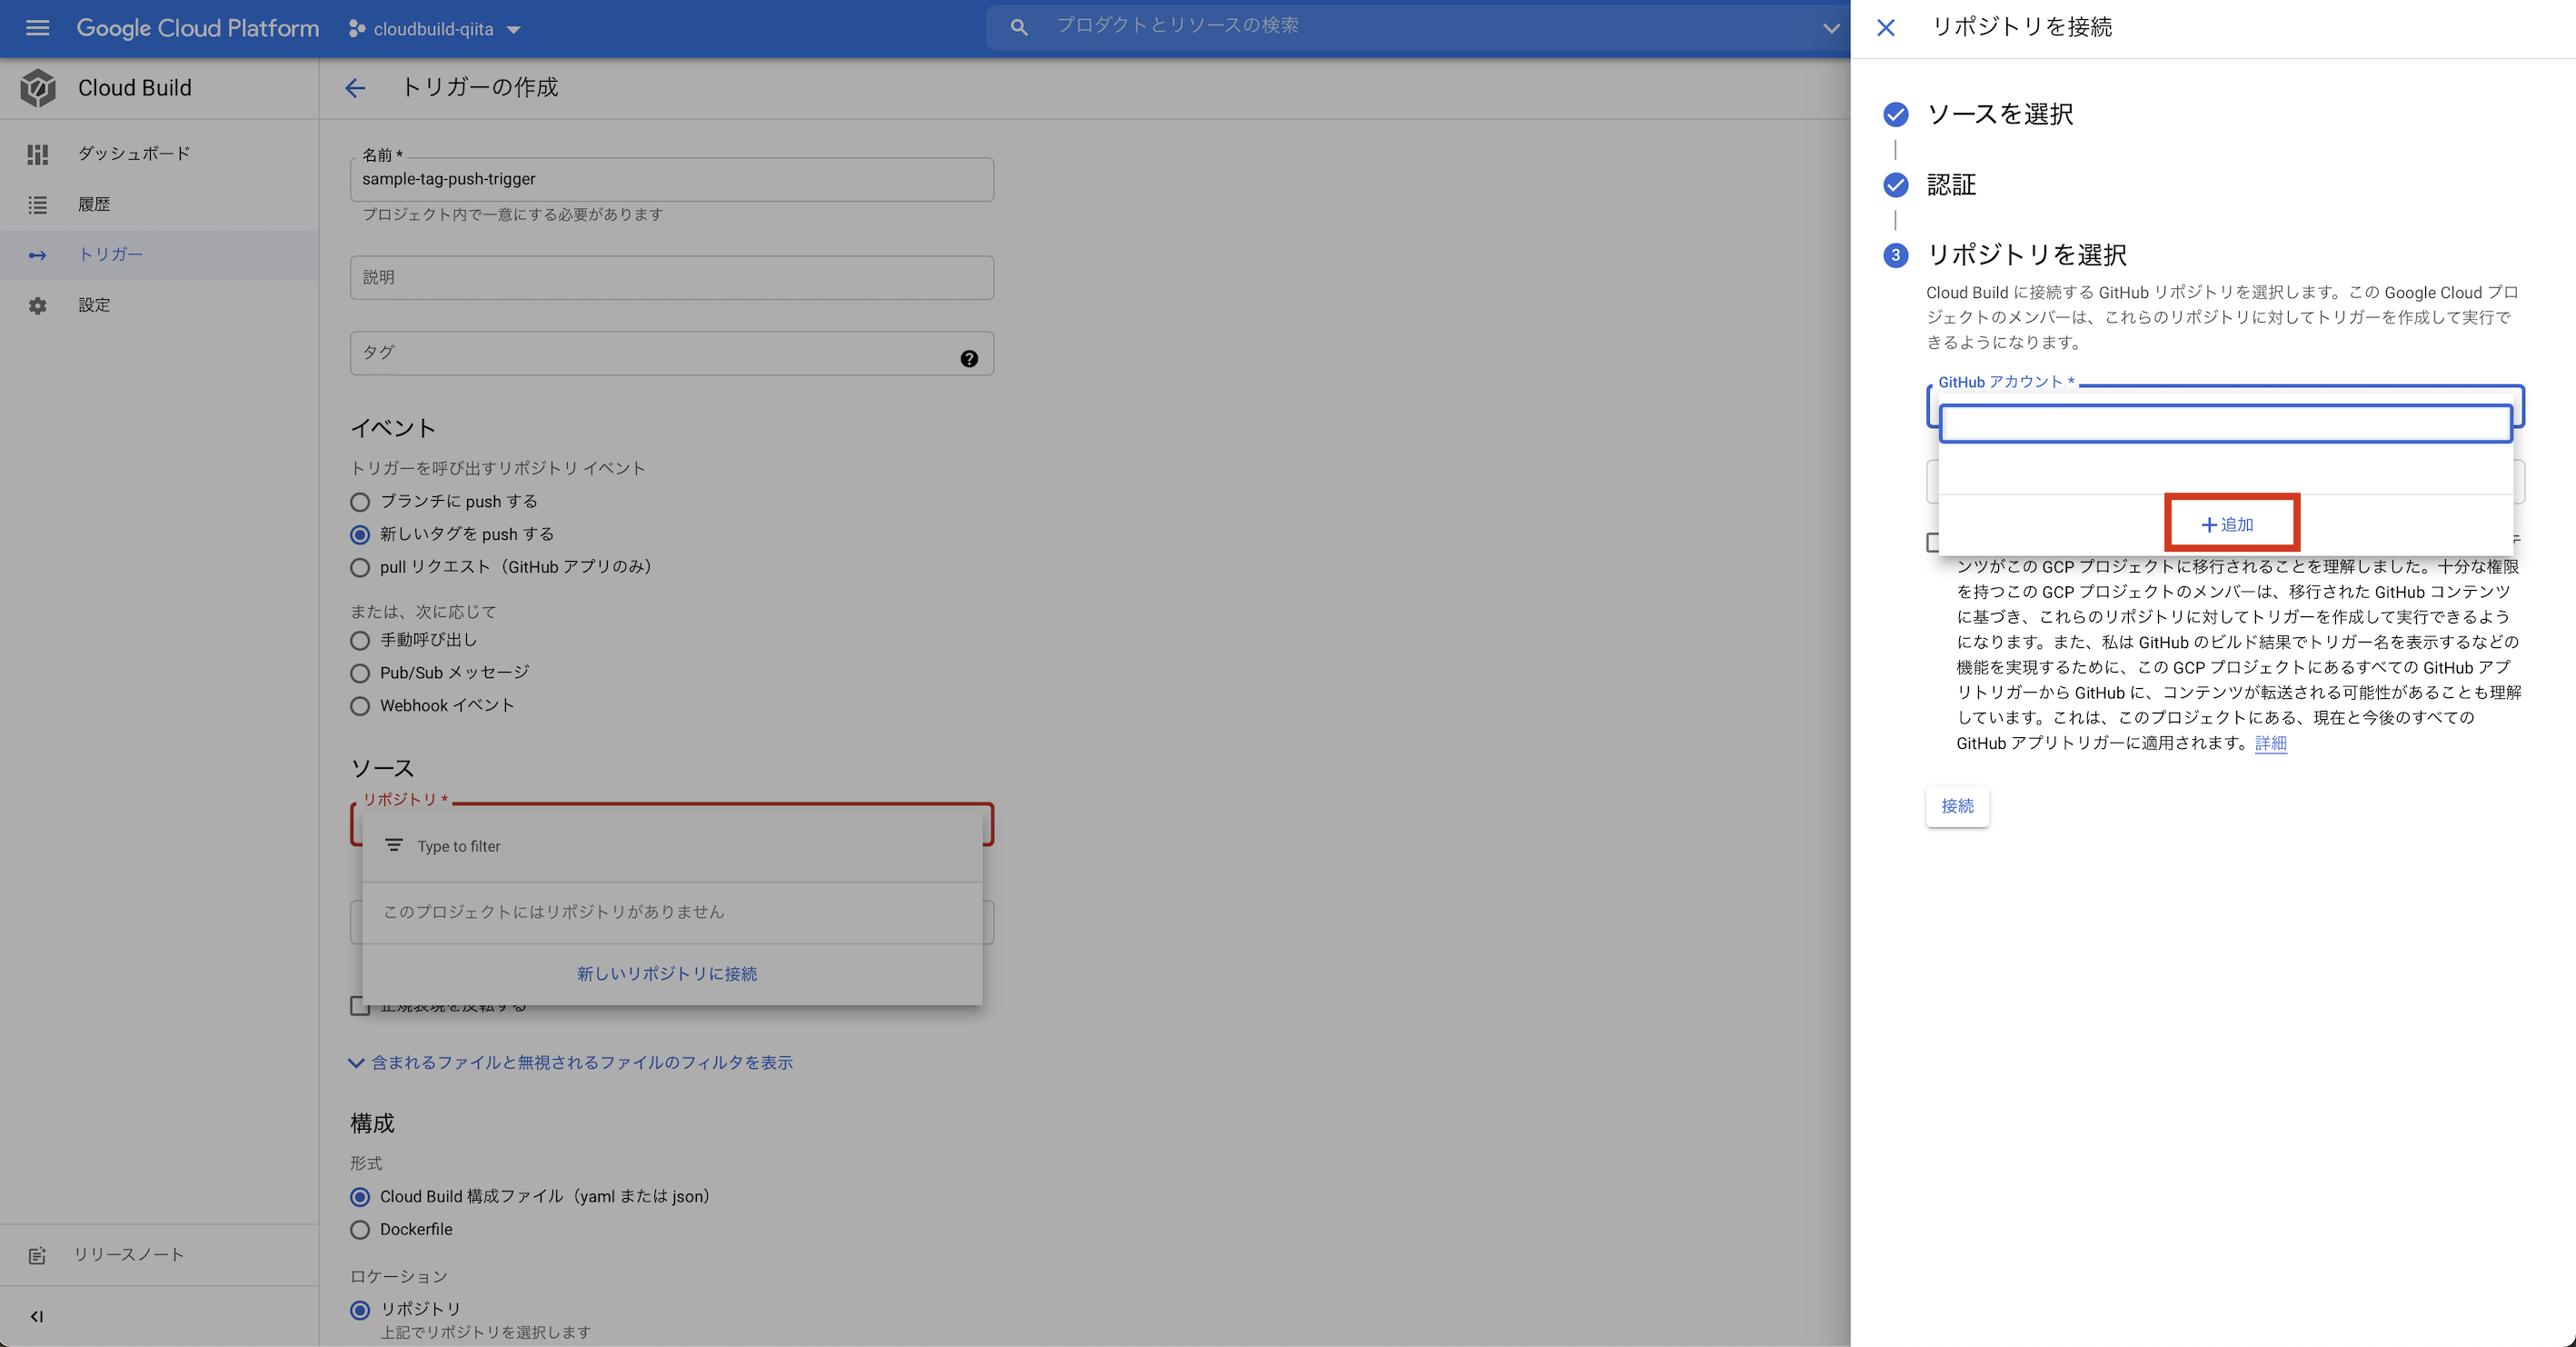
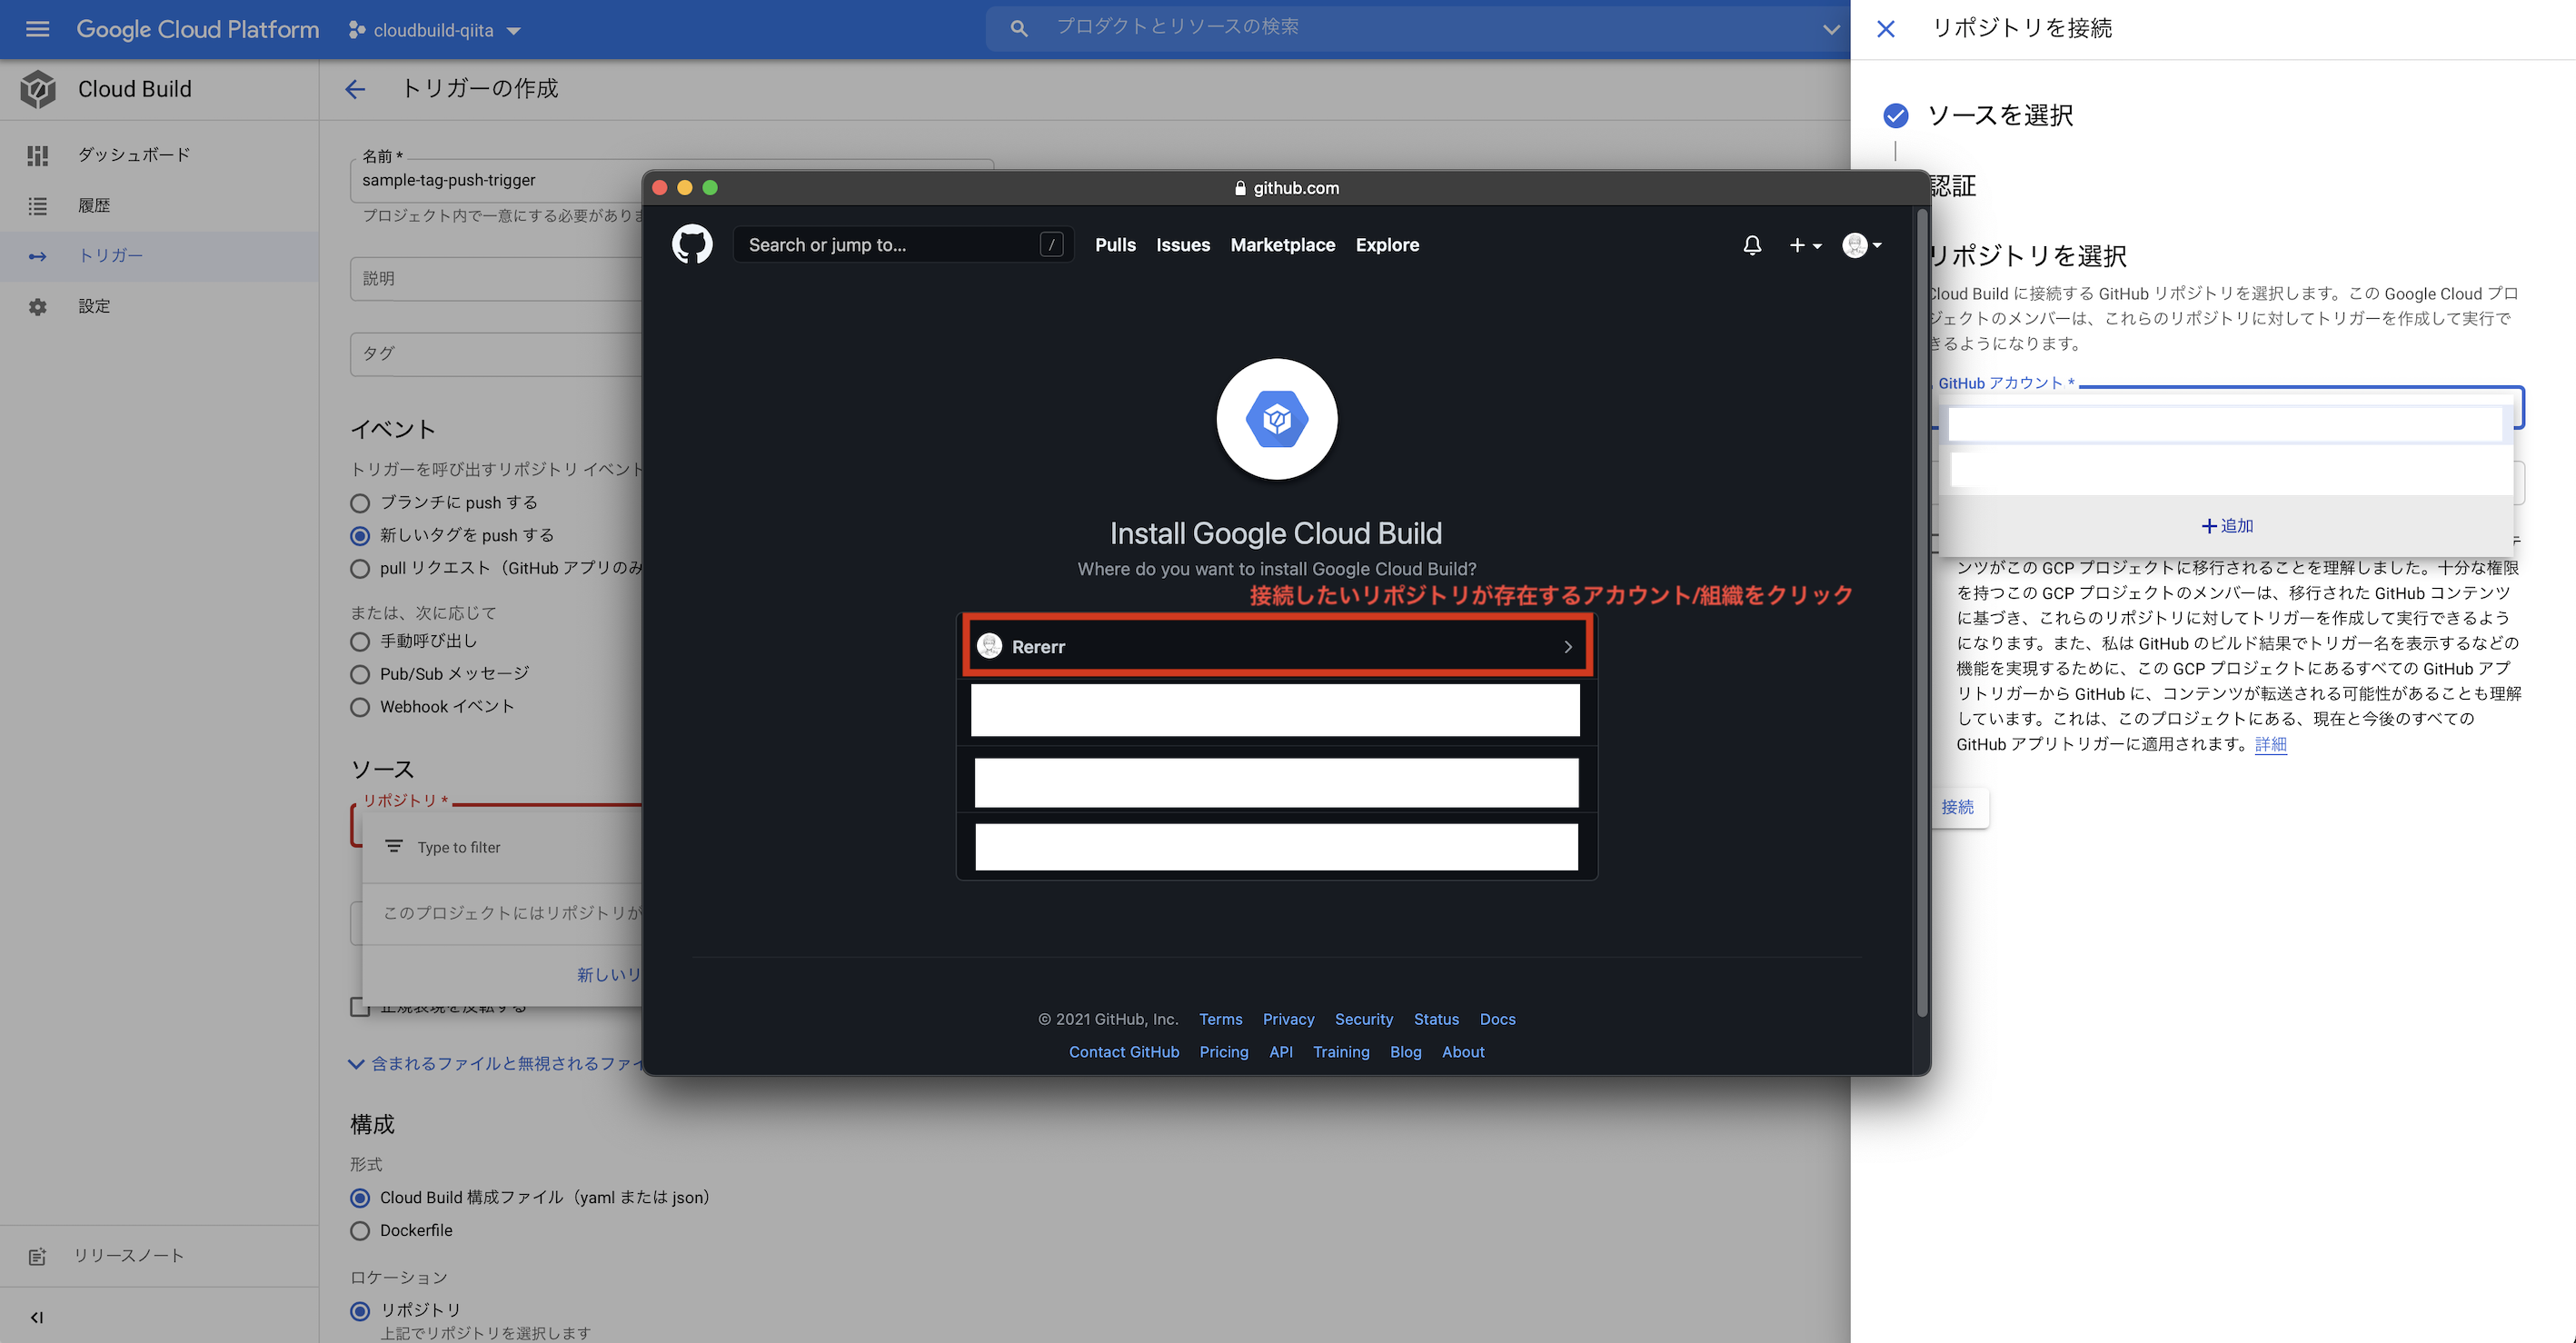
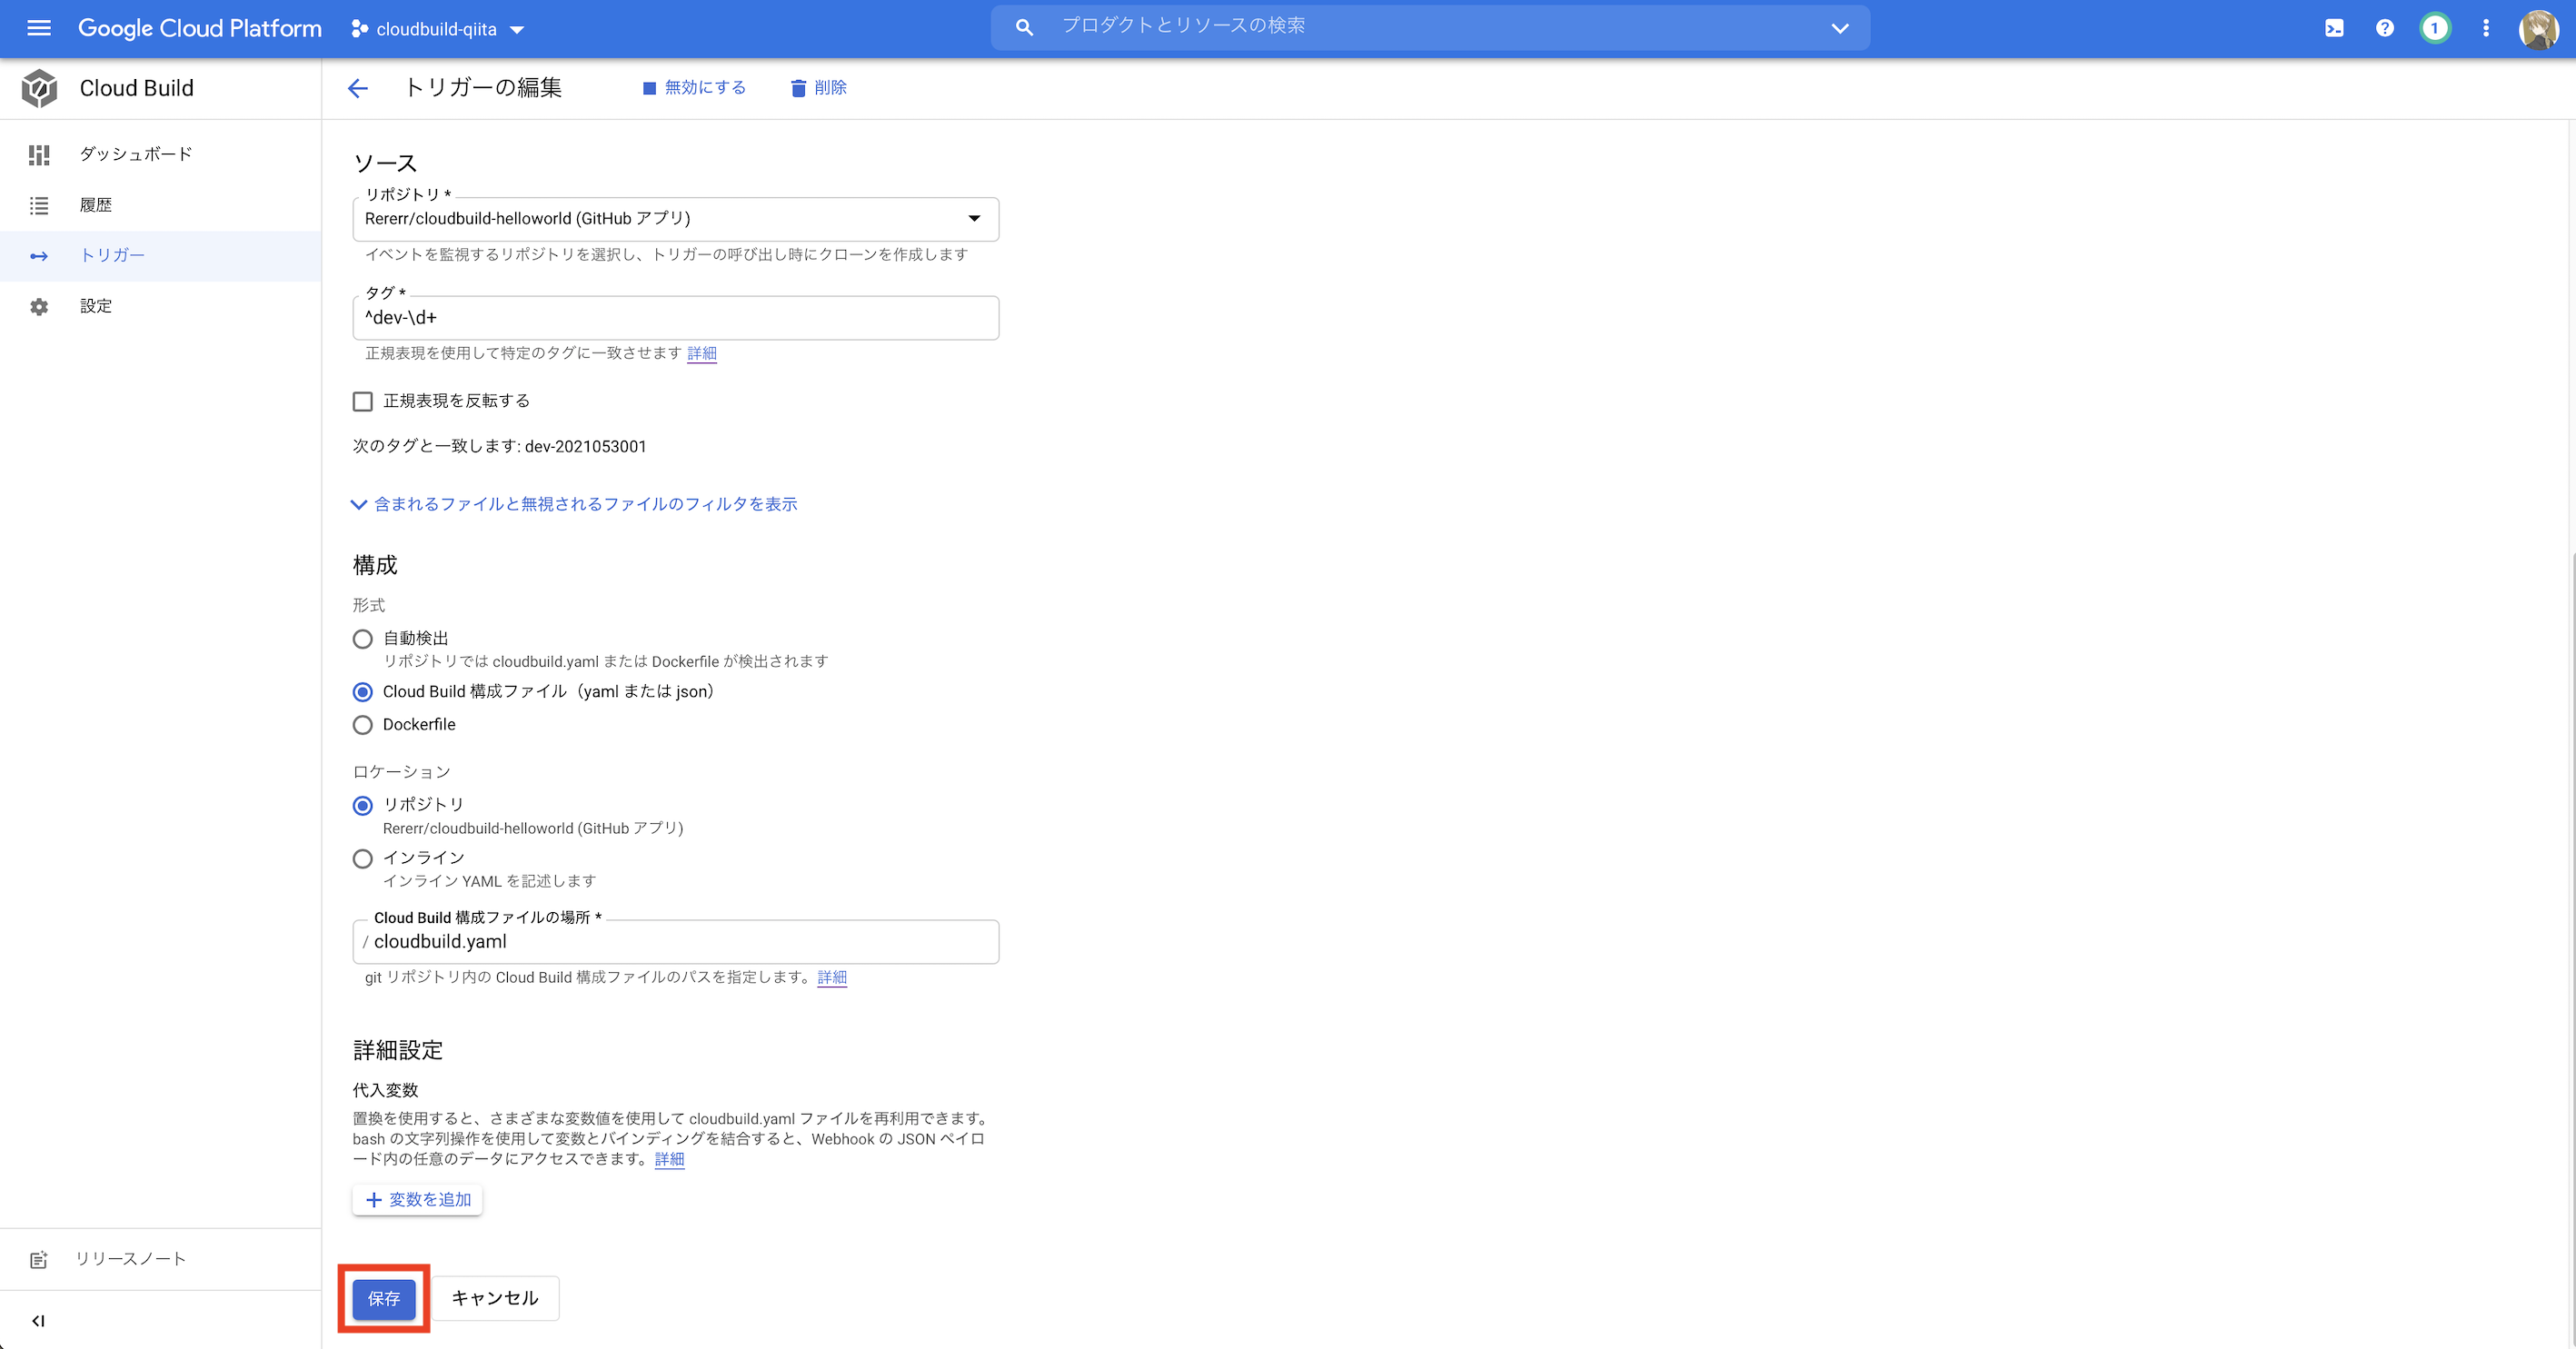
- CloudBuildトリガーの作成&GitHubリポジトリの接続

IAM(Cloud Identity and Access Management)の設定
- cloudbuild.gserviceaccount.comアカウントへ下記権限の付与
-
AppEngineデプロイ担当者:デプロイに必要 -
AppEngineサービス管理者:デプロイ後のトラフィック変更に必要 -
CloudBuildサービスアカウント:元々付与されている -
クラウドKMS暗号鍵の復号化:GitHubとの連携時KMSを利用する場合には必要 -
サービスアカウントユーザー:新しいバージョンをデプロイするために必要, IAMからは追加できず、CloudBuildの設定から有効にする -
ストレージ管理者:GitHubリポジトリのミラーリングに必要
GitHubの設定
- Adminロールの設定(CloudBuildの接続に利用するGitHubアカウント)
手順
KMSを利用したGitHubSSH鍵の暗号化(※コードブロック内大文字は自由入力)
1. 意図しないプロジェクトへの接続を防ぐため、config再セット
$ gcloud config set project PROJECT_NAME
(PROJECT_NAMEは連携設定をするプロジェクト名)
2. 暗号鍵のキーリングを作成
$ gcloud kms keyrings create KEYRING \
--location LOCATION
(KEYRINGは設定したいkeyringの名称)
example
$ gcloud kms keyrings create github-deploy-keyring \
$ --location global
3. 暗号鍵のキーを作成
$ gcloud kms keys create KEY \
--keyring KEYRING \
--location LOCATION \
--purpose encryption
(KEYは設定したいkeyの名称, KEYRINGは手順2で設定したkeyringの名称, LOCATIONはkeyを保管したいCloudの場所)
example
$ gcloud kms keys create github-key \
--keyring github-deploy-keyring \
--location global \
--purpose encryption
4. SSH鍵の作成
$ cd ~/.ssh
$ ssh-keygen -t ed25519 -C ”your_mail@email.sample”
$ Enter file in which to save the key: id_ed25519
$ Enter passphrase (empty for no passphrase):
$ Enter same passphrase again:
下記メッセージが出れば成功
Your identification has been saved in id_ed25519.
Your public key has been saved in id_ed25519.pub.
5. ssh-agentへの登録
バックグラウンドでssh-agentを開始
$ eval "$(ssh-agent -s)"
> Agent pid 59566
~/.ssh/configファイルの確認
$ open ~/.ssh/config
> The file /Users/you/.ssh/config does not exist.
上記エラーの時はファイルが存在しないので、ファイルを作成する
$ touch ~/.ssh/config
~/.ssh/config ファイルを開いて今回の接続情報を作成する
~/.ssh/config
Host cloudbuild-qiita  # 好きな名前を設定, 汎用の場合は'*'
  AddKeysToAgent yes
  UseKeychain yes
  IdentityFile ~/.ssh/id_ed25519  # id_ed25519キーの場所と名前がデフォルト以外の場合はここを置き換える
6. SSH 秘密鍵をssh-agentに追加して、パスフレーズをキーチェーンに保存
$ ssh-add -K ~/.ssh/id_ed25519
7. 作成したSSH鍵をGitHubへ登録
公開鍵をクリップボードへコピー
$ pbcopy < id_ed25519.pub
- GitHubのプロフィール画像をクリックし、続いて
Settingsをクリック - ユーザ設定サイドバーで
SSH and GPG keysをクリック -
[Add SSH key]をクリック -
[Title]フィールドで、新しいキーを説明するラベルを追加 - キーを
[Key]フィールドに貼り付ける -
[Add SSH key]をクリック
8. KMSを利用したSSH鍵の暗号化
$ gcloud kms encrypt \
--key KEY \
--keyring KEYRING \
--location LOCATION \
--plaintext-file id_ed25519 \
--ciphertext-file CIPHERTEXT_FILE
(KEY/KEYRING/LOCATIONは手順3までで設定したもの, CIPHERTEXT_FILEは設定したい名称)
example
$ gcloud kms encrypt \
--key github-key \
--keyring github-deploy-keyring \
--location global \
--plaintext-file id_ed25519 \
--ciphertext-file .github_cloudbuild.enc
9. 暗号化したSSH鍵をプロジェクトフォルダ内に移動させる
$ mv CIPHERTEXT_FILE ~/go/src/github.com/YOUR_PROJECT_DIRECTORY/
(CIPHERTEXT_FILEは手順8で設定した名称、YOUR_PROJECT_DIRECTORYはCloudBuildでデプロイしたいプロジェクトのディレクトリPATH)
example
$ mv .github_cloudbuild.enc ~/go/src/github.com/Rererr/cloudbuild-helloworld/
10.下記コマンドで、プロジェクトフォルダに.known_hostファイルを作成
$ ssh-keyscan -t rsa github.com > ~/go/src/github.com/YOUR_PROJECT_DIRECTORY/.known_hosts
example
$ ssh-keyscan -t rsa github.com > ~/go/src/github.com/Rererr/cloudbuild-helloworld/.known_hosts
11. プロジェクトディレクトリに必要なファイル群の確認
-
CIPHERTEXT_FILEex.) .github_cloudbuild.enc .known_hosts
cloudbuild.yamlの設定
-
SSH鍵の複合化を実行, 複合化したキーを/root/.ssh/id_ed25519へ保存 -
/root/.ssh/id_ed25519の権限変更 -
/root/.ssh/configへ接続情報の書き込み -
known_hostsの移動 -
submodule update --initの実行 -
app deployの実行 - 最新19バージョンを残し、古いバージョンの削除を実行
cloudbuild.yaml
steps:
  - name: "gcr.io/cloud-builders/gcloud"
    args:
      - --project=$PROJECT_ID
      - kms
      - decrypt
      - --ciphertext-file=.github_cloudbuild.enc
      - --plaintext-file=/root/.ssh/id_ed25519
      - --location=global
      - --keyring=github-deploy-keyring
      - --key=github-key
    volumes:
      - name: "ssh"
        path: /root/.ssh
    id: 'decrypt-ssh'

  - name: "gcr.io/cloud-builders/git"
    entrypoint: "bash"
    args:
      - "-c"
      - |
        chmod 600 /root/.ssh/id_ed25519
        cat <<EOF >/root/.ssh/config
        Hostname github.com
        IdentityFile /root/.ssh/id_ed25519
        EOF
        mv .known_hosts /root/.ssh/known_hosts
    volumes:
      - name: "ssh"
        path: /root/.ssh
    waitFor:
      - 'decrypt-ssh'
    id: 'git-ssh'

 - name: gcr.io/cloud-builders/git
    args: ["submodule", "update", "--init"]
    volumes:
      - name: "ssh"
        path: /root/.ssh
    waitFor:
      - 'git-ssh'
    id: 'git-submodule-update'

  - name: "gcr.io/cloud-builders/gcloud"
    args:
      - "app"
      - "deploy"
      - "--project=$PROJECT_ID"
      - "app.yaml"
    waitFor:
      - 'git-submodule-update'
    timeout: 3600s

  - name: "gcr.io/cloud-builders/gcloud"
    entrypoint: "bash"
    args:
      - "-c"
      - "gcloud app versions list | sort -rk 4,4 | tail -n +20 | awk '{print $2;}' | xargs -I {} gcloud app versions delete {}"

timeout: 3600s
app.yamlの記載(本筋じゃないのでruntimeのみ記載)
app.yaml
runtime: go115
hello.goの作成(本筋じゃないのでHello, World!を返すだけのHTTP Server)
helloworld.go
package main

import (
        "fmt"
        "log"
        "net/http"
        "os"
)

func main() {
        http.HandleFunc("/", handle)
        port := os.Getenv("PORT")
        if port == "" {
                port = "8080"
        }
        log.Printf("Listening on port %s", port)
        if err := http.ListenAndServe(":"+port, nil); err != nil {
                log.Fatal(err)
        }
}

func handle(w http.ResponseWriter, r *http.Request) {
        if r.URL.Path != "/" {
                http.NotFound(w, r)
                return
        }
        fmt.Fprint(w, "Hello world!")
}
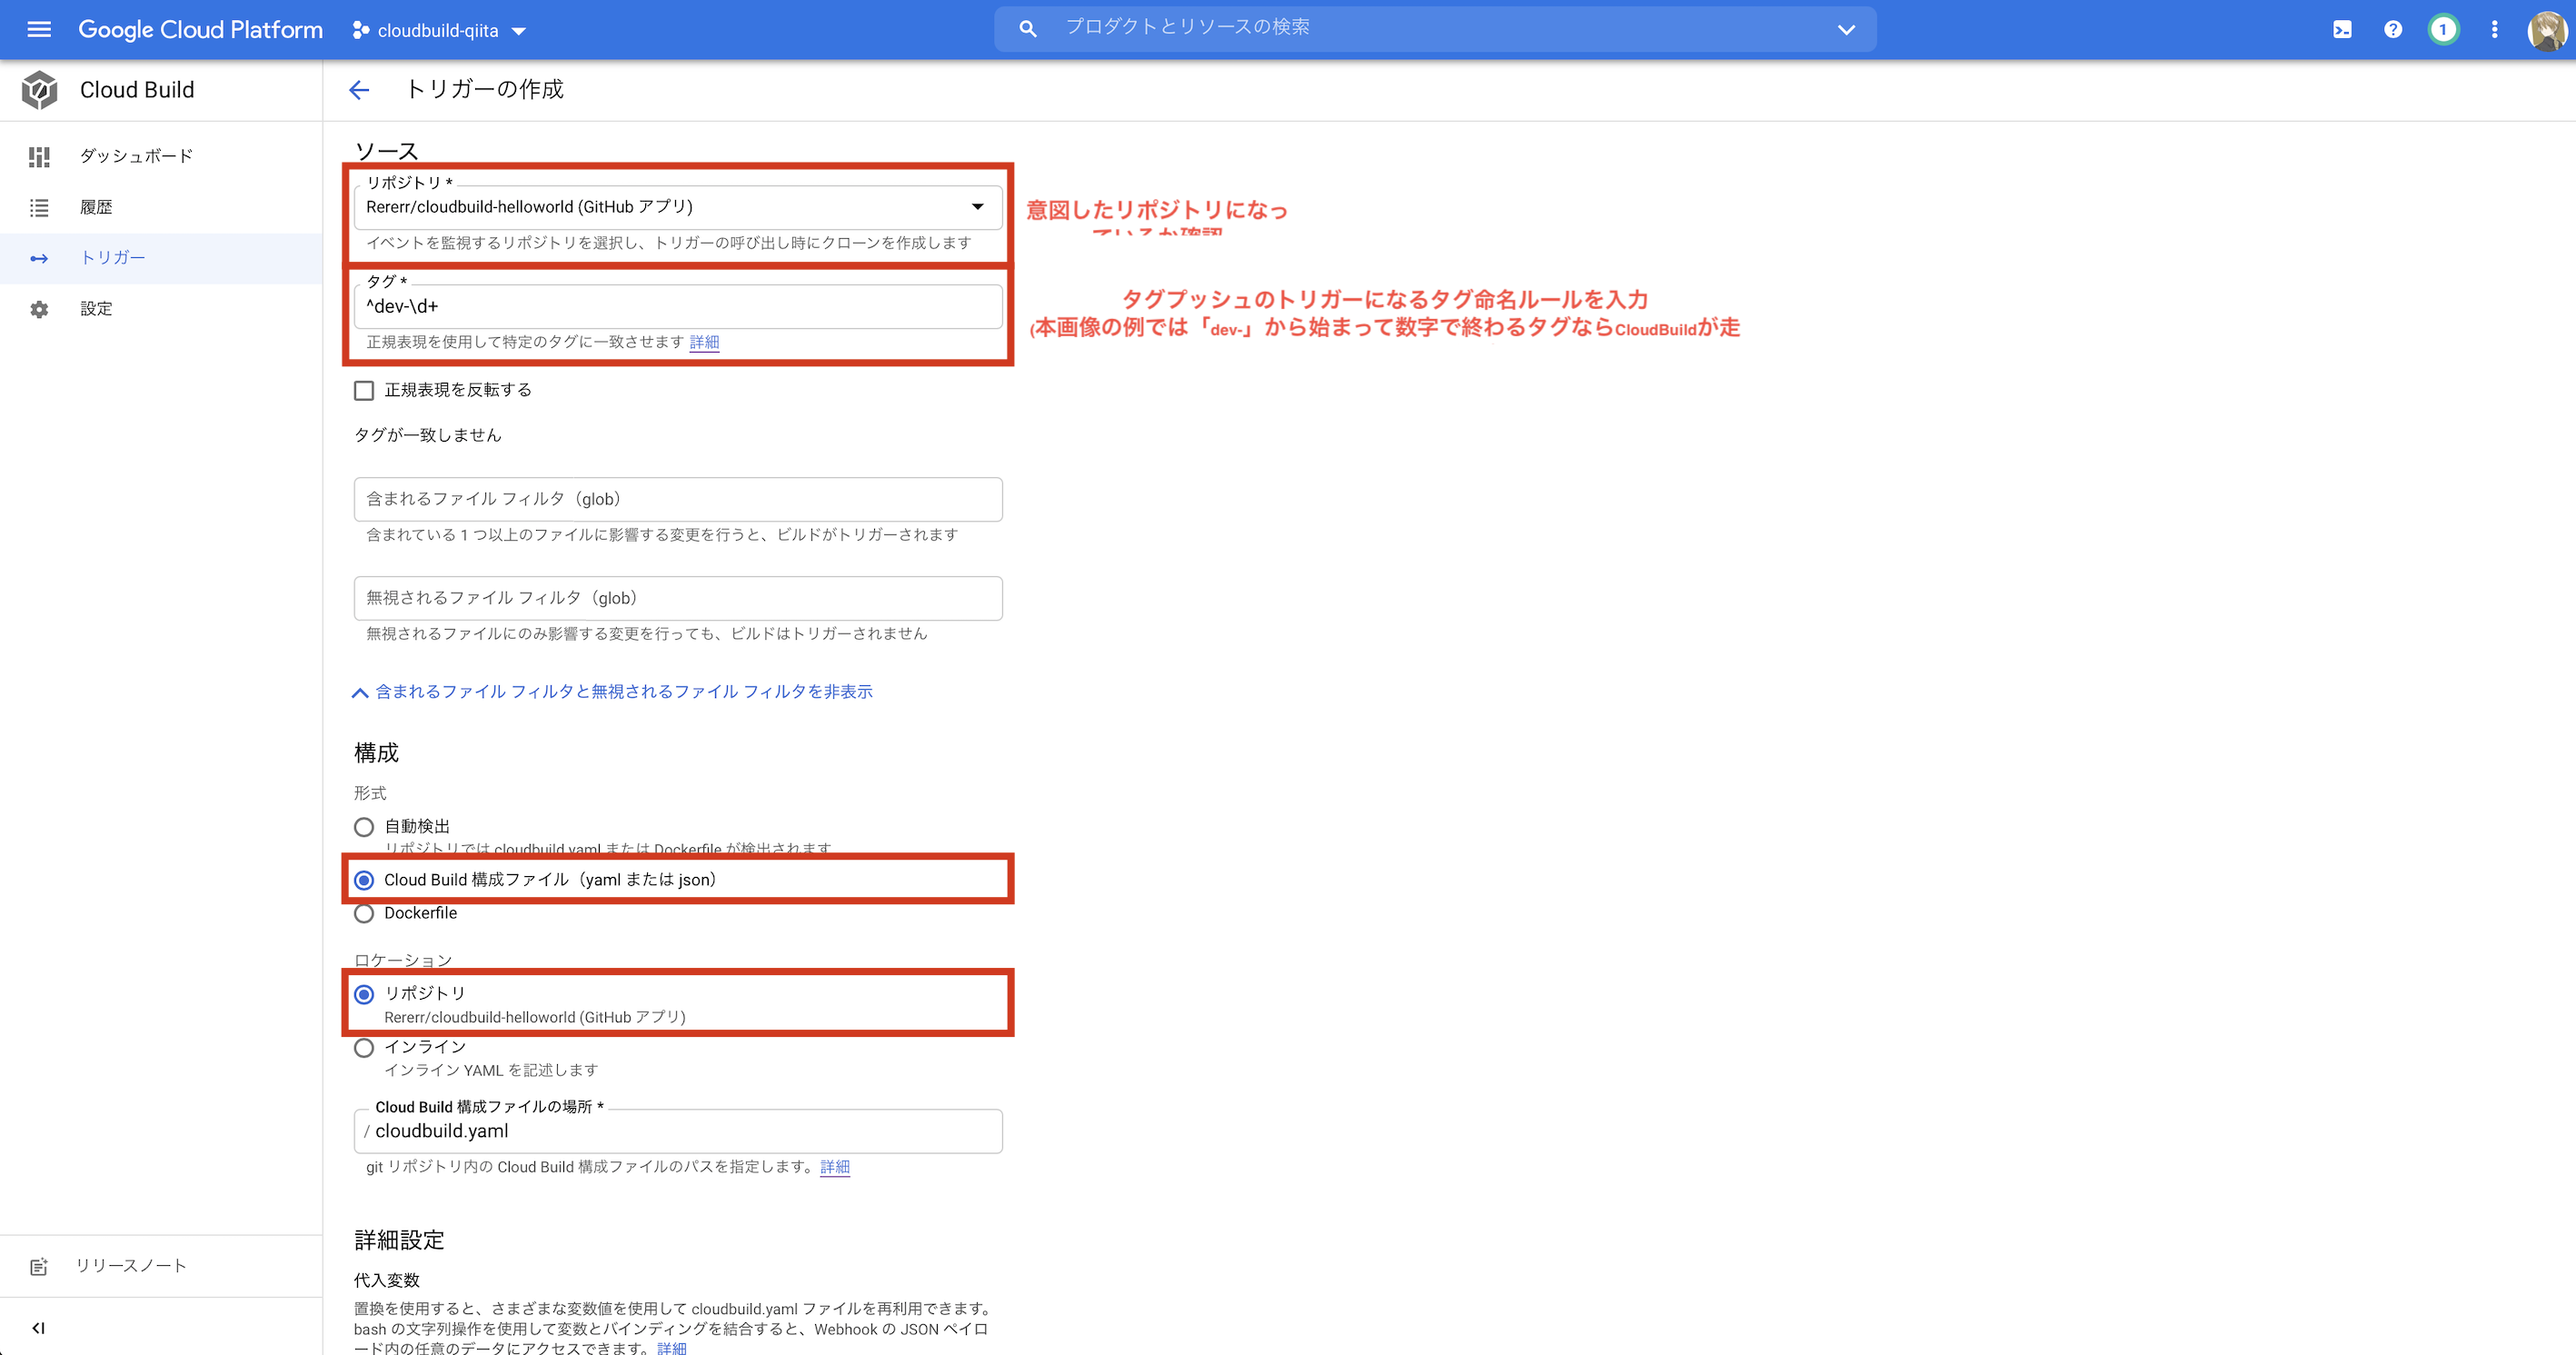
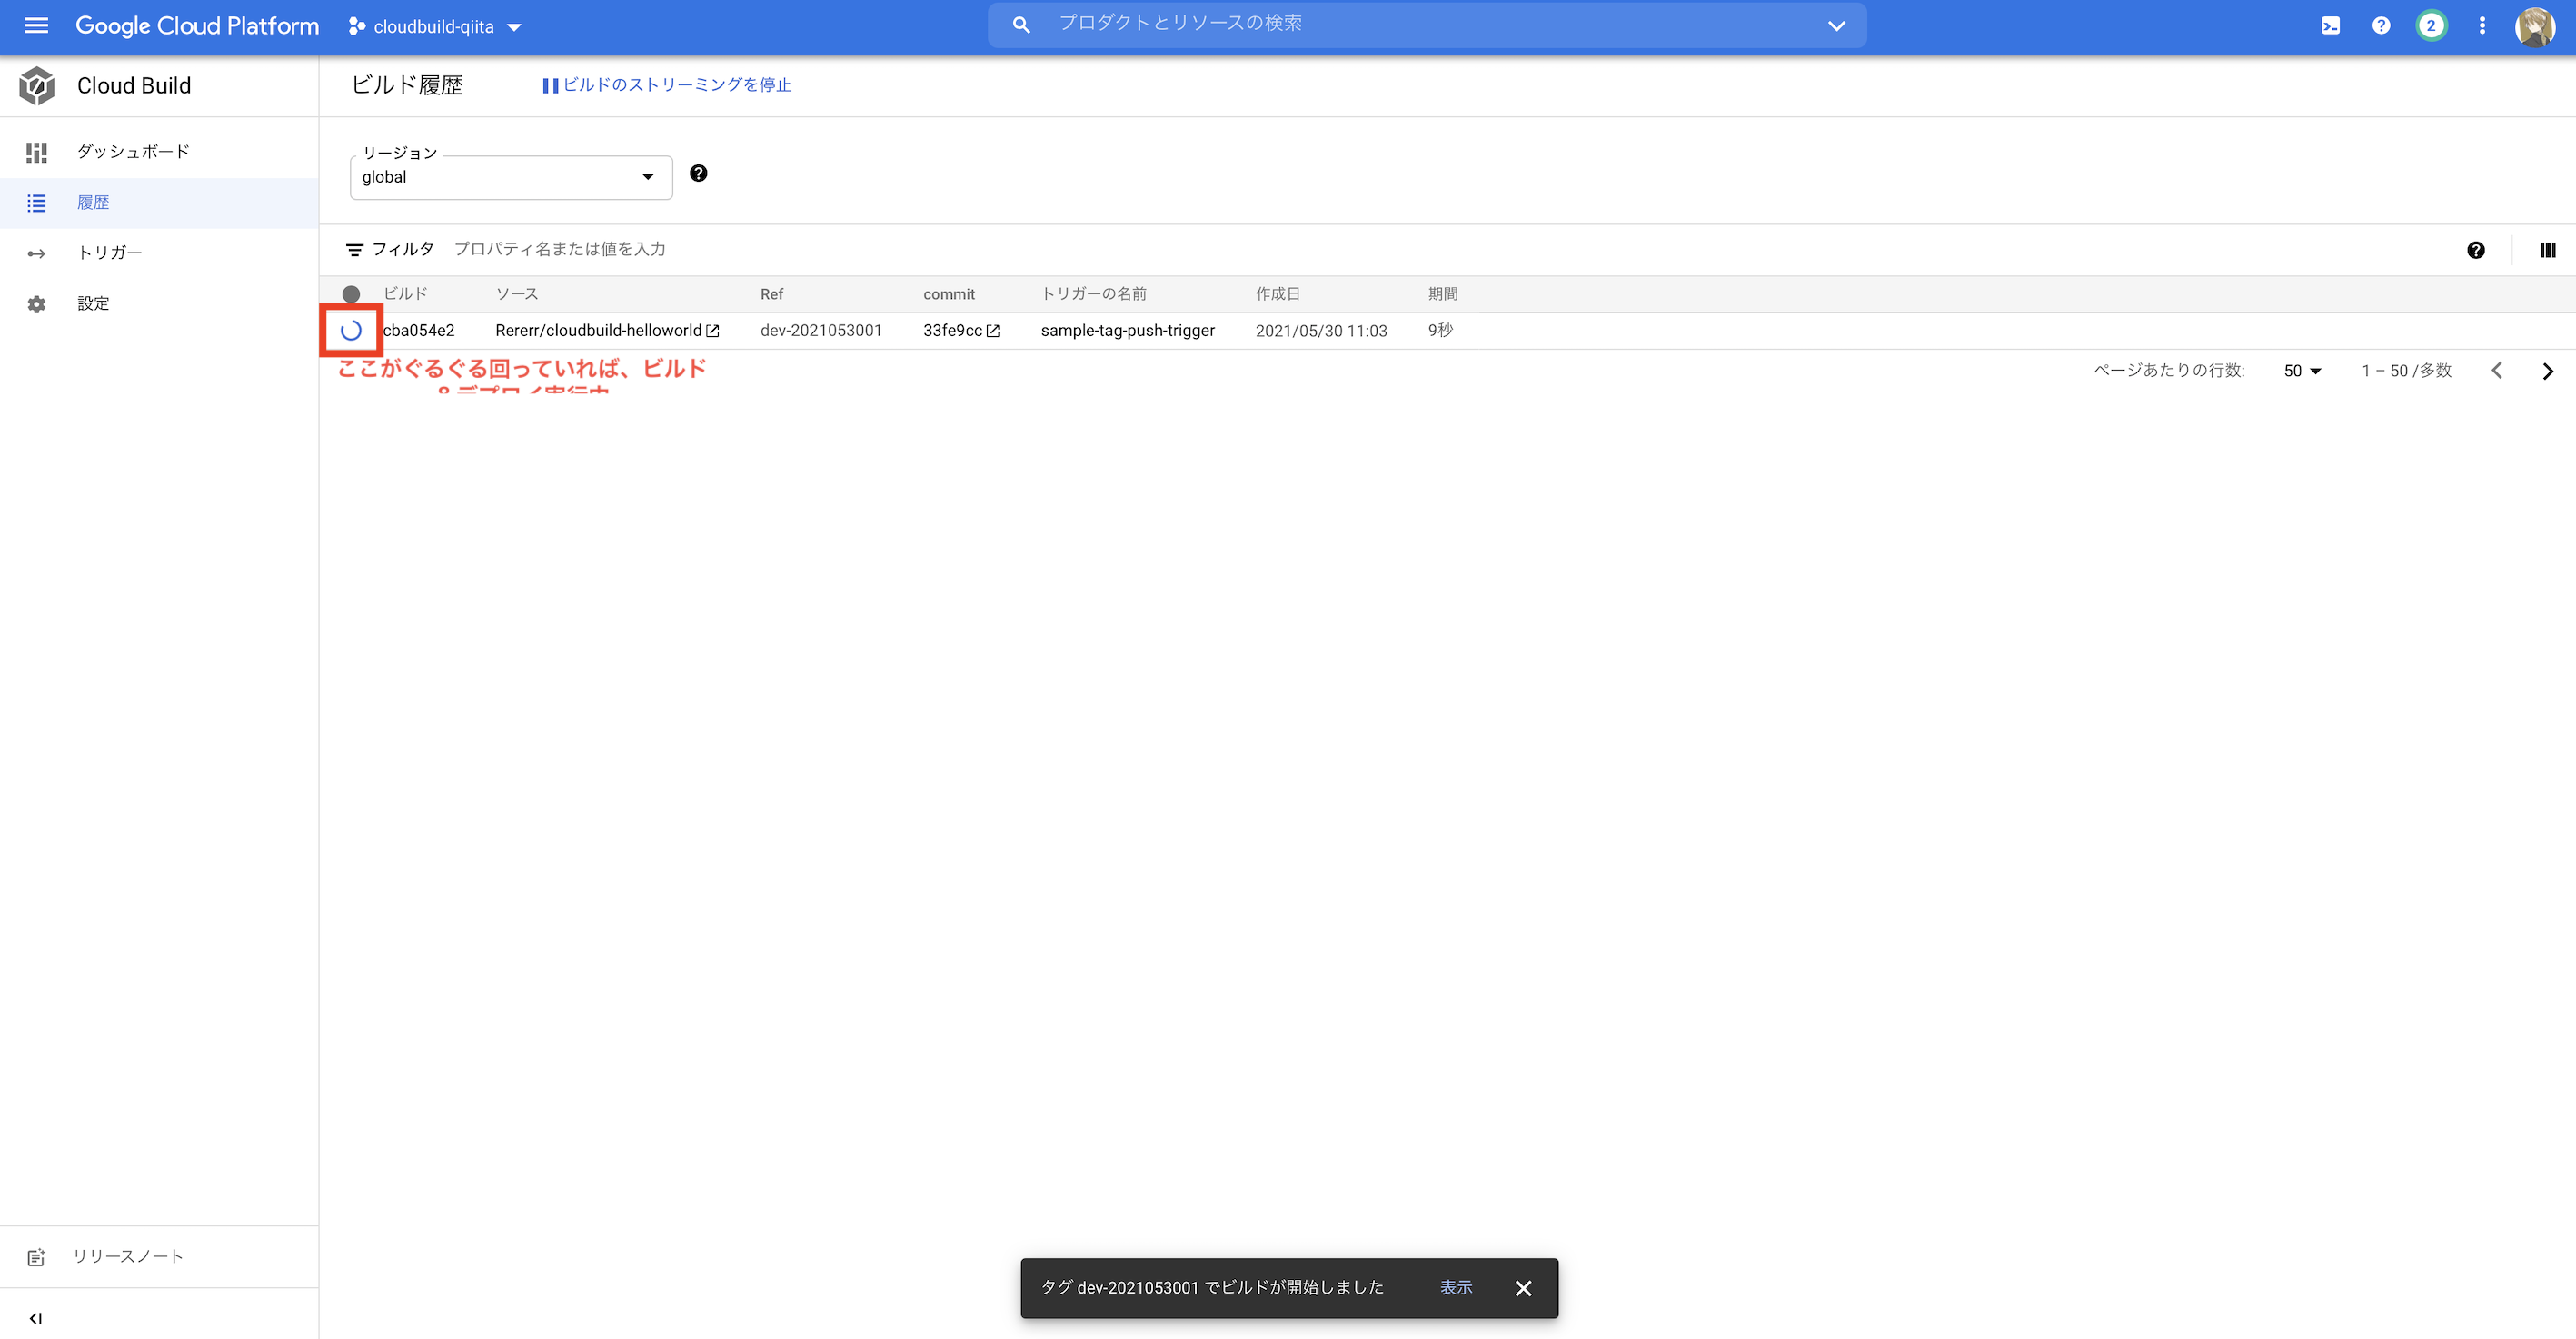
GitHubへタグプッシュ
$ git branch # 念の為現在のブランチの確認
$ git tag dev-2021053001 # tagの作成
$ git push origin dev-2021053001 # tagのpush
CloudBuildでビルド&デプロイができているか確認
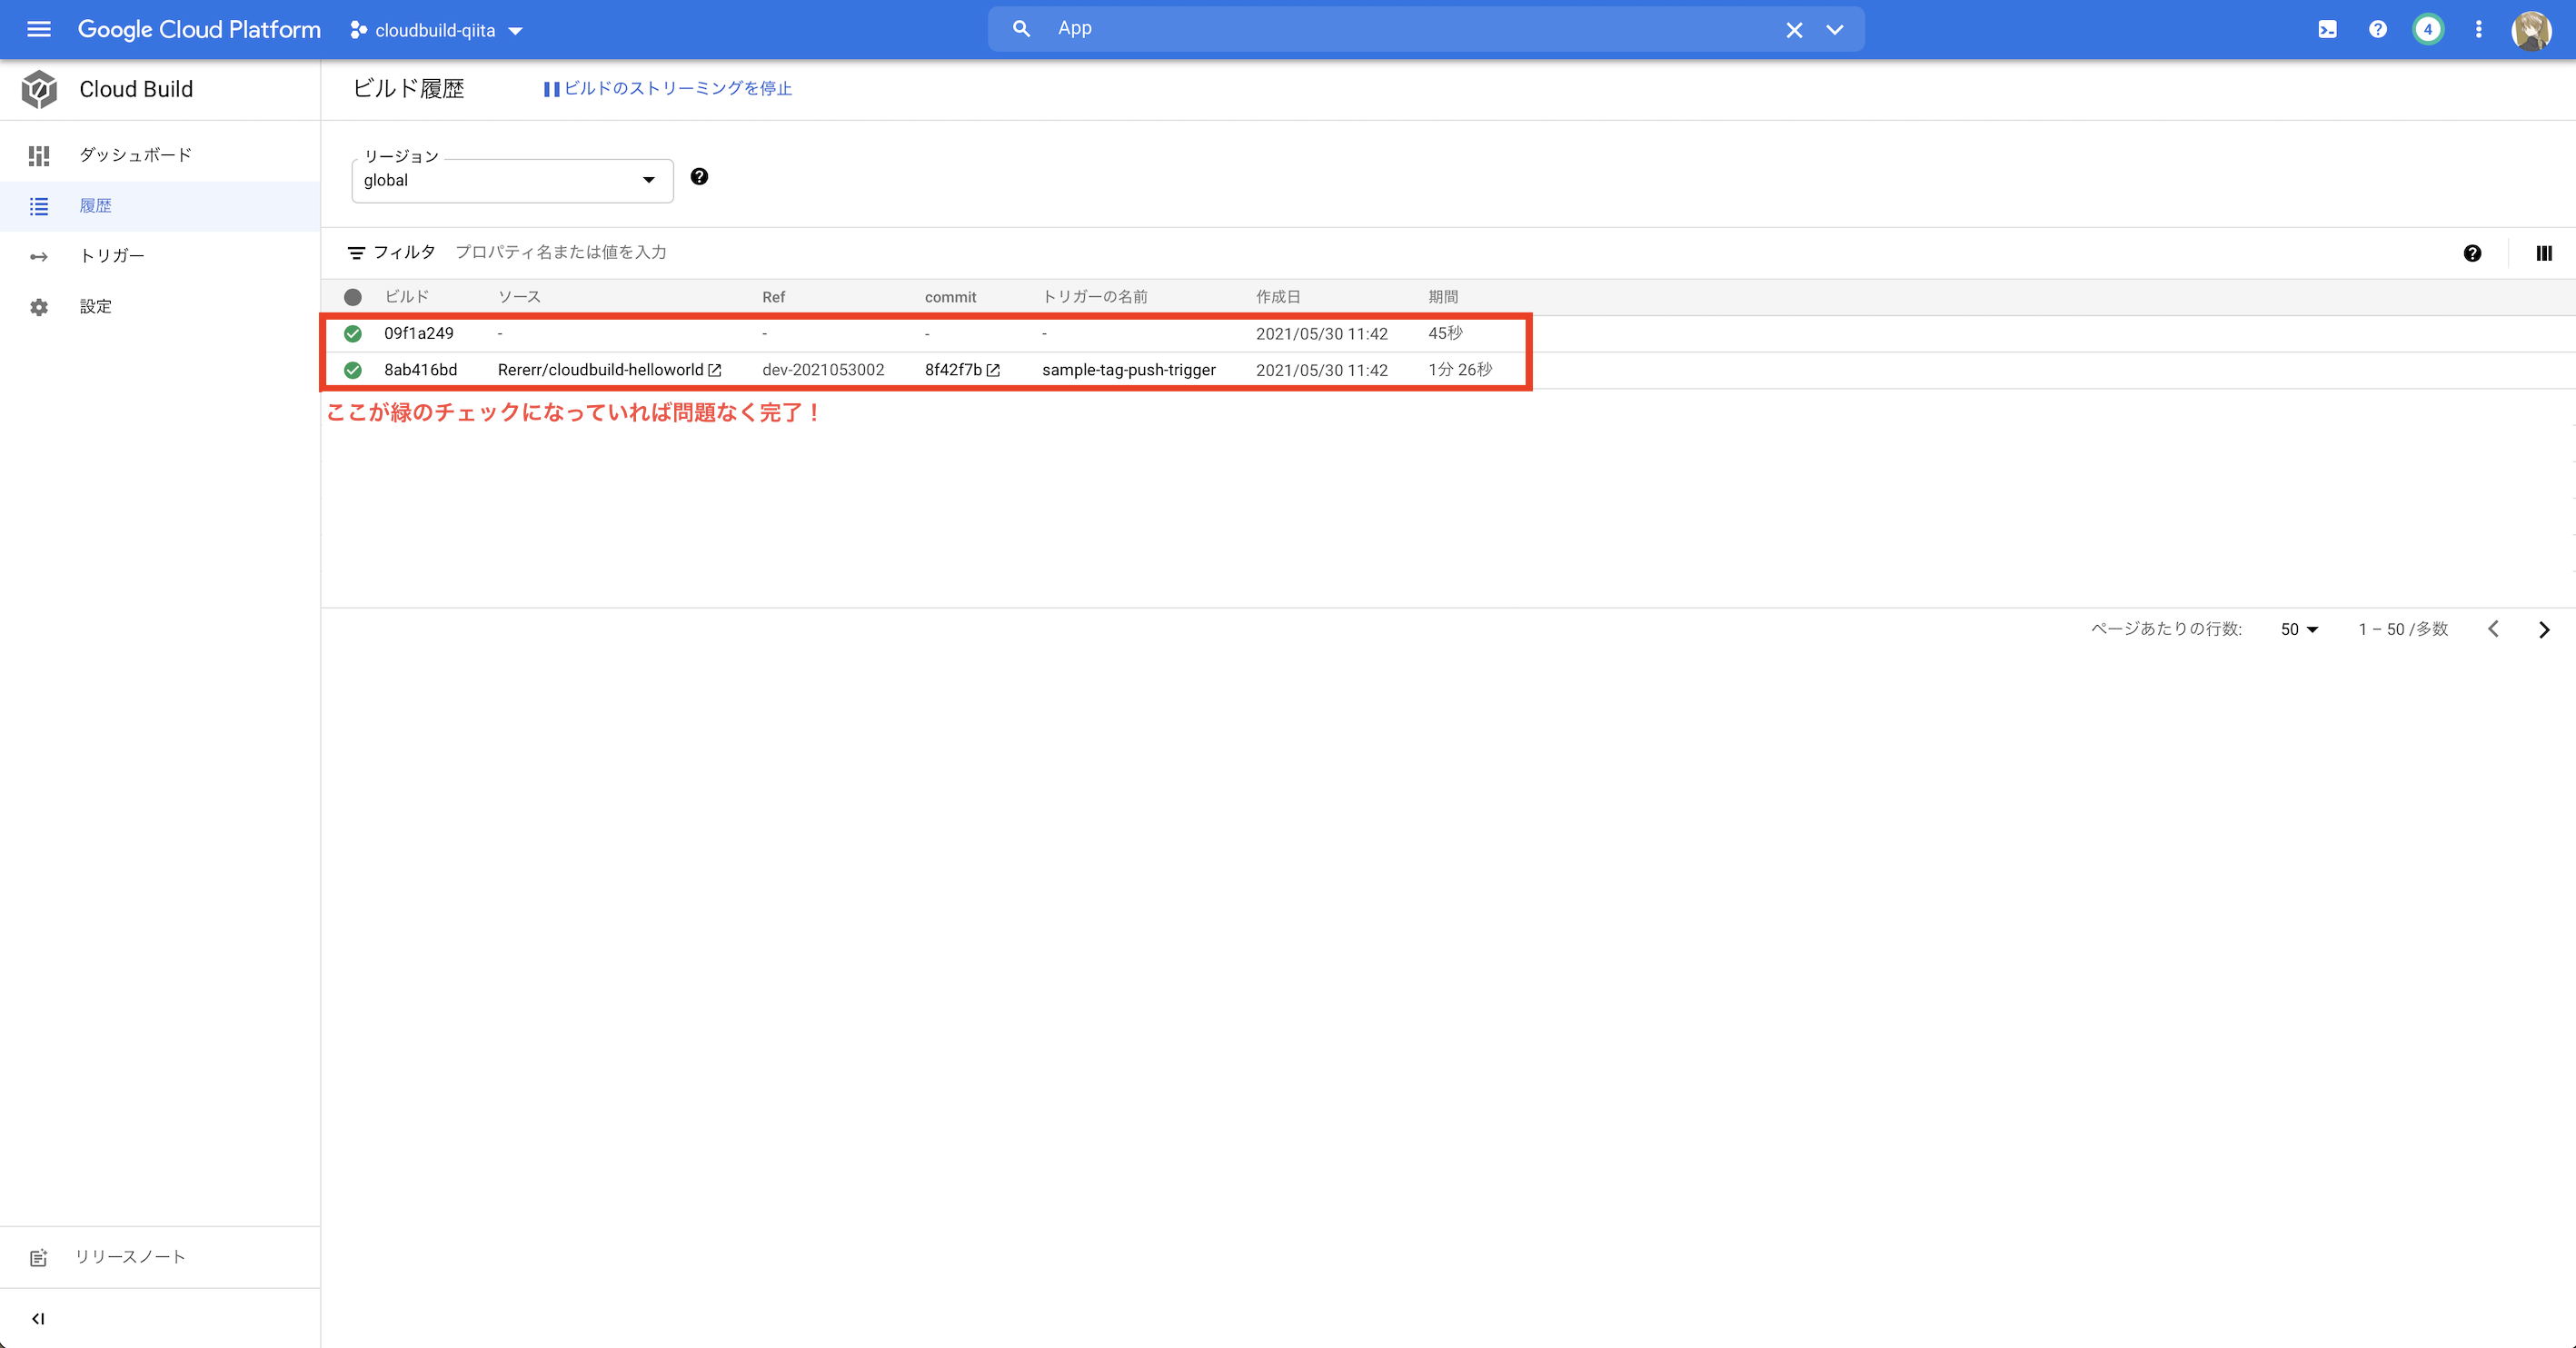
AppEngineへのデプロイ確認
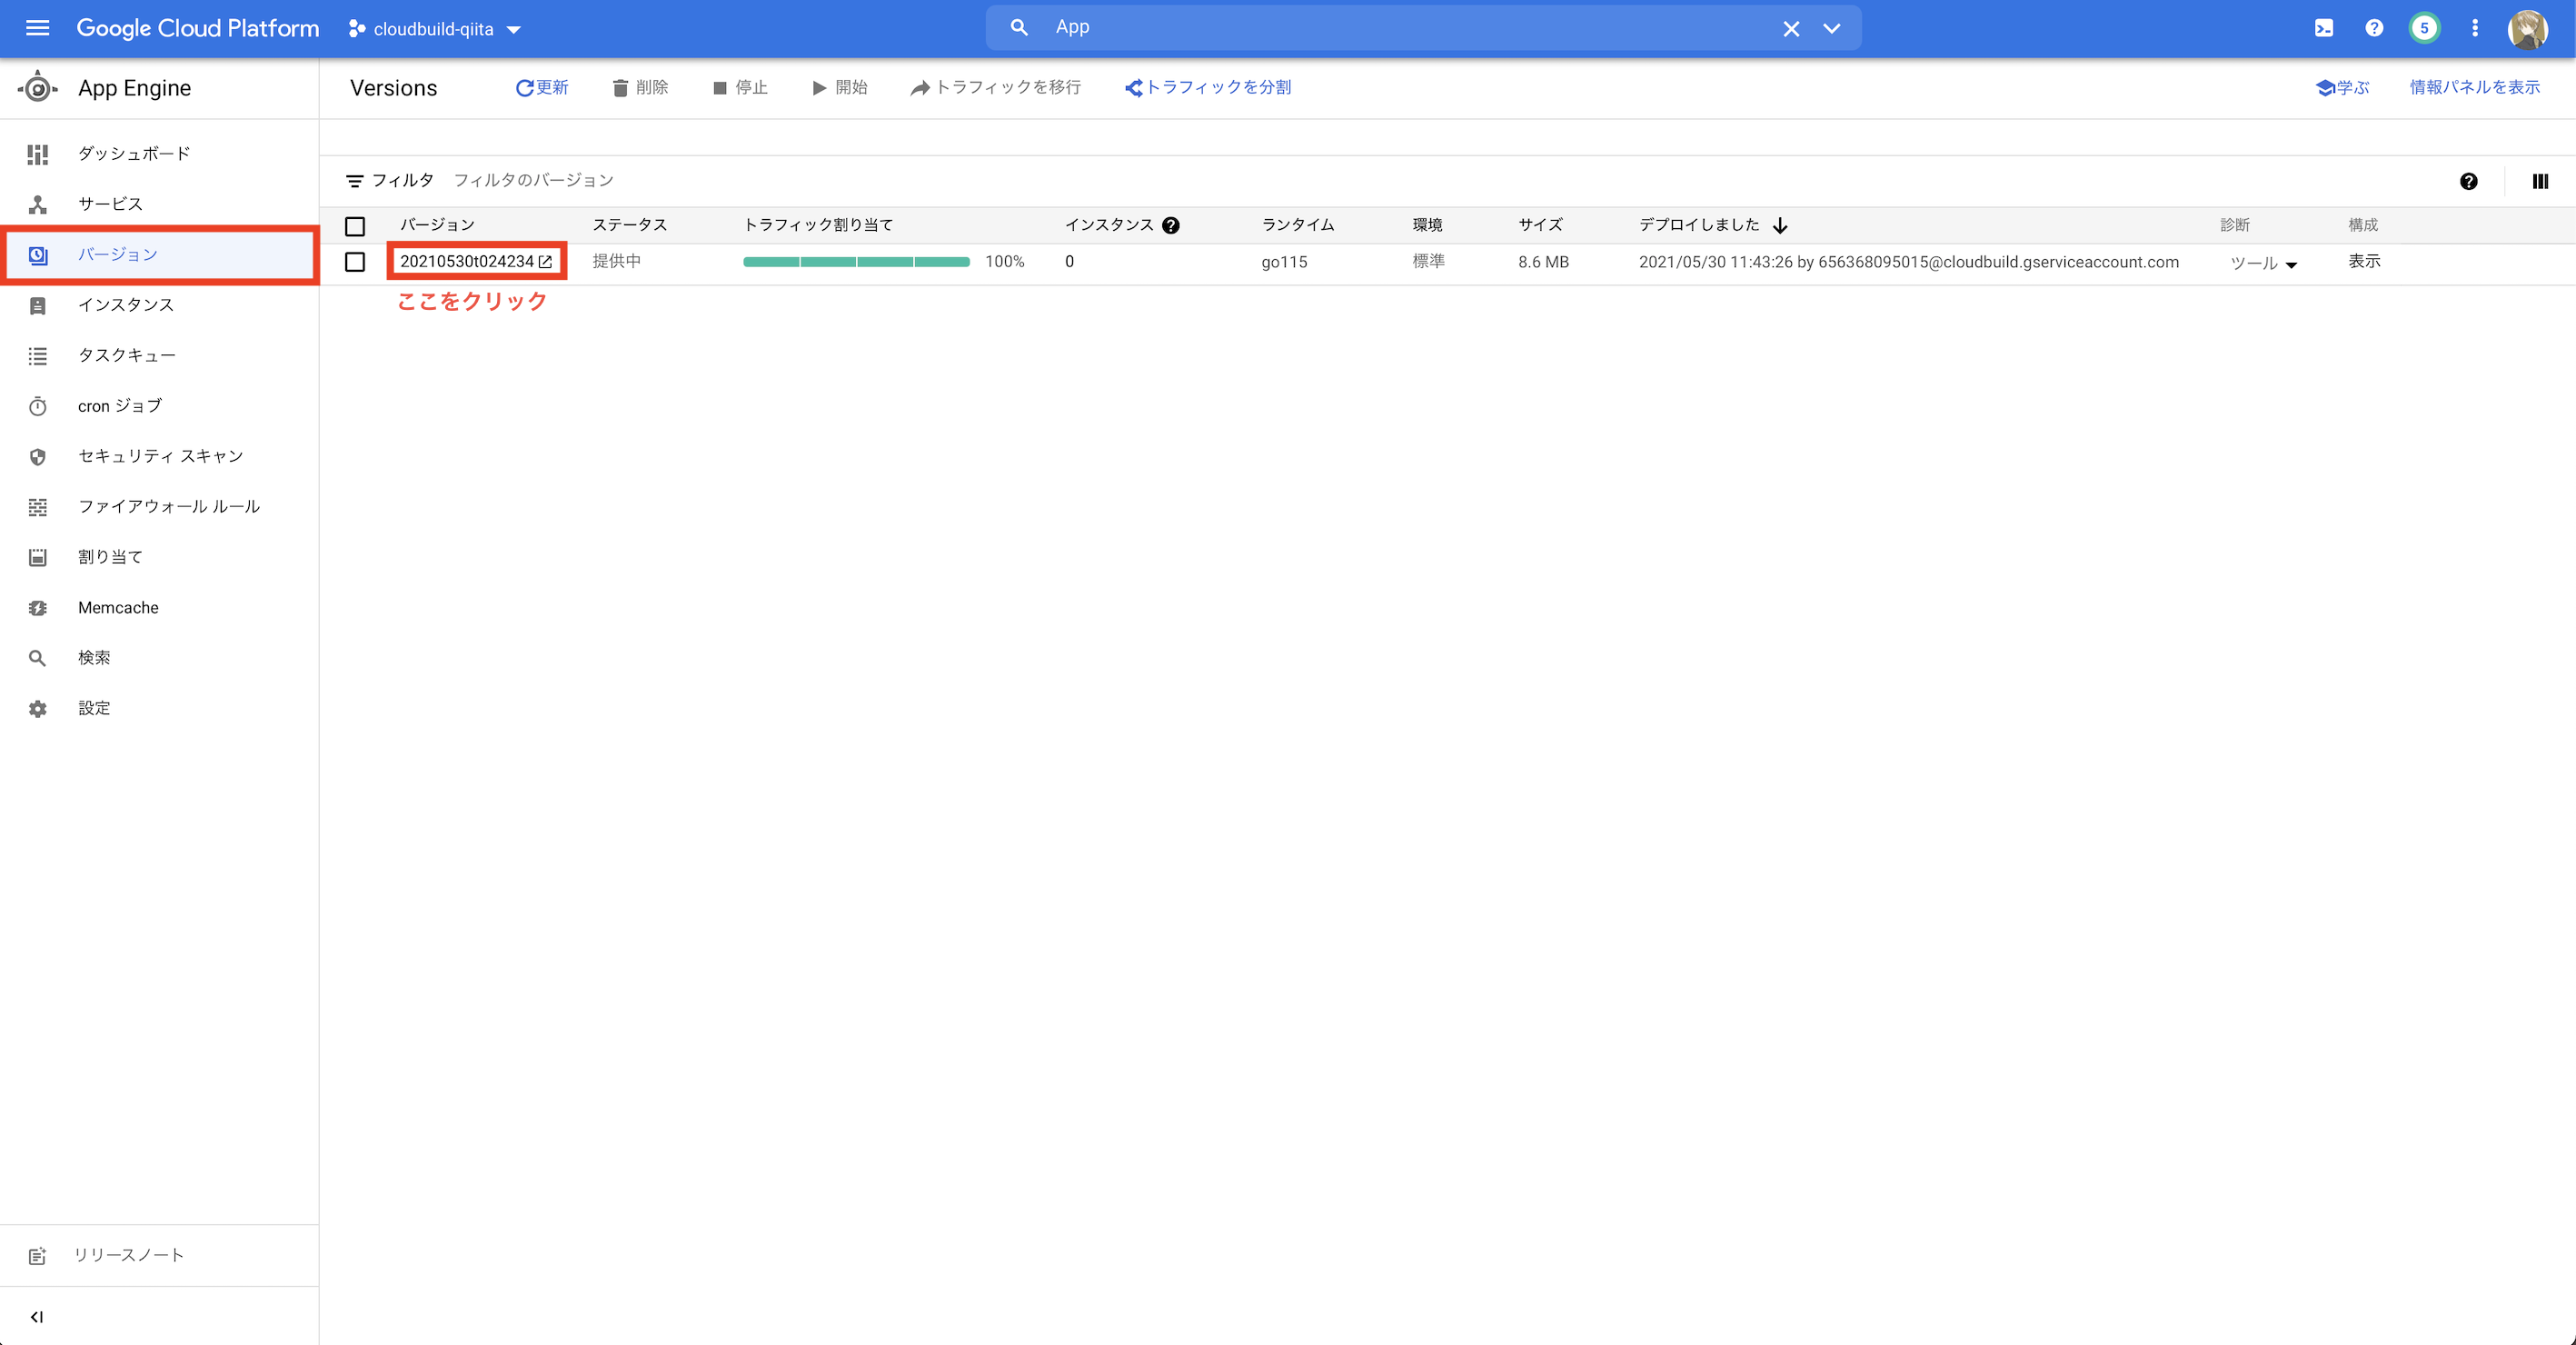
Hello world!が表示されていれば成功

後片付け
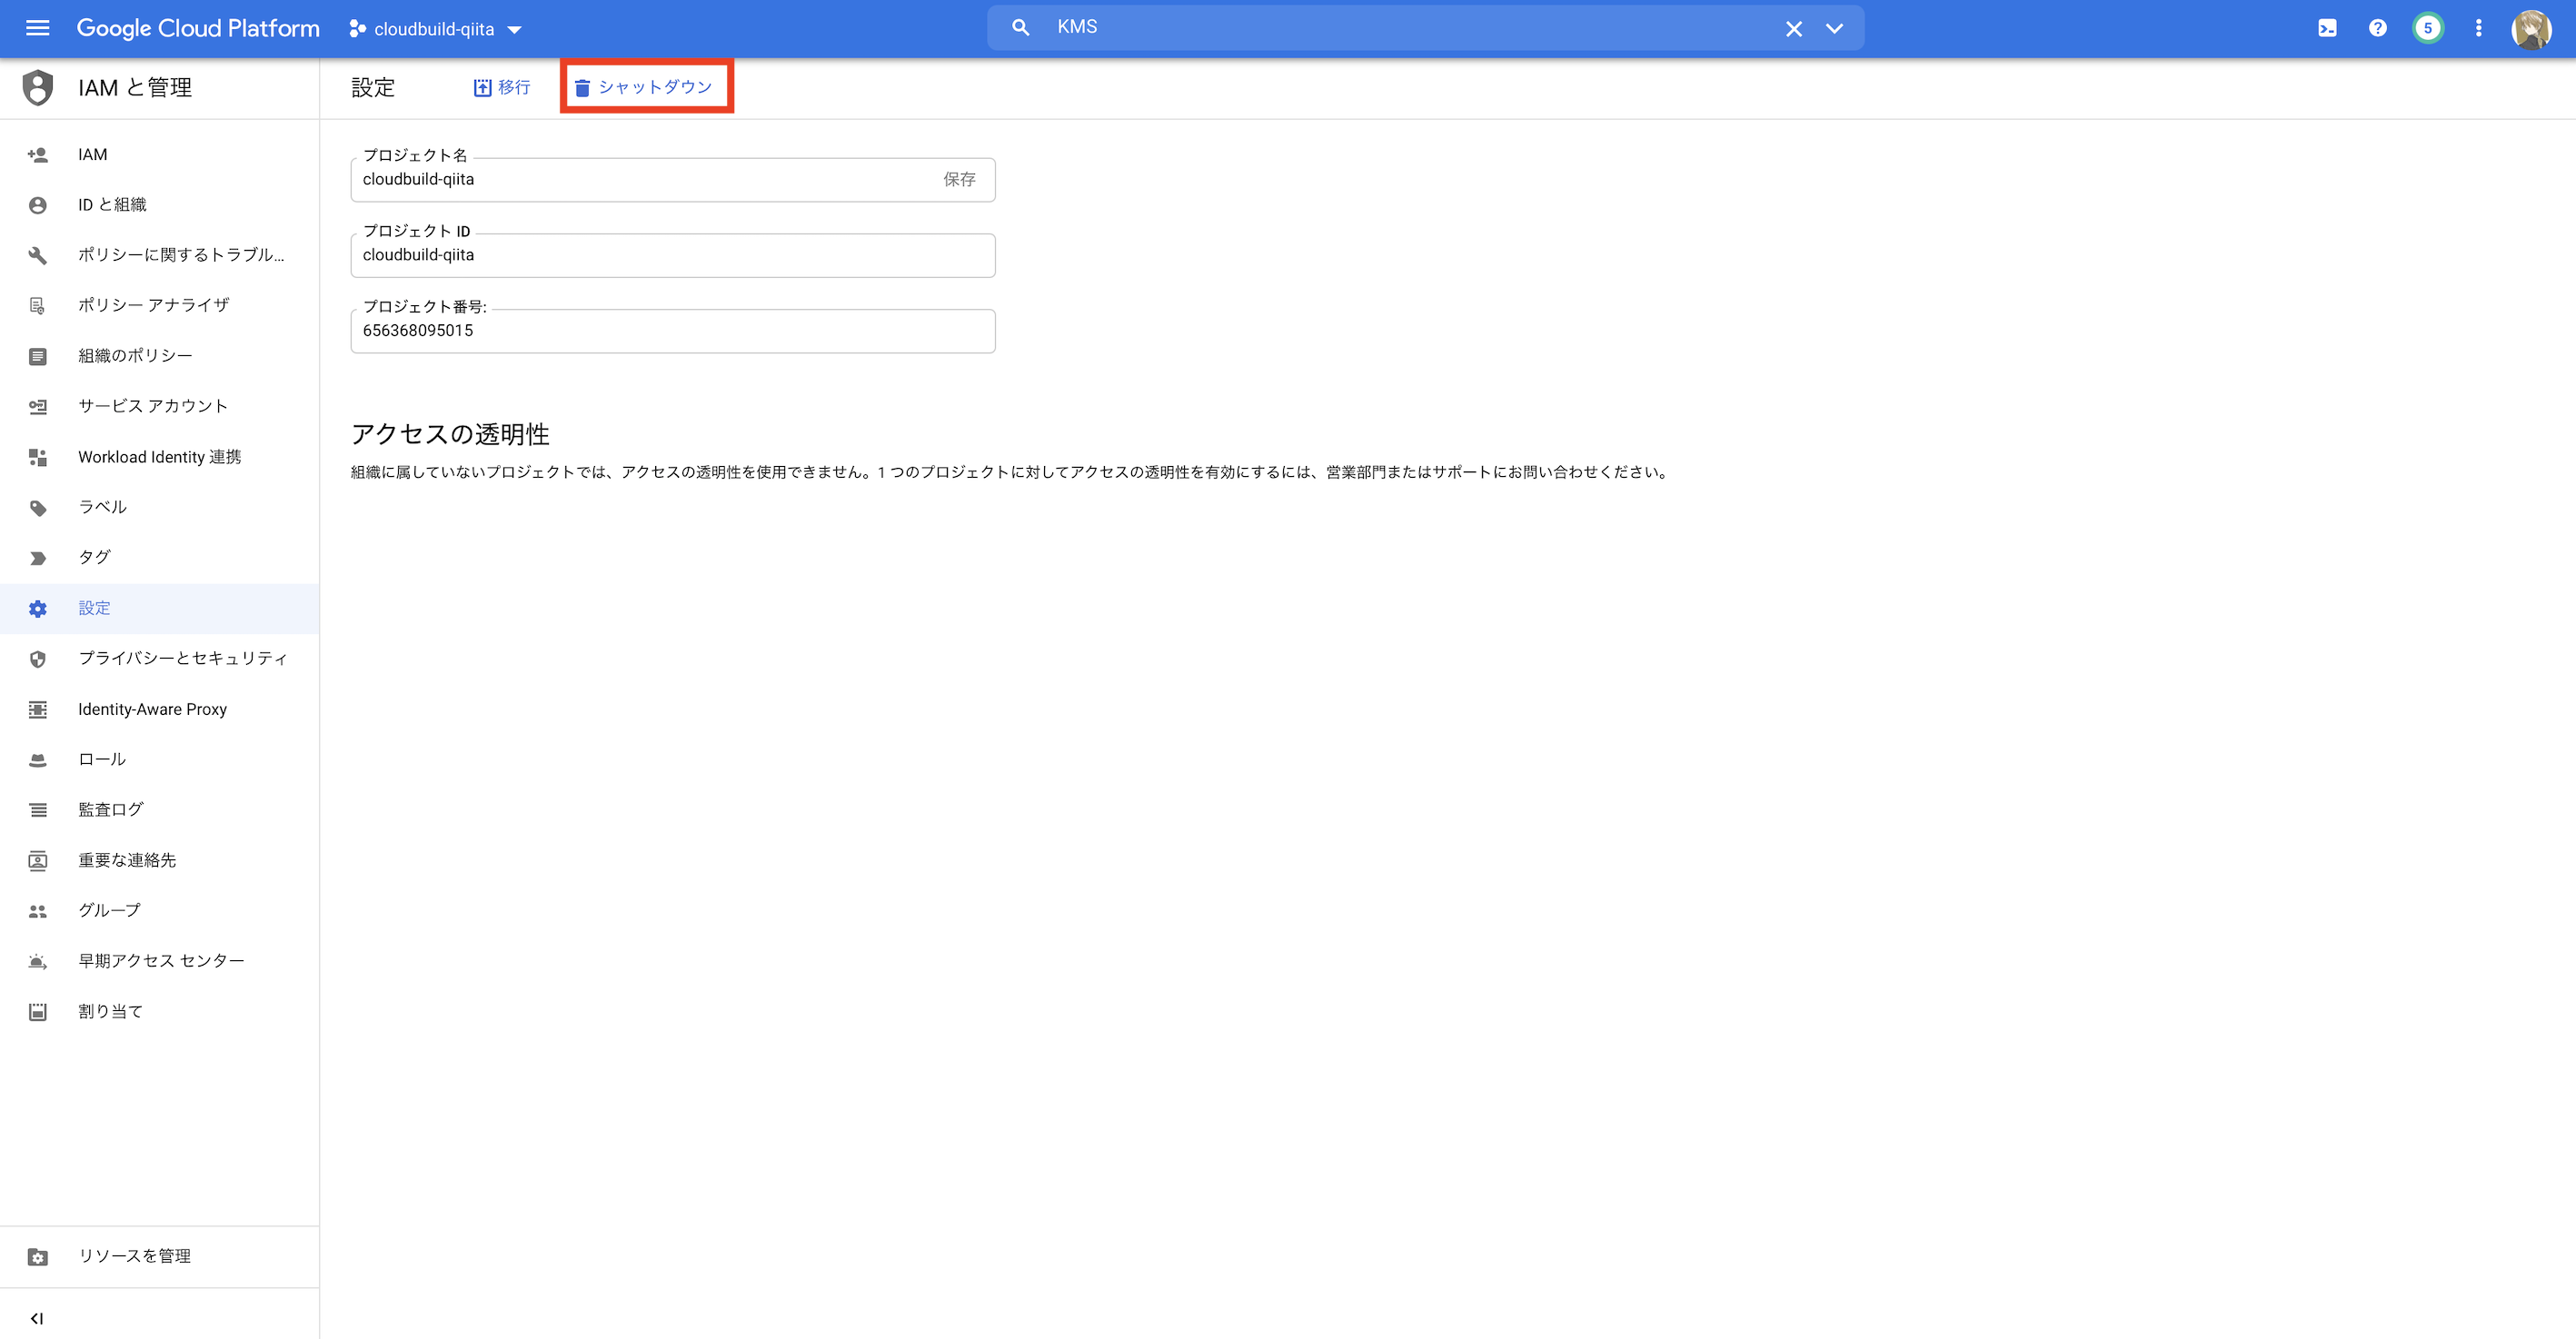
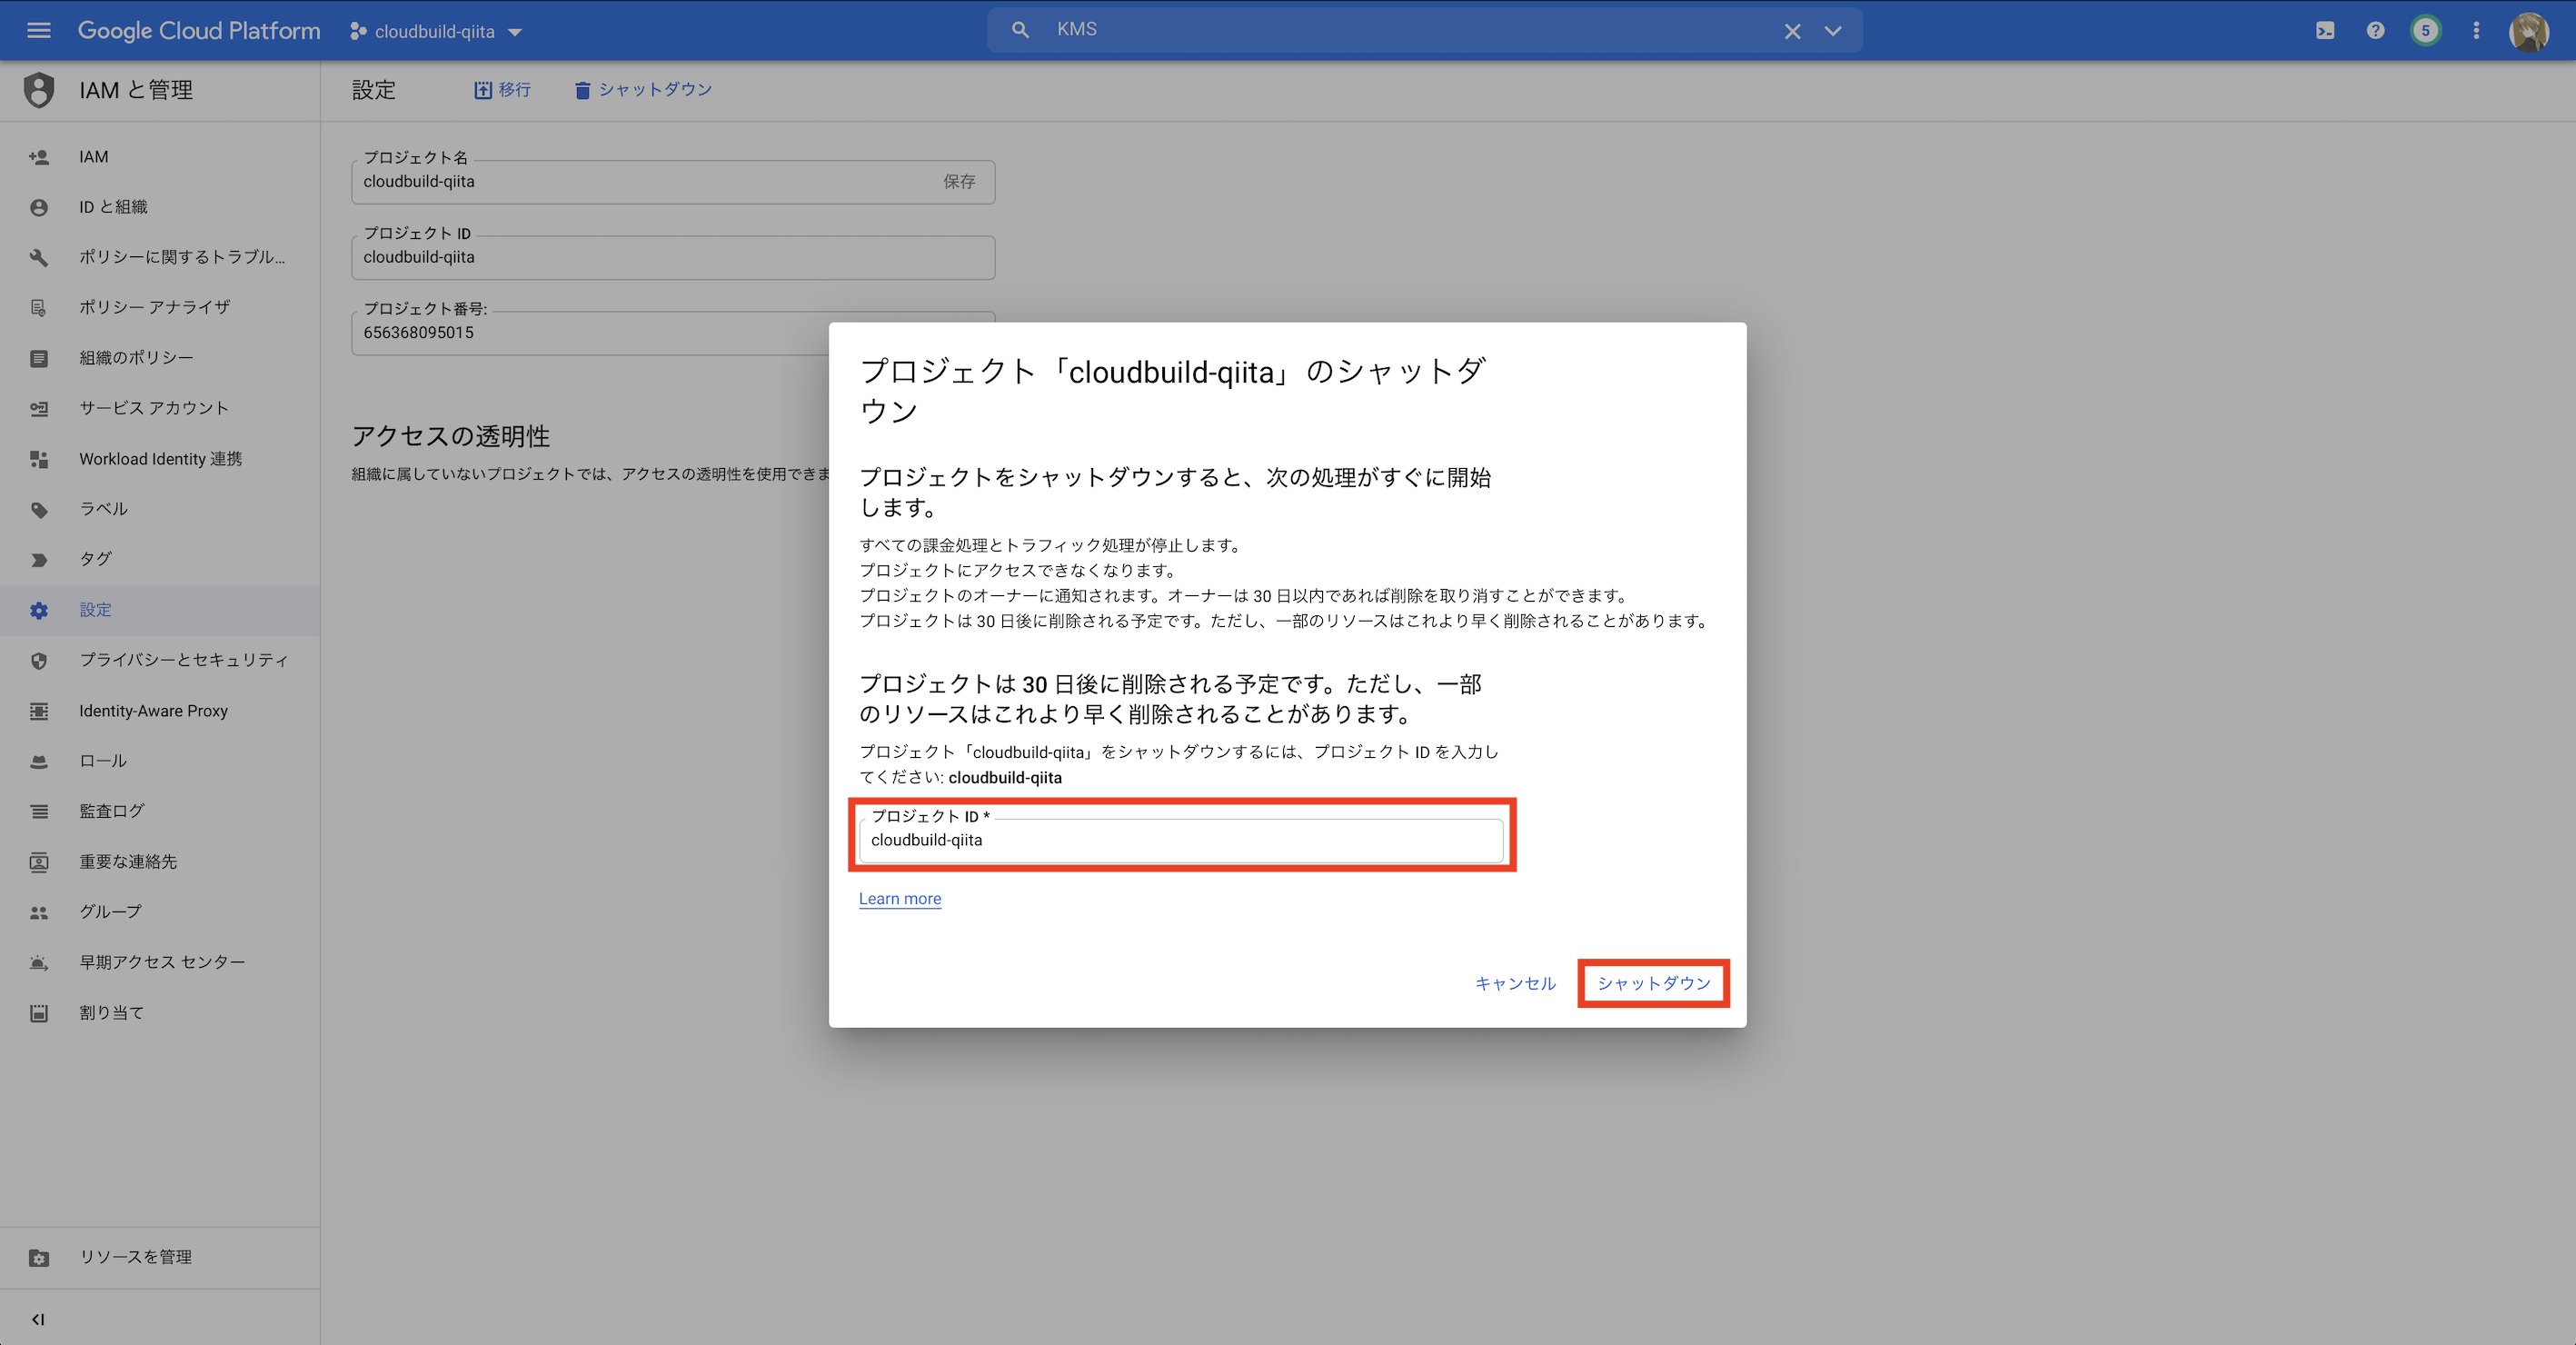
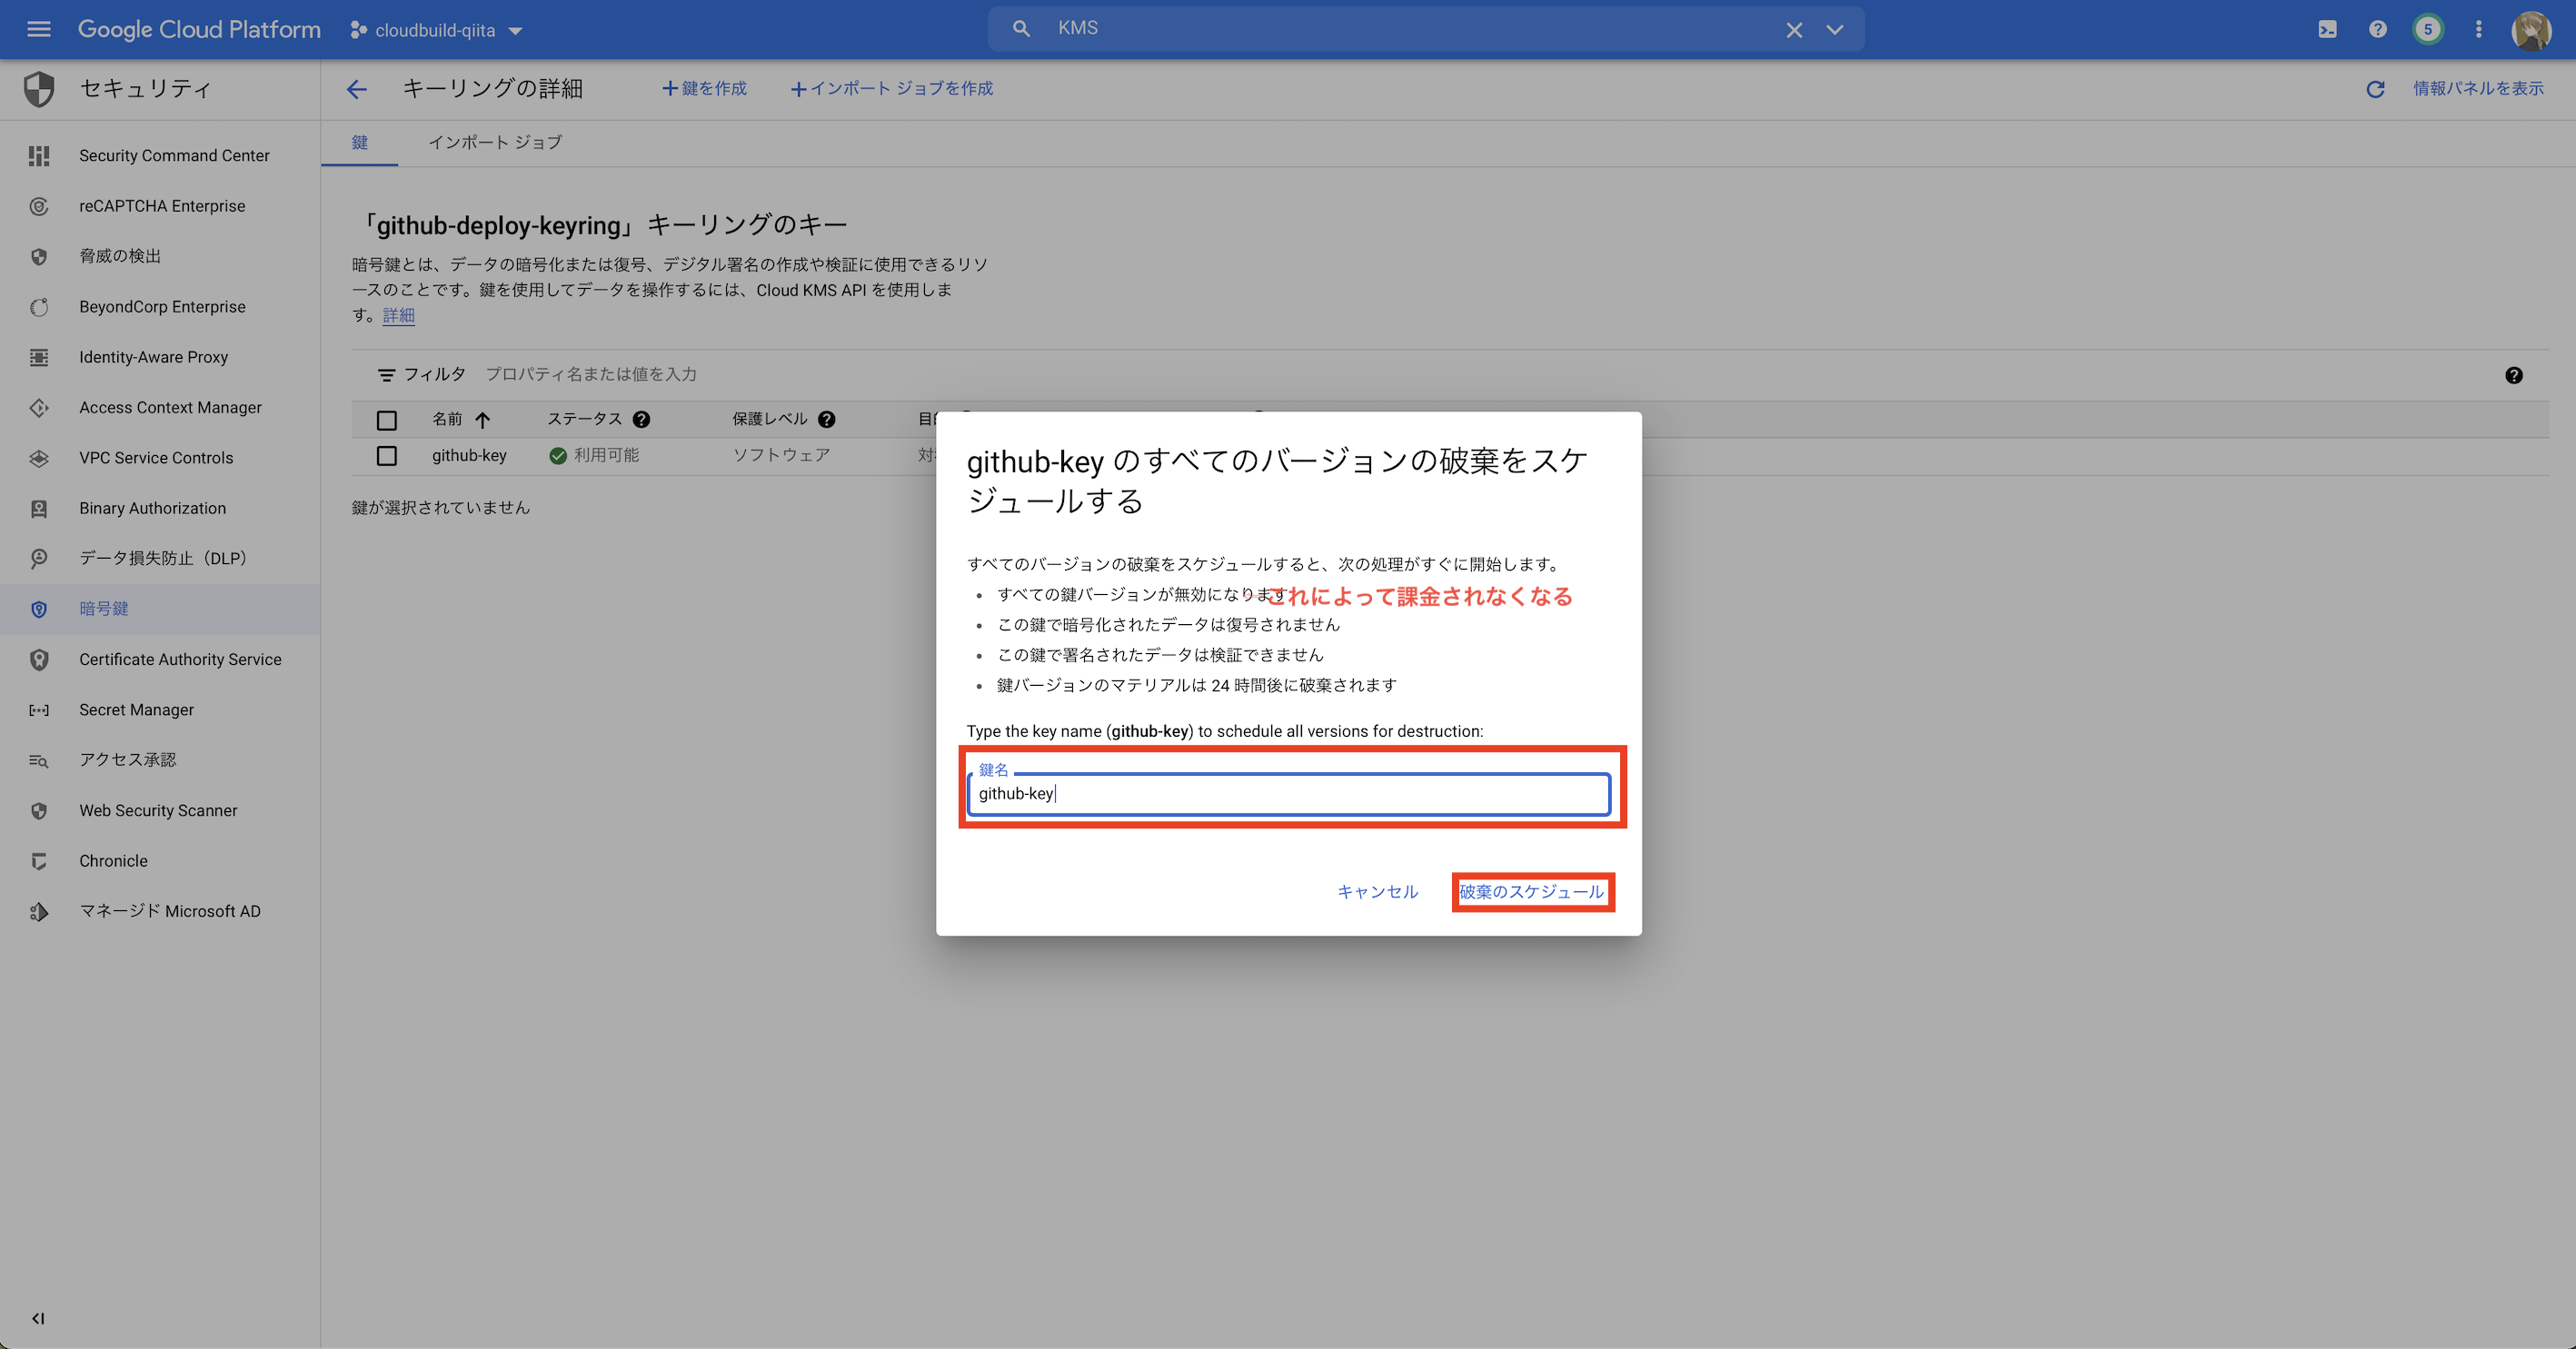
プロジェクトの削除(今回のために作成したプロジェクトならこれが一番早くて確実)

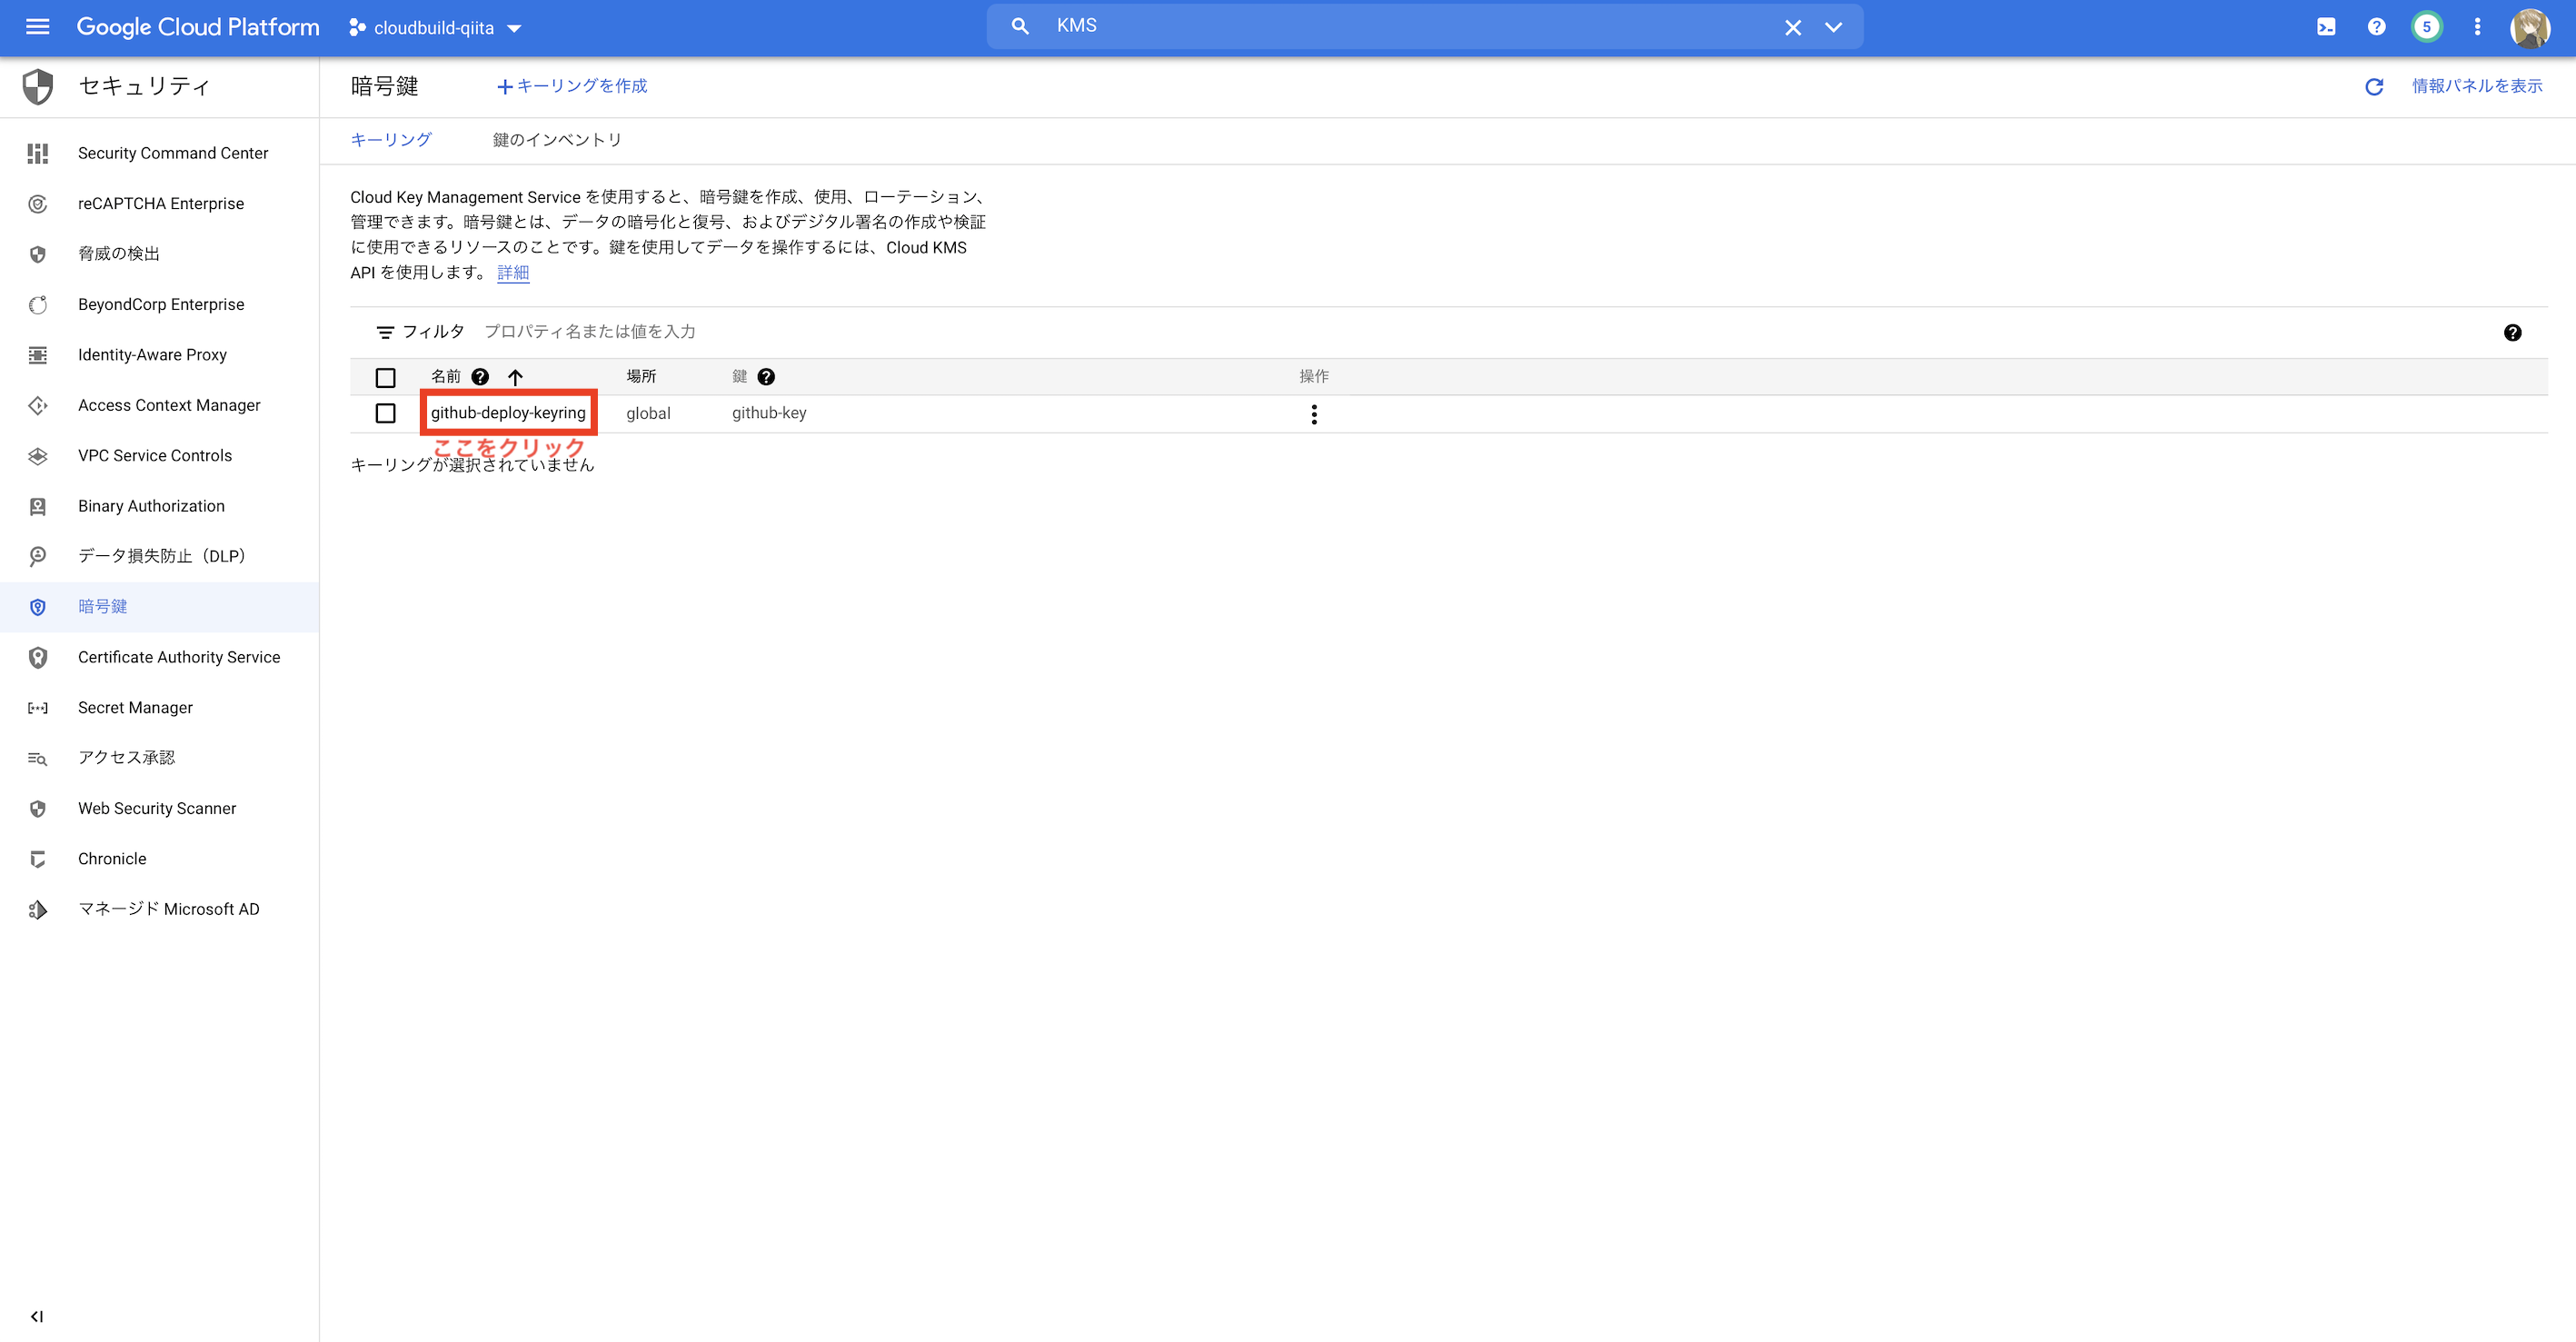
KMS(プロジェクトを消せないなら)
KMSの課金は、アクティブな鍵に対して行われるので、鍵を非アクティブに変更します

GitHub
今回のために作成したSSH鍵の削除
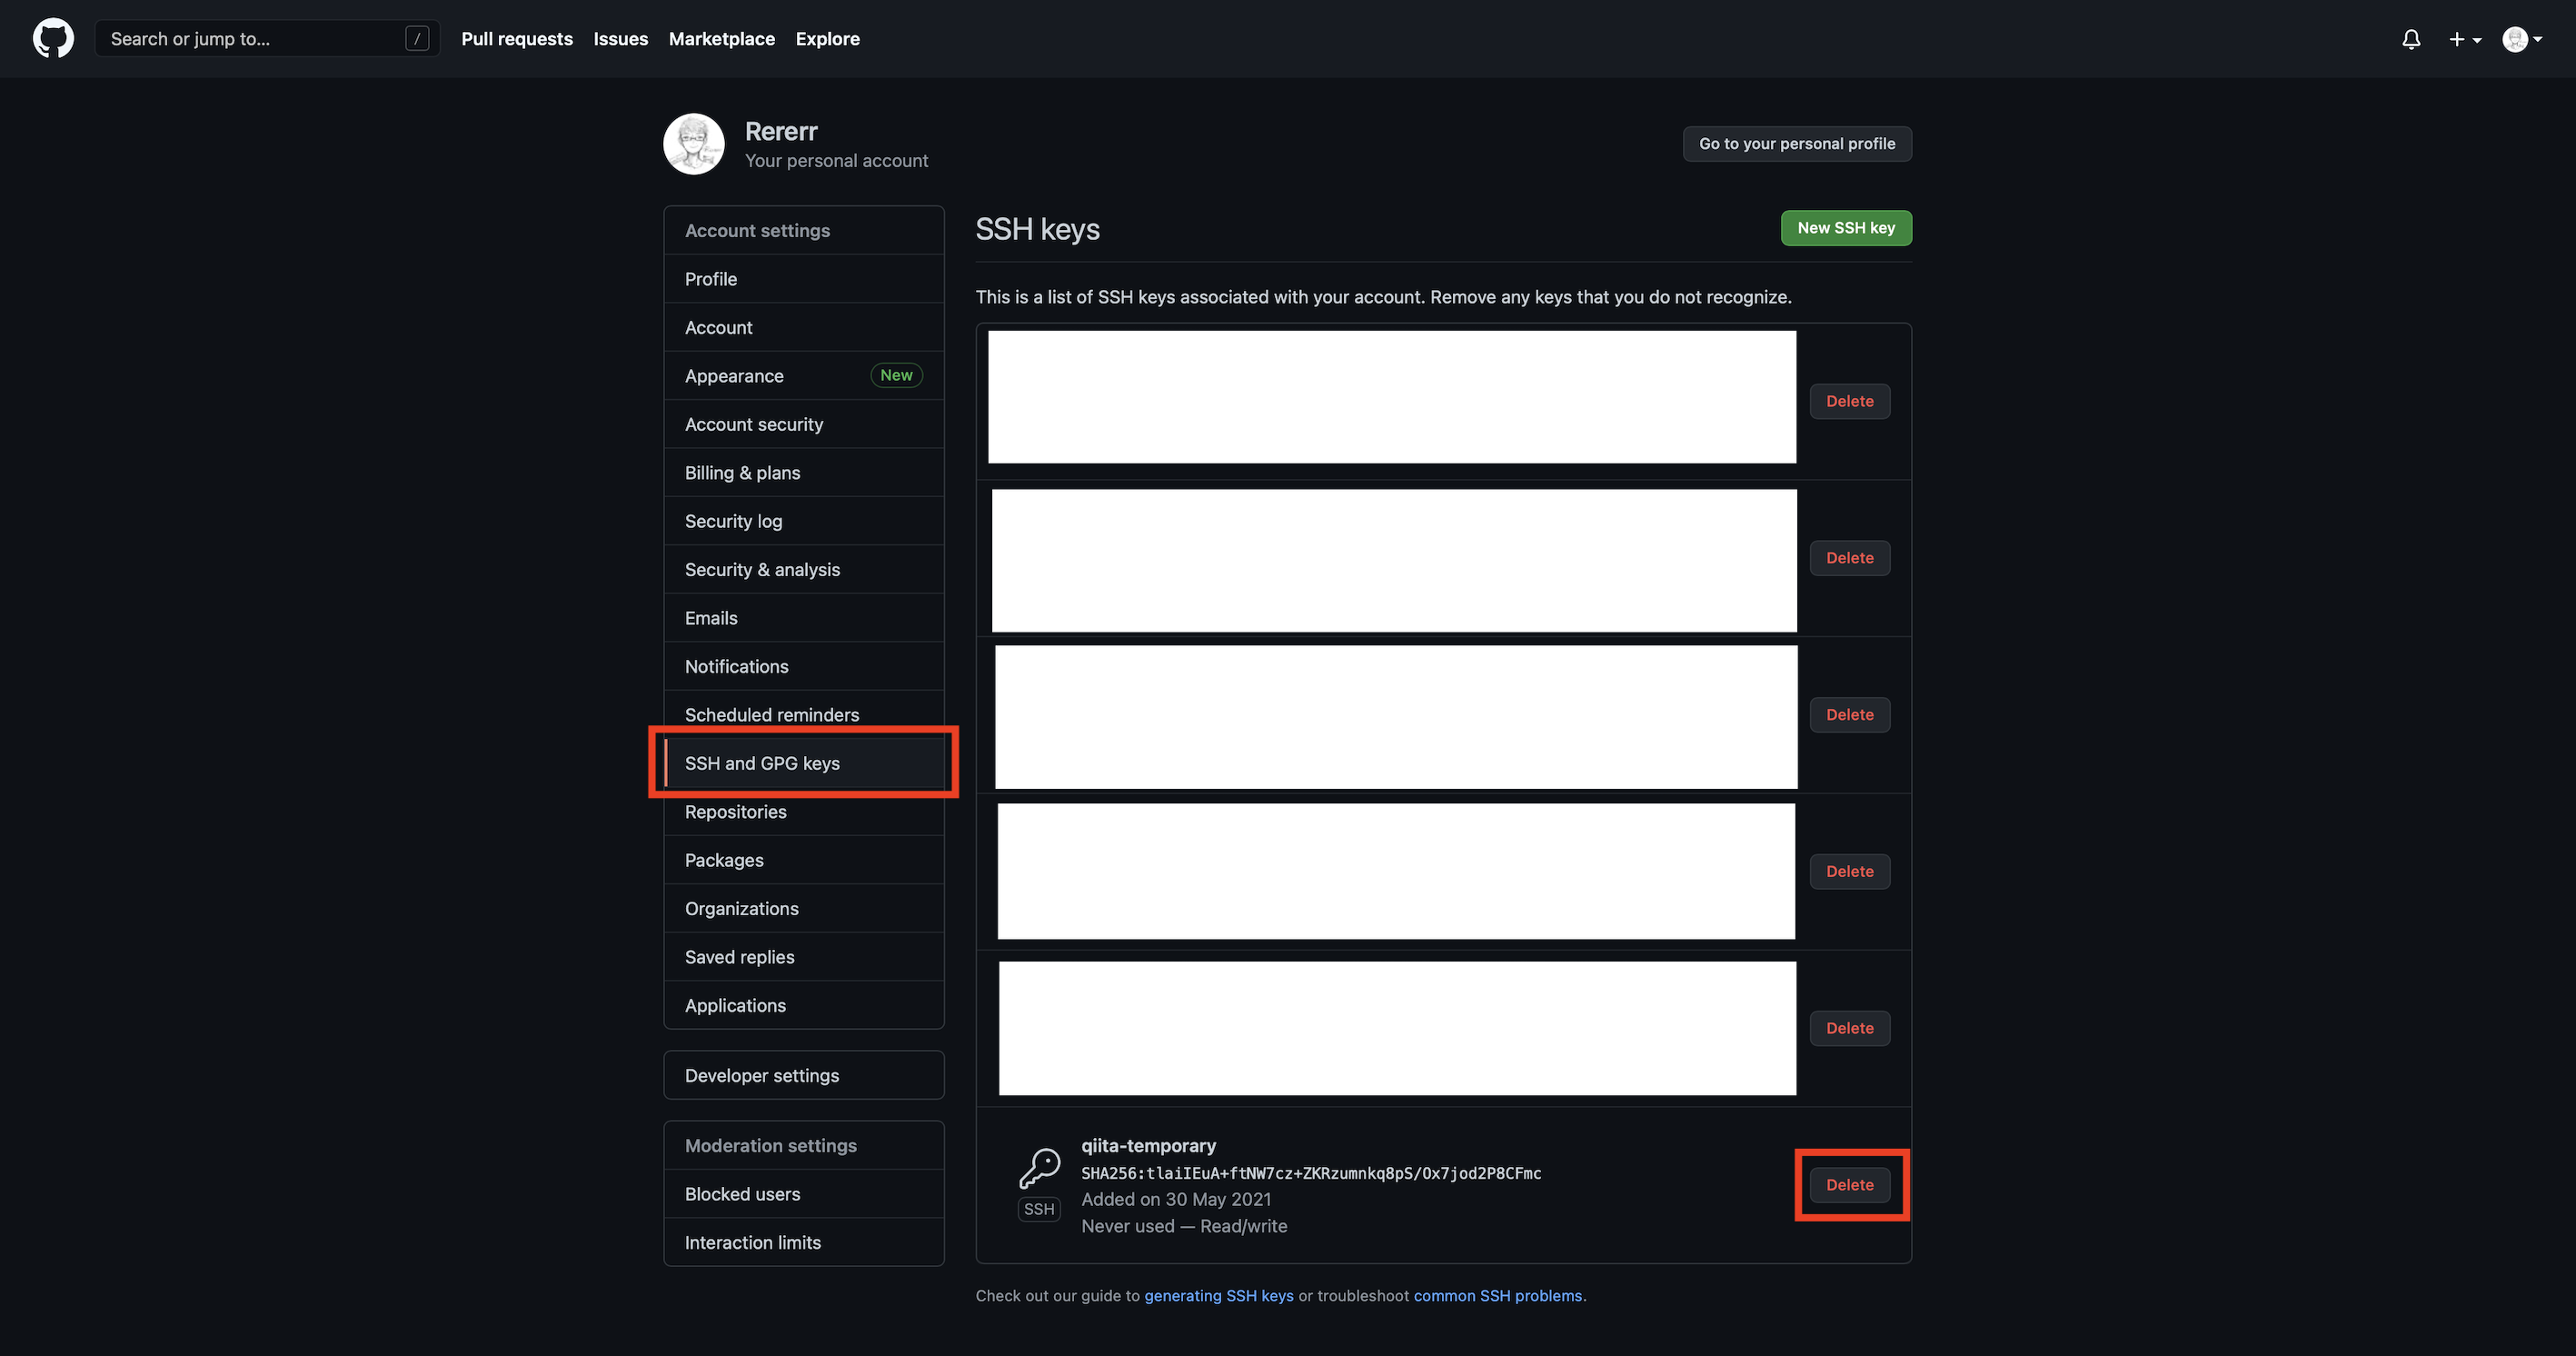
あと、リポジトリも不要なら消しておきましょう!
~/.ssh/config
今回追記した部分は削除しておきましょう
~/.ssh/config 下記部分は削除
Host cloudbuild-qiita
     AddKeysToAgent yes
     UseKeychain yes
     IdentityFile ~/.ssh/id_ed25519
あとがき
思ったよりもめちゃくちゃ長くなりました....
もし不明な点や追記希望などありましたら、コメントや編集リクエストいただけると嬉しいです。