arduinoやmbedでロータリーエンコーダのカウント値を取得するときはピン割込みを使うことが多いですが,それでは高パルスのエンコーダを使って移動した際にしばし値の取りこぼしが起こることが想定されます.
そのため高速に取りこぼしなく読み取りするためにはSTM32でハードウェアカウントするのが一般的のようです(mbedでも一応ハードウェアカウントできるらしいけど数が足らない).
今回紹介するのは「エンコーダカウントのためだけにSTM32使って分厚いデータシート読むのもなぁ...」という時間もなくて面倒くさがりな僕の悩みを解決してくれるICのµPD4701ACです.
µPD4701ACとは

高速カウントが可能なNECのインクリメンタル方式エンコーダ用カウンタです.
もともとはマウスのホイール用に生産されたようなのですが,ロボットに使われるロータリーエンコーダにも対応することができます.
便利ですがGPIOを大量に使うのでピン数が少ない場合は気を付けてください.
購入方法
以前はマルツで販売していたようですが,現在では生産が終了しているためか国内では販売していないor超高額に設定されているようです.
そのためこちらのUTSORCEというサイトで購入しました.
https://www.utsource.net/itm/p/11243559.html
海外サイトですが,配送でFedEXを使うと1週間ほどで届きました.
多く購入すると安くなります.
基板に取り付けるピンソケットは
https://www.amazon.co.jp/gp/product/B07JGWYDLP/ref=ppx_yo_dt_b_asin_title_o02_s00?ie=UTF8&psc=1
で買うことができます(安いですが足がとても柔らかいので注意).
データシート
NEC製なので日本語のデータシートがあります.
https://www.tyro-teq.com/ds/pdf/u/0070/UPD4701AC.pdf
配線図
配線図は以下の通りです(上記データシートから引用).
uPD4701Aと書いてありますが,uPD4701ACと配線が同じなので問題ありません.
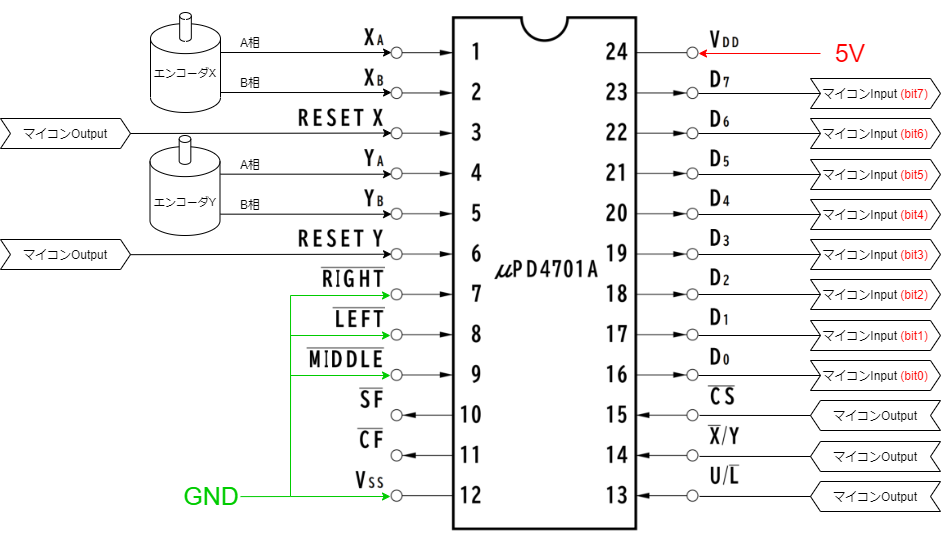
この図の通り,このIC1つで2つのエンコーダをカウントできます.お得ですね.
RIGHT,LEFT,MIDDLEはマウスのボタン用らしいのですが使わないので一応GNDに繋げておきます.
カウント値は2進数でそれぞれのbitが$D_0$から$D_7$で出力されます.
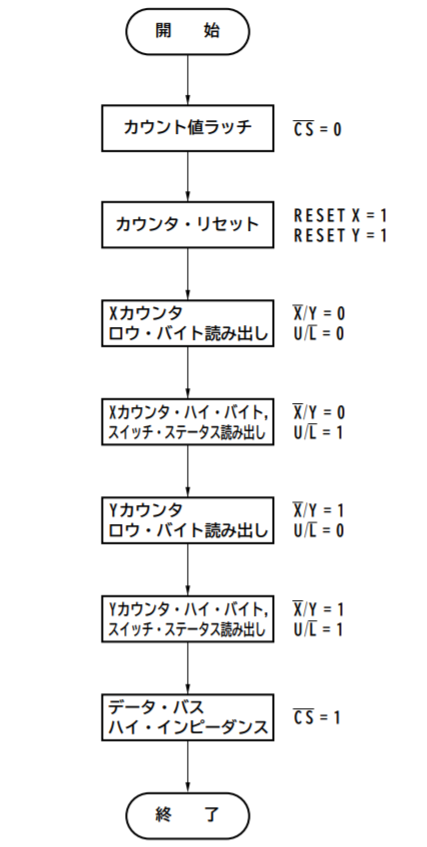
注意すべき点はこのICは12bitまで取得できるため,設定を変えて$D_0$~$D_7$で下位8bitを取得し,$D_0$から$D_4$で上位4bitを取得します.詳しくは下のフローを確認してください.
カウント値読み取りフロー
実験したときのソースコード
mbedでSTM Nucleo F446REを使用しました.
# include "mbed.h"

// シリアル通信の設定
Serial pc(SERIAL_TX, SERIAL_RX, 115200);
// タイマコールバック用
Ticker flipper;
// タイマコールバック関数が呼ばれたときにtrueにするフラグ
int is_on_timer = false;
// エンコーダの加算値
int enc_cnt_x = 0;
int enc_cnt_y = 0;

// uPD4701ACのピン設定
DigitalIn bit_A0(PC_3);
DigitalIn bit_A1(PC_2);
DigitalIn bit_A2(PH_1);
DigitalIn bit_A3(PC_13);
DigitalIn bit_A4(PB_7);
DigitalIn bit_A5(PA_15);
DigitalIn bit_A6(PC_12);
DigitalIn bit_A7(PC_10);

DigitalOut cs(PC_0);
DigitalOut xy(PC_1);
DigitalOut ul(PB_0);
DigitalOut reset_x(PA_4);
DigitalOut reset_y(PA_1);


// ICから出力された1byteを取得する
int ReadByte()
{
    int byte = 0;
    byte = bit_A0.read() | (bit_A1.read() << 1) | (bit_A2.read() << 2) | (bit_A3.read() << 3) | (bit_A4.read() << 4) | (bit_A5.read() << 5) | (bit_A6.read() << 6) | (bit_A7.read() << 7);

    return byte;
}
// 引数で指定したピンの設定により下位・上位の8bitを取得する
int GetSettingByte(bool p_xy_pin_state, bool p_ul_pin_state)
{
    // エンコーダのXかYかを設定する
    xy = p_xy_pin_state;
    // 下位bitか上位bitかを設定する
    ul = p_ul_pin_state;

    return ReadByte();
}

// 正転 0 ~  2048 が 0 ~ 2048,
// 逆転-1 ~ -2048 が 4096 ~ 2049 になるので変換する
int ChangeByte2CountValue(int byte)
{
    if(byte > (4096/2)){
        return byte - 4096;
    }else{
        return byte;
    }
}

// エンコーダのカウント値を取得する
void GetEncoderCount(int *p_x_count, int *p_y_count)
{
    // csの立ち下がり時の情報を読むからhigh->lowに
    cs = false;

    // こうしないと読めないから一応falseにし直す
    reset_x = false;
    reset_y = false;

    // 下位上位の8bitを読む
    int x_low_byte  = GetSettingByte(false, false);
    int x_high_byte = GetSettingByte(true, false);
    int y_low_byte  = GetSettingByte(false, true);
    int y_high_byte = GetSettingByte(true, true);


    // 上位の前4bit分はSF,L,R,Mだからいらない
    int x_12bit = x_low_byte | ((x_high_byte & 0b00001111) << 8);
    int y_12bit = y_low_byte | ((y_high_byte & 0b00001111) << 8);

    // csの立ち下がり時の情報を読むのでhighに設定し直す
    cs = true;

    // 保有しているカウント値をリセットする
    reset_x = true;
    reset_x = false;
    reset_y = true;
    reset_y = false;
    // カウント値を参照返しする
    *p_x_count = ChangeByte2CountValue(x_12bit);
    *p_y_count = ChangeByte2CountValue(y_12bit);
}

// 100[ms]に1回呼ばれてフラグをONにする
void OnTimerFlag()
{
    is_on_timer = true;
}

// フラグがtrueならこの関数が呼ばれる.メインスレッドで処理するため(このくらいの重さなら必要ないけど一応)
void TimerCallbackMain() {
    // エンコーダのカウントを値取得する
    int x_count = 0;
    int y_count = 0;
    GetEncoderCount(&x_count, &y_count);

    // 取得したカウント値を加算する
    enc_cnt_x += x_count;
    enc_cnt_y += y_count;

    //pc.printf("AA  %d  %d  %d  %d  %d  %d  %d  %d\n\r", bit_A0.read() ,bit_A1.read(), bit_A2.read() ,bit_A3.read() ,bit_A4.read() ,bit_A5.read(),bit_A6.read() ,bit_A7.read());
    pc.printf("[X]%5d [Y]%5d\n\r", enc_cnt_x, enc_cnt_y);

}


int main()
{
    pc.printf("RUN !\n");

    // 100[ms]に1回呼ばれるタイマコールバック関数
    flipper.attach(&OnTimerFlag, 0.1);

    while(1)
    {
        if(is_on_timer == true)
        {
            is_on_timer = false;
            TimerCallbackMain();
        }
    }
}