この記事はTDU CPSLab Advent Calendar 2023 - Adventarの20日目の記事です
M5Capsuleとは
M5CapsuleとはM5Stack社から販売されている組み込み開発ボードです。

発売日が2023年10月5日で比較的最近発売されたものです。M5Capsuleにはスイッチサイエンスのサイトの商品名にも書かれているようにM5StampS3が搭載されています。
M5StampS3の違いとして、M5Capsuleには6軸センサ、マイク、赤外線、RTC、バッテリーなどが内蔵されています。
M5StampS3とは?
マイコンにESP-S3FN8(2.4 GHz Wi-Fi)を搭載した切手サイズの開発ボードです。多数あるM5Stack社のボードでも最小サイズのものとなっています。M5Capsule以外にもM5StampS3が搭載されているものにはM5Dial、M5Cardputerがあります。
他のM5シリーズとの比較をしてみましょう
| ボード | M5Capsule | M5Stack Core2 | M5StickC Plus | AtomS3 Lite |
|---|---|---|---|---|
| MCU | ESP32-S3FN8 | ESP32-D0WD-V3 | ESP32-PICO-D4 | ESP32-S3FN8 |
| Battery | 250 mAh | 390 mAh | 120 mAh | なし |
| Display | なし | 390×240 | 135×240 | なし |
| LED | RGB | 電源表示灯(緑) | 赤色LED | RGB |
| IMU | BMI270 | MPU6886 | MPU6886 | なし |
| RTC | BM8563 | BM8563 | BM8563 | なし |
| MIC | SPM1423 | SPM1423 | SPM1423 | なし |
| IR | あり | なし | あり | なし |
| SD | あり | あり | なし | なし |
| 寸法(mm) | 40×24×16.2 | 54×54×16 | 48.2×25.5×13.7 | 24×24×9.5 |
| 重量 | 18.5g | 70g | 21g | 9.5g |
| 値段 | 3500円 | 8096円 | 3828円 | 1496円 |
最近、M5Stack Core2 v1.1やM5StickC Plus2といった性能が向上したバージョンアップ製品が発売されましたが今回の比較は古いバージョンで行っています。
他にも、スピーカーやバイブレータなどの比較対象はあります。また、Grove拡張ユニットを接続できるので上の表でない機能を補うことも可能です。どれが一番良い悪いということはないので、使い分けることが大事だと思います。
私個人の考えですが、軽量にもかかわずバッテリー容量が大きいことがM5Capsuleの優れている点であり、ディスプレイがついていないという点もボードを使い分けるポイントになると思っています。
環境構築
実際にM5Capsuleで開発を行っていきます。開発環境はPlatformIOを利用します。
プロジェクトの作成(開発ボードの選択)
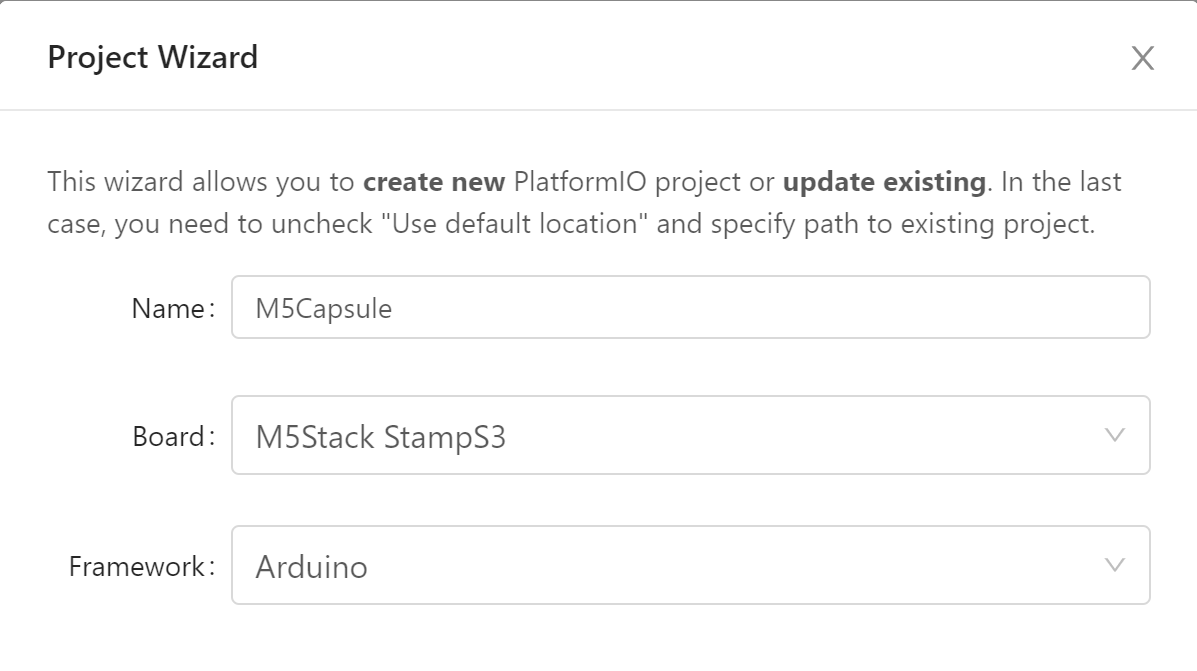
PIO Homeから、New Projectを選択します。Boardの欄でM5Capsuleはないため、M5Stack StampS3を選択し、プロジェクトを作成します。
ライブラリのインクルード
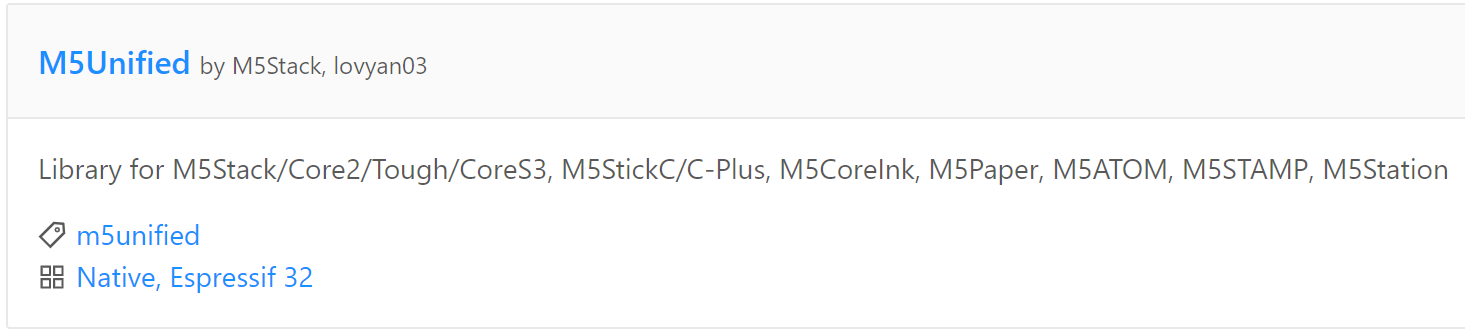
M5Capsule(M5StampS3)には、現段階ではM5StackやM5Core2のようなライブラリがありません。そこで、M5Unifiedというライブラリを利用します。PIO HomeのLibrariesを選択し、検索ボックスからM5Unifiedを入力してください。下の画像と同じものを選択し、プロジェクトに追加してください。
M5Unifiedとは?
M5Unifiedは、M5Stack製品の仕様の異なるハードウェアを共通のAPIで扱うためのライブラリで、同じソースを違うデバイスでも利用することができます。
また、M5UnifiedではRGB LEDの制御には対応していないため、RGB LEDの制御が必要な場合はFastLEDやEspEasyLEDなどのライブラリを導入する必要があります。
これで、環境構築は完了です。
RGB LED
以下はRGB LEDを1秒周期で赤、緑、青の順で点灯させるコードです。私はEspEasyLEDライブラリを利用します。
#include <Arduino.h>
#include <M5Unified.h>
#include <EspEasyLED.h>

EspEasyLED *rgbled;

void setup(){
  auto cfg = M5.config();
  M5.begin(cfg);

  rgbled = new EspEasyLED(GPIO_NUM_21, 1, 20);
}

void loop(){
  if(rgbled){
    rgbled->showColor(EspEasyLEDColor::RED);
    delay(1000);

    rgbled->showColor(EspEasyLEDColor::GREEN);
    delay(1000);

    rgbled->showColor(EspEasyLEDColor::BLUE);
    delay(1000);
  }
}


注意
PlatformIOで開発を行う場合、以下のようなエラーが出現する可能性があります。私が直面したエラーを2つ紹介します。
1.ピン定義のエラー
C:/Users/user/.platformio/packages/framework-arduinoespressif32/libraries/SPI/src/SPI.cpp: In member function 'void SPIClass::begin(int8_t, int8_t, int8_t, int8_t)':
C:/Users/user/.platformio/packages/framework-arduinoespressif32/libraries/SPI/src/SPI.cpp:87:37: error: 'SCK' was not declared in this scope
         _sck = (_spi_num == FSPI) ? SCK : -1;
                                     ^~~
C:/Users/user/.platformio/packages/framework-arduinoespressif32/libraries/SPI/src/SPI.cpp:87:37: note: suggested alternative: 'SCL'
         _sck = (_spi_num == FSPI) ? SCK : -1;
                                     ^~~
                                     SCL
C:/Users/user/.platformio/packages/framework-arduinoespressif32/libraries/SPI/src/SPI.cpp:88:38: error: 'MISO' was not declared in this scope
         _miso = (_spi_num == FSPI) ? MISO : -1;
                                      ^~~~
C:/Users/user/.platformio/packages/framework-arduinoespressif32/libraries/SPI/src/SPI.cpp:89:38: error: 'MOSI' was not declared in this scope
         _mosi = (_spi_num == FSPI) ? MOSI : -1;
                                      ^~~~
C:/Users/user/.platformio/packages/framework-arduinoespressif32/libraries/SPI/src/SPI.cpp:90:36: error: 'SS' was not declared in this scope
         _ss = (_spi_num == FSPI) ? SS : -1;
                                    ^~
C:/Users/user/.platformio/packages/framework-arduinoespressif32/libraries/SPI/src/SPI.cpp:90:36: note: suggested alternative: 'PS'
         _ss = (_spi_num == FSPI) ? SS : -1;
                                    ^~
                                    PS
M5Stack StampS3ボードのSPIデフォルトピンを追加します。
.platformio\packages\framework-arduinoespressif32\variants\m5stack_stamp_s3にあるpins_arduino.hに以下を追加してください。
static const uint8_t SS = 5;
static const uint8_t MOSI = 23;
static const uint8_t MISO = 19;
static const uint8_t SCK = 18;
USBシリアルでの書き込みのエラー
A serial exception error occurred: Write timeout
Note: This error originates from pySerial. It is likely not a problem with esptool, but with the hardware connection or drivers.
For troubleshooting steps visit: https://docs.espressif.com/projects/esptool/en/latest/troubleshooting.html
ESP32-S3系の書き込みをする際に出るエラーですが、ボードをダウンロードモードにすることで解決します。
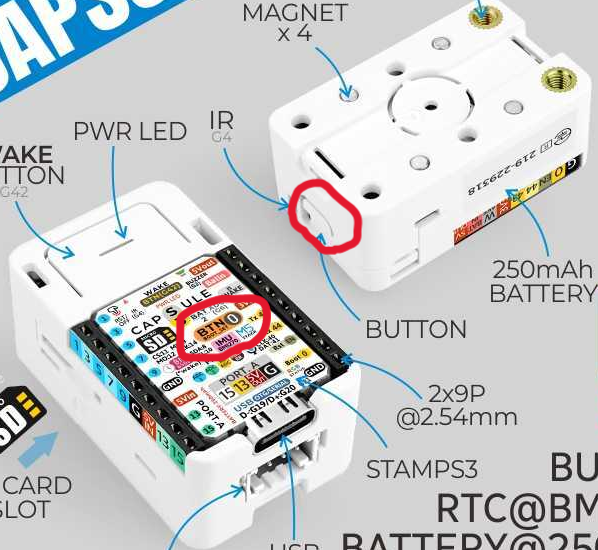
Capsuleの場合はBTN0(非常にわかりにくいですがこの下にボタンがあります)を押しながらリセットを押すことでダウンロードモードに入ります。また、書き込んだ後、側面のボタンを押すことで元のモードに戻ります。下の画像の赤で囲った部分を押してください。
IMU + WiFi
以下はM5Capsuleの6軸IMUで加速度とジャイロを取得し、MQTTでnode-redサーバに送信するコードです。node-redの説明は省略します。
#include <Arduino.h>
#include <M5Unified.h>
#include <WiFi.h>
#include <EspEasyLED.h>
#include <PubSubClient.h>
#include <ArduinoJson.h>

const char *ssid = "アクセスポイントのSSID";
const char *pass = "アクセスポイントのパスワード";
const char* server_addr = "ローカルホストのIPアドレス";
const int server_port = 1883;
const char* device_ID = "M5Capsule";
const char* pub_topic = "/capsule";

EspEasyLED *rgbled;

struct IMUData{
  float accX;
  float accY;
  float accZ;
  float gyroX;
  float gyroY;
  float gyroZ;
};
IMUData data;

WiFiClient client;
PubSubClient mqttClient(client);

void connectMqtt(){
  while(!mqttClient.connected()){
    if(mqttClient.connect(device_ID)){
      //正常
      rgbled->showColor(EspEasyLEDColor::GREEN);
    }else{
      //MQTTブローカー未接続
      rgbled->showColor(EspEasyLEDColor::ORANGE);
      delay(500);
    }
  }
}

void mqttLoop(){
  if(!mqttClient.connected()){
    connectMqtt();
  }
  mqttClient.loop();
}

void setup(){
  auto cfg = M5.config();
  M5.begin(cfg);

  rgbled = new EspEasyLED(GPIO_NUM_21, 1, 20);

  WiFi.begin(ssid, pass);
  while(WiFi.status() != WL_CONNECTED){
    //WiFi未接続
    rgbled->showColor(EspEasyLEDColor::RED);
    delay(500);
  }

  mqttClient.setServer(server_addr, server_port);
}

void loop(){
  mqttLoop();

  M5.Imu.getAccel(&data.accX, &data.accY, &data.accZ);
  M5.Imu.getGyro(&data.gyroX, &data.gyroY, &data.gyroZ);

  char json[200];
  const size_t capacity = JSON_OBJECT_SIZE(10);
  StaticJsonDocument<capacity> doc;
  doc["accX"] = data.accX;
  doc["accY"] = data.accY;
  doc["accZ"] = data.accZ;
  doc["gyroX"] = data.gyroX;
  doc["gyroY"] = data.gyroY;
  doc["gyroZ"] = data.gyroZ;
  serializeJson(doc, json);
  mqttClient.publish(pub_topic, json);

  delay(100);
}
以下はnode-red側のフローのjsonファイルです。MQTTブローカーはAedes MQTT brokerを使用します。
フロー
[
    {
        "id": "57ac515f3bda4659",
        "type": "tab",
        "label": "capsule",
        "disabled": false,
        "info": "",
        "env": []
    },
    {
        "id": "2e38c8c15fa2a199",
        "type": "mqtt in",
        "z": "57ac515f3bda4659",
        "name": "",
        "topic": "/capsule",
        "qos": "2",
        "datatype": "auto-detect",
        "broker": "8750dc9609eaf7c9",
        "nl": false,
        "rap": true,
        "rh": 0,
        "inputs": 0,
        "x": 80,
        "y": 120,
        "wires": [
            [
                "cfa8cbdbb4f9cb70"
            ]
        ]
    },
    {
        "id": "6c12ead8f6fe7dd0",
        "type": "aedes broker",
        "z": "57ac515f3bda4659",
        "name": "",
        "mqtt_port": 1883,
        "mqtt_ws_bind": "port",
        "mqtt_ws_port": "",
        "mqtt_ws_path": "",
        "cert": "",
        "key": "",
        "certname": "",
        "keyname": "",
        "persistence_bind": "memory",
        "dburl": "",
        "usetls": false,
        "x": 110,
        "y": 60,
        "wires": [
            [],
            []
        ]
    },
    {
        "id": "cfa8cbdbb4f9cb70",
        "type": "debug",
        "z": "57ac515f3bda4659",
        "name": "debug 21",
        "active": true,
        "tosidebar": true,
        "console": false,
        "tostatus": false,
        "complete": "false",
        "statusVal": "",
        "statusType": "auto",
        "x": 280,
        "y": 120,
        "wires": []
    },
    {
        "id": "8750dc9609eaf7c9",
        "type": "mqtt-broker",
        "name": "",
        "broker": "localhost",
        "port": "1883",
        "clientid": "",
        "autoConnect": true,
        "usetls": false,
        "protocolVersion": "4",
        "keepalive": "60",
        "cleansession": true,
        "autoUnsubscribe": true,
        "birthTopic": "",
        "birthQos": "0",
        "birthPayload": "",
        "birthMsg": {},
        "closeTopic": "",
        "closePayload": "",
        "closeMsg": {},
        "willTopic": "",
        "willQos": "0",
        "willPayload": "",
        "willMsg": {},
        "userProps": "",
        "sessionExpiry": ""
    }
]
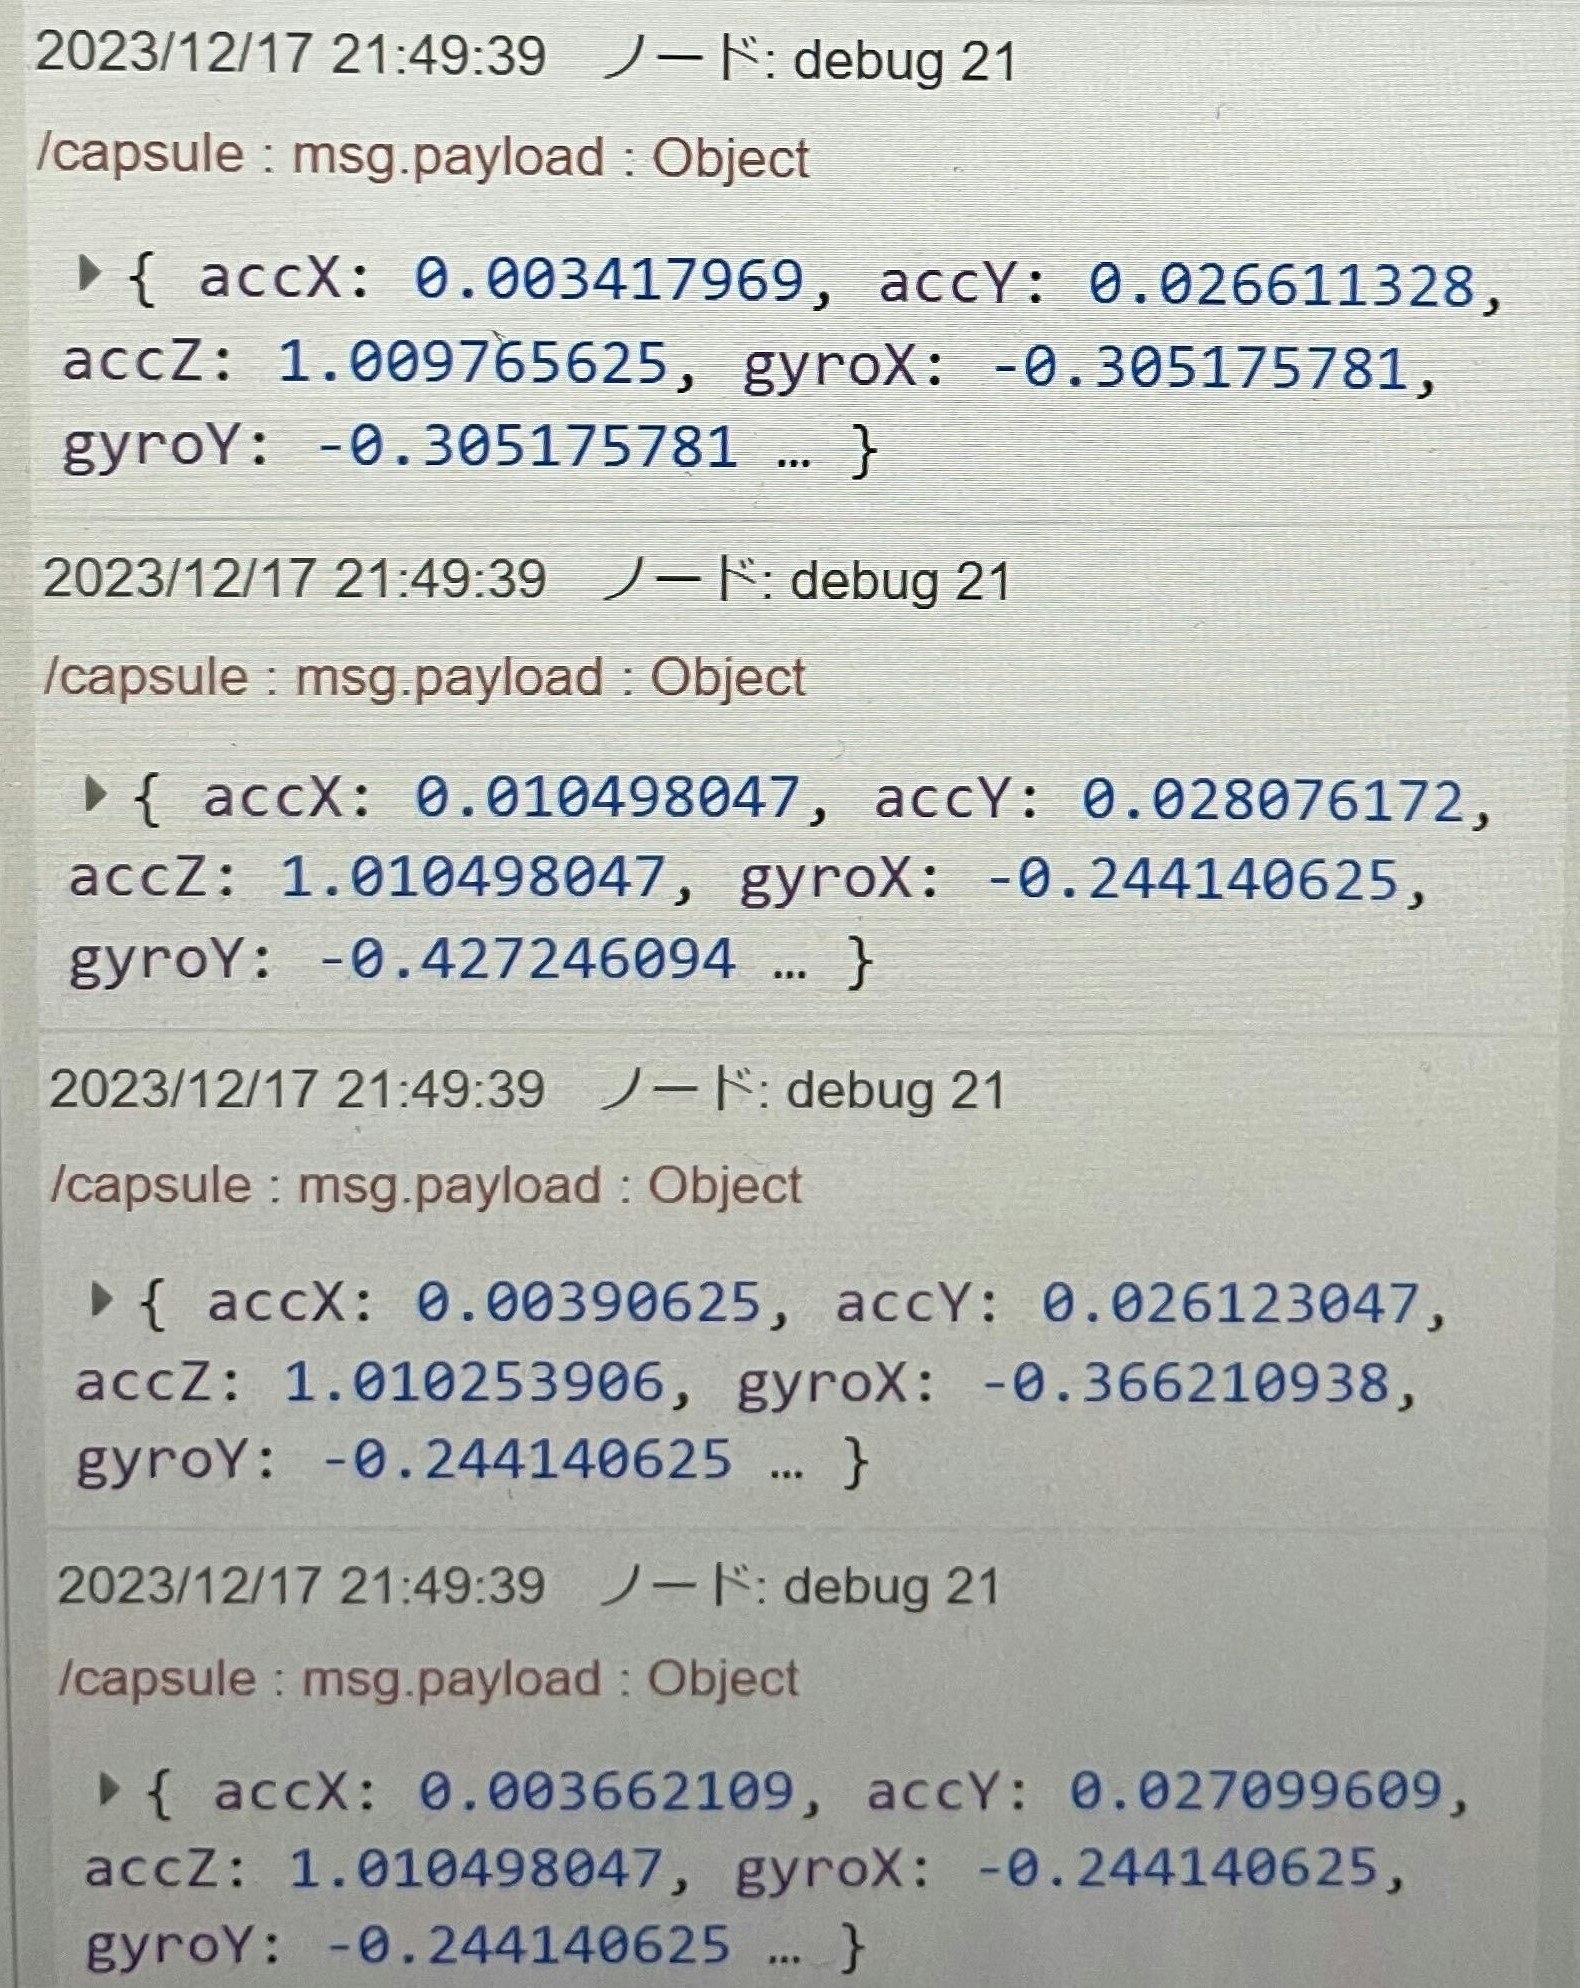
以下の画像のように正しく送信できていることが分かります。動画をのせたかったですが、撮影するのが下手すぎたため無理でしたm(__)m
まとめ
M5Capsuleについて、簡単にまとめてみました。まだ発売されてから時間がたっていないので使い方が分からなかった人が扱えるようになったら本望です!!
また、M5Unifiedライブラリを扱えたら、ほとんどのM5シリーズを動かすことは可能なのでぜひ使ってみてください。