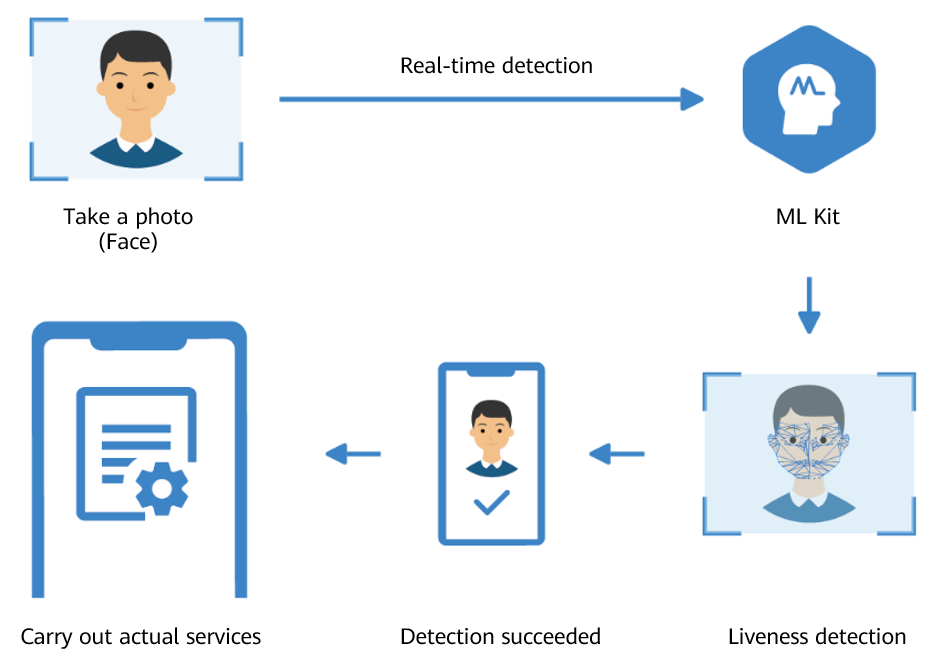
生体検知について
カメラに映っている顔は、本物の人間がカメラに映されているものなのか?それとも単なる顔写真か人の動画なのか?それを識別するのに、生体検知の技術が使われます。
Androidにおける生体検知の実装
Androidで生体検知を実装するのに、HMS ML Kitを利用するのがもっとも簡単です。
オフィシャルサイトに実装方法が載っていますが、少し複雑なので、より簡単な実装方法をまとめてみました。
プロジェクトのbuild.gradle
プロジェクトのbuild.gradleにHMS ML Kitのリポジトリを追加します。
build.gradle
buildscript {
    repositories {
        google()
        jcenter()

        // こちらの行を追加
        maven {url 'http://developer.huawei.com/repo/'}
    }
    ...
}

allprojects {
    repositories {
        google()
        jcenter()

        // こちらの行を追加
        maven { url 'http://developer.huawei.com/repo/' }
    }
}

...
モジュールのbuild.gradle
build.gradle
...
dependencies {

    ...
    // 生体検知ライブラリを追加
    implementation 'com.huawei.hms:ml-computer-vision-livenessdetection:2.2.0.300'
}
...
AndroidManifest.xml
AndroidManifest.xmlに機械学習モデルとカメラ権限の宣言を入れます。
AndroidManifest.xml
<?xml version="1.0" encoding="utf-8"?>
<manifest xmlns:android="http://schemas.android.com/apk/res/android"
    package="あなたのパッケージ">

    <!-- 機械学習モデル -->
    <meta-data
        android:name="com.huawei.hms.ml.DEPENDENCY"
        android:value= "livenessdetection"/>

    <!-- カメラの権限が必要 -->
    <uses-permission android:name="android.permission.CAMERA"/>

    ...

</manifest>
レイアウト
HMS ML Kitの生体検知機能を使うのに、レイアウトの用意はいりません。
ただ、生体検知機能を呼び出すトリガーと、生体検知結果が返った後の結果表示に、レイアウトが必要な場合があります(ユーザー次第)。
サンプルとして、次のように、トリガーのButtonと、結果表示のImageViewとTextViewで、簡単なレイアウトを作ってみます。
main_activity.xml
<?xml version="1.0" encoding="utf-8"?>
<layout xmlns:android="http://schemas.android.com/apk/res/android"
    xmlns:app="http://schemas.android.com/apk/res-auto"
    >

    <androidx.constraintlayout.widget.ConstraintLayout
        android:id="@+id/main_container"
        android:layout_width="match_parent"
        android:layout_height="match_parent"
        android:keepScreenOn="true">

        <ImageView
            android:id="@+id/image_view"
            android:layout_width="match_parent"
            android:layout_height="0dp"
            android:scaleType="fitCenter"
            app:layout_constraintTop_toTopOf="parent"
            app:layout_constraintBottom_toTopOf="@id/textview_result"
            app:layout_constraintStart_toStartOf="parent"
            app:layout_constraintEnd_toEndOf="parent"
            />

        <TextView
            android:id="@+id/textview_result"
            android:layout_width="match_parent"
            android:layout_height="wrap_content"
            android:textAlignment="center"
            app:layout_constraintTop_toBottomOf="@id/image_view"
            app:layout_constraintBottom_toTopOf="@id/button_start"
            app:layout_constraintStart_toStartOf="parent"
            app:layout_constraintEnd_toEndOf="parent"
            />

        <Button
            android:id="@+id/button_start"
            android:layout_width="wrap_content"
            android:layout_height="wrap_content"
            android:text="Live Detect"
            app:layout_constraintTop_toBottomOf="@id/textview_result"
            app:layout_constraintBottom_toBottomOf="parent"
            app:layout_constraintStart_toStartOf="parent"
            app:layout_constraintEnd_toEndOf="parent"
            />

    </androidx.constraintlayout.widget.ConstraintLayout>

</layout>
Activity
Activityの中でやることがたった2つだけです。
- MLLivenessCapture.getInstance().startDetect()で生体検知を起動させます。
- 生体検知結果を受け取るonSuccess()の中で、MLLivenessCaptureResult.isLiveの値がtrue(本物)かfalse(偽物)かをチェックします。
MainActivity.kt
private lateinit var binding: MainActivityBinding

override fun onCreate(savedInstanceState: Bundle?) {
    super.onCreate(savedInstanceState)
    binding = DataBindingUtil.setContentView(this, R.layout.main_activity)
    binding.buttonStart.setOnClickListener {
        MLLivenessCapture.getInstance().startDetect(
            this,
            object : MLLivenessCapture.Callback{
                override fun onSuccess(result: MLLivenessCaptureResult?) {
                    result?.let {
                        binding.imageView.setImageBitmap(it.bitmap)
                        binding.textviewResult.text = if (it.isLive) "Is Live" else "Not Live"
                    }
                }

                override fun onFailure(errorCode: Int) {
                }
            }
        )
    }
}
これで簡単な生体検知アプリのメイン機能が完成です。
GitHub
参考
- HMS:https://developer.huawei.com/consumer/jp/
- HMS ML Kitの紹介:https://developer.huawei.com/consumer/jp/hms/huawei-mlkit
- HMS ML Kitのドキュメント:https://developer.huawei.com/consumer/jp/doc/development/HMSCore-Guides/service-introduction-0000001050040017
- HMS ML Kitの生体検知の概要:https://developer.huawei.com/consumer/jp/doc/development/HMSCore-Guides/liveness-detection-0000001051386243
- Huawei Developers:https://forums.developer.huawei.com/forumPortal/en/home
- Facebook Huawei Developersグループ:https://www.facebook.com/Huaweidevs/