みなさん、こんにちは!
AWS CDKを触ってみたブログです!
ざっくり理解からデプロイまで実施します!
ちなみに私はIaCのTerraformは使ったことがありますが、CDK, TypeScriptは本ブログ書くまで未経験です。
ざっくり理解
私のざっくり理解は以下です。
- 自分の得意なプログラミング言語でリソースの設定値を定義してデプロイすると裏でCFn(CloudFormation)のスタックが作られる。
- リソースの設定値の定義にはレベルが1~3まであり、自分で選んでコードを書いていく。(これがコンストラクトレベル)
L1はCFnと同じ: 1つ1つ丁寧に設定値を定義する
L2はマネコンと似てる: EC2作成するとENIやEBSも一緒に作られる
L3は特定のAWSアーキテクチャを作れる: Web三層構造などの決まったパターンを作れる
CFnはYAMLやJSONで定義するため柔軟性がないデメリットをカバーするのがCDKの立ち位置みたいですね。
Terraformの場合はHCL(HashiCorp Configuration Language)でリソースの設定値を定義するので、好きなプログラミング言語を使えるCDKの方が学習コストが低く済みますね!
もっと詳しいこと知りたい方は公式ドキュメント読んでください!
開発環境構築
なんとなーくCDKについて理解できたところで早速リソースデプロイしますか!って言いたいところですが、CDKはプログラミング言語で書いたあとにCFnテンプレートを出力する必要があるためNode.jsが実行できないといけないです。
他にもAWSアカウント持ってますよねとか前提条件があります。
今回はAWS CLI導入済みで認証設定済みのローカルPC(Windows11)を使って作業します。
Node.js インストール
1.以下のURLからパッケージをダウンロードし、インストーラーを起動する
https://nodejs.org/ja/download
2.画面の指示に従い進めていくとPowerShellが起動するため、Enterを押し処理を進める
3.Node.jsをインストールできたか確認する
実行コマンド
node --version
実行ログ
PS C:\xxx\rei> node --version
v22.16.0
4.npmも一緒にインストールされているか確認する
実行コマンド
npm -v
実行ログ
PS C:\xxx\rei> npm -v
11.1.0
AWS CDK インストール
1.CDKをインストールする
実行コマンド
npm install -g aws-cdk
2.AWS CDKをインストールできたか確認する
実行コマンド
cdk --version
実行ログ
PS C:\xxx\rei> cdk --version
2.1019.2 (build c29855e)
PS C:\xxx\rei>
ブートストラップリソースの作成
開発環境も作れたしデプロイするかー!って言いたいですが、あと1ステップだけ必要で、ブートストラップリソースを作成しないといけないです。
ブートストラップリソースはCDKで構築を行うために必要なリソースのことで、S3バケット, ECRリポジトリ, IAMロールなどがあります。
手動作成でなくて、コマンド実行するとCFnスタックとして作成されるので楽ちんです。
ブートストラップリソースを作成し終わったら、実際にデプロイしていきます。
詳しいブートストラップについてはこちらの公式ドキュメントを参照してください!
1. 作成
ブートストラップリソースを作成します。
cdk bootstrap aws://{awsアカウントID}/{リージョン}の形式でコマンド実行してください。
実行コマンド
cdk bootstrap aws://123456789012/ap-northeast-1
※AWSアカウントIDが123456789012、リージョンがap-northeast-1の場合のコマンド例です。
実行ログ
PS C:\xxx\rei> cdk bootstrap aws://123456789012/ap-northeast-1
 ⏳  Bootstrapping environment aws://123456789012/ap-northeast-1...
Trusted accounts for deployment: (none)
Trusted accounts for lookup: (none)
Using default execution policy of 'arn:aws:iam::aws:policy/AdministratorAccess'. Pass '--cloudformation-execution-policies' to customize.
CDKToolkit: creating CloudFormation changeset...
CDKToolkit |  0/12 | 11:35:22 | REVIEW_IN_PROGRESS   | AWS::CloudFormation::Stack | CDKToolkit User Initiated
<省略>
CDKToolkit | 12/12 | 11:36:12 | CREATE_COMPLETE      | AWS::CloudFormation::Stack | CDKToolkit
 ✅  Environment aws://123456789012/ap-northeast-1 bootstrapped.
PS C:\xxx\rei>
2. 確認
スタックが作成されたか確認します。
実行コマンド
aws cloudformation list-stacks --stack-status-filter CREATE_COMPLETE
実行ログ
PS C:\xxx\rei> aws cloudformation list-stacks --stack-status-filter CREATE_COMPLETE  --region ap-northeast-1
{
    "StackSummaries": [
        {
            "StackId": "arn:aws:cloudformation:ap-northeast-1:123456789012:stack/CDKToolkit/b4a022b0-0000-0000-0000-000000000000",
            "StackName": "CDKToolkit",
            "TemplateDescription": "This stack includes resources needed to deploy AWS CDK apps into this environment",
            "CreationTime": "2025-06-29T02:35:22.734000+00:00",
            "LastUpdatedTime": "2025-06-29T02:35:28.337000+00:00",
            "StackStatus": "CREATE_COMPLETE",
            "DriftInformation": {
                "StackDriftStatus": "NOT_CHECKED"
            }
        }
    ]
}

PS C:\xxx\rei>
はじめてのデプロイ
ここからがお待ちかねのデプロイです!
プログラミング言語はたくさん情報が載っているTypeScriptを選択します。
1. プロジェクトの作成
testディレクトリを作成し、カレントディレクトリを移動して、新しい TypeScript CDK プロジェクトを作成します。
実行コマンド
mkdir ~/test
cd ~/test
cdk init -l typescript
実行ログ
PS C:\xxx\rei> mkdir test


    ディレクトリ: C:\xxx\rei


Mode                 LastWriteTime         Length Name
----                 -------------         ------ ----
d-----        2025/06/29     10:59                test


PS C:\xxx\rei> cd test
PS C:\xxx\rei\test> cdk init -l typescript
Applying project template app for typescript
# Welcome to your CDK TypeScript project

This is a blank project for CDK development with TypeScript.

The `cdk.json` file tells the CDK Toolkit how to execute your app.

## Useful commands

* `npm run build`   compile typescript to js
* `npm run watch`   watch for changes and compile
* `npm run test`    perform the jest unit tests
* `npx cdk deploy`  deploy this stack to your default AWS account/region
* `npx cdk diff`    compare deployed stack with current state
* `npx cdk synth`   emits the synthesized CloudFormation template

Initializing a new git repository...
warning: in the working copy of '.gitignore', LF will be replaced by CRLF the next time Git touches it
warning: in the working copy of '.npmignore', LF will be replaced by CRLF the next time Git touches it
warning: in the working copy of 'README.md', LF will be replaced by CRLF the next time Git touches it
warning: in the working copy of 'bin/test.ts', LF will be replaced by CRLF the next time Git touches it
warning: in the working copy of 'cdk.json', LF will be replaced by CRLF the next time Git touches it
warning: in the working copy of 'jest.config.js', LF will be replaced by CRLF the next time Git touches it
warning: in the working copy of 'lib/test-stack.ts', LF will be replaced by CRLF the next time Git touches it
warning: in the working copy of 'package.json', LF will be replaced by CRLF the next time Git touches it
warning: in the working copy of 'test/test.test.ts', LF will be replaced by CRLF the next time Git touches it
warning: in the working copy of 'tsconfig.json', LF will be replaced by CRLF the next time Git touches it
Executing npm install...
npm warn deprecated inflight@1.0.6: This module is not supported, and leaks memory. Do not use it. Check out lru-cache if you want a good and tested way to coalesce async requests by a key value, which is much  morecomprehensive and powerful.
npm warn deprecated glob@7.2.3: Glob versions prior to v9 are no longer supported
✅ All done!
PS C:\xxx\rei\test>
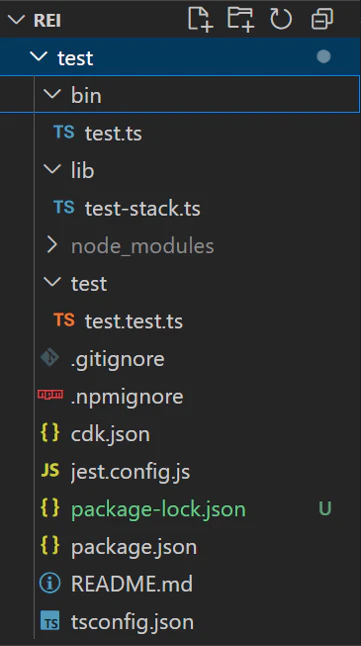
cdk init を実行すると以下のディレクトリとファイルが作成されます。
2. コンストラクトの定義
AWS CDK L2 コンストラクトを使用して SQSキューを作成します。
stackファイルの3,12-14行目のコメントアウトを解除してSQSキューのリソースの設定値を定義します。
また、今回はappファイルは変更しないで進めます。
stackファイルとappファイルについて 簡単に説明します。
- stackファイルはlib/に配置されており、作成したいAWSリソースを定義する役割を持つファイルです。
- appファイルはbin/に配置されており、cdk実行時に最初に実行されるファイルでlib/で定義されたstackを呼び出します。
appファイルでAWSアカウントやリージョン、呼び出すstackを指定します。
lib\test-stack.ts
import * as cdk from 'aws-cdk-lib';
import { Construct } from 'constructs';
import * as sqs from 'aws-cdk-lib/aws-sqs'; // コメントアウト解除

export class TestStack extends cdk.Stack {
  constructor(scope: Construct, id: string, props?: cdk.StackProps) {
    super(scope, id, props);

    // The code that defines your stack goes here

    // example resource
    const queue = new sqs.Queue(this, 'TestQueue', {  // コメントアウト解除
      visibilityTimeout: cdk.Duration.seconds(300)    // コメントアウト解除
    });                                               // コメントアウト解除
  }
}
これで作成したいリソースの設定値を定義できました!
3. アプリケーションをデプロイのための準備
CDKのコードからCFnテンプレートを作成します。
synth実施せず、deploy実行しても問題ないです。
実行コマンド
cdk synth
実行ログ
PS C:\xxx\rei\test> cdk synth
Resources:
  TestQueue6F0069AA:
    Type: AWS::SQS::Queue
    Properties:
      VisibilityTimeout: 300
    UpdateReplacePolicy: Delete
    DeletionPolicy: Delete
    Metadata:
      aws:cdk:path: TestStack/TestQueue/Resource
  CDKMetadata:
    Type: AWS::CDK::Metadata
    Properties:
      Analytics: v2:deflate64:H4sIAAAAAAAA/zPSMzIw0DNUTCwv1k1OydbNyUzSqw4uSUzO1kksL44vLizWqw4sTS1Nja5WKssszkzKzMksqQzJzE3NLy1RslLSUqqN1XFOywOrqa3VyctPSdXLKtYvMzLSMzTTM1DMKs7M1C0qzSvJzE3VC4LQABZFVk91AAAA
    Metadata:
      aws:cdk:path: TestStack/CDKMetadata/Default
    Condition: CDKMetadataAvailable
Conditions:
  CDKMetadataAvailable:
    Fn::Or:
<省略>
Parameters:
  BootstrapVersion:
    Type: AWS::SSM::Parameter::Value
    Default: /cdk-bootstrap/hnb659fds/version
    Description: Version of the CDK Bootstrap resources in this environment, automatically retrieved from SSM Parameter Store. [cdk:skip]

PS C:\xxx\rei\test>
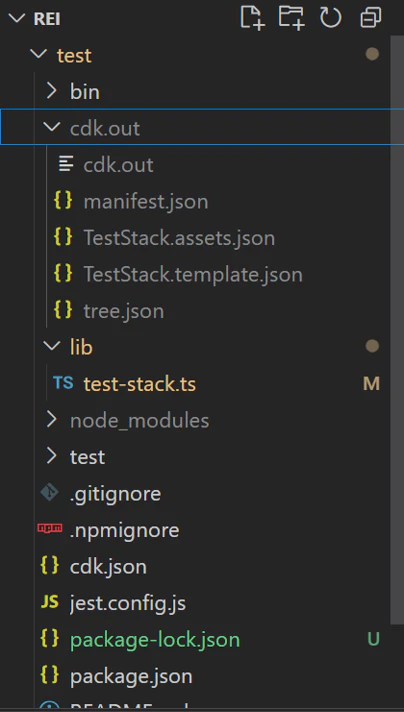
cdk synth を実行すると cdk.out ディレクトリにjson形式でテンプレが作成されます。
4. リソースをデプロイする
テンプレートができたので、スタックをデプロイします。
実行コマンド
cdk deploy
実行ログ
PS C:\xxx\rei\test> cdk deploy

✨  Synthesis time: 7.51s

TestStack: start: Building TestStack Template
TestStack: success: Built TestStack Template
TestStack: start: Publishing TestStack Template (current_account-current_region)
TestStack: success: Published TestStack Template (current_account-current_region)
TestStack: deploying... [1/1]
TestStack: creating CloudFormation changeset...
TestStack | 0/3 | 11:15:24 | REVIEW_IN_PROGRESS   | AWS::CloudFormation::Stack | TestStack User Initiated
TestStack | 0/3 | 11:15:30 | CREATE_IN_PROGRESS   | AWS::CloudFormation::Stack | TestStack User Initiated
TestStack | 0/3 | 11:15:33 | CREATE_IN_PROGRESS   | AWS::SQS::Queue            | TestQueue (TestQueue6F0069AA)
TestStack | 0/3 | 11:15:33 | CREATE_IN_PROGRESS   | AWS::CDK::Metadata         | CDKMetadata/Default (CDKMetadata)
TestStack | 0/3 | 11:15:34 | CREATE_IN_PROGRESS   | AWS::CDK::Metadata         | CDKMetadata/Default (CDKMetadata) Resource creation Initiated
TestStack | 0/3 | 11:15:34 | CREATE_IN_PROGRESS   | AWS::SQS::Queue            | TestQueue (TestQueue6F0069AA) Resource creation Initiated
TestStack | 1/3 | 11:15:34 | CREATE_COMPLETE      | AWS::CDK::Metadata         | CDKMetadata/Default (CDKMetadata)
TestStack | 1/3 | 11:15:35 | CREATE_IN_PROGRESS   | AWS::SQS::Queue            | TestQueue (TestQueue6F0069AA) Eventual consistency check    initiated
TestStack | 1/3 | 11:15:35 | CREATE_IN_PROGRESS   | AWS::CloudFormation::Stack | TestStack Eventual consistency check initiated
TestStack | 2/3 | 11:16:05 | CREATE_COMPLETE      | AWS::SQS::Queue            | TestQueue (TestQueue6F0069AA)
TestStack | 3/3 | 11:16:06 | CREATE_COMPLETE      | AWS::CloudFormation::Stack | TestStack

 ✅  TestStack

✨  Deployment time: 42.49s

Stack ARN:
arn:aws:cloudformation:ap-northeast-1:123456789012:stack/TestStack/eaa3add0-548e-11f0-a59e-0e227aab3e2b

✨  Total time: 50s

PS C:\xxx\rei\test>
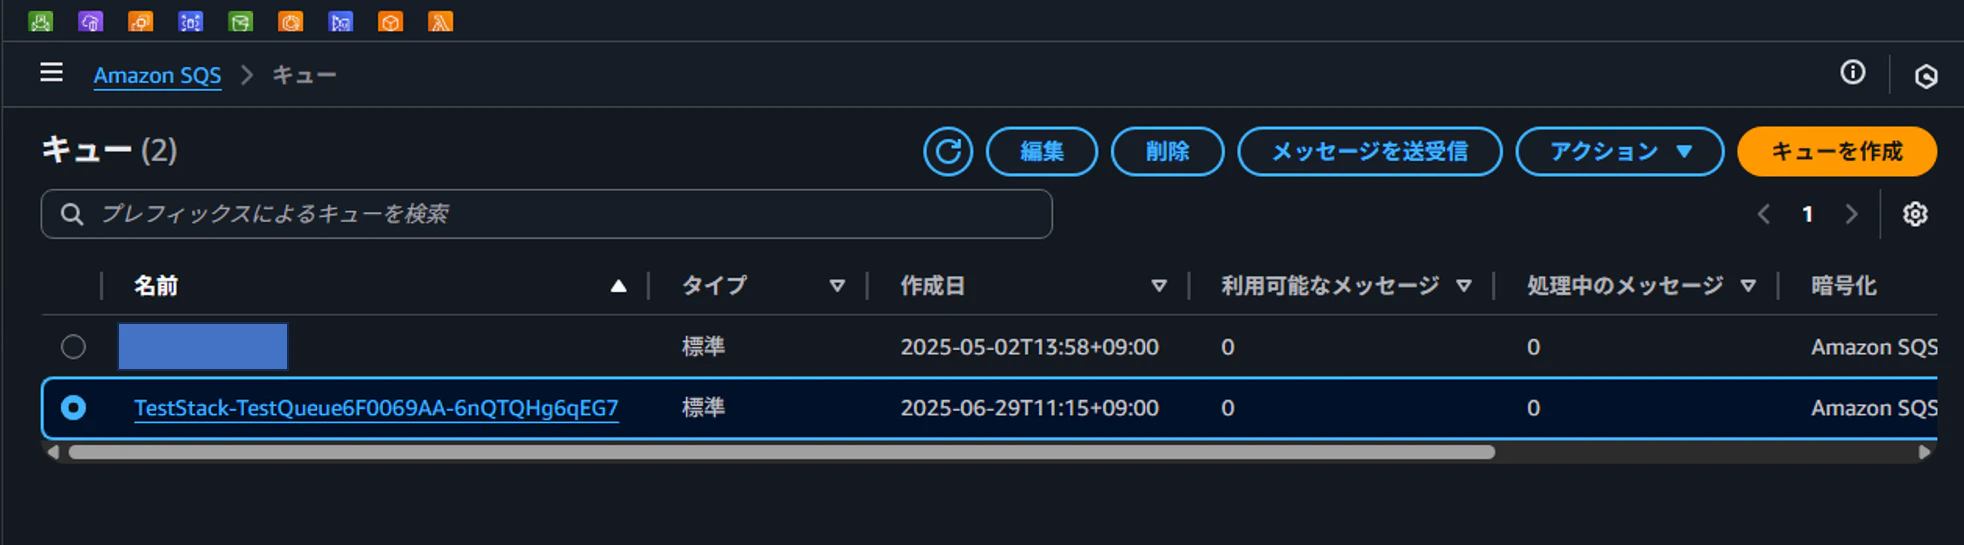
スタックが作成されています!

もちろん作成したSQSキューも作成されています
5. リソースの削除
最後はお片付けするので、スタックを削除するコマンドを実行します。
実行コマンド
cdk destroy
実行ログ
PS C:\xxx\rei\test> cdk destroy
Are you sure you want to delete: TestStack (y/n)? y
TestStack: destroying... [1/1]
TestStack |   0 | 11:20:19 | DELETE_IN_PROGRESS   | AWS::CloudFormation::Stack | TestStack User Initiated
TestStack |   0 | 11:20:21 | DELETE_IN_PROGRESS   | AWS::SQS::Queue            | TestQueue (TestQueue6F0069AA)
TestStack |   0 | 11:20:21 | DELETE_IN_PROGRESS   | AWS::CDK::Metadata         | CDKMetadata/Default (CDKMetadata)
TestStack |   1 | 11:20:22 | DELETE_COMPLETE      | AWS::CDK::Metadata         | CDKMetadata/Default (CDKMetadata)
  1 Currently in progress: TestStack, TestQueue6F0069AA

 ✅  TestStack: destroyed
PS C:\xxx\rei\test>
作成されたスタックのイベントに DELETE_COMPLETE がありますね。

SQSキューも削除されています

おわりに
これでCDK一通り触れるようになりましたね!
説明しきれていない部分も多いので次回のCDKブログをお楽しみに!