みなさん、こんにちは!
Databricks は通常のデータ処理やデータ分析に加え、MLflow の機能が統合されていたり、機械学習まわりに強みがあることが特徴です。
「Databricks で機械学習を扱ってみたいけれどどうすればいいかわからない」「これからはじめて使ってみる」という方を対象に、機械学習のデータ取り込みからモデル登録までをシンプルな例をもとに解説していきます。
※本記事では Azure Databricks を使用しています。
はじめに
今回は例として、有名なアヤメの分類データである iris データセットを読み込み、分類モデルを作成したのち Unity Catalog にモデルの登録を行います。
さっそく、以下で具体的な手順について見ていきましょう。
手順
1. データ取り込み
DBFS の sample フォルダにIris データセットをアップロードした後、ノートブックで以下のプログラムを実行します。
from pyspark.sql.types import *

# 入力ファイルパス
path = "dbfs:/FileStore/tables/sample/iris.csv"

# スキーマ指定
schema = StructType([
    StructField("sepal_length", DoubleType(), False),
    StructField("sepal_width", DoubleType(), False),
    StructField("petal_length", DoubleType(), False),
    StructField("petal_width", DoubleType(), False),
    StructField("species", StringType(), False)
])

# CSVデータ読み込み
iris_sdf = spark.read\
    .format("csv")\
    .options(header="false")\
    .load(path, schema=schema)

display(iris_sdf)
iris データセットのCSVファイルを読み込み、pyspark DataFrame として格納します。
格納されたデータは以下のようになっています。

2. データ変換
以下のコマンドにより、pyspark DataFrame から pandas DataFrame への変換、species の表記修正を行い、describe()で統計情報を表示します。
iris_df = iris_sdf.toPandas()

iris_df.loc[iris_df["species"] == "Iris-setosa", "species"] = "setosa"
iris_df.loc[iris_df["species"] == "Iris-versicolor", "species"] = "versicolor"
iris_df.loc[iris_df["species"] == "Iris-virginica", "species"] = "virginica"

iris_df.describe()

また、以下のコマンドを実行し特徴量の分布を確認してみます。
import seaborn as sns

%matplotlib inline
sns.pairplot(iris_df, hue="species")

Databricks の実行環境にはデータ分析や機械学習で使用する主要なライブラリ(searborn, scikit-learn, mflow等)が標準でインストールされているため、余計な手間なく分析作業を行うことができます。
また、下記コマンドを実行し、モデルの学習用と検証用に分割したデータを準備しておきます。
from sklearn.model_selection import train_test_split

iris_df_list = iris_df.values.tolist()
X = [row[:-1] for row in iris_df_list]
y = [row[-1] for row in iris_df_list]

# 学習用と検証用にデータを分割
X_train, X_test, y_train, y_test = train_test_split(X, y, test_size=0.2, random_state=0)
今回は species を予測対象にしたいので、species が y、それ以外は X とします。
取得した X, y をもとに学習用と検証用のデータを作成しておきます。
3. モデル作成
以下を実行し、モデルの作成と記録を行います。
import mlflow
from mlflow.models.signature import infer_signature
from sklearn.ensemble import RandomForestClassifier

def train_model(n_estimators, max_depth):
    # モデルの定義
    model = RandomForestClassifier(
        n_estimators=n_estimators,
        max_depth=max_depth,
        criterion="gini",
        random_state=0,
    )

    # 訓練
    model.fit(X_train, y_train)

    # 評価
    score = model.score(X_test, y_test)

    return model, score

# MLflow の記録開始
with mlflow.start_run(run_name="iris_untuned_random_forest"):
    # モデルの学習
    n_estimators = 10
    max_depth = 5
    model, score = train_model(n_estimators, max_depth)
    print(f"n_estimators: {n_estimators}, max_depth: {max_depth}, score: {score}")

    # シグネチャ取得
    signature = infer_signature(X_train, model.predict_proba(X_train)[:,1])

    # 記録保存
    mlflow.log_param("n_estimators", n_estimators)
    mlflow.log_param("max_depth", max_depth)
    mlflow.log_metric("score", score)
    mlflow.sklearn.log_model(model, "model", signature=signature)
コードについて解説します。
まず、上記コードではモデル学習用の関数train_modelを定義しています。与えられたn_estimatorsとmax_depthをもとに機械学習モデル(今回はランダムフォレスト分類器)の学習と評価を行い、パラメータとスコアを返す関数です。
mlflow.start_run()のwithブロックが処理の本体となっており、パラメータn_estimatorsとmax_depthをtrain_model関数に与え、結果を取得します。
シグネチャはモデルの入力と出力の仕様であり、モデル登録用に取得しています。
ブロックの最後ではパラメータやメトリクスをまとめて記録しています。
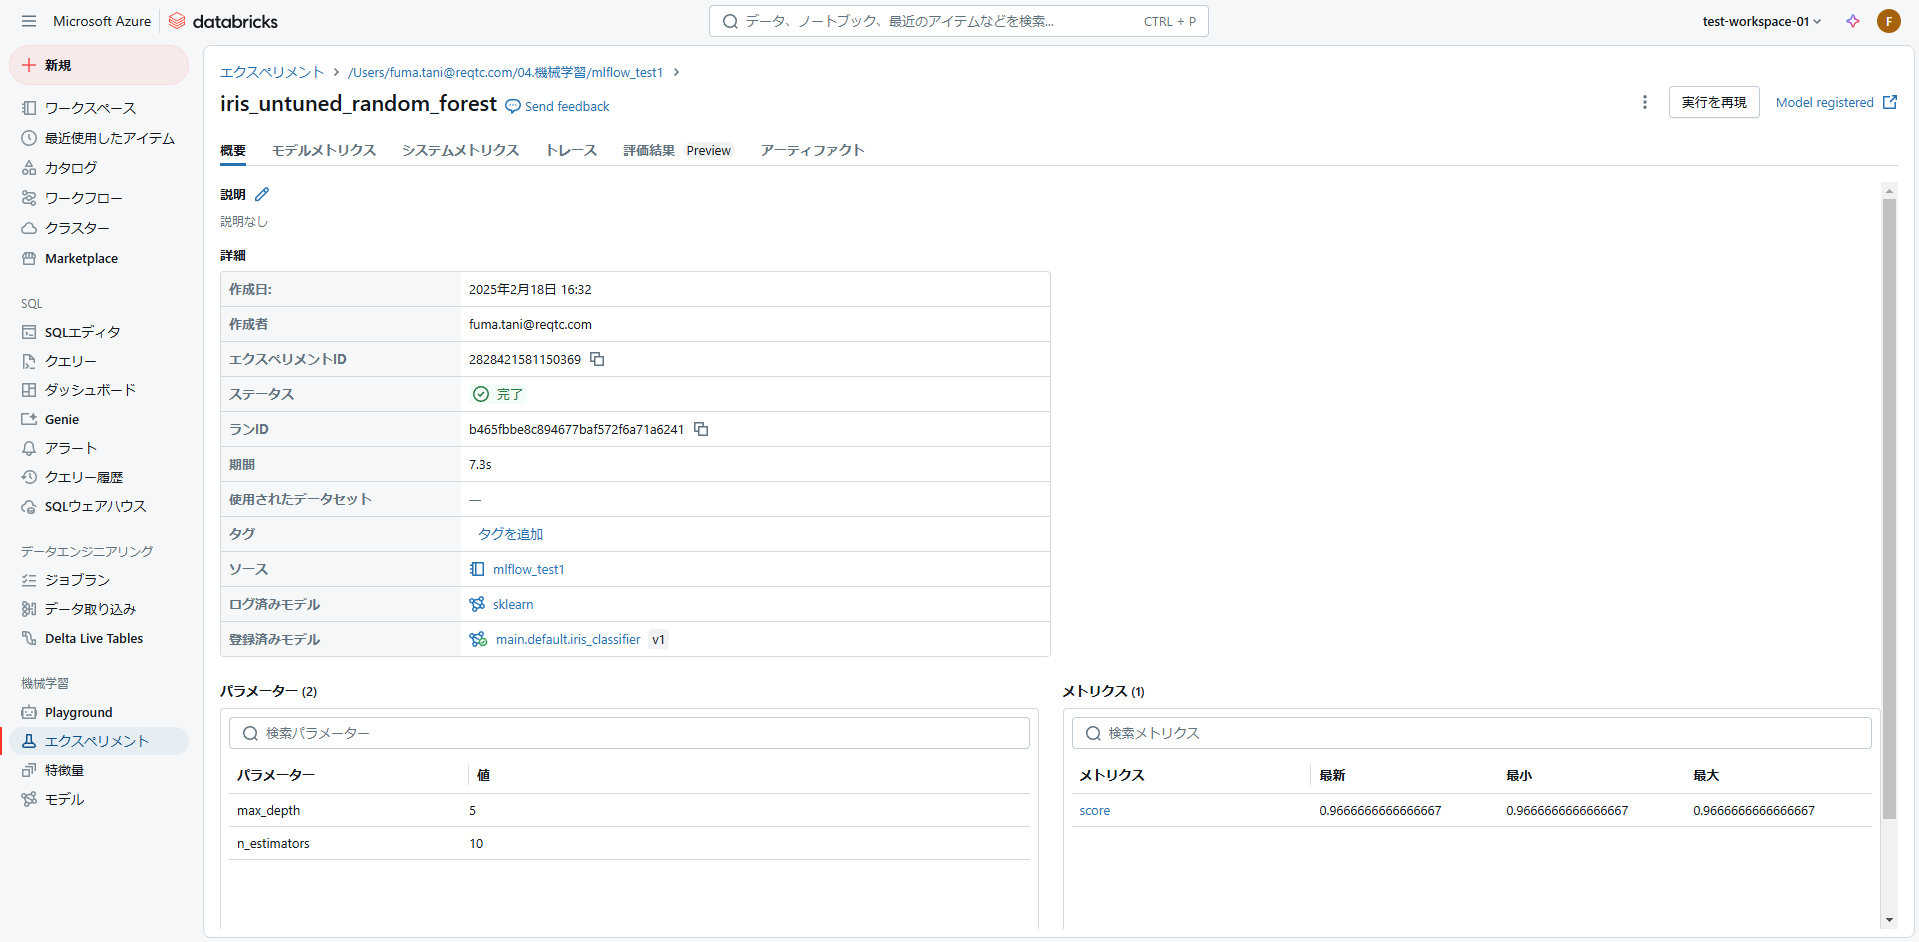
Databricks には MLflow の機能が統合されており、メニューの「エクスペリメント」から上記を実行した結果の詳細を確認することができます。
4. モデル登録
以下のコマンドでMLパイプラインの run_id を取得し、Unity Catalog にモデルを登録することができます。
※Unity Catalog にモデルを登録するためには、アタッチしたクラスターで Unity Catalog が有効化されている必要があるためご注意ください。
run_id = mlflow.search_runs(filter_string='tags.mlflow.runName = "iris_untuned_random_forest"').iloc[0].run_id
import time

# Unity Catalog にモデルを登録
mlflow.set_registry_uri("databricks-uc")
model_name = f"main.default.iris_classifier"
model_version = mlflow.register_model(f"runs:/{run_id}/model", model_name)

time.sleep(15)
登録したモデルはメニューの「モデル」から確認することができます。
モデルの管理画面で表示されたリンクをクリックすると、下記のようにカタログ画面が開きモデルの詳細情報を確認できます。

さいごに
機械学習に関して、データ取り込みからモデル登録までの一連の流れをシンプルな例とともに見てきました。
今回ご紹介した内容以外にも、Databricks では機械学習まわりの様々な機能をサポートしています。下記の公式チュートリアルも参考に、いろいろと試してみてください。
チュートリアル: AI と機械学習の概要 | Databricks Documentation
本記事が Databricks における機械学習の理解の一助となれば幸いです。