MVVM LightにはXamarin.Androidのテンプレートはあるけど、データバインディングが手書きの上コードビハインドだらけなので、Formsを利用したい。でも公式ページ通りに導入しても必要なLocatorクラスなどを自動生成してくれない。よって今回は手動で導入する手順をまとめました。
1. NuGetからMVVM Lightをインストールする
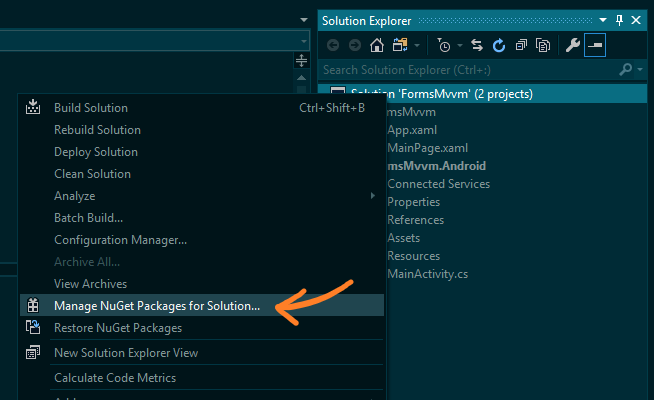
まずはソリューションを右クリック、「ソリューションのNuGetパッケージを管理」を選択します。

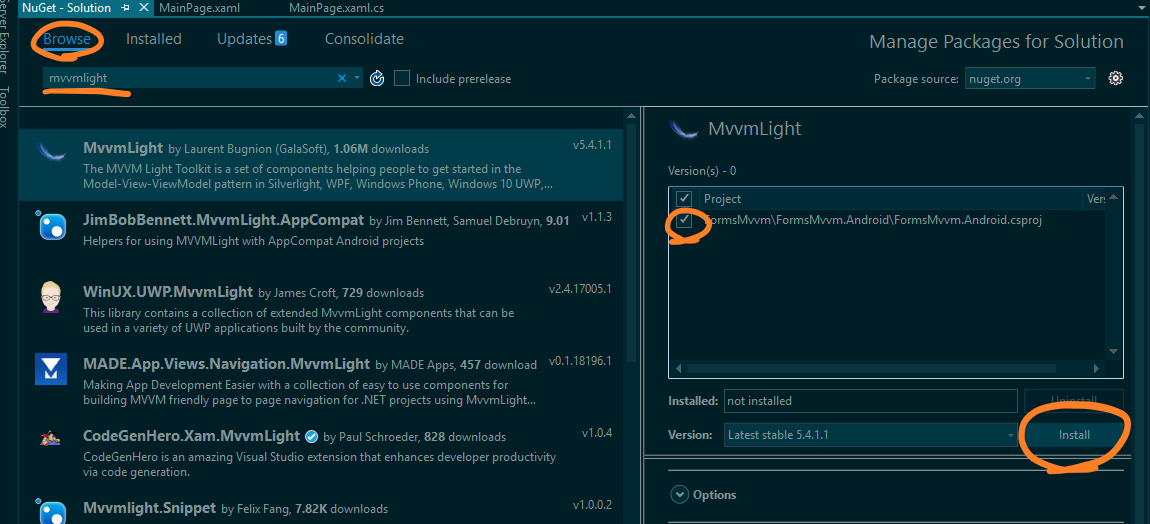
「mvvmlight」で検索、全プロジェクトにチェックを入れてインストールします。
ここではAndroidしかないがiOS, UWP等ある場合も同様です。

規約承認などをして出力ウィンドウに===Finished===と出たら完了です。
必要なファイルの作成
まずはMainViewModelから。ここではMVVM関係のファイルはMvvm名前空間に入れてあります。
時刻を表示するためのサンプルです。
using System;
using System.Threading.Tasks;
using GalaSoft.MvvmLight;
using GalaSoft.MvvmLight.Threading;

namespace FormsMvvm.Mvvm
{
    public class MainViewModel : ViewModelBase
    {
        private bool _runClock;

        private string _clock;
        public string Clock
        {
            get
            {
                return _clock;
            }
            set
            {
                Set(ref _clock, value);
            }
        }


        public MainViewModel()
        {
            StartClock();
        }

        public void StartClock()
        {
            _runClock = true;

            Task.Run(
                async () =>
                {
                    while (_runClock)
                    {
                        DispatcherHelper.CheckBeginInvokeOnUI(
                            () =>
                            {
                                Clock = DateTime.Now.ToString("HH:mm:ss");
                            });

                        await Task.Delay(1000);
                    }
                });
        }

        public void StopClock()
        {
            _runClock = false;
        }
    }
}
次にViewModelLocator。通常はコンストラクターでModelのなにやらを記述しますが、今回は省略。(今度書き足します)
using System.Diagnostics.CodeAnalysis;
using GalaSoft.MvvmLight.Ioc;
using CommonServiceLocator;

namespace FormsMvvm.Mvvm
{
    public class ViewModelLocator
    {
        [SuppressMessage("Microsoft.Performance",
            "CA1822:MarkMembersAsStatic",
            Justification = "This non-static member is needed for data binding purposes.")]
        public MainViewModel Main
        {
            get
            {
                return ServiceLocator.Current.GetInstance<MainViewModel>();
            }
        }

        public static bool UseDesignTimeData
        {
            get
            {
                return false;
            }
        }

        static ViewModelLocator()
        {
            ServiceLocator.SetLocatorProvider(() => SimpleIoc.Default);

            SimpleIoc.Default.Register<MainViewModel>();
        }

        public static void Cleanup()
        {
        }
    }
}
xaml上でViewModelLocatorを参照できるようにするために、App.xamlにViewModelLocatorを配置します。
<?xml version="1.0" encoding="utf-8" ?>
<Application xmlns="http://xamarin.com/schemas/2014/forms"
             xmlns:x="http://schemas.microsoft.com/winfx/2009/xaml"
             x:Class="FormsMvvm.App"
             xmlns:vm="clr-namespace:FormsMvvm.Mvvm"> <!--ここと-->
	<Application.Resources>
        <vm:ViewModelLocator x:Key="Locator" /> <!--ここ-->
    </Application.Resources>
</Application>
最後にDispatcherHelperの初期化をApp.xaml.csのコンストラクタで行います。
DispatcherHelper.Initialize();
これにて導入完了です。
データバインディングする
これでようやくxamlから簡単にデータバインディングできるようになりました。
DataContextではなくBindingContextにLocatorをバインドします。そのためWPFと違いIntelliSenseでプロパティ名などを補完してくれません...
<?xml version="1.0" encoding="utf-8" ?>
<ContentPage xmlns="http://xamarin.com/schemas/2014/forms"
             xmlns:x="http://schemas.microsoft.com/winfx/2009/xaml"
             xmlns:d="http://schemas.microsoft.com/expression/blend/2008"
             xmlns:local="clr-namespace:Exp_XamarinMvvmForms"
             xmlns:fab="clr-namespace:FuryTechs.FloatingActionButton;assembly=FuryTechs.FloatingActionButton"
             xmlns:androidWidget="clr-namespace:Android.Widget;assembly=Mono.Android;targetPlatform=Android"
             x:Class="Exp_XamarinMvvmForms.MainPage"

             BindingContext="{Binding Main, Source={StaticResource Locator}}"> <!--これを忘れずに-->
    <StackLayout>
        <Label Text="{Binding Clock}"
               FontSize="70" />
    </StackLayout>
</ContentPage>