前書き
初心者向けに自分なりの言葉で柔らかく書いたつもりです。非エンジニアですが、メモ目的とアウトプットの恩恵のために記事にしました。間違っているところなどありましたら、コメントをください。
あとコードにコメントが多く可読性が悪いかもしれません。そこは申し訳なく…
iosからAWSまでの一連の流れを記事にしているためかなり長くなっているので、記事を分けて書いています。
- RailsとiOS(Swift)とAWS間をAPI通信で、データファイル保存させるまで①devise token auth編
- RailsとiOS(Swift)とAWS間をAPI通信で、データファイル保存させるまで③Alamofire、Swiftyjson編 apiモードを使ってdevise_token_auth(認証)以外のデータの送受信
- RailsとiOS(Swift)とAWS間をAPI通信で、データファイル保存させるまで④carrierwave編
③までのものがこちら
https://github.com/ToruMizuno/railswiftapi
④までのものがこちら
https://github.com/ToruMizuno/railswiftapi2
Alamofire、Swiftyjson編
参考記事
- Swift3とAlamofireでPDFファイルをダウンロードしてReaderで表示する
- 【Swift3.0】Alamofireで画像&パラメータを送信
- AlmofireとSwiftyJSONで天気アプリ
- SwiftyJSONをクラスオブジェクトで初期化する(Swiftにおけるリフレクション)
- SwiftyJson,Alamofireを使用した際、データを配列に入れる処理について
- Swift時代の定番通信ライブラリのAlamofireを使ってみる #Swift4対応
- [Ios] スイフトのパラメータを使用して画像をアップロードする
devise_token_auth(認証)のデータの送受信
プロジェクト作成
いつも通りXcodeを開いて、Create a new Xcode projectで新規のプロジェクトを作成する
cocoapodsの作成
cocoapodsの環境構築はRubyやRails、Xcodeの環境構築と同様に割愛します。
$ cd desktop/railswiftiOS
$ pod init
podfile編集
# Uncomment the next line to define a global platform for your project
# platform :ios, '9.0'

target 'プロジェクト名' do
  # Comment the next line if you're not using Swift and don't want to use dynamic frameworks
  use_frameworks!

  # Pods for 'プロジェクト名'
  pod 'Alamofire', '~> 4.5'
  pod 'SwiftyJSON'

  target 'プロジェクト名Tests' do
    inherit! :search_paths
    # Pods for testing
  end

  target 'プロジェクト名UITests' do
    inherit! :search_paths
    # Pods for testing
  end

end
ライブラリー導入
$ pod install
**********.xcworkspaceファイル(青いファイルではなく白いファイル)を使用して開発していく
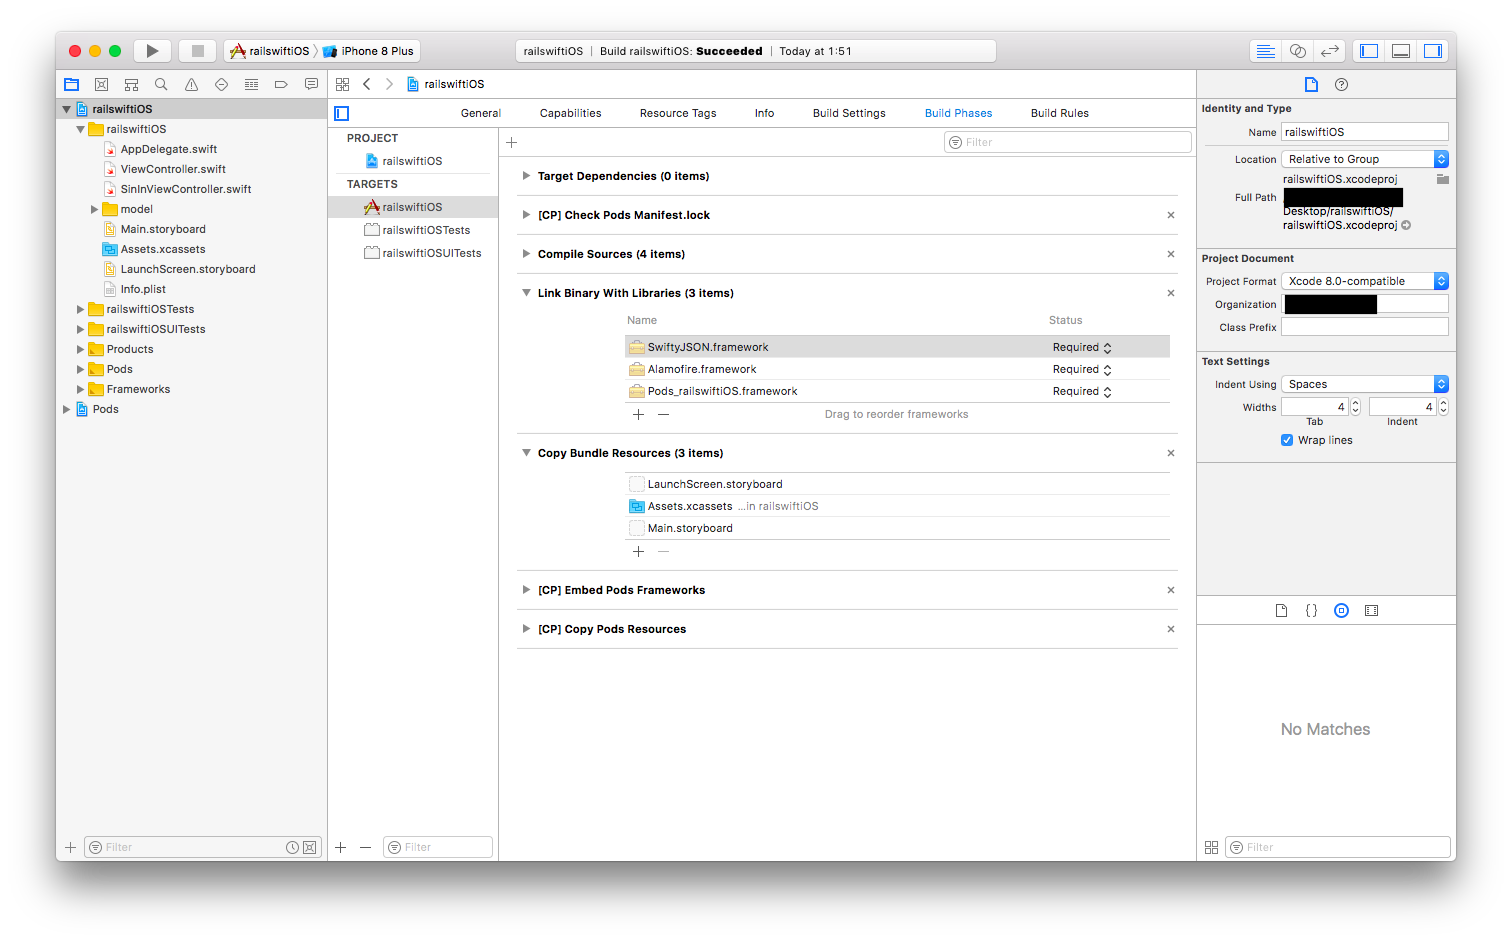
TARGETS、Build Phases、Link Binary With LibrariesよりSwiftJSONとAlamofireのライブラリーを導入する
導入後エラーが出る場合はこちらの記事で対処
No such No such module”Alamofire”の対処記録
簡単にいうとProductのCleanをする。それでも解消されない場合はProductのBuild後Xcodeを再起動する。
パラメータの保存先
とりあえずユーザー名や自己紹介文よりも、アカウントのIDさえ取ってこれてさえいれば、データベースに問い合わせる際に検索で使えるのでIDは保存できるようにする
新しく.swiftファイルを作成
import UIKit

class Webuser: NSObject {
    var web_user_id: Int = 0//プロパティ
}
画面間でパラメータを渡せるように準備
import UIKit

@UIApplicationMain
class AppDelegate: UIResponder, UIApplicationDelegate {

    var window: UIWindow?

    //追加
    var accesstoken: String!
    var client: String!
    var uid: String!
    var webuser: Webuser!
    //////////////////////////////////

    func application(_ application: UIApplication, didFinishLaunchingWithOptions launchOptions: [UIApplicationLaunchOptionsKey: Any]?) -> Bool {
        // Override point for customization after application launch.
        return true
    }
*
*
*
}
ライブラリーをimportする
import UIKit
import Alamofire
import SwiftyJSON
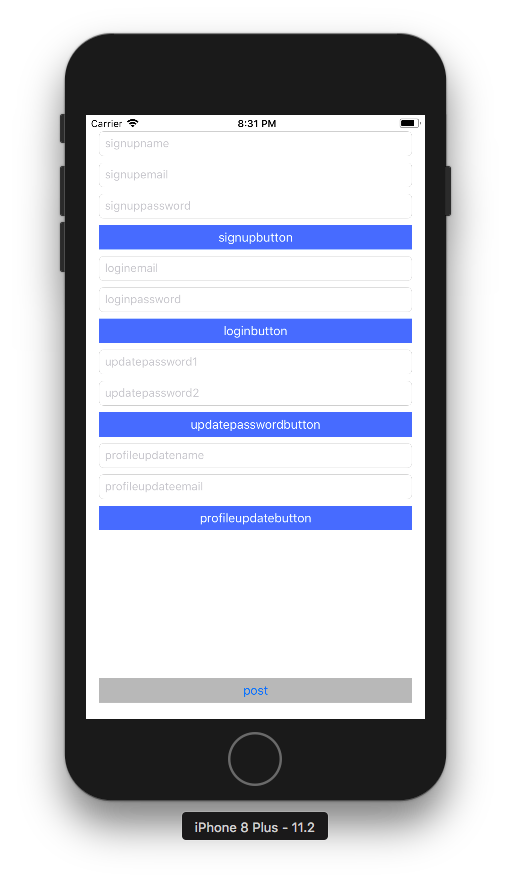
ストーリーボードとの接続とパラメータ用の変数の用意
    @IBOutlet weak var signupname: UITextField!
    @IBOutlet weak var signupemail: UITextField!
    @IBOutlet weak var signuppassword: UITextField!

    @IBOutlet weak var loginemail: UITextField!
    @IBOutlet weak var loginpassword: UITextField!

    @IBOutlet weak var updatepassword1: UITextField!
    @IBOutlet weak var updatepassword2: UITextField!

    @IBOutlet weak var profileupdatename: UITextField!
    @IBOutlet weak var profileupdateemail: UITextField!


    //これらは取得したらすぐにAppDelegateにあげるのが望ましい
    var accesstoken: String!
    var client: String!
    var uid:String!

    //このページで通信して保存や呼び出しをするのに、一旦待機させたいので作っている
    var webuserid: Int!
サインアップ
localhost:3000/api/authにPOST
@IBAction func signupbutton(_ sender: Any) {

    //パラメーターを辞書で入れていく//左辺がカラム名、右辺が値
    var params: [String: String] = [:]
    params["user_name"] = signupname.text!
    params["email"] = signupemail.text!
    params["password"] = signuppassword.text!

    Alamofire.request("http://localhost:3000/api/auth", method: .post, parameters: params).responseJSON { response in
        print("Request: \(String(describing: response.request))")
        print("Response: \(String(describing: response.response))")
        print("Error: \(String(describing: response.error))")

        //エラーがなかった場合
        if response.response?.statusCode == 200 {

            //responseからヘッダー情報を取り出して変数に保存する
            self.accesstoken = (response.response?.allHeaderFields["access-token"] as? String)!
            self.client = (response.response?.allHeaderFields["client"] as? String)!
            self.uid = (response.response?.allHeaderFields["uid"] as? String)!

            //通信後にこれらの情報を取ってこれていた場合は
            if self.accesstoken != nil && self.client != nil && self.uid != nil {
                print("webuser保存に成功しました")

                //responseから保存したアカウントデータのIDを抜き出す
                let json:JSON = JSON(response.result.value ?? kill)
                json.forEach { (arg) in
                    let (_, json) = arg
                    self.webuserid = json["id"].intValue
                }

                let webuserid: Int = self.webuserid//optionalをintに変換
                let accesstoken: String = self.accesstoken//optionalをintに変換
                let client: String = self.client//optionalをintに変換
                let uid: String = self.uid//optionalをintに変換

                print("accesstoken: \(String(describing: accesstoken))")
                print("client: \(String(describing: client))")
                print("uid: \(String(describing: uid))")
                print("WebuserID: \(String(describing: webuserid))")

                let webuser = Webuser()
                //パラメーターセット
                webuser.web_user_id = webuserid

                //appDelegateに上げる
                let appDelegate = UIApplication.shared.delegate as! AppDelegate
                appDelegate.webuser = webuser
                appDelegate.accesstoken = accesstoken
                appDelegate.client = client
                appDelegate.uid = uid

            }

            //エラーがあった場合
        } else {
            print("Error: \(String(describing: response.error))")
        }

    }
}
ログイン
localhost:3000/api/auth/sign_inにPOST
@IBAction func loginbutton(_ sender: Any) {
    //パラメーターを辞書で入れていく//左辺がカラム名、右辺が値
    var params: [String: String] = [:]
    params["email"] = loginemail.text!
    params["password"] = loginpassword.text!

    Alamofire.request("http://localhost:3000/api/auth/sign_in", method: .post, parameters: params).responseJSON { response in
        print("Request: \(String(describing: response.request))")
        print("Response: \(String(describing: response.response))")
        print("Error: \(String(describing: response.error))")

        //エラーがなかった場合
        if response.response?.statusCode == 200 {

            //responseからヘッダー情報を取り出して変数に保存する
            self.accesstoken = (response.response?.allHeaderFields["access-token"] as? String)!
            self.client = (response.response?.allHeaderFields["client"] as? String)!
            self.uid = (response.response?.allHeaderFields["uid"] as? String)!

            //通信後にこれらの情報を取ってこれていた場合は
            if self.accesstoken != nil && self.client != nil && self.uid != nil {

                //responseからとって来たアカウントのデータのIDを抜き出す
                let json:JSON = JSON(response.result.value ?? kill)
                json.forEach { (arg) in
                    let (_, json) = arg
                    self.webuserid = json["id"].intValue
                }

                let webuserid: Int = self.webuserid//optionalをintに変換
                let accesstoken: String = self.accesstoken//optionalをstringに変換
                let client: String = self.client//optionalをstringに変換
                let uid: String = self.uid//optionalをstringに変換

                print("WebuserID: \(String(describing: webuserid))")
                print("accesstoken: \(String(describing: accesstoken))")
                print("client: \(String(describing: client))")
                print("uid: \(String(describing: uid))")

                let webuser = Webuser()
                //パラメーターセット
                webuser.web_user_id = webuserid

                //appDelegateに上げる
                let appDelegate = UIApplication.shared.delegate as! AppDelegate
                appDelegate.webuser = webuser
                appDelegate.accesstoken = accesstoken
                appDelegate.client = client
                appDelegate.uid = uid

            }
            //エラーがあった場合何度か通信を試みてみる
        } else {

            //何度か通信を試みてみる

            print("Error: \(String(describing: response.error))")
        }

    }
}
パスワードの変更
localhost:3000/api/auth/passwordにPUT
サインアップかログインしていないとaccesstoken、client、uidが取得できてないので使えない
@IBAction func updatepasswordbutton(_ sender: Any) {
    //パラメーターを辞書で入れていく//左辺がカラム名、右辺が値
    var params: [String: String] = [:]
    params["password"] = updatepassword1.text!
    params["password_confirmation"] = updatepassword1.text!

    //ログインやサインアップでこれらの情報を取ってこれていた場合は
    if self.accesstoken != nil && self.client != nil && self.uid != nil {

        //取り出したトークン情報をヘッダーに格納
        var headers: [String : String] = [:]
        headers["access-token"] = self.accesstoken
        headers["client"] = self.client
        headers["uid"] = self.uid

        print("Request: \(String(describing: self.accesstoken))")
        print("Request: \(String(describing: self.client))")
        print("Request: \(String(describing: self.uid))")

        Alamofire.request("http://localhost:3000/api/auth/password", method: .put, parameters: params, headers: headers).responseJSON { response in
            print("Request: \(String(describing: response.request))")
            print("Response: \(String(describing: response.response))")
            print("Error: \(String(describing: response.error))")

            //アクセスできた場合
            if response.response?.statusCode == 200 {
                print("パスワード変更にアクセスできました")

                //アクセスできなかった場合
            } else {

                //何度か通信を試みてみる

                print("パスワード変更にアクセスできませんでした")

            }

        }

        //ヘッダー情報を取ってこれていなかった場合
    } else {

        //ログインしていないと警告を出す

    }

}
ユーザー情報の変更
localhost:3000/api/authに PUT
こちらも同様にサインアップかログインしていないとaccesstoken、client、uidが取得できてないので使えない
@IBAction func profileupdatebutton(_ sender: Any) {

    //パラメーターを辞書で入れていく//左辺がカラム名、右辺が値
    var params: [String: String] = [:]
    params["user_name"] = profileupdatename.text!
    params["email"] = profileupdateemail.text!

    //ログインやサインアップでこれらの情報を取ってこれていた場合は
    if self.accesstoken != nil && self.client != nil && self.uid != nil {

        //取り出したトークン情報をヘッダーに格納
        var headers: [String : String] = [:]
        headers["access-token"] = self.accesstoken
        headers["client"] = self.client
        headers["uid"] = self.uid

        print("Request: \(String(describing: self.accesstoken))")
        print("Request: \(String(describing: self.client))")
        print("Request: \(String(describing: self.uid))")

        Alamofire.request("http://localhost:3000/api/auth", method: .put, parameters: params, headers: headers).responseJSON { response in
            print("Request: \(String(describing: response.request))")
            print("Response: \(String(describing: response.response))")
            print("Error: \(String(describing: response.error))")

            //アクセスできた場合(更新ができた場合)
            if response.response?.statusCode == 200 {
                print("パスワード以外の変更にアクセスできました")
                print("webuserの更新に成功しました")

                //更新したwebuserのIDを抜き出す

                //responseから保存したアカウントデータのIDを抜き出す
                let json:JSON = JSON(response.result.value ?? kill)
                json.forEach { (arg) in
                    let (_, json) = arg
                    self.webuserid = json["id"].intValue

                }
                //アクセスできたら、再びアクセストークンなどをレスポンスから取り出す必要がある
                //responseからヘッダー情報を取り出して変数に保存する
                self.accesstoken = (response.response?.allHeaderFields["access-token"] as? String)!
                self.client = (response.response?.allHeaderFields["client"] as? String)!
                self.uid = (response.response?.allHeaderFields["uid"] as? String)!

                let webuserid: Int = self.webuserid//optionalをintに変換
                let accesstoken: String = self.accesstoken//optionalをStringに変換
                let client: String = self.client//optionalをStringに変換
                let uid: String = self.uid//optionalをStringに変換

                print("accesstoken: \(String(describing: accesstoken))")
                print("client: \(String(describing: client))")
                print("uid: \(String(describing: uid))")
                print("WebuserID: \(String(describing: webuserid))")

                let webuser = Webuser()
                //パラメーターセット
                webuser.web_user_id = webuserid

                //appDelegateに上げる
                let appDelegate = UIApplication.shared.delegate as! AppDelegate
                appDelegate.webuser = webuser
                appDelegate.accesstoken = accesstoken
                appDelegate.client = client
                appDelegate.uid = uid

                //変更にアクセスできなかった場合
            } else {

                print("変更にアクセスできませんでした")

            }

        }

        //ヘッダー情報を取ってこれていなかった場合
    } else {

        //ログインしていないと警告を出す

    }

}
The resource could not be loaded because the App Transport Security policy requires the use of a secure connection.などとエラーが出る場合はssl通信(https)の設定がされていないので下記の記事で対処
- iOS9のWebviewでNSURLErrorDomainとなる場合の対処法(ATS)
- 【Swift4】App Transport Security(ATS)のエラーが出た場合の対処方法【Objective-C】【Xcode9】
Alamofire、Swiftyjson編、続き
記事の初めにも記述しましたが、iosからAWSまでの一連の流れを記事にしているためかなり長くなってしまったので他の記事でも紹介しています。
こちらを続けてご覧下さい。