背景??
CoreMLとは、iPhoneやMac上で動く機械学習ライブラリです。
このライブラリが優れているのは、端末内で機械学習を行えるだけではなく、
TensorFlowやPytorchのモデルを変換してスマホに搭載することもできるんですね。
モデルの変換にはCoremltoolsというものを使います。公式のサイトのチュートリアルを見れば、
変換するところまでは簡単です。しかし、今回、変換させたCoreMLが正しい分類結果を出してくれずに
数日間悩んだので、解決策を載せておきます。
ハマったのは以下の点です。
- 分類における確率が「1100%」とかとんでもない値になる
- PyTorchのモデルで分類したときの結果と一致しない
- 変換できたけれどSwiftUIでエラーが出て動かない
PyTorchのモデル → CoreMLのモデル
公式のサイトのPyTorch conversionの項目通りにいくとこんな感じ。
たとえば、MobileNetのpre-trained modelを変換する場合...
- モデルをダウンロードする
- 推論モードにする --> CoreMLではdrop outが無効化されるからとのことです
- モデルのトレースとinput sizeを記載してct.convertする
- 名前をつけて保存
import torch
import torchvision
import coremltools as ct

# Load a pre-trained version of MobileNetV2
torch_model = torchvision.models.mobilenet_v2(pretrained=True)
# Set the model in evaluation mode.
torch_model.eval()

# Trace the model with random data.
example_input = torch.rand(1, 3, 224, 224)
traced_model = torch.jit.trace(torch_model, example_input)
out = traced_model(example_input)

# Using image_input in the inputs parameter:
# Convert to Core ML neural network using the Unified Conversion API.
model = ct.convert(
    traced_model,
    inputs=[ct.TensorType(shape=example_input.shape)]
 )

# Save the converted model.
model.save("newmodel.mlmodel")
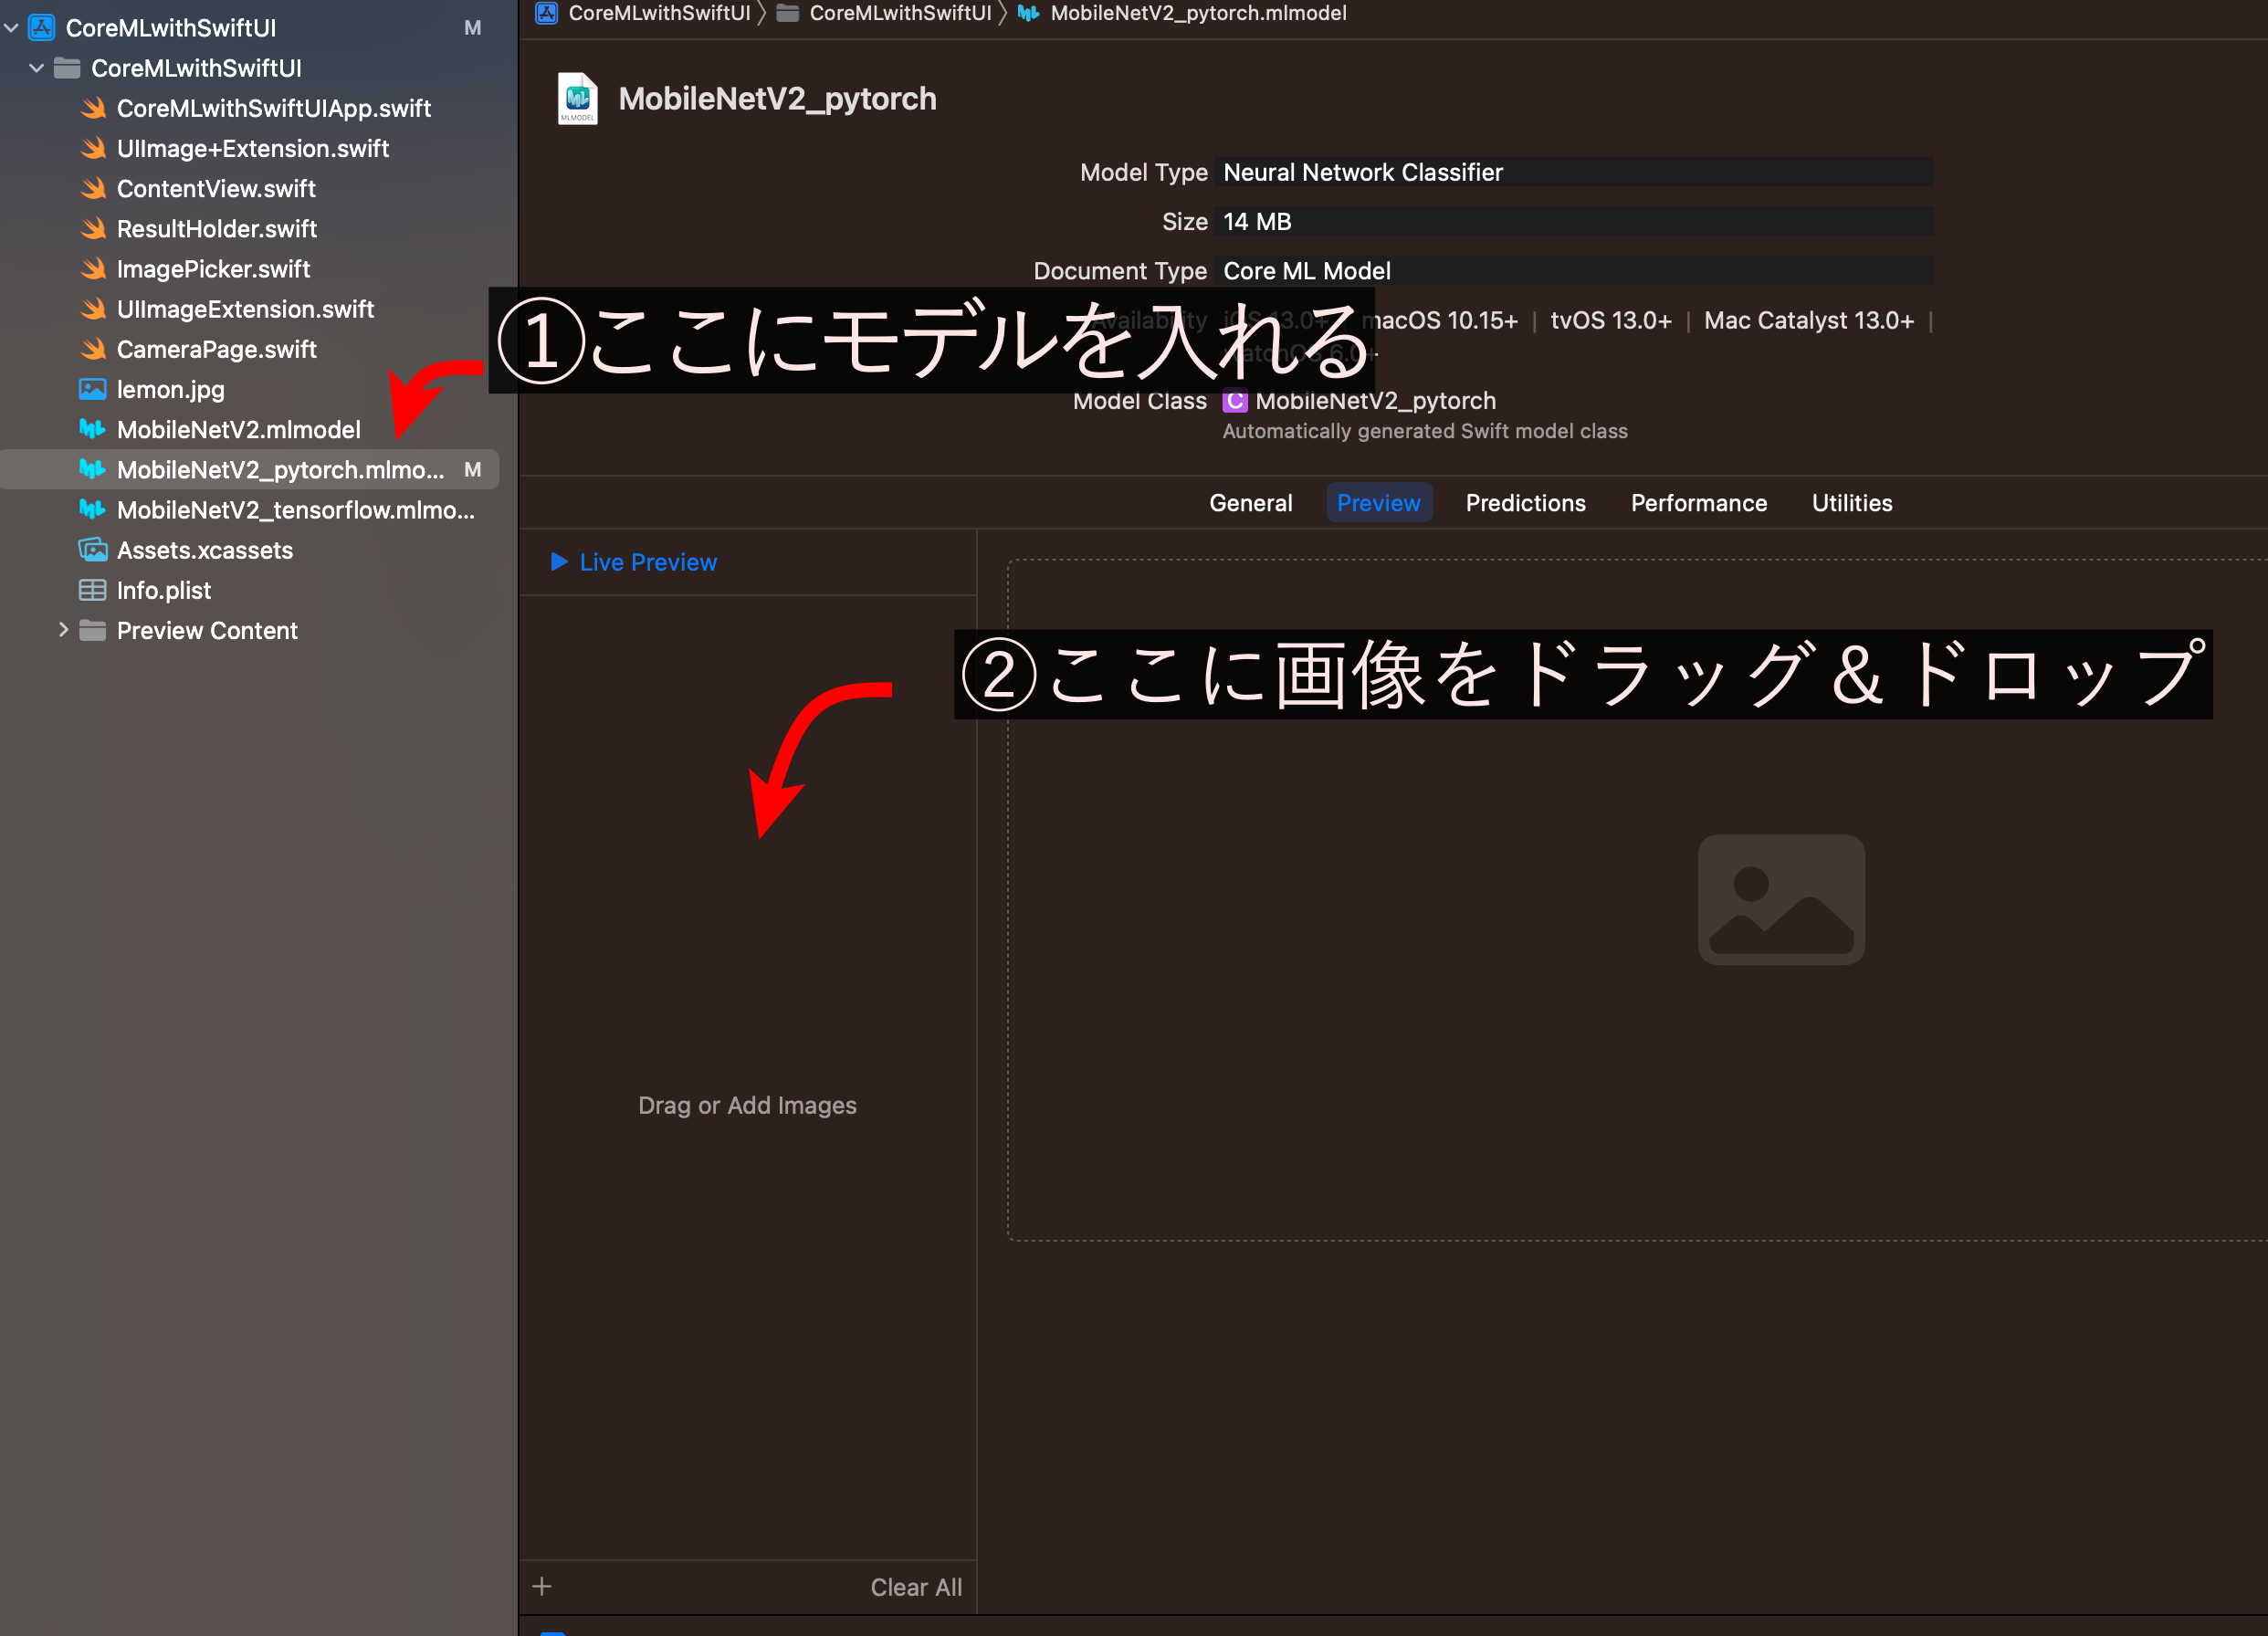
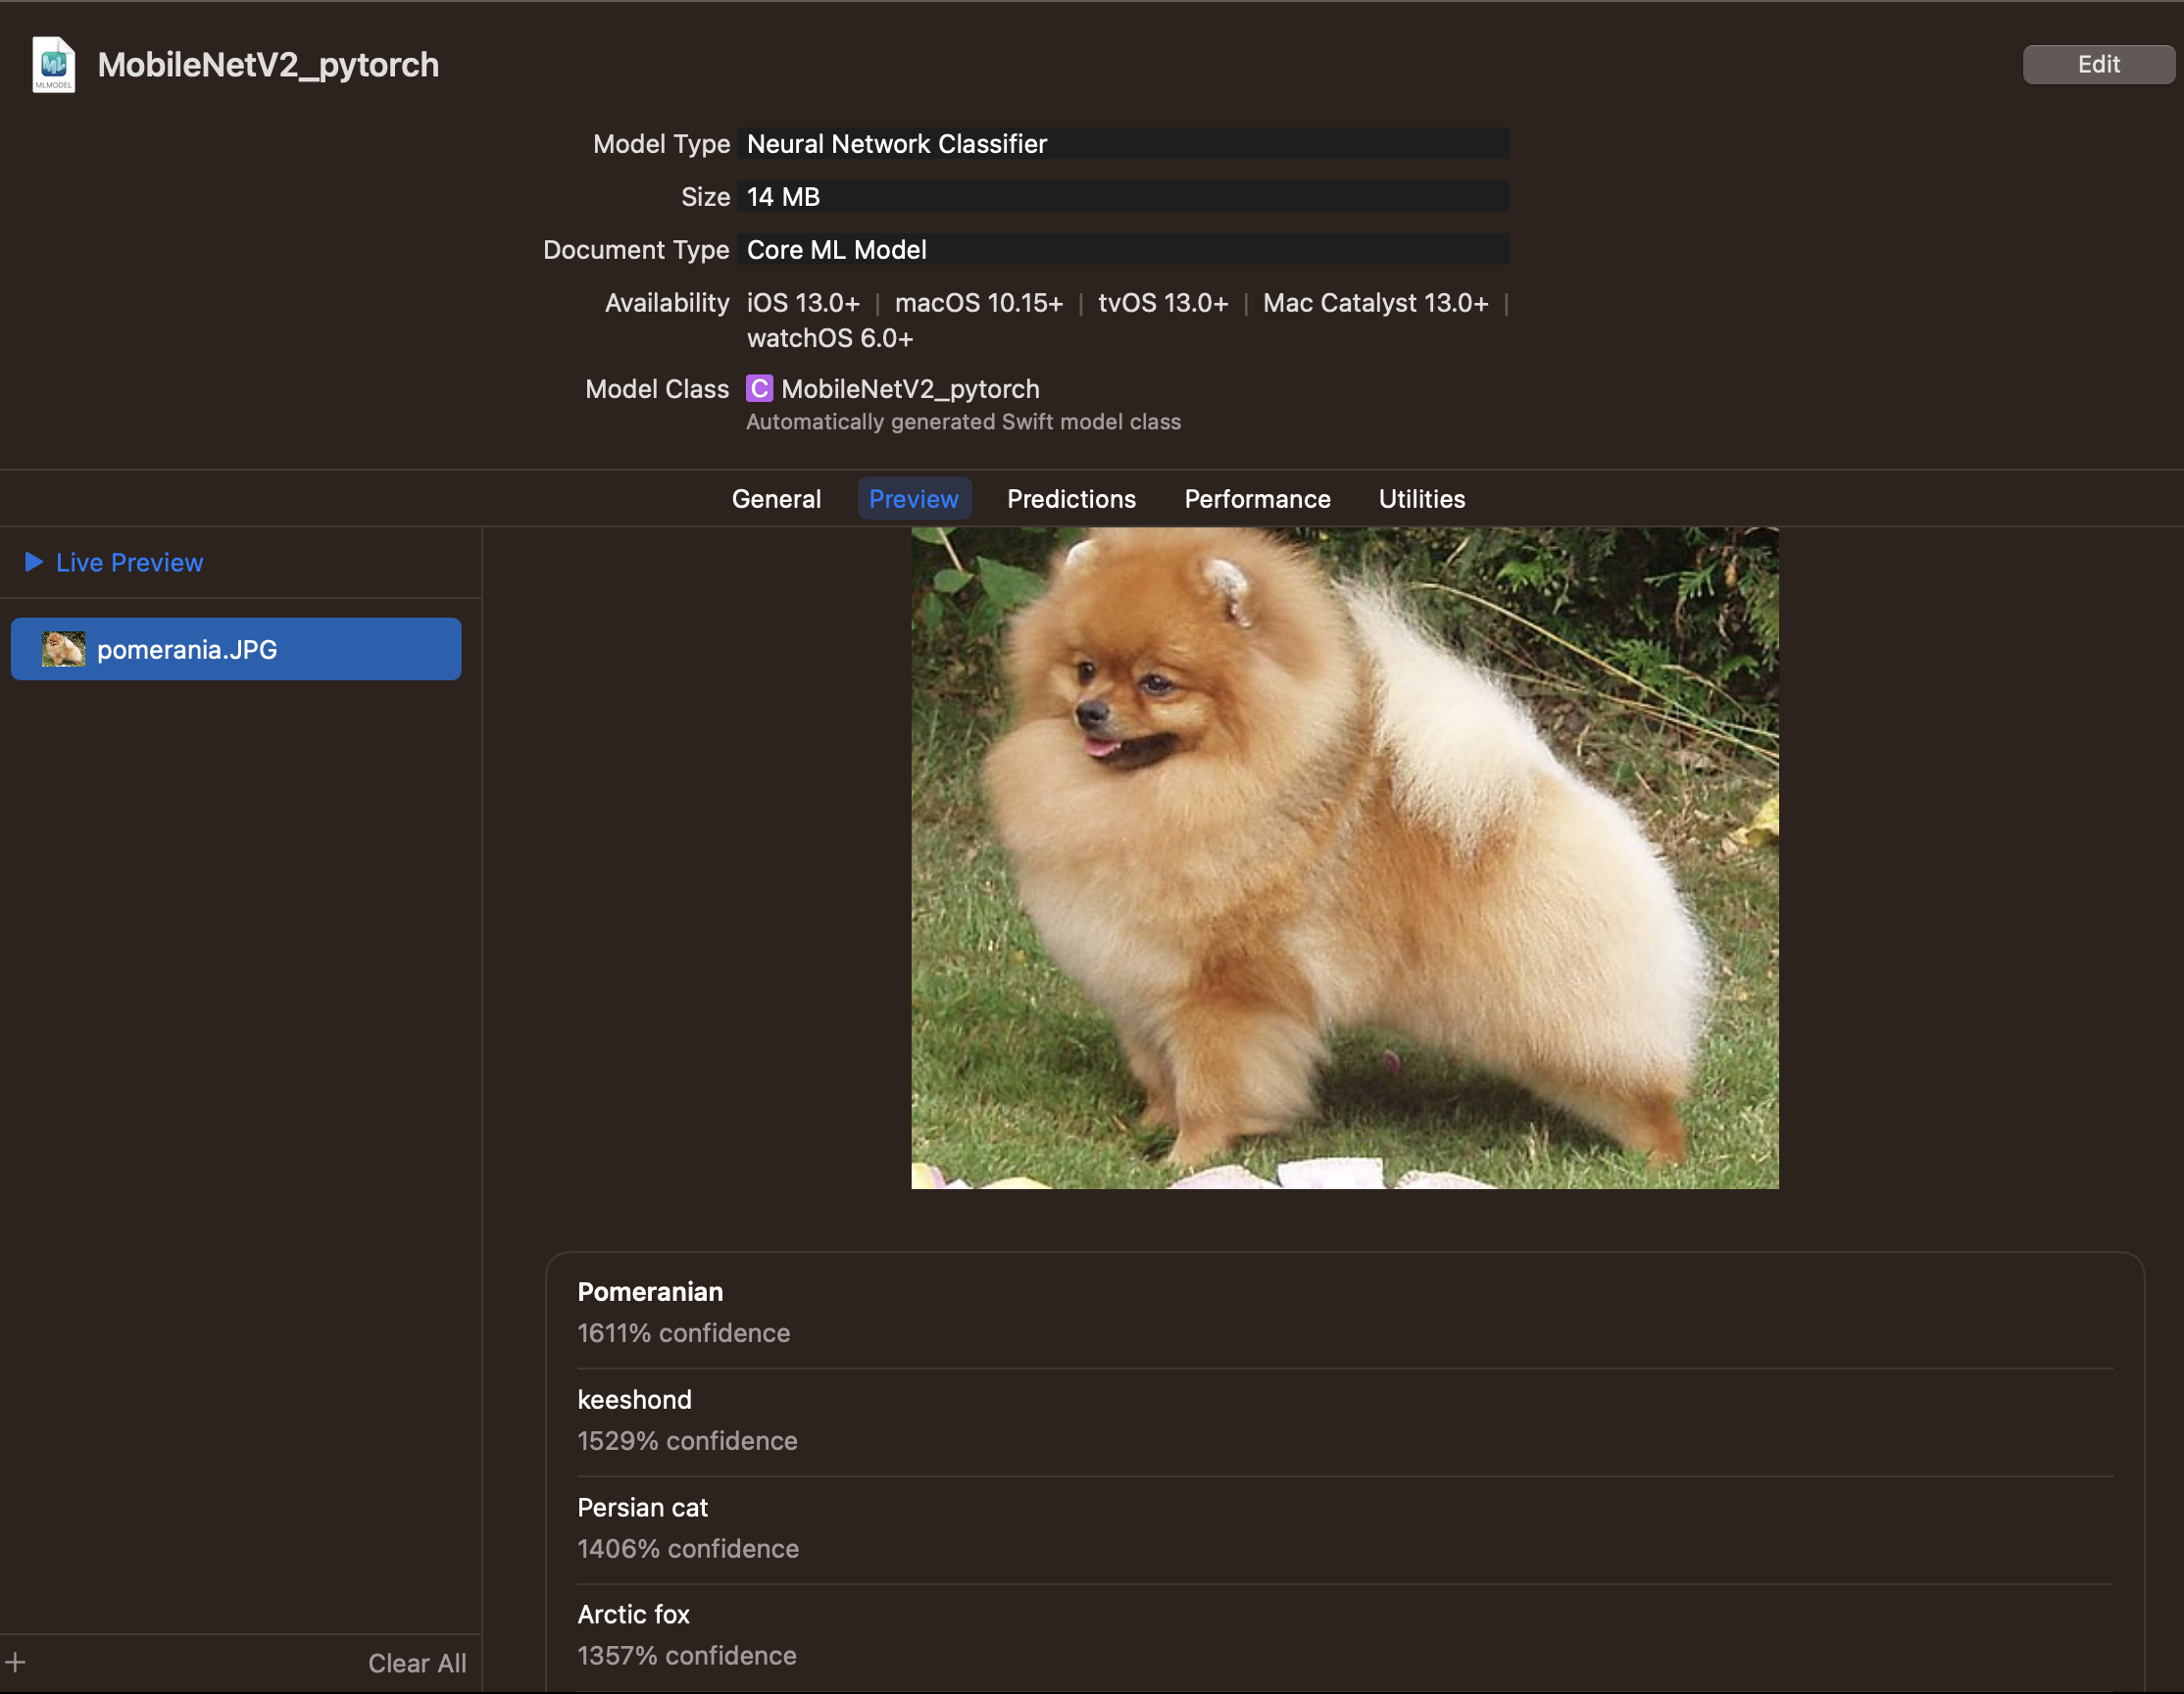
作成したCoreMLによる推論結果がPyTorchと一致しない!!
作成したmlmodelファイルをXcodeに突っ込むと、Previewの画面から推論を試すことができます。
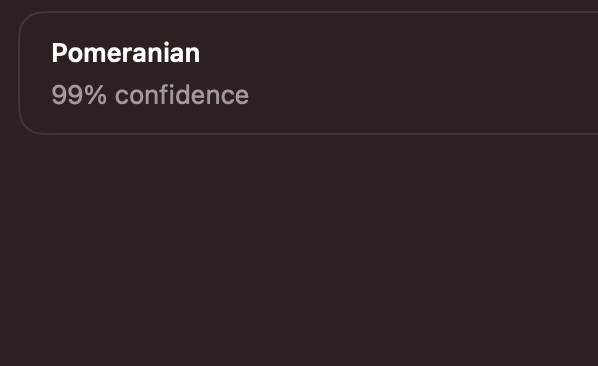
今回はポメラニアンの画像を推論にかけてみることにしましょう。
さて、推論結果は...
驚きの1611%!!!
ソフトマックスの層を追加する
調べてみると、推論にソフトマックスが含まれていないため、モデルの方にソフトマックスの層を追加する必要があるようです。ラッパーモデルクラスを作成します。
class TorchClassificationModel(nn.Module):
    def __init__(self):
        super(TorchClassificationModel, self).__init__()
        self.layers = nn.Sequential(
            base_model,
            nn.Softmax(dim=1)
        )
    def forward(self, x):
        return self.layers(x)
まともな数字が出てくるようになりましたね。Torchってなんぞや??
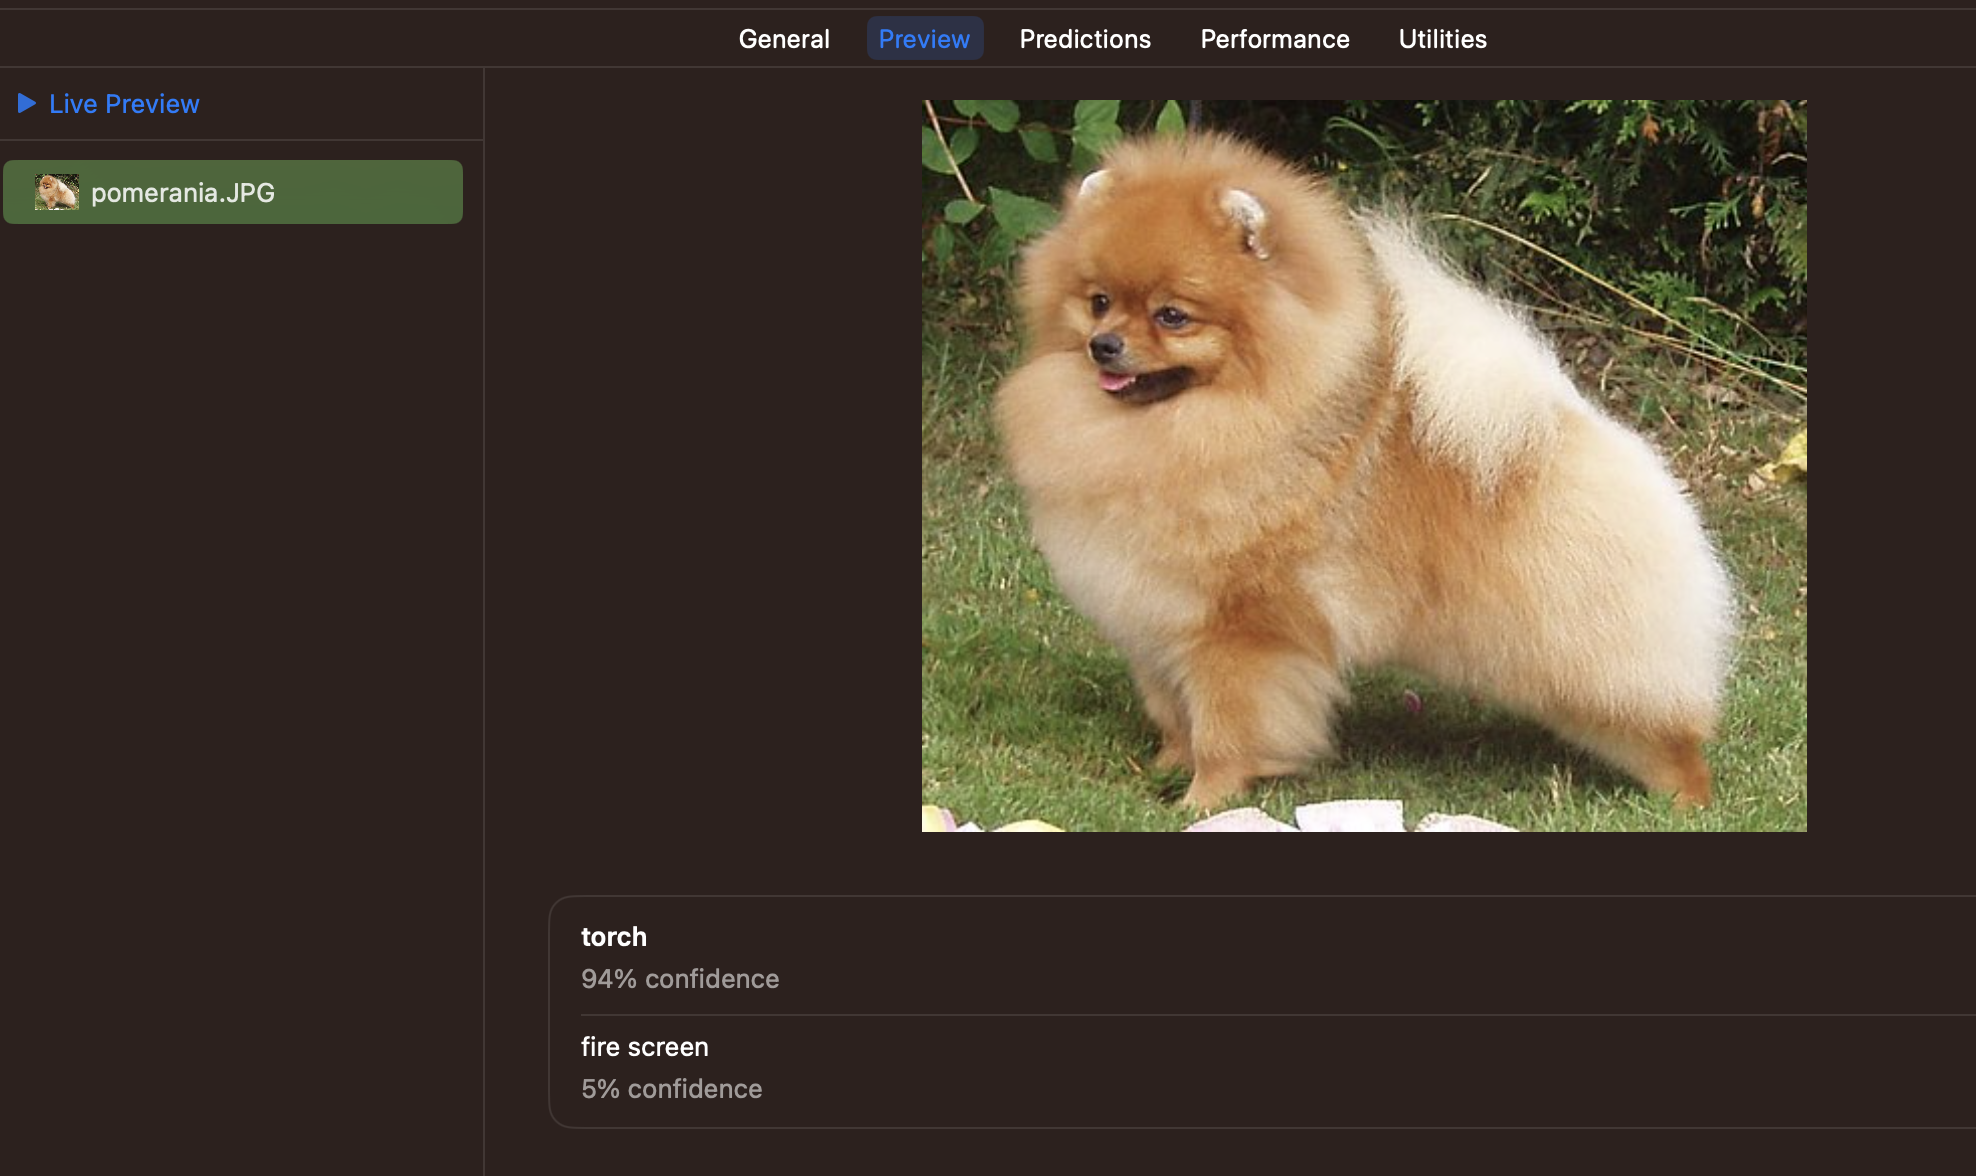
ちなみに、PyTorchモデルによる推論結果はこちら。
ポメラニアン98.85%としっかり推定できています。
from PIL import Image
import torch
from torchvision import models, transforms
from torch.nn import functional as F

sample_img = Image.open("/content/pomeranian.jpg")

preprocess = transforms.Compose([
    transforms.Resize(224),
    transforms.CenterCrop(224),
    transforms.ToTensor(),
    transforms.Normalize(
        mean=[0.485, 0.456, 0.406],
        std=[0.229, 0.224, 0.225]
    )
])

img_tensor = preprocess(sample_img) #[3,224,224]
input = img_tensor.unsqueeze(0) #[1,3,224,224]
output = torch_model(input)

probs = F.softmax(output, dim=1)
probs, indices = probs.sort(dim=1, descending=True)

for probs, indices in zip(probs, indices):
    for k in range(3):
        print(f"Top-{k + 1} {class_labels[indices[k]]} {probs[k]:.2%}")
Top-1 Pomeranian 98.85%
Top-2 chow 0.71%
Top-3 keeshond 0.19%
スケールとバイアスの設定
ちなみに、Pytorchでは入力画像は以下の処理を経ています。
- 224px四方にリサイズする
- ImageNetの平均と標準偏差により標準化
CoreMLではリサイズはされていますが標準化はされません。そこで、Coremltoolsでスケールとバイアスを設定することにより、標準化していない画像を投入しても正しく判定されるようにします。AppleのQ&Aに従い、image_inputに下記を追加。
#Set the image scale and bias for input image preprocessing.
scale = 1.0 / (255.0 * 0.226)
red_bias = -0.485 / 0.226
green_bias = -0.456 / 0.226
blue_bias = -0.406 / 0.226

image_input = ct.ImageType(name="input_1",
                           shape=example_input.shape,
                           scale=scale,
                           bias=[red_bias, green_bias, blue_bias],
                           color_layout='BGR')
さて、推論結果はどうでしょう??
ポメラニアンが上位にきましたが、Pytorchの判定結果とは異なっていますね...

そういえばBGRの変換って必要なのでしょうか??抜いてみましょう。
結果、やっとPytorchの判定結果と一致するようになりました。
#Set the image scale and bias for input image preprocessing.
scale = 1.0 / (255.0 * 0.226)
red_bias = -0.485 / 0.226
green_bias = -0.456 / 0.226
blue_bias = -0.406 / 0.226

image_input = ct.ImageType(name="input_1",
                           shape=example_input.shape,
                           scale=scale,
                           bias=[red_bias, green_bias, blue_bias])
スマホの端末で推論が動かない!!
XcodeでSwiftUIのコードを書きます。
こちらを写経してみました。
    private func classifyImage() {
        let currentImageName = photos[currentIndex]

        guard let image = UIImage(named: currentImageName),
              let resizedImage = image.resizeImageTo(size:CGSize(width: 224, height: 224)),
              let buffer = resizedImage.convertToBuffer() else {
              return
        }

        let output = try? model.prediction(image: buffer)

        if let output = output {
            let results = output.classLabelProbs.sorted { $0.1 > $1.1 }
            let result = results.map { (key, value) in
                return "\(key) = \(String(format: "%.2f", value * 100))%"
            }.joined(separator: "\n")

            self.classificationLabel = result
        }
    }
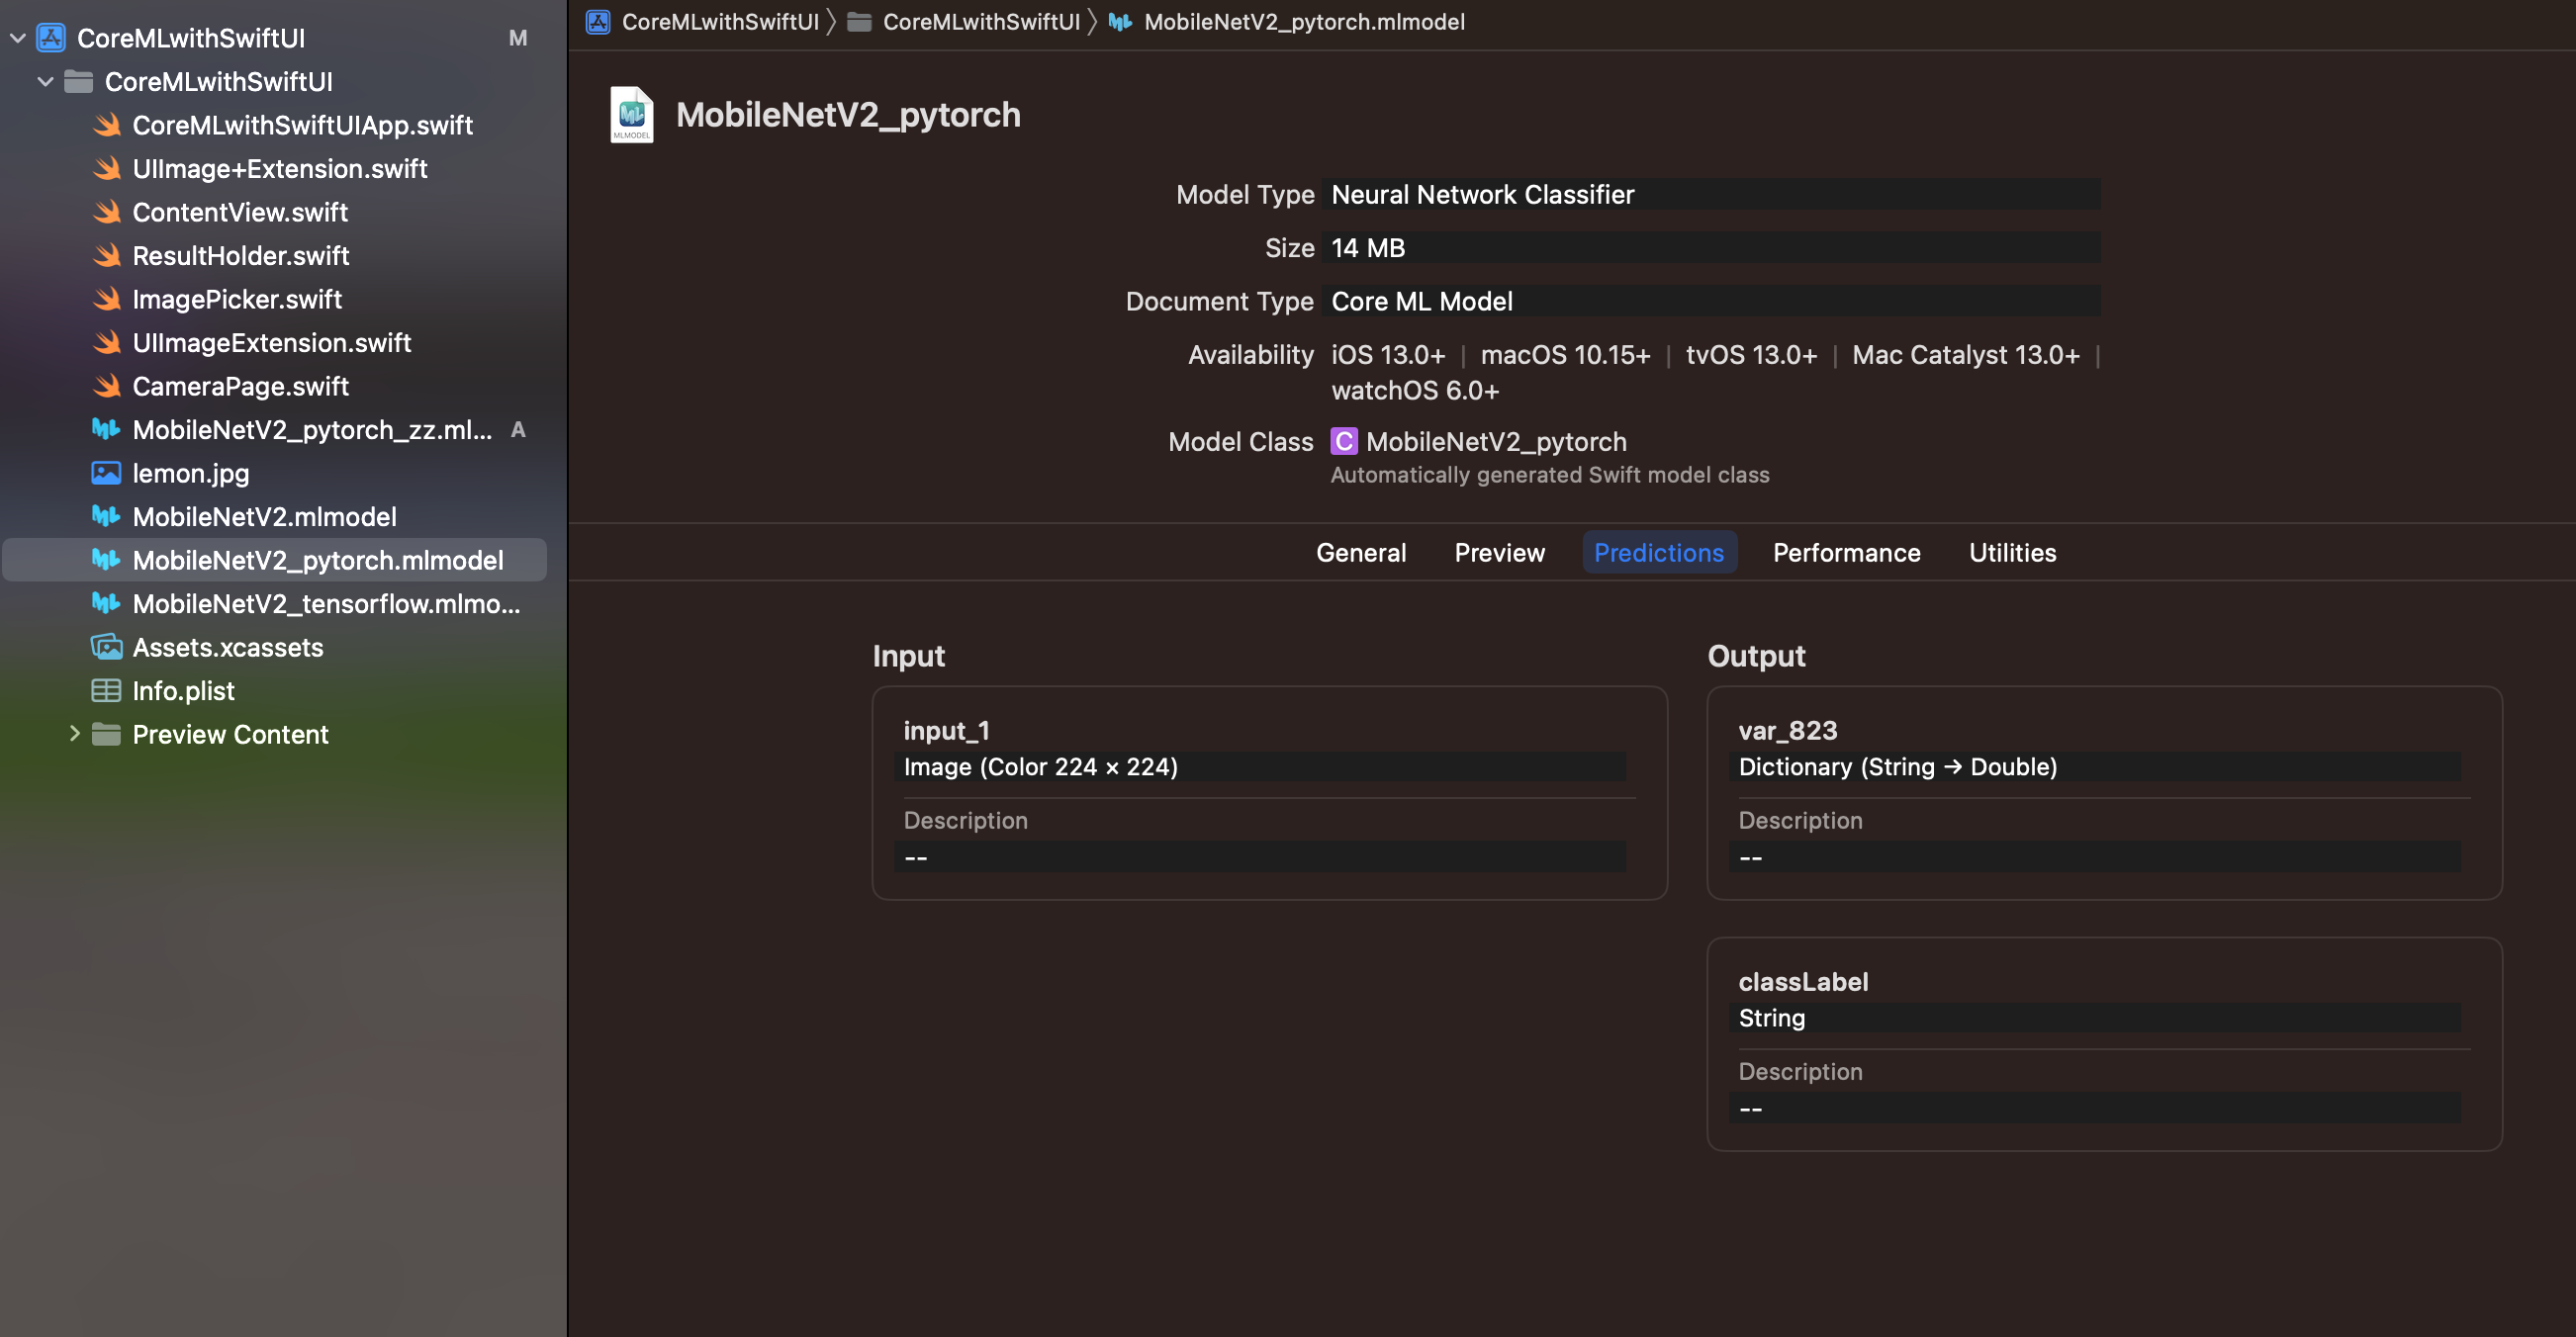
すると2つのエラーメッセージが。
Incorrect argument label in call (have 'image:', expected 'input_1:')
Value of type 'MobileNetV2_pytorchOutput' has no member 'classLabelProbs'
これを直すためには、mlmodelの「Predictions」を開きます。すると、InputとOutputの項目にそれぞれ名前がついていることがわかりますね。指示に従い、Input画像の名前を「input_1」、output.classLabelProbsを「output.var_823」に変更します。※この部分は変換するたびに色んな値をとります。
これでエラーが出ずに動くようになります。
まとめ
コードを書いておきます。
Python↓↓
import torch.nn as nn

########################
# Convert Pytorch model     #
########################

import torch
import torchvision
import coremltools as ct
import numpy as np


# Load a pre-trained version of MobileNetV2
base_model = torchvision.models.mobilenet_v2(pretrained=True)

class TorchClassificationModel(nn.Module):
    def __init__(self):
        super(TorchClassificationModel, self).__init__()
        self.layers = nn.Sequential(
            base_model,
            nn.Softmax(dim=1)
        )
    def forward(self, x):
        return self.layers(x)

# Set the model in evaluation mode
torch_model = TorchClassificationModel().eval()
# torch_model = base_model.eval()

# Trace with random data
example_input = torch.rand(1, 3, 224, 224) # after test, will get 'size mismatch' error message with size 256x256
traced_model = torch.jit.trace(torch_model, example_input)


# Download class labels (from a separate file)
import urllib
label_url = 'https://storage.googleapis.com/download.tensorflow.org/data/ImageNetLabels.txt'
class_labels = urllib.request.urlopen(label_url).read().decode("utf-8").splitlines()
class_labels = class_labels[1:] # remove the first class which is background
assert len(class_labels) == 1000


#Set the image scale and bias for input image preprocessing.
scale = 1.0 / (255.0 * 0.226)
red_bias = -0.485 / 0.226
green_bias = -0.456 / 0.226
blue_bias = -0.406 / 0.226

image_input = ct.ImageType(name="input_1",
                           shape=example_input.shape,
                           scale=scale,
                           bias=[red_bias, green_bias, blue_bias])

# Convert to Core ML using the Unified Conversion API
mlmodel = ct.convert(
    traced_model,
    inputs=[image_input],
    classifier_config = ct.ClassifierConfig(class_labels),
    compute_units=ct.ComputeUnit.CPU_ONLY,
)

# Save model
mlmodel.save("MobileNetV2_pytorch.mlmodel")
SwiftUI↓↓ ※その他の部分はこちらを写経をして下さい
    private func classifyImage() {
        let currentImageName = photos[currentIndex]

        guard let image = UIImage(named: currentImageName),
              let resizedImage = image.resize image to(size:CGSize(width: 224, height: 224)),
              let buffer = resizedImage.convertToBuffer() else {
              return
        }

        let output = try? model.prediction(input_1: buffer)

        if let output = output {
            let results = output.var_823.sorted { $0.1 > $1.1 }
            let result = results.map { (key, value) in
                return "\(key) = \(String(format: "%.2f", value * 100))%"
            }.joined(separator: "\n")

            self.classificationLabel = result
        }
    }
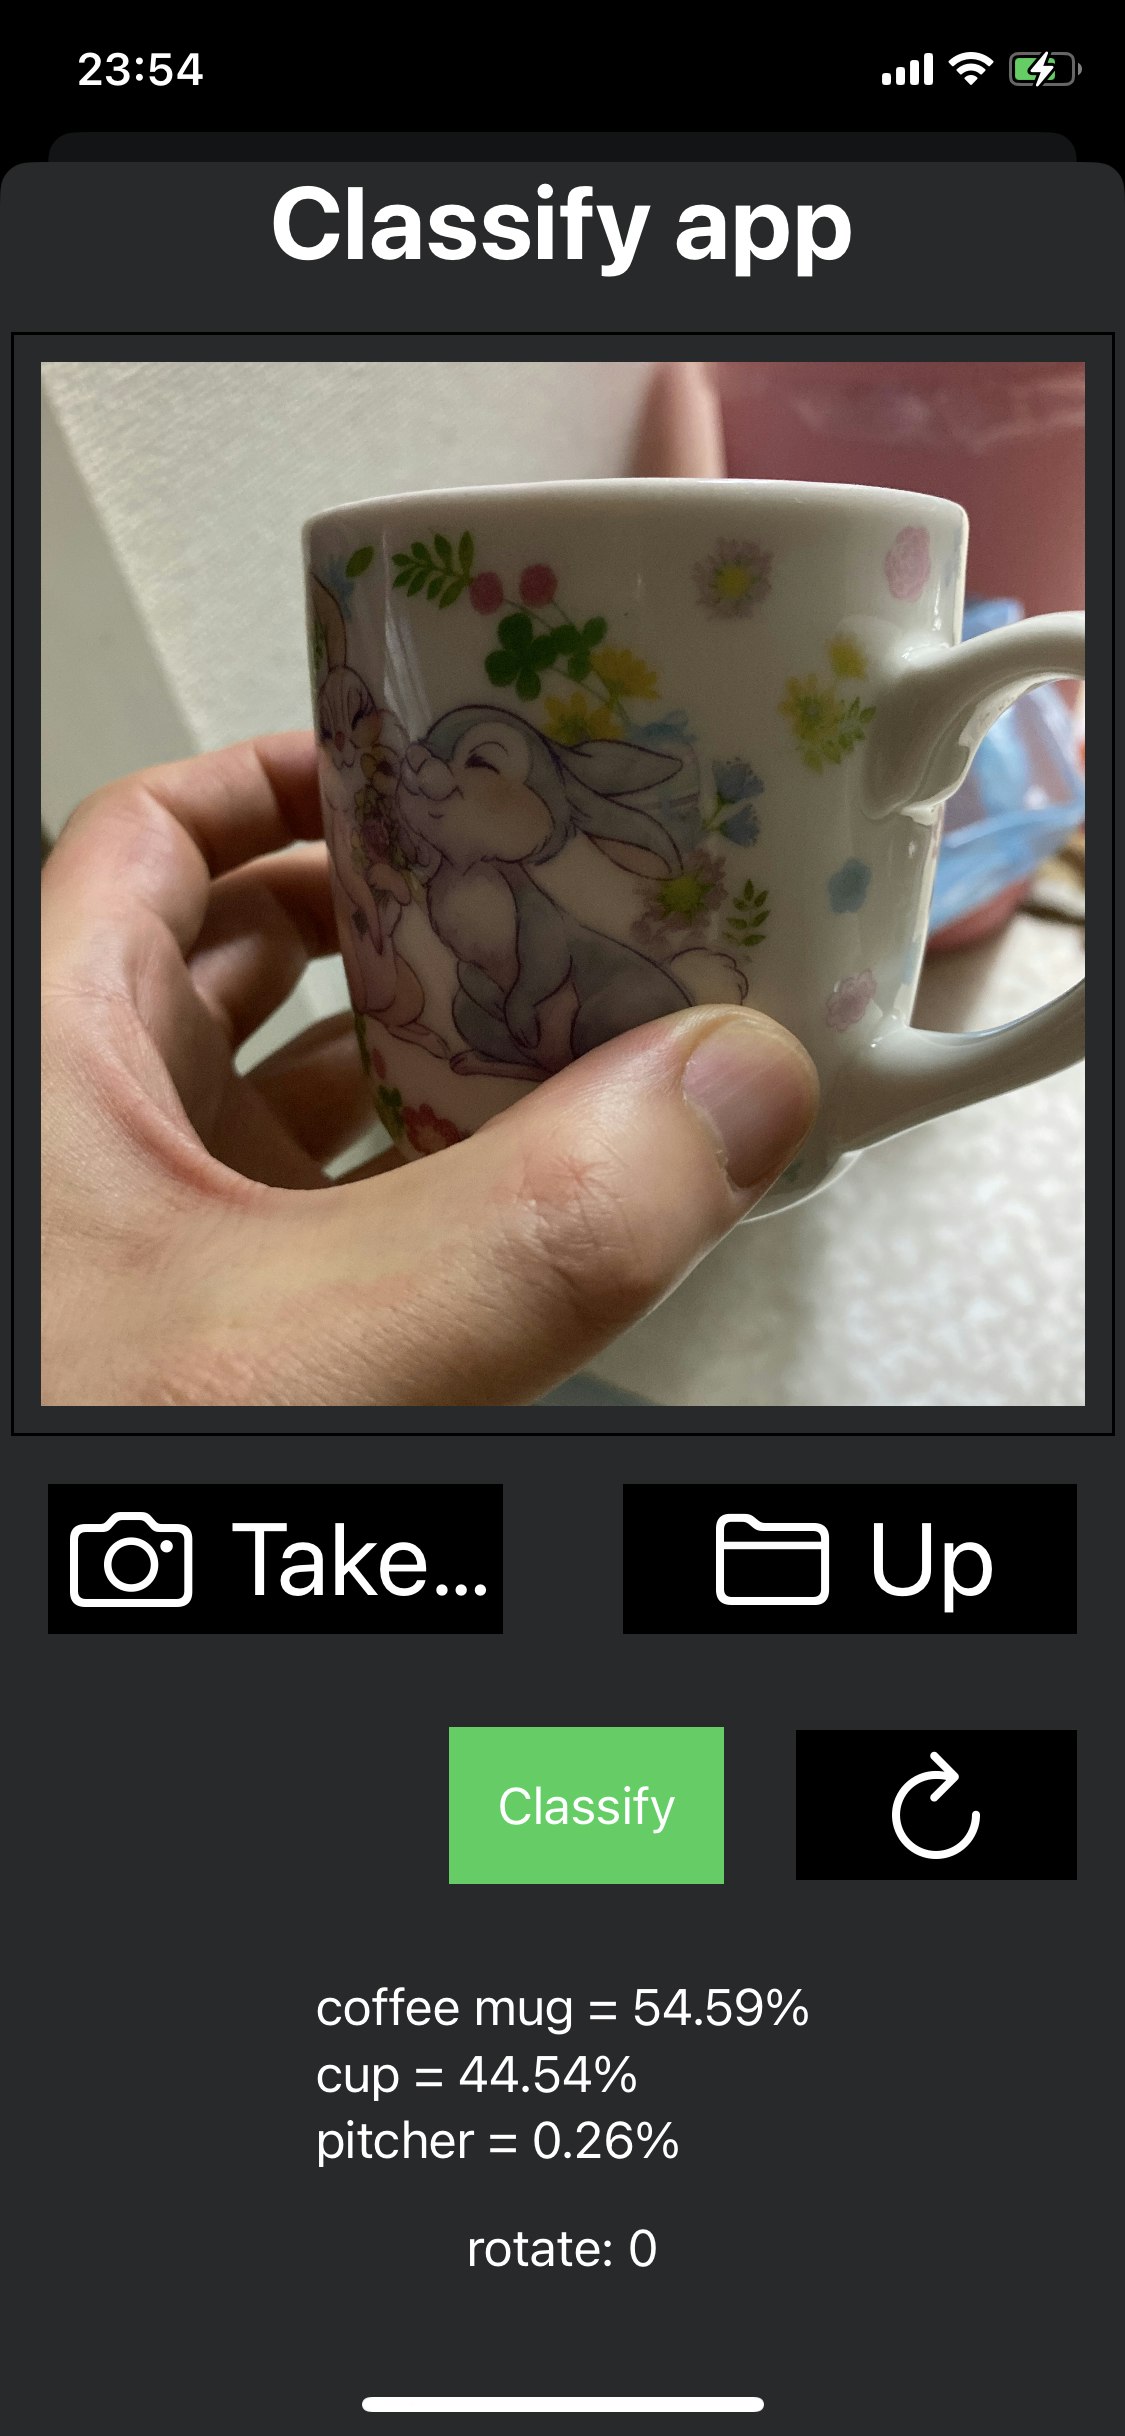
カメラで撮影したものを判定するUIを作ってみました。なかなかいい感じですね!!
参考サイト: