はじめに
最近なんだかんだでメンバーとServiceMesh(Istio)に関して会話する機会が多くなってきたので、最新状況のキャッチアップも含めて試してきたことを数回に分けてまとめていこうと思っています。
この記事の目的
OpenShift ServiceMesh v2.4からCluster-WideなControl PlaneのデプロイがGAされましたが、最低限どういうセットアップをするかを整理しました。
Cluster-Wideか、従来のMultitenatの違いに関しては、リンク先に簡易に記載が書かれていますので、気になる方はご確認ください。
Cluster-WideなControl Planeをデプロイする
ここから実機でのセットアップ方法を説明します。
実施環境
今回は OpenShift 4.12 (Red Hat OpenShift on IBM Cloud, いわゆるROKS)を用意して検証しています。ServiceMeshはv2.4.0を導入しています。導入方法はこれまでと特に変わらずOperatorHubから導入になりますので、詳細は割愛します。
# OpenShift 4.12 (Red Hat OpenShift on IBM Cloud)を用意
$ oc get clusterversion
NAME      VERSION   AVAILABLE   PROGRESSING   SINCE   STATUS
version   4.12.20   True        False         24m     Cluster version is 4.12.20

# ServiceMeshはv2.4以上を導入
$ oc get installPlan -A
NAMESPACE                       NAME            CSV                                        APPROVAL    APPROVED
openshift-distributed-tracing   install-2qpzw   jaeger-operator.v1.42.0-5                  Automatic   true
openshift-distributed-tracing   install-kr72z   jaeger-operator.v1.42.0-5-0.1687199951.p   Automatic   true
openshift-operators-redhat      install-9pq9g   elasticsearch-operator.v5.7.2              Automatic   true
openshift-operators             install-crblq   servicemeshoperator.v2.4.0                 Automatic   true
openshift-operators             install-mkrfs   kiali-operator.v1.65.6                     Automatic   true
1. Control Plane導入のためのProject (Namespace)の作成
まずはControl Plane導入のためのProject (Namespace)を作成します。今回は「istio-system」としています。
$ oc new-project istio-system
Now using project "istio-system" on server "https://xxxx-e.jp-tok.containers.cloud.ibm.com:xxxxx".

You can add applications to this project with the 'new-app' command. For example, try:

    oc new-app rails-postgresql-example

to build a new example application in Ruby. Or use kubectl to deploy a simple Kubernetes application:

    kubectl create deployment hello-node --image=k8s.gcr.io/e2e-test-images/agnhost:2.33 -- /agnhost serve-hostname
2. Control Planeの作成
Mesh管理下にあるPod間の通信はmTLSは強制し、クラスター外への通信はServiceEntry経由でないとアクセスできない、セキュリティ設定で環境を用意します。「mode: ClusterWide」が今回の肝の設定になります。
apiVersion: maistra.io/v2
kind: ServiceMeshControlPlane
metadata:
  name: basic
  namespace: istio-system
spec:
  security:
    controlPlane:
      mtls: true
    dataPlane:
      mtls: true
      automtls: true
  proxy:
    networking:
      trafficControl:
        outbound:
          policy: REGISTRY_ONLY
  gateways:
    openshiftRoute:
      enabled: false
  version: v2.4
  mode: ClusterWide
上記yamlファイルを用意して、applyすれば導入できます。
$ oc apply -f smcp.yml
servicemeshcontrolplane.maistra.io/basic created
以下のように管理およびトラフィック制御用のPodが起動することが確認できます。
% oc get po -n istio-system
NAME                                    READY   STATUS    RESTARTS   AGE
grafana-6855f8d7f-7vgd6                 2/2     Running   0          2m3s
istio-egressgateway-59b5b9dcbd-8ph44    1/1     Running   0          2m4s
istio-ingressgateway-8555558d45-6dfzp   1/1     Running   0          2m5s
istiod-basic-6d6df88cc6-n65br           1/1     Running   0          2m30s
jaeger-5d9c7c9cf5-pfd8h                 2/2     Running   0          2m3s
kiali-598cb67f49-mfjft                  1/1     Running   0          44s
prometheus-75ff9bf885-zfjjr             3/3     Running   0          2m22s
検証していて気づいたのですが、Cluster-Wideのデプロイの場合、spec.generalに対し、「validationMessages: true」を設定すると、Ingress/Egress Gatewayの作成途中で止まってしまう現象に遭遇しました(2023/07/12時点)。
apiVersion: maistra.io/v2
kind: ServiceMeshControlPlane
metadata:
  name: basic
  namespace: istio-system
spec:
  security:
    controlPlane:
      mtls: true
    dataPlane:
      mtls: true
      automtls: true
  general:
    validationMessages: true
  version: v2.4
  mode: ClusterWide
Ingress/Egress Gatewayの作成途中が止まること自体はConfigMapに「istio-ca-root-cert」が作成されないためです。validationMessagesの設定は「Use to enable or disable validation messages to the status fields of istio.io resources. This can be useful for detecting configuration errors in resources.」とあるので、証明書の発行に影響があるのだろうか?と疑問に思うところはありますが、、この辺り注意です。
この現象に遭遇したのもあり、証明書を発行してのServiceMesh Control Planeの導入もついでに検証しました。近いうちに記事を公開したいと思います。
3. MemberRollの作成
このステップがこれまでのMultitenantでの導入と異なります。Mesh下におきたいProject (Namespace)をlabelSelectorで条件付けし登録する流れになります(これまでは直接Project名を指定していました)。
以下の通りにServiceMeshMemberRollの設定を記載します。以下の設定だと、「istio-injection: enabled」のラベルを持つProject(Namespace)がメンバーとしてMesh下に置かれることになります。
apiVersion: maistra.io/v1
kind: ServiceMeshMemberRoll
metadata:
  name: default
  namespace: istio-system
spec:
  memberSelectors:
  - matchLabels:
      istio-injection: enabled
oc applyだと警告が出ますが、以下の通り適用すればよいです。
$ oc apply -f smmr.yml
Warning: resource servicemeshmemberrolls/default is missing the kubectl.kubernetes.io/last-applied-configuration annotation which is required by oc apply. oc apply should only be used on resources created declaratively by either oc create --save-config or oc apply. The missing annotation will be patched automatically.
servicemeshmemberroll.maistra.io/default configured
4. ProjectをMeshに登録する
ServiceMeshMemberRollの設定に合わせて、実際にProjectを登録してみます。
Projectを作成してから、直接Namespaceリソースのラベルを書き換える方法でも良いですし、以下のように先にラベルを指定してProjectを作っても良いと思います。
今回は「project01」と言う名前のProjectを作成します。
apiVersion: project.openshift.io/v1
kind: Project
metadata:
  labels:
    istio-injection: enabled
  name: project01
実際に適用し、Projectを作成します。
$ oc apply -f project.yml
project.project.openshift.io/project01 created

$ oc get project project01 --show-labels
NAME        DISPLAY NAME   STATUS   LABELS
project01                  Active   istio-injection=enabled,kubernetes.io/metadata.name=project01,maistra.io/member-of=istio-system,pod-security.kubernetes.io/audit-version=v1.24,pod-security.kubernetes.io/audit=restricted,pod-security.kubernetes.io/warn-version=v1.24,pod-security.kubernetes.io/warn=restricted
実際にMesh下に置かれたか確認します。ServiceMeshMemberRollの詳細を確認し、「Member Statuses」にProjectが表示されていればOKです。
$ oc describe smmr default -n istio-system |grep -5 "Member Statuses"
    Reason:                Configured
    Status:                True
    Type:                  Ready
  Configured Members:
    project01
  Member Statuses:
    Conditions:
      Last Transition Time:  2023-07-12T04:20:32Z
      Status:                True
      Type:                  Reconciled
    Namespace:               project01
ちなみに、今回はNetwork Policyも自動適用される設定のため、Mesh管理下に置かれた時点でProjectに対しNetwork Policyが適用されるのが確認できます。
$ oc get networkpolicy -n project01
NAME                       POD-SELECTOR                   AGE
istio-expose-route-basic   maistra.io/expose-route=true   5m6s
istio-mesh-basic           <none>                         5m6s
5. 動作確認
あとはサンプル・アプリケーションを動かして動作確認です。特にMultitenantでの導入と変わりませんが、ざっとみてみます。
Ingress Gatewayで利用する証明書は事前に用意しておきます。
% oc get secret -n istio-system
NAME                                                   TYPE                                  DATA   AGE
:
mesh-xxxxxxxxxxxxxxxxxxxxxxxxxxxxxxxx-0000             kubernetes.io/tls                     2      104s
bookinfoはごついので、ServiceMeshのDocumentに記載されているサンプル・アプリケーションのyamlをベースに、以下のファイルを用意します。
サンプルのままだと、だいぶ古くなっているのか動かない箇所も見受けられたので、少しだけ修正を加えています。
---
apiVersion: apps/v1
kind: Deployment
metadata:
  name: frontend-v1
  labels:
    app.openshift.io/runtime: nodejs
spec:
  replicas: 1
  selector:
    matchLabels:
      app: frontend
      version: v1
  template:
    metadata:
      labels:
        app: frontend
        version: v1
      annotations:
        sidecar.istio.io/inject: "true"
    spec:
      containers:
      - name: frontend
        image: quay.io/voravitl/frontend-js:v1
        imagePullPolicy: Always
        env:
          - name: BACKEND_URL
            value: http://backend:8080/version
        resources:
          requests:
            cpu: "0.1"
            memory: 60Mi
          limits:
            cpu: "0.2"
            memory: 100Mi
        ports:
        - containerPort: 8080
        securityContext:
          runAsNonRoot: true
          allowPrivilegeEscalation: false
          seccompProfile:
            type: RuntimeDefault
          capabilities:
            drop: ["ALL"]
---
apiVersion: v1
kind: Service
metadata:
  labels:
    app: frontend
  name: frontend
spec:
  ports:
  - name: http
    port: 8080
    protocol: TCP
    targetPort: 8080
  selector:
    app: frontend
  sessionAffinity: None
  type: ClusterIP
---
apiVersion: networking.istio.io/v1beta1
kind: VirtualService
metadata:
  name: frontend
spec:
  hosts:
  - frontend-https.mesh-xxxxxxxxxxxxxxxxxxxxxxxxxxxxxxxx-0000.jp-tok.containers.appdomain.cloud
  gateways:
  - istio-system/frontend-gateway-01
  http:
  - route:
    - destination:
        host: frontend
        subset: v2
      weight: 0
    - destination:
        host: frontend
        subset: v1
      weight: 100
---
apiVersion: networking.istio.io/v1beta1
kind: DestinationRule
metadata:
  name: frontend
spec:
  host: frontend
  subsets:
  - name: v1
    labels:
      version: v1
  - name: v2
    labels:
      version: v2

---
apiVersion: apps/v1
kind: Deployment
metadata:
  labels:
    app.openshift.io/runtime: quarkus
  name: backend-v1
spec:
  progressDeadlineSeconds: 600
  replicas: 1
  selector:
    matchLabels:
      app: backend
      version: v1
  template:
    metadata:
      annotations:
        sidecar.istio.io/inject: "true"
        sidecar.istio.io/rewriteAppHTTPProbers: "true"
      labels:
        app: backend
        version: v1
    spec:
      containers:
      - env:
        - name: APP_BACKEND
          value: https://httpbin.org/status/200
        - name: APP_VERSION
          value: v1
        - name: quarkus.log.console.color
          value: "false"
        image: quay.io/voravitl/backend-native:v1
        imagePullPolicy: Always
        livenessProbe:
          failureThreshold: 1
          httpGet:
            path: /status
            port: 8080
            scheme: HTTP
          initialDelaySeconds: 30
          periodSeconds: 5
          successThreshold: 1
          timeoutSeconds: 1
        name: backend
        ports:
        - containerPort: 8080
          protocol: TCP
        readinessProbe:
          failureThreshold: 1
          httpGet:
            path: /ready
            port: 8080
            scheme: HTTP
          initialDelaySeconds: 30
          periodSeconds: 5
          successThreshold: 1
          timeoutSeconds: 1
        resources:
          limits:
            cpu: 100m
            memory: 100Mi
          requests:
            cpu: 50m
            memory: 40Mi
        terminationMessagePath: /dev/termination-log
        terminationMessagePolicy: File
        securityContext:
          runAsNonRoot: true
          allowPrivilegeEscalation: false
          seccompProfile:
            type: RuntimeDefault
          capabilities:
            drop: ["ALL"]
      dnsPolicy: ClusterFirst
      restartPolicy: Always
      schedulerName: default-scheduler
      terminationGracePeriodSeconds: 30
---
apiVersion: v1
kind: Service
metadata:
  labels:
    app: backend
  name: backend
spec:
  ports:
  - name: http
    port: 8080
    protocol: TCP
    targetPort: 8080
  selector:
    app: backend
  sessionAffinity: None
  type: ClusterIP
---
apiVersion: networking.istio.io/v1beta1
kind: VirtualService
metadata:
  name: backend
spec:
  hosts:
  - backend
  http:
  - route:
    - destination:
        host: backend
---
apiVersion: networking.istio.io/v1beta1
kind: DestinationRule
metadata:
  name: backend
spec:
  host: backend

---
apiVersion: networking.istio.io/v1beta1
kind: Gateway
metadata:
  name: frontend-gateway-01
  namespace: istio-system
spec:
  selector:
    istio: ingressgateway
  servers:
  - hosts:
    - frontend-https.xxxxxxxxxxxxxxxxxxxxxxxxxxxxxxxx-0000.jp-tok.containers.appdomain.cloud
    port:
      name: https
      number: 443
      protocol: HTTPS
    tls:
      credentialName: mesh-xxxxxxxxxxxxxxxxxxxxxxxxxxxxxxxx-0000
      mode: SIMPLE
デプロイしたいプロジェクトに切り替えて、リソースを作成します。
$ oc project project01
Now using project "project01" on server "https://xxxx-e.jp-tok.containers.cloud.ibm.com:xxxxx".

$ oc apply -f test.yml
deployment.apps/frontend-v1 created
service/frontend created
virtualservice.networking.istio.io/frontend created
destinationrule.networking.istio.io/frontend created
deployment.apps/backend-v1 created
service/backend created
virtualservice.networking.istio.io/backend created
destinationrule.networking.istio.io/backend created
gateway.networking.istio.io/frontend-gateway-01 created
インターネットからアクセスするため、今回はOpenShift Router経由でアクセスできるようにRouteを作成します。
apiVersion: route.openshift.io/v1
kind: Route
metadata:
  name: istio-system-frontend-gateway-https-01
  namespace: istio-system
spec:
  host: frontend-https.mesh-xxxxxxxxxxxxxxxxxxxxxxxxxxxxxxxx-0000.jp-tok.containers.appdomain.cloud
  to:
    kind: Service
    name: istio-ingressgateway
    weight: 100
  port:
    targetPort: https
  tls:
    termination: passthrough
  wildcardPolicy: None
実際にOpenShiftに適用し、Routeリソースを作成します。
$ oc apply -f route.yml
route.route.openshift.io/istio-system-frontend-gateway-https-01 created
あとは実際にアクセスします。
$ curl https://frontend-https.mesh-xxxxxxxxxxxxxxxxxxxxxxxxxxxxxxxx-0000.jp-tok.containers.appdomain.cloud
Frontend version: v1 => [Backend: http://backend:8080/version, Response: 200, Body: Backend version:v1, Response:200, Host:backend-v1-696d9fd45f-rrb9r, Status:200, Message: ]
# 実際に稼働しているPodの一覧を見ると、確かにbackendアプリのHost名と一致している
$ oc get pod -n project01
NAME READY STATUS RESTARTS AGE
backend-v1-696d9fd45f-rrb9r 2/2 Running 0 7m16s
frontend-v1-55b46b7f9-rvz42 2/2 Running 0 7m16s
# Podから外部のリソースにアクセスしようとしても、ServiceEntryを定義していないので通信できない
問題ないことはKialiの画面からも確認できます。
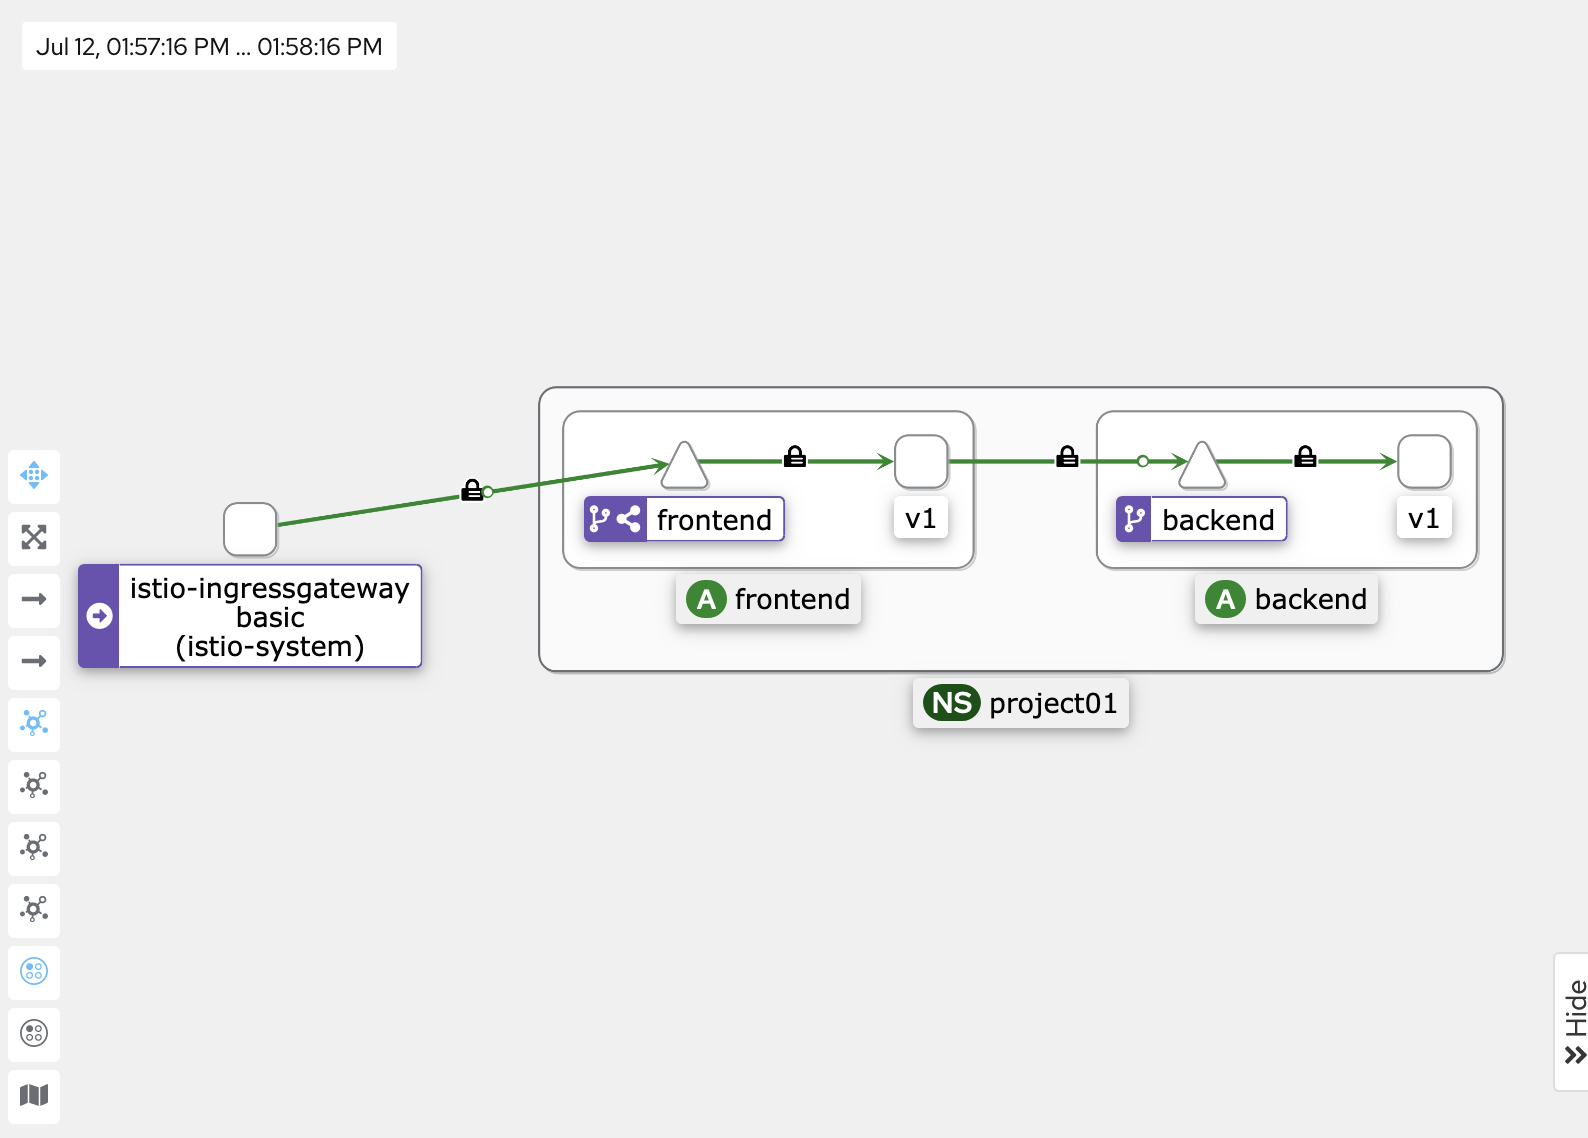
6. (おまけ) 通信制御の動作確認
mTLSで通信されているのは、上記のKialiの画面で、錠マークがあるので判断できます。
また、外部接続に関しては、例えばwww.ibm.comに対してhttp/https通信をしてみたとします。ServiceEntryが定義されていない場合は以下の通りエラーとなることが確認できます。
# HTTP通信
$ oc exec -n project01 backend-v1-696d9fd45f-rrb9r -- curl -sL -o /dev/null -w '%{http_code}\n' http://www.ibm.com
502

# HTTPS通信
$ oc exec -n project01 backend-v1-696d9fd45f-rrb9r -- curl -sL -o /dev/null -w '%{http_code}\n' https://www.ibm.com
000
command terminated with exit code 35
ここで、HTTPS通信に関しては許可するようにServiceEntryを定義します。
apiVersion: networking.istio.io/v1beta1
kind: ServiceEntry
metadata:
  name: ibm
  namespace: project01
spec:
  hosts:
  - www.ibm.com
  location: MESH_EXTERNAL
  ports:
  - number: 443
    name: https
    protocol: TLS
  resolution: DNS
実際に適用し、動作を見ると、HTTPS通信のみ通るようになったことが確認できます。
# ServiceEntryの適用
$ oc apply -f serviceentry.yml
serviceentry.networking.istio.io/ibm created

# HTTP通信はNG
$ oc exec -n project01 backend-v1-696d9fd45f-rrb9r -- curl -sL -o /dev/null -w '%{http_code}\n' http://www.ibm.com
502

# HTTPS通信はOK
$ oc exec -n project01 backend-v1-696d9fd45f-rrb9r -- curl -sL -o /dev/null -w '%{http_code}\n' https://www.ibm.com
200
さいごに
長くなりましたが、正しく動作できることも確認できました。
Multitenantとの違いはきちんと把握しないとではありますが、今後はCluster-Wideでのデプロイも実施されていくと思いますので、ServiceMesh導入時の参考になれば幸いです。