Diplayクラス
EV3のディスプレイの表示に関するクラス
0.コーディングの前に・・・
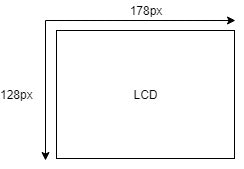
EV3の画面のサイズは幅178px 高さ128pxのサイズであり、左上が(0,0)で、下に行けば行くほどy座標は増え右に行けば行くほどx座標は増える
LCDは黒、グレー、明るいグレー、白の4つのいろを表示できる
1.文字の表示(Easyバージョン)
pythonの組み込みのprint関数を使って文字を表示する方法。普通に使うだけでは文字が小さすぎて読むことができないのでsetfontコマンドで表示されるフォントを設定する必要がある。
# !/usr/bin/env python3
# simple_hello.py print関数を使って文字を表示する方法

from time import sleep
import os

# フォントの設定
# setfontに適用できるフォントは"/usr/share/consolefonts"の中にある
os.system('setfont Uni2-VGA14')

# ev3上のstdoutに文字の出力
print('EV3 Python')
print()
print('ev3','Python')

# 5秒待機
sleep(5)
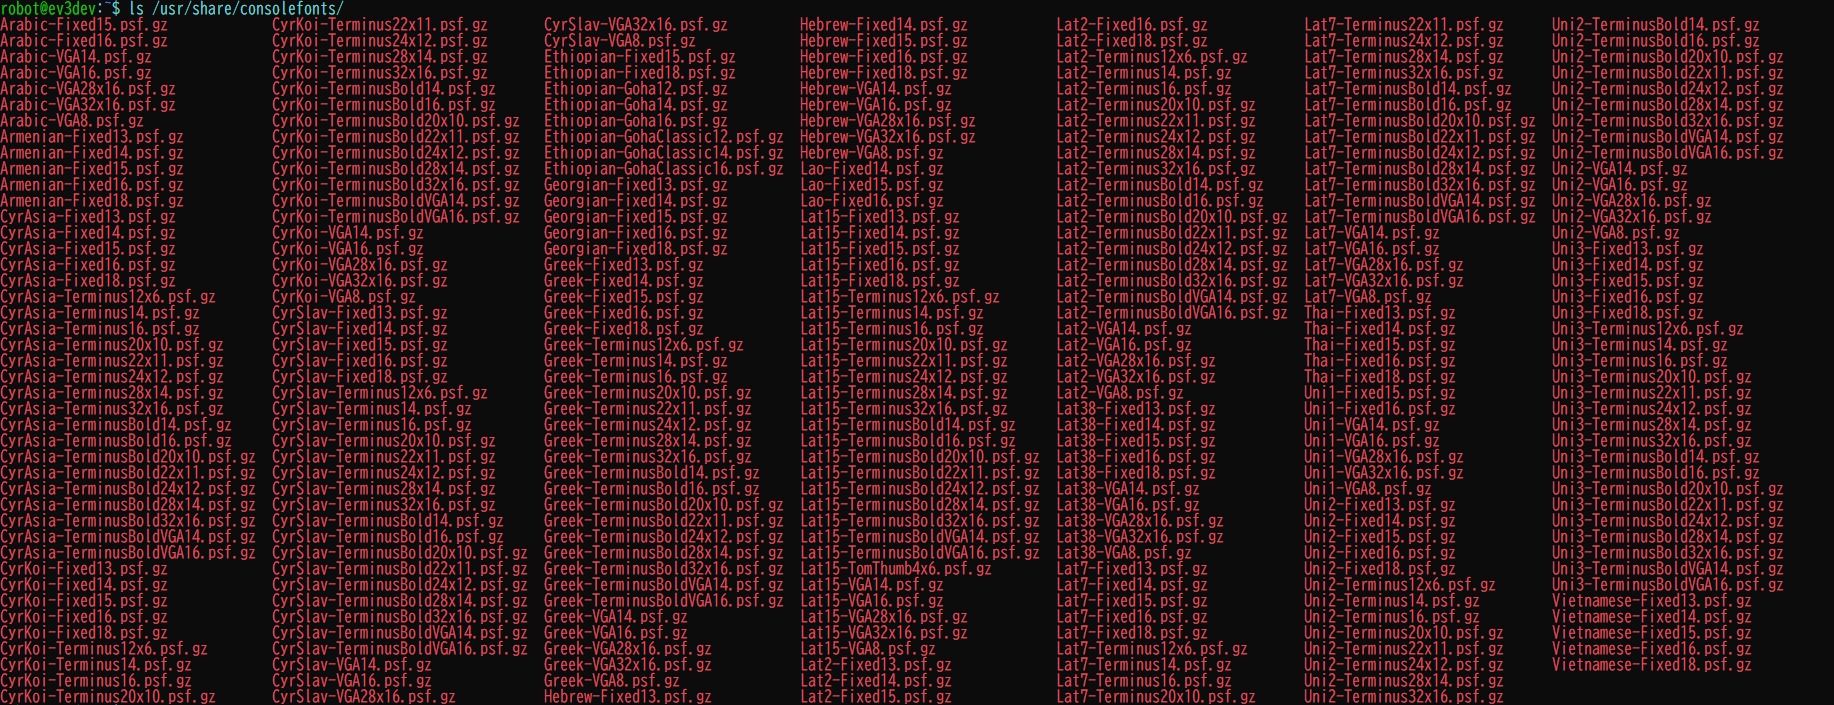
使えるフォントはOpen SSH Terminalでls /usr/share/consolefontsを実行すると一覧が表示される。使うフォントは末尾の.psf.gzは省いて書く
フォント一覧
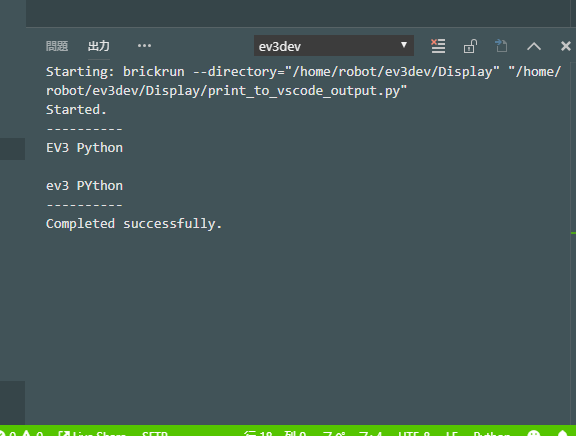
2.VS Codeの出力画面に文字を表示する
print関数の出力先をstderrにするとVS Codeの出力ウィンドウに文字列が出力される.
# !/usr/bin/env python3
# print_to_vscode_output.py PCのVS Code上に文字を出力する

from time import sleep
import os
import sys

# printの引数fileにsys.stderrを指定するとVS Code上に文字が出力される
print('EV3 Python',file=sys.stderr)
print('',file=sys.stderr)
print('ev3','PYthon',file=sys.stderr)

# 5秒待機
sleep(5)
実行例(VS Codeからプログラムを実行すると自動で出力画面が表示される)
3.ev3devのAPIを用いた文字の表示
text_pixels(text,clear_screen=True,x=0,y=0,text_color='black',font=None)
textで指定した文字列を画面の*(x,y)*の位置に表示する
| 引数 | 説明 | デフォルト値 |
|---|---|---|
| text(string) | 表示する文字列 | |
| clear_screen(bool) | 画面に表示するときに画面をクリアするかどうか(Trueだった場合クリアする) | True |
| x(int) | 画面の横方向の位置 | 0 |
| y(int) | 画面の縦方向の位置 | 0 |
| text_color(string) | 文字色 | 'black' |
| font(string) | フォント | None |
# !/usr/bin/env python3
# lcd_text_grid.py Displayクラスのメソッドを用いて画面に文字を表示する
# MEMO:EV3のLCDのサイズは178x128,左上が(0,0)

from time import sleep
from ev3dev2.display import Display
import ev3dev2.fonts as fonts

# インスタンス化
lcd = Display()

# 文字を表示
# MEMO:font名のの後ろの数字が文字の高さを表している(ex:helvO24ならば高さは24px)
lcd.text_pixels("ABCDE",font='helvB24',x=0,y=0,clear_screen=False)
lcd.text_pixels("FGHIJ",font='courB24',x=0,y=25,clear_screen=False)

# LCDを更新する
lcd.update()

# 5秒待つ
sleep(5)
text_grid(text,clear_screen=True,x=0,y=0,text_color='black',font=None)
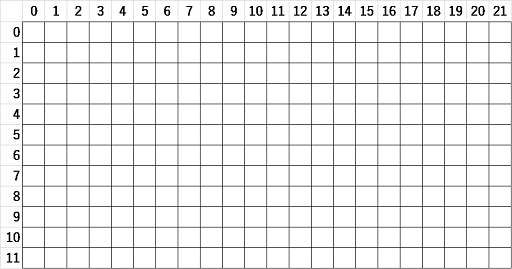
テキストを縦横22列12行に区切ったグリッドの位置に表示する。グリッド1つのサイズは8px × 10pxであり、1文字を1行の高さに収めようとすると非常に小さく見ずらいためこの関数を使った文字の表示は推奨しない。
| 引数 | 説明 | デフォルト値 |
|---|---|---|
| text(string) | 表示する文字列 | |
| clear_screen(bool) | 画面に表示するときに画面をクリアするかどうか(Trueだった場合クリアする) | True |
| x(int) | 横方向のグリッドの位置 | 0 |
| y(int) | 縦方向のグリッドの位置 | 0 |
| text_color(string) | 文字色 | 'black' |
| font(string) | フォント | None |
# !/usr/bin/env python3
# lcd_text_grid.py Displayクラスのメソッドを用いて画面に文字を表示する
# MEMO:text_gridは画面上を8pxx10pxのGridが横22列縦12行で分割されている

from time import sleep
from ev3dev2.display import Display
import ev3dev2.fonts as fonts

# インスタンス化
lcd = Display()

# 文字を表示
lcd.text_grid('ABCDE',font='helvO24',x=0,y=0,clear_screen=False)
lcd.text_grid('FGHIJ',font='helvO24',x=0,y=2,clear_screen=False)

# LCDを更新する
lcd.update()

# 5秒待つ
sleep(5)
4.グラフィック(図形描画)
線を描く
・ line(clear_screen=True,x1=10,y1=10,x2=50,y2=50,line_color='black',width=1)
点(x1,y1)と点(x2,y2)を結ぶ直線を描く
| 引数 | 説明 | デフォルト値 |
|---|---|---|
| clear_screen(bool) | 画面に表示するときに画面をクリアするかどうか(Trueだった場合クリアする) | True |
| x1(int) | 始点のx座標 | 10 |
| y1(int) | 始点のy座標 | 10 |
| x2(int) | 終点のx座標 | 50 |
| y2(int) | 終点のy座標 | 50 |
| line_color(string) | 線の色 | 'black' |
| width(int) | 線の幅 | 1 |
・ circle(clear_screen=True,x=50,y=50,radius=40,*fill_color='black',outline_color='black')
点(x,y)を中心とする半径radiusの円を描く
| 引数 | 説明 | デフォルト値 |
|---|---|---|
| clear_screen(bool) | 画面に表示するときに画面をクリアするかどうか(Trueだった場合クリアする) | True |
| x(int) | 円の中心点のx座標 | 50 |
| y(int) | 円の中心点のy座標 | 50 |
| radius(int) | 円の半径 | 40 |
| fill_color(string) | 塗りつぶしの色 | 'black' |
| outline_color(string) | 外郭の線の色 | 'black' |
・ rectangle(clear_screen=True,x1=10,y1=10,x2=80,y2=40,fill_color='black',outline_color='black')
点(x1,y1)を四角形の左上、点(x2,y2)を四角形の右下とする四角形を描く
| 引数 | 説明 | デフォルト値 |
|---|---|---|
| clear_screen(bool) | 画面に表示するときに画面をクリアするかどうか(Trueだった場合クリアする) | True |
| x1(int) | 四角形の左上の点のx座標 | 10 |
| y1(int) | 四角形の左上の点のy座標 | 10 |
| x2(int) | 四角形の右下の点のx座標 | 80 |
| y2(int) | 四角形の右下の点のy座標 | 40 |
| fill_color(string) | 塗りつぶしの色 | 'black' |
| outline_color(string) | 外郭の線の色 | 'black' |
・point(clear_screen=True,x=10,y=10,point_color='black')
点(x,y)に点を描く
# !/usr/bin/env python3
# graphics.py 図形の描画

from time import sleep
from ev3dev2.display import Display
from ev3dev2.button import Button
import sys
from math import pi,sin

# インスタンス化
lcd = Display()
button = Button()

# 画面の横幅と縦幅を定義
LCD_WIDTH,LCD_HEIGHT = lcd.xres,lcd.yres


# 円で輪郭と目と口を描く
lcd.circle(clear_screen=False,x=LCD_WIDTH/2,y=LCD_HEIGHT/2,radius=60,fill_color='lightgrey')
lcd.circle(False,69,44,10)
lcd.circle(False,109,44,10)
lcd.circle(False,89,94,18,'grey')

# 四角形で目の穴を描く
lcd.rectangle(False,66,41,72,47,'white','white')
lcd.rectangle(False,106,41,112,47,'white','white')

# 画面を更新(必須)
lcd.update()

# ボタンが押されるまで待機
button.wait_for_bump('enter')
5.画像の表示
PIL(Python Image Library)のImageオブジェクトを使ってLCDに画像を表示することができる。使用できる画像の形式はjpegやbmp,gif,png等主要なものなら対応しているがgifアニメーションには対応していない。また、言うまでもないが表示できる色はblack,light grey,dark grey,whiteの4つのみである。
・Image.open(fp)
返り値:Imageオブジェクト
画像ファイルを開きImageオブジェクトを返す
| 引数 | 説明 | デフォルト値 |
|---|---|---|
| fp | 画像ファイルのパス |
・display.image.paste(image,box=None)
imageオブジェクトを画面の指定した位置に表示する。
| 引数 | 説明 | デフォルト値 |
|---|---|---|
| image(Image) | Image.openで返されたImageオブジェクト | - |
| box(tuple) | 画像を表示する位置 (画像左上のx座標,画像左上のy座標) | None(画面左上(0,0)の位置に表示) |
# !/usr/bin/env python3
# image.py 画像の表示

from time import sleep
from ev3dev2.display import Display
from ev3dev2.button import Button
from PIL import Image

# インスタンス化
lcd = Display()
button = Button()

# 画像を開く
image = Image.open('img/lena_gray.bmp')

# 画像を配置
lcd.image.paste(image,(0,0))

# 画面を更新(必須)
lcd.update()

# ボタンが押されるまで待機
button.wait_for_bump('enter')