概要
B2C向けECショップのクローンサイトを作っています。
今回は決済システムを実装するため、サードパーティのStripeを導入します。
記事の内容としては、バックエンド側のみとなります。
フロントエンド側では、React、TypeScriptで実装する予定です。フロントエンドの実装は次の記事で書きます。
ユースケース
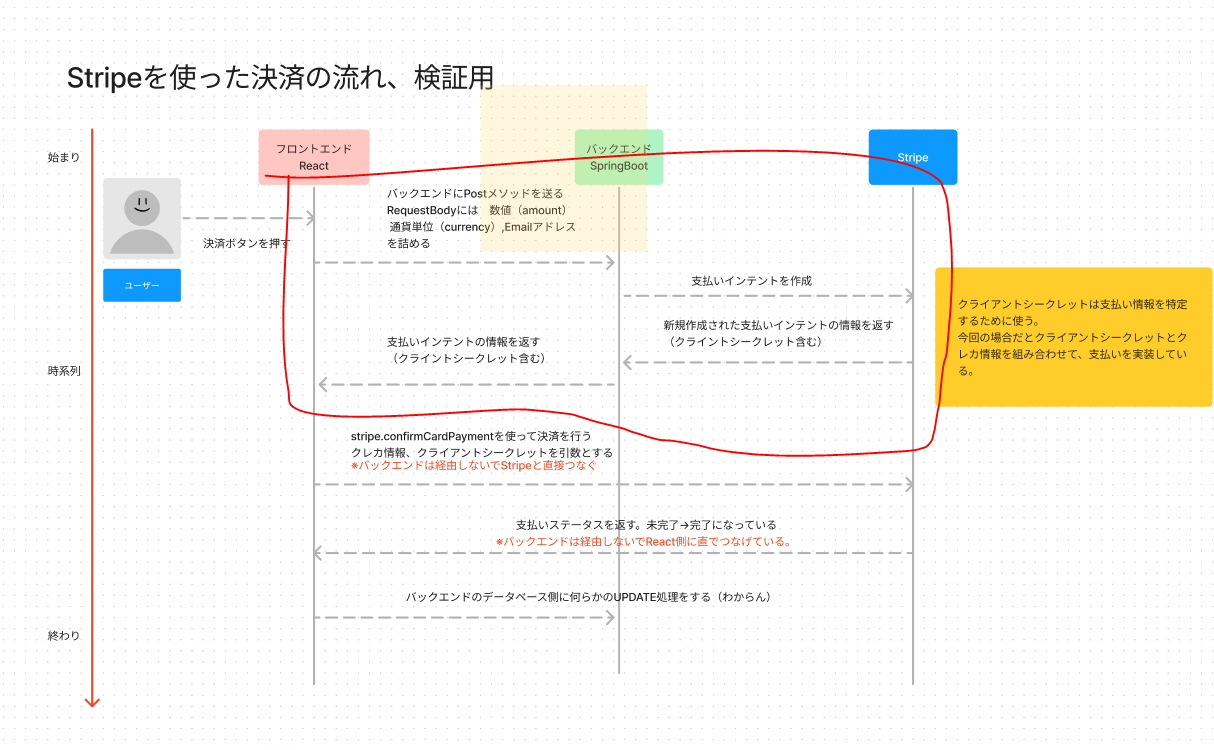
以下画像はStripeを使った決済の流れです。今回の記事は赤枠部分を実装します。
フロントエンド側はReactの代わりにPostmanを使います。
開発環境
OS:windows10
バックエンド側:
IDE:IntelliJ Community
spring-boot-starter-parent 2.75
java : 11
手順
stripeの会員登録を行う。
Stripeの開発者画面からAPIキーを取得します。(下画像参照)
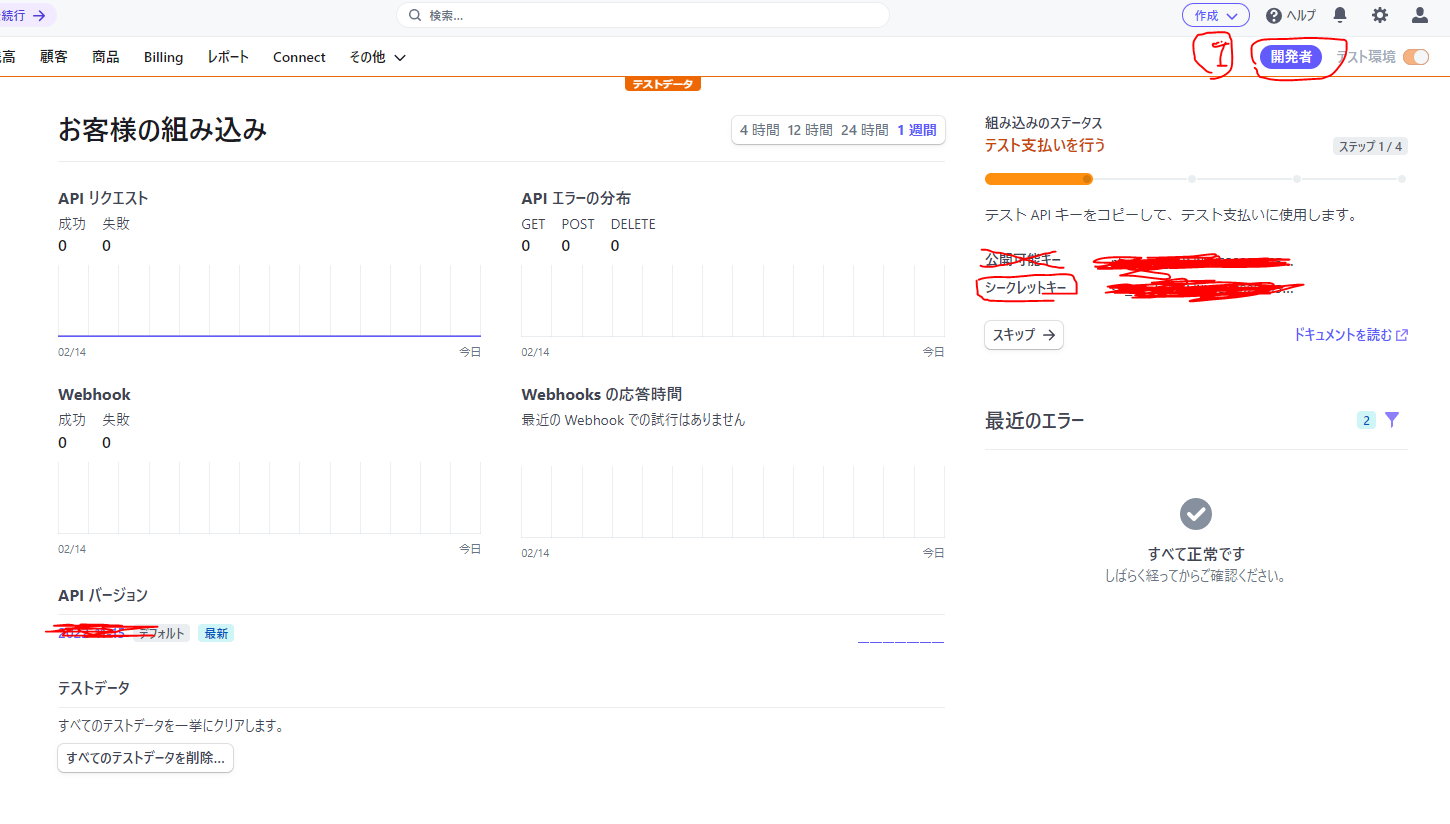
APIキーはapplication.propertyにコピペします
XXXにシークレットキーを入れる。
stripe.key.secret=XXXXXXXXXXXXXXXXXXX
mavenにstripeのライブラリを追加する
		<dependency>
			<groupId>com.stripe</groupId>
			<artifactId>stripe-java</artifactId>
			<version>10.1.0</version>
		</dependency>
SpringBootの実装
作成したファイル一覧
| ファイル名 | 説明 |
|---|---|
| PaymentInfoRequest | Apiに入っているリクエストボディを定義しているクラス |
| PaymentService | サービスレイヤー。 |
| PaymentContoller | コントローラーを使用。Restを使用 |
| application.property | Stripeのシークレットキーの値を追加 |
実装の方針
シンプルにするため、自前のデータベース(MySQL)には一切アクセスしません。
支払い情報のデータはstripe側で確認することを前提とします。
本当は自前のMySQL側にもstripe側の処理を記録する必要があると思います。(バックアップとかStripeから別のサードパーティに乗り換えする時など)
コード部分(長いです。先にファイル一覧を追加してください)
PaymentInfoRequest.java
package com.example.restapi.implement.payment;

import lombok.Data;

@Data
public class PaymentInfoRequest {

    // 金額の量 50以上の値を入力する
    // 単位はcurrency になる
    //例えば amount=50 currency="jpy"とすると 50円になる
    private int amount;
    //通貨の種類 日本円なので"jpy"と入力する
    private String currency;

    private String receiptEmail;
}
PaymentService.java
package com.example.restapi.implement.payment;

import com.stripe.Stripe;
import com.stripe.exception.StripeException;
import com.stripe.model.PaymentIntent;
import org.springframework.beans.factory.annotation.Autowired;
import org.springframework.beans.factory.annotation.Value;
import org.springframework.http.HttpStatus;
import org.springframework.http.ResponseEntity;
import org.springframework.stereotype.Service;

import java.util.ArrayList;
import java.util.HashMap;
import java.util.List;
import java.util.Map;

@Service
public class PaymentService {

    @Autowired
    public PaymentService(@Value("${stripe.key.secret}") String secretKey) {
        Stripe.apiKey = secretKey;
    }

    public PaymentIntent createPaymentIntent(PaymentInfoRequest paymentInfoRequest) throws StripeException {
        List<String> paymentMethodTypes = new ArrayList<>();
        paymentMethodTypes.add("card");

        Map<String, Object> params = new HashMap<>();
        params.put("amount", paymentInfoRequest.getAmount());
        params.put("currency", paymentInfoRequest.getCurrency());
        params.put("payment_method_types", paymentMethodTypes);

        return PaymentIntent.create(params);
    }

}
PaymentController.java
package com.example.restapi.implement.payment;

import com.stripe.exception.StripeException;
import com.stripe.model.PaymentIntent;
import org.springframework.beans.factory.annotation.Autowired;
import org.springframework.http.HttpStatus;
import org.springframework.http.ResponseEntity;
import org.springframework.web.bind.annotation.*;

@RestController
public class PaymentController {

    private PaymentService paymentService;

    @Autowired
    public PaymentController(PaymentService paymentService) {
        this.paymentService = paymentService;
    }

    @PostMapping("/api/pay/payment-intent")
    public ResponseEntity<String> createPaymentIntent(@RequestBody PaymentInfoRequest paymentInfoRequest)
            throws StripeException {

        PaymentIntent paymentIntent = paymentService.createPaymentIntent(paymentInfoRequest);
        String paymentStr = paymentIntent.toJson();

        return new ResponseEntity<>(paymentStr, HttpStatus.OK);
    }
}
application.property
漏洩したら困る情報なのでぼかしています。
stripe.key.secret=XXXXXXXXXXXXXXXXXXX
実装後の確認
PostmanでSpringBootのRestApiを叩いて支払情報を作成します。
以下gifアニメはその時の画像です。
左側はPostman 右側はブラウザで開いたStripeの画面です。
支払い情報が新規に作成されたことを確認できます。支払いの状態は未完了です。Postmanのレスポンスからクライアントシークレットが入っていることを確認できます。
クライアントシークレットは決済を完了させる必要な値で実装上必須な値です。

他にやったこと
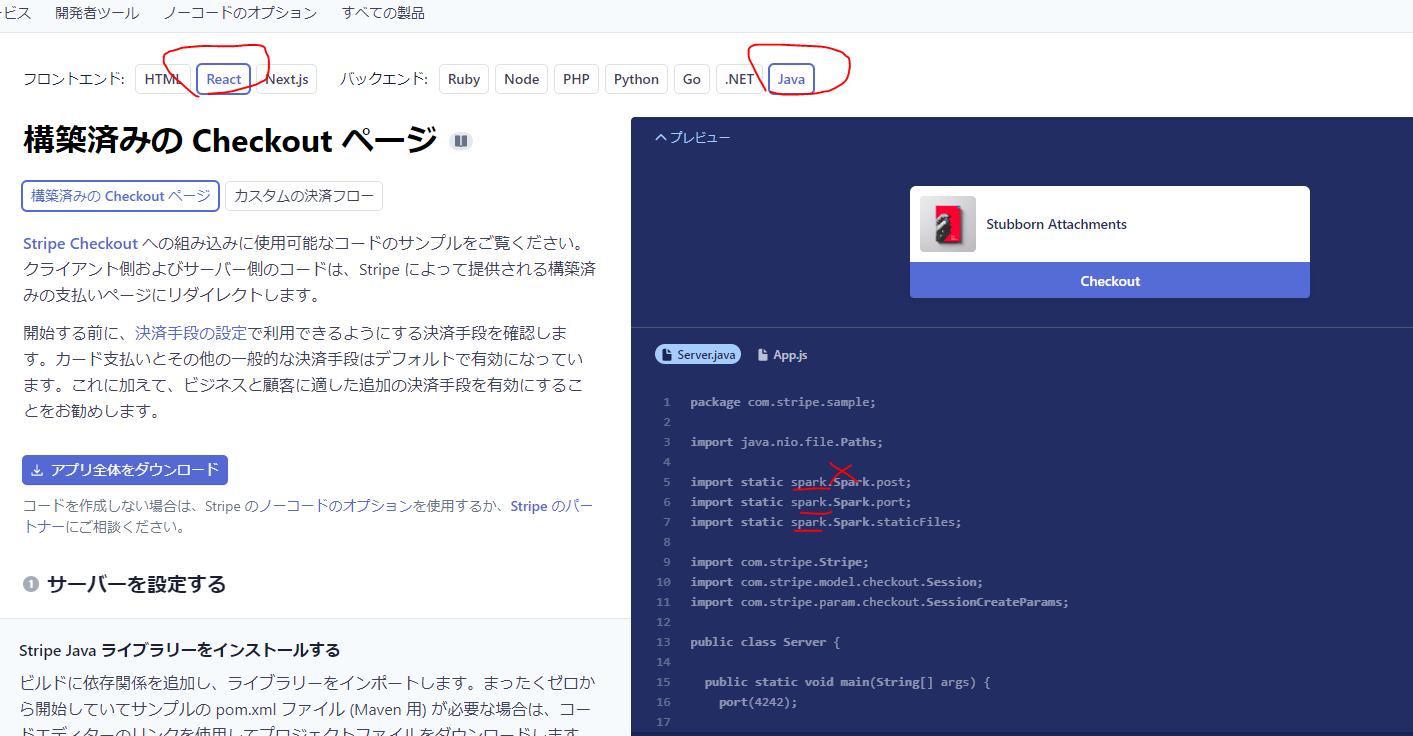
公式を参照するとJavaとReactの例がある!しかし…
公式サイトを参照すると、JavaとReactのサンプルコードが書かれています。
しかしSparkFrameWorkの例が書かれており、SpringBootの場合ではありません。
スクショ
参考
Section34 Stripe Payment Processing