概要
webアプリケーションの認可認証を実装します。
フロントエンドの側の実装がメインになります
バックエンドのSpringBootは仕上がっている体で進めます。postmanでのE2Eテストしかしません
以下フレームワークを使って実装します。
バックエンド:SpringBoot restapi
フロントエンド:next.js react typescript axios
認可認証:SpringSecurity
開発環境
開発環境
OS:windows10
バックエンド側:
IDE:IntelliJ Community
spring-boot-starter-parent 2.75
java : 11
フロントエンド:
IDE:VScode
├── @types/node@18.11.15
├── @types/react-dom@18.0.9
├── @types/react@18.0.26
├── axios@1.2.1
├── eslint-config-next@13.0.6
├── eslint@8.29.0
├── next-auth@4.18.7
├── next@13.0.6
├── react-bootstrap@2.7.0
├── react-dom@18.2.0
├── react@18.2.0
├── styled-components@5.3.6
├── styled-jsx@5.1.1
└── typescript@4.9.4
図とか
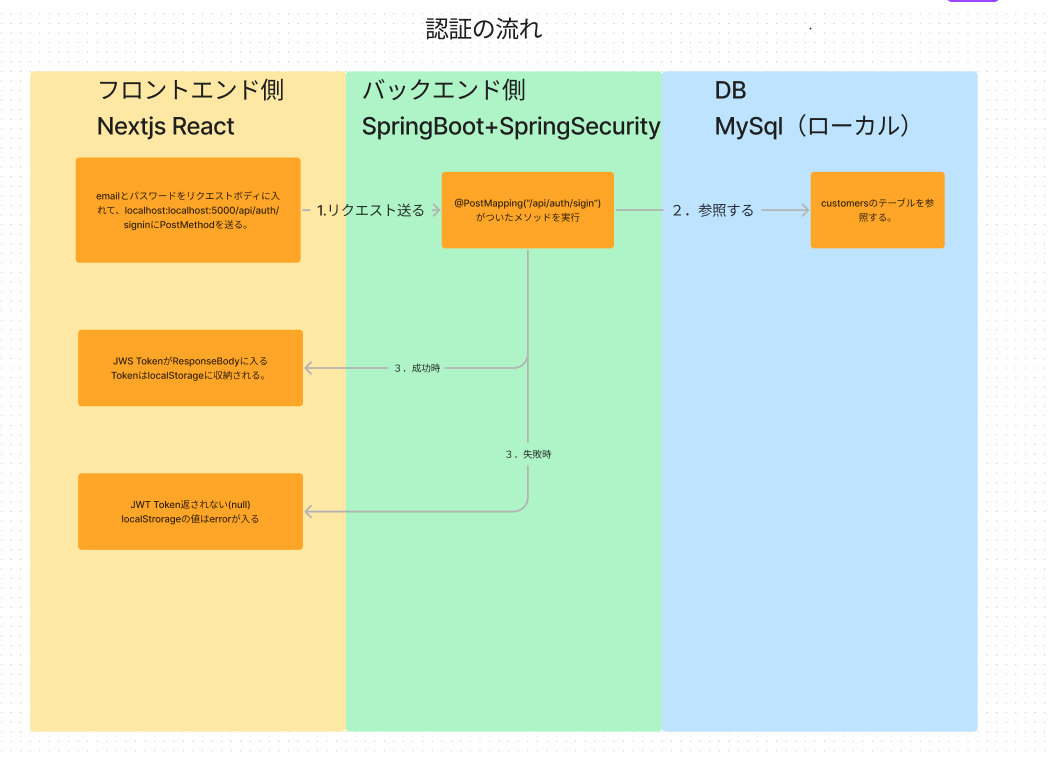
認証の動き
認可の動き
バックエンドの動きははかなり端折ってます。実際はややこしいです。
Controllerレイヤーに入る前にアクセストークンのバリデーション処理が入るよって理解で十分だと思います。
フロントエンドファイル構成(仮)
実装
バックエンド側
実装は済んでいるものとして進めます。
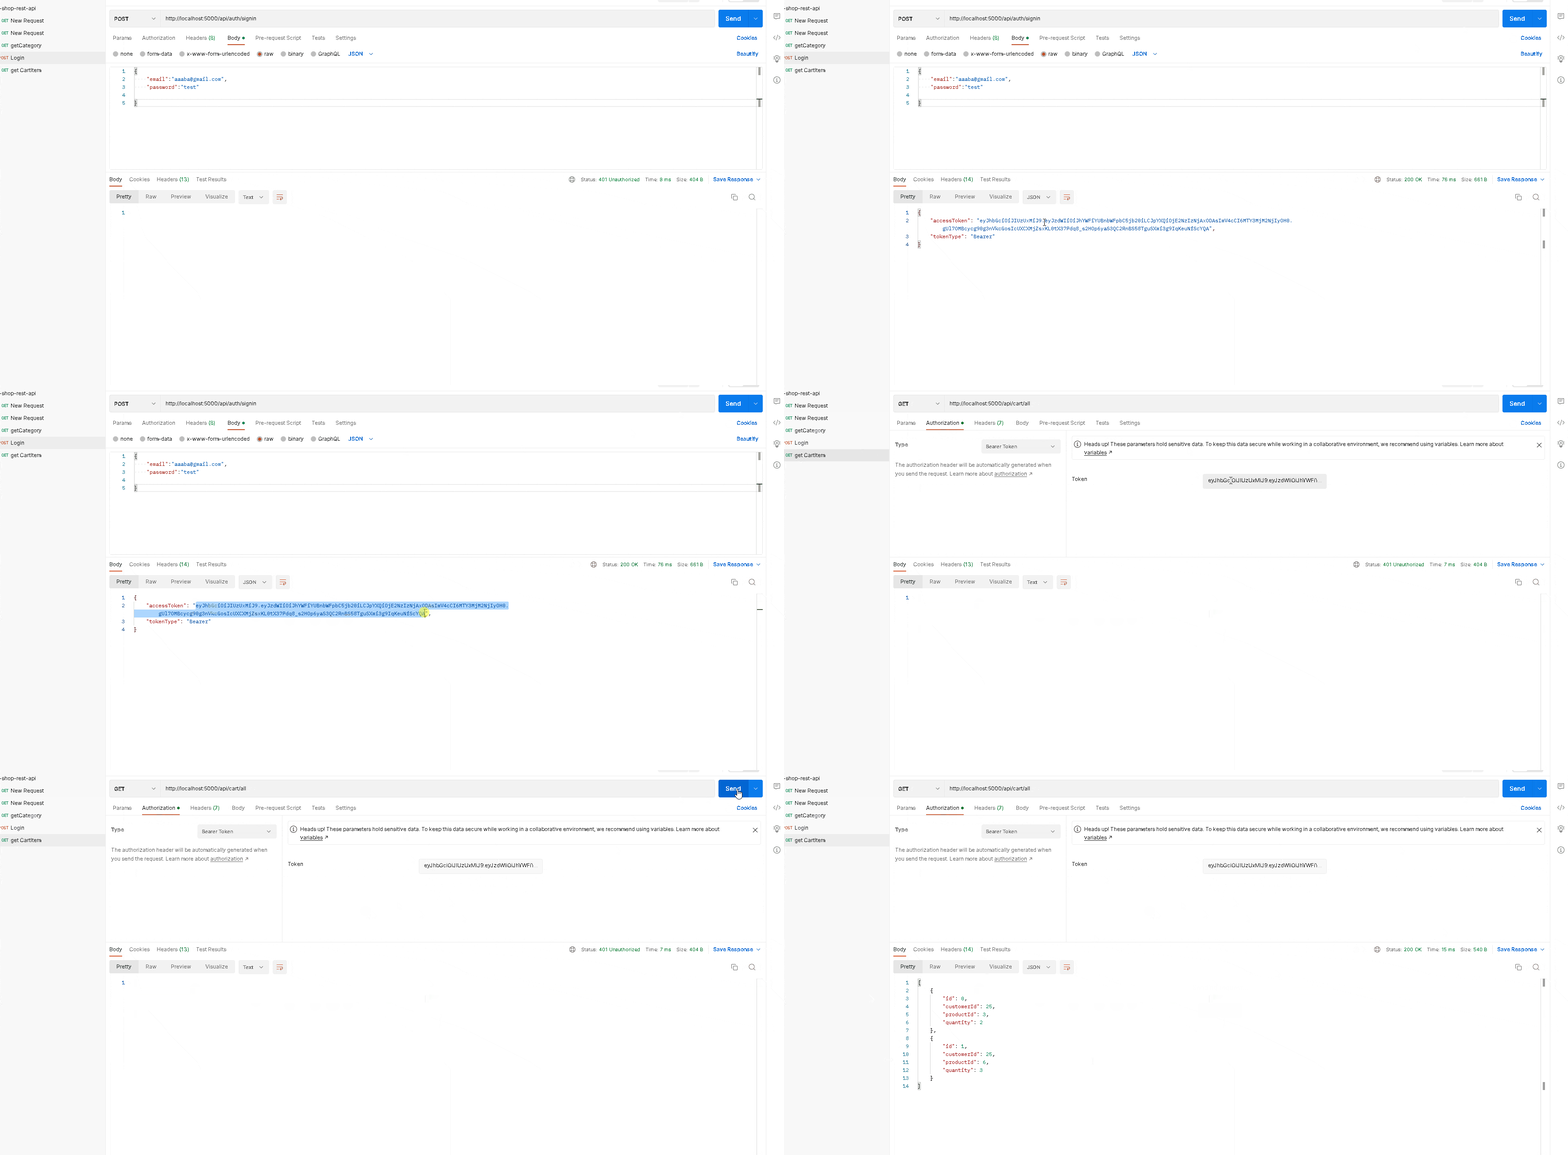
Postmanでの認証
ログインしてから、レスポンスで返されるaccesstokenを使って認可が必要なapiを叩いている様子です。
フロントエンドの側の実装
ソースコード
/**
* @remarks ユースケース上、ログイン機能の実装するために使います。顧客の詳細情報(電話番号、住所など)はCustomerDetail側の管轄になります。
*
* @author RYA234
* @link {signin.ts}
*/
export  type Customer = {
	append(arg0: string, inputEmail: string): unknown
	/** Eメールアドレスです。ログインするときに必要な情報です 入力した情報とMySql側で照合します。*/
	email:string
	/** パスワードです。 ログインするときに必要な情報です。SpringSecurity側でエンコードされます。*/
	password:string
}
import axios from 'axios';
import { URLSearchParams } from 'url';
import { Customer } from '../types/customer';


export const signIn = ({email,password}: Customer) =>{
	return axios.post(`http://127.0.0.1:5000/api/auth/signin`,
	{ email: email, password: password },
	{ headers: {
		'Request-Method' : 'POST',
		'Content-Type': 'application/json',
		'Access-Control-Allow-Origin': '*',
		'Access-Control-Allow-Headers': '*',
		'Access-Control-Allow-Credentials': 'true'
	} } //COR回避

	);
};

export const logout =()=>{
	return axios.post(`http://127.0.0.1:5000/api/auth/logout`);
}


//認可が必要なapi 本来だったら別カテゴリーに移す
export const getCartItems =(jwtAccessKey : string)=>{
	return axios.get(`http://127.0.0.1:5000/api/cart/all`,
	{ headers : {
			'Authorization': `Bearer ${jwtAccessKey}`
		}}
	);
}
import { MouseEventHandler, useRef, useState } from "react";
import * as customerService from "../../service/customerService";
import { Customer } from "../../types/customer";
import { JwtResponse } from "../../types/jwtResponse.t";
import { Button, CarouselItem, Form } from 'react-bootstrap';
import { Category } from "../../types/category";


/**
 * @remarks 検証用ページ <br/
 *			以下の2点の実装方法を確認するためのページです。<br/>
 *	  	  1. nextjsをフロントとしてSpringSecurityの認証するための実装方法確認<br/>
 *		  2. 認証成功後、認可が必要なapiを使えるか実装方法確認y<br/>
 * @returns
 *
 *
 */
export default function Authcheck(){

	// 開発効率上げるため この時点で登録情報は入力済みとする
	// 登録情報はMysqlに保存され passwordはバックエンド側でbcrypt方式で暗号化され保存される。
	const [inputEmail,setInputEmail] = useState<string>('aaaba@gmail.com');
	const [inputPassword,setInputPassword] = useState<string>('test');
	const [jwtAccessToken, setJwtAccessToken] = useState<string | null>();
	const [cartItemMessage,setCartItemMessage] = useState<string>();
	const [presentCartItems, setPresentCartItems] = useState<cartItemType[]>([]);

	// 本当は型定義ファイルに移すべきだが、今回はここに書く
	type cartItemType = {
		id:number,
		customerId:number,
		productId:number,
		quantity:number,
	}

	// 認証ログイン処理
	const submitHandler=(event : React.FocusEvent<HTMLFormElement>) => {
		event.preventDefault();
		const requestBody : Customer  ={
			email: inputEmail,
			password: inputPassword,
			append: function (arg0: string, inputEmail: string): unknown {
				throw new Error("Function not implemented.");
			}
		} ;
		customerService
		.signIn(requestBody)
		.then((response) => {
			localStorage.setItem('accessToken', response.data.accessToken)
			setJwtAccessToken(response.data.accessToken);})
		.catch((error) => {
			localStorage.setItem('accessToken', ' error');
			setJwtAccessToken(localStorage.getItem('accessToken'));})
		;
	}

	// 認可 顧客の買い物かごの情報を取得する。
	const getCategoriesHandler = (onClick? : React.MouseEvent<HTMLButtonElement> | undefined) => {
		customerService
		.getCartItems(jwtAccessToken as string)
		.then((cartItems) => {
				cartItems.data.map((cartItem : cartItemType) => {
				setPresentCartItems(presentCartItems => [...presentCartItems,{
					id:cartItem.id,
					customerId:cartItem.customerId,
					productId:cartItem.productId,
					quantity:cartItem.quantity
				}]);
				setCartItemMessage('成功');
				}
				)
		})
		.catch((error: any) => {
			setPresentCartItems([]); // 初期化
			setCartItemMessage('失敗');
		})
	}
	return(
		<>
			<h2>auth jwt 認証 ログイン</h2>
			フロント側:NextJs<br />
			バックエンド側:Springboot SpringSecurity<br />
			動き
			<br />
			URI http://localhost:5000/api/auth/signinにPOST Methodを送ります。<br />
			<br />
			リクエストボディにはjson形式で ユーザーが入力したemailとpasswordが含まれています。<br />
			正しいemailとpasswordが入力された場合、localstorageがJWT-Tokenが収納されます。<br />
			誤ったemailとpasswordが入力された場合、localstorageに「error」が収納されます。<br />

			local:storageの値「UseStateに渡している値」:<br />
			{jwtAccessToken}
			<Form onSubmit = {submitHandler} >
			<Form.Group className="mb-3" controlId="formBasicEmail">
				<Form.Label>Email address</Form.Label><br />
				<Form.Control
					type="email"
					placeholder="Enter email"
					value  = {inputEmail as string}
					onChange={(event) => setInputEmail(event.target.value)}
					/><br />
			</Form.Group>

			<Form.Group className="mb-3" controlId="formBasicPassword">
				<Form.Label>Password</Form.Label><br />
				<Form.Control
					type="password"
					placeholder="Password"
					value ={inputPassword as string}
					onChange={(event) => setInputPassword(event.target.value)}
					/><br /><br />
			</Form.Group>

			<Button variant="primary" type="submit">
				Submit
			</Button>
			</Form>
		<div>
			<h2>auth jwt 認可</h2>
			認証が必要なAPIを叩けるか実際に確認する。<br />
				ユースケース的には、ECショップにおいてユーザーが自分の買い物カゴの情報を取得します。<br />
				<Button onClick={getCategoriesHandler}>買い物カゴの情報を取得する。</Button>
				<br />
				id, 商品Id、数量
				 {presentCartItems.map((cartItem:cartItemType) => {
					return(
						// eslint-disable-next-line react/jsx-key
						<div>
						{cartItem.id}  {cartItem.productId} {cartItem.quantity}
						</div>
					)
				 }
				)}
				<br/><br/>
				api実行できたか<br/>
				{cartItemMessage}
		</div>
	</>
	)
}
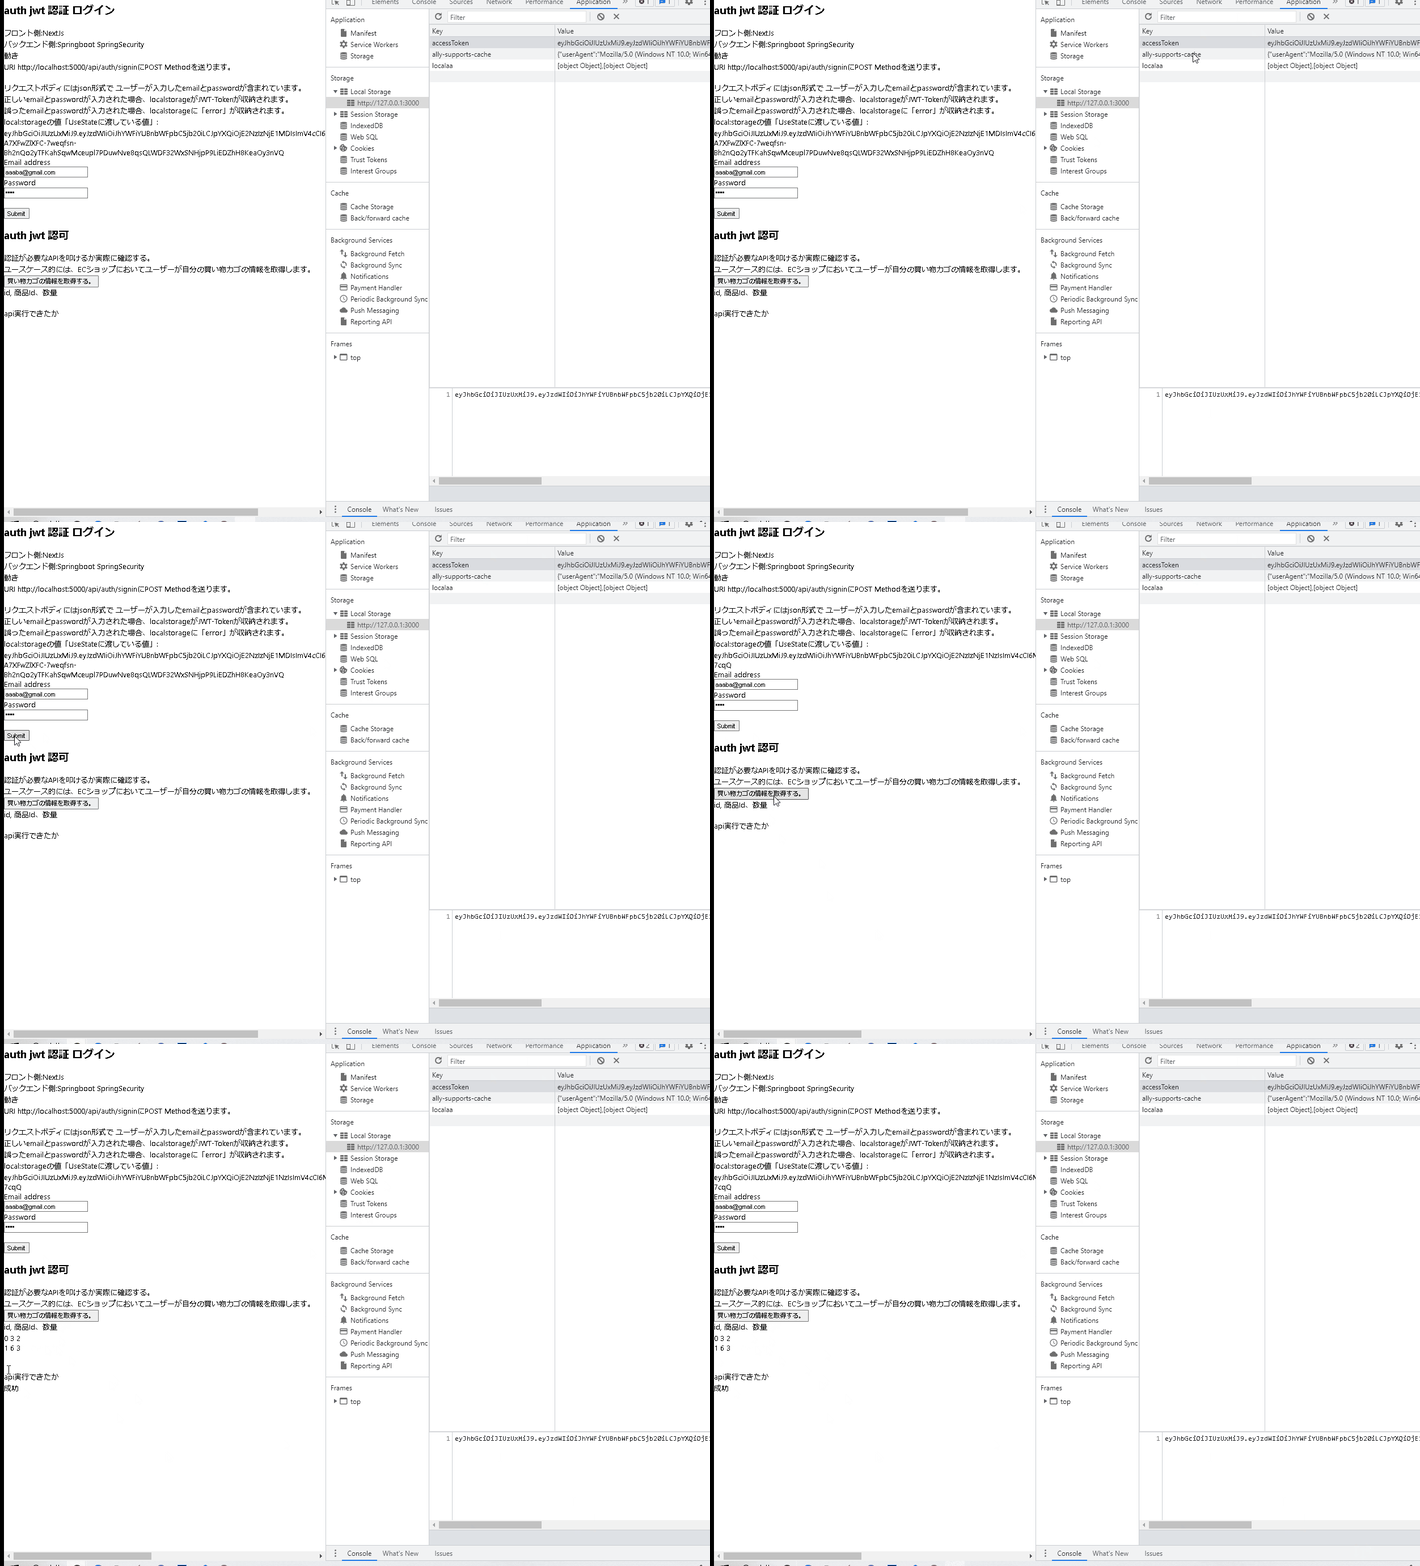
認証(ログイン)ができるか検証する
localstorageにaccessTokenが入っているので 期待した動きができてますね

認証後 認可が必要なapiが実行できるか検証する。
認証せず、認可が必要なapiが実行できないことを検証する。
以下 gifアニメは accessTokenを消して、認可が必要なAPIを叩いている様子です。
		.catch((error: any) => {
			setPresentCartItems([]); // 初期化
			setCartItemMessage('失敗');
		})
らへんの処理をしているので期待した動きをしています。
あとはログアウト処理できれば機能的に十分そう


