目標
目標を次のように定めます。
- 雪面を作る
- 降った雪を積もらせる
3. 積もった雪を削る
3についてはその内やりたいなーくらいに思ってます。
ソースコード
一応、GitHubにソースは上げています。
https://github.com/RT-EGG/csOpenGL/tree/master/SamplePrograms/GLSnowAccumulation
あまり整理してないので見にくいかも。
1. 雪面を作る
ここでの目標は画像のようになります。
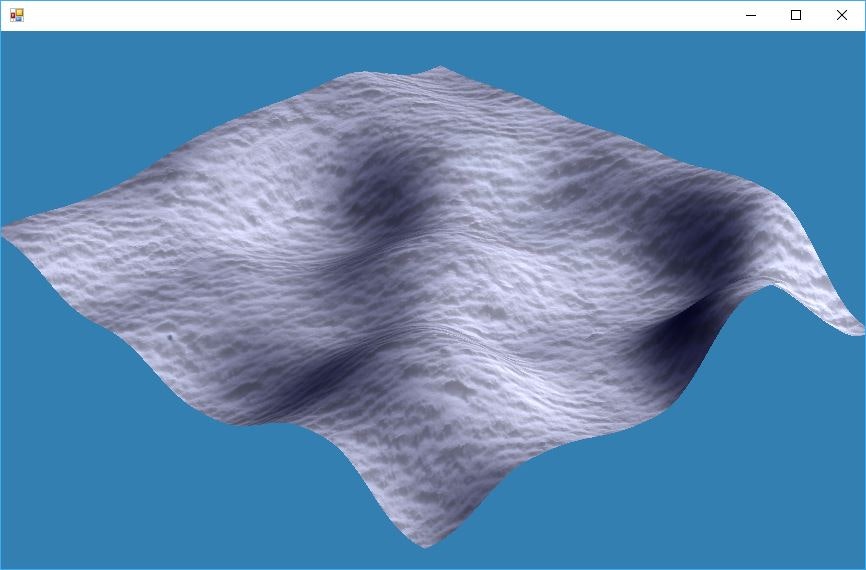
早い話が、画像のようなメッシュを作って適当にテクスチャを貼って適当に陰影をつけるだけです。
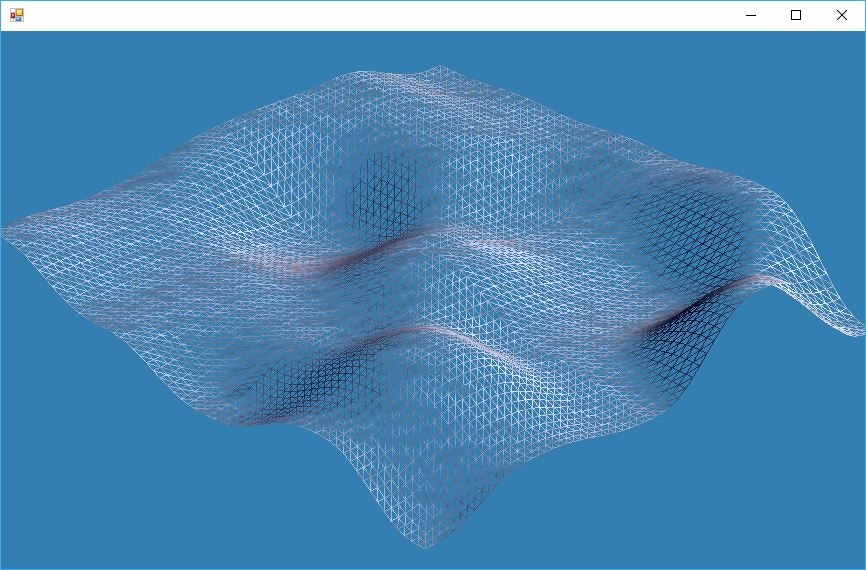
2(,3)の目標を踏まえ、メッシュの頂点は動的に変化することを想定します。
VBOデータの再計算を繰り返してもいいのですが、今回は標高マップを参照してテッセレーションしてみます。
1.1 標高マップの作成
作り方にはいろいろあると思いますが、今回の方法では画像のような標高マップ(テクスチャ)が作られます。
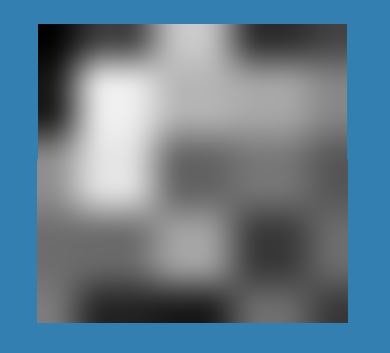
考え方はバリューノイズに近く、
"格子点ごとに一意な乱数値を定義し、間を曲線的に補間する"
が一言での説明となります。
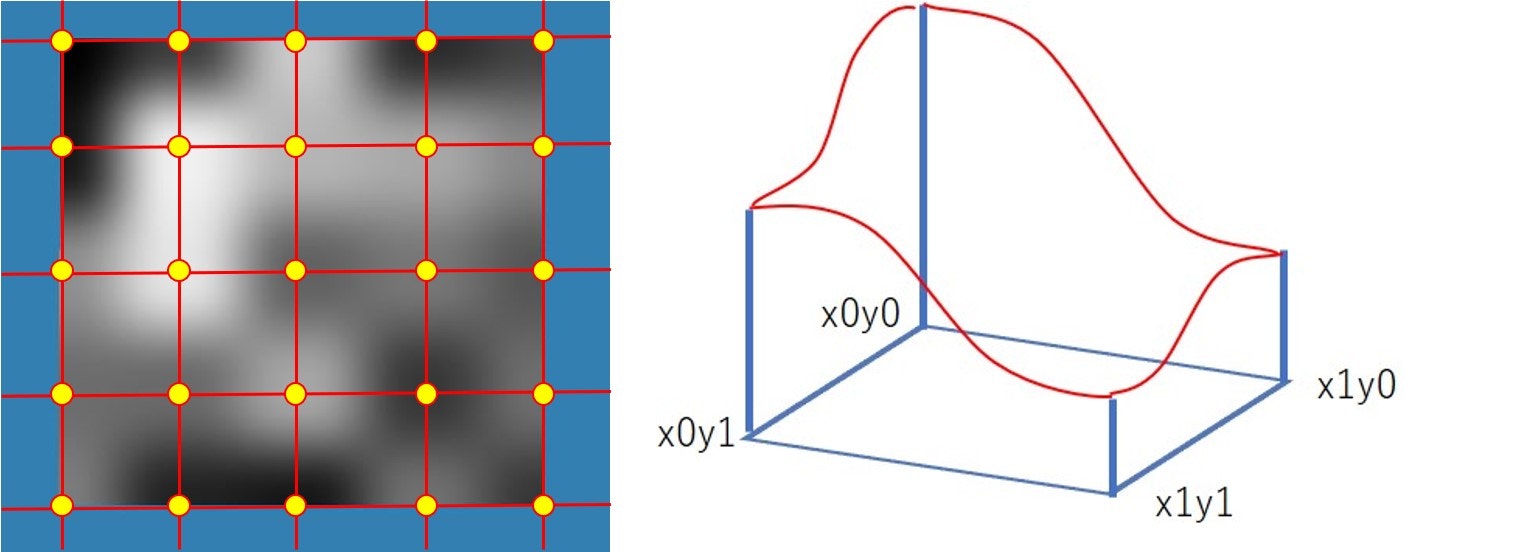
補間関数には次の5次関数を使っています。
C(t)=6t5-15t4+10t3
確かパーリンノイズとか調べてた時に見かけた関数だったと思います。
(最初はパーリンノイズで標高マップを作ろうとしてましたが、なんだかうまくいかずにこの方法に)
標高マップの初期化について、今回はComputeShaderを使っています。初期化は頻繁に行うものではないのでCPUでも十分です。
GLSLでの乱数生成は次の関数を用いています。
float rand(vec2 co, float aSeed)
{
    return fract(sin(dot(co.xy ,vec2(12.9898,78.233)) * aSeed) * 43758.5453);
}
これも、どこかでみたものを流用したものです。
aSeedは乱数シードであり、CPUで生成した乱数値を入力することを想定しています。これにより、初期化の度に異なる標高マップを作成することができます。
1.2 メッシュの生成
メッシュは標高マップを参照して動的に生成するため、テッセレーションにて分割/評価を行います。
VertexShader、TessellationControlShaderについては大したことをしていない(次のステージへ頂点情報を渡しているだけな)ので、ここでは割愛します。
# version 430

layout (quads, equal_spacing, ccw) in;

layout (binding = 0)  uniform sampler2D inHeightMap;
layout (location = 2) uniform mat4 inProjectionMatrix;
layout (location = 3) uniform mat4 inModelViewMatrix;
layout (location = 4) uniform mat4 inModelMatrix;
layout (location = 5) uniform mat3 inNormalMatrix;
layout (location = 6) uniform float inMinHeight;
layout (location = 7) uniform float inMaxHeight;
layout (location = 8) uniform ivec2 inSurfaceTextureSize;

in gl_PerVertex
{
	vec4 gl_Position;
}gl_in[gl_MaxPatchVertices];

layout (location = 0) in vec3 inNormal[gl_MaxPatchVertices];
layout (location = 1) in vec2 inTexCoord[gl_MaxPatchVertices];

out gl_PerVertex
{
	vec4 gl_Position;
};

layout (location = 0) out vec3 outNormal;
layout (location = 1) out vec2 outSurfaceTexCoord;
layout (location = 2) out float outOffset;

vec4 CalcPositionAt(vec3 aTessCoord)
{
    vec4 p0 = mix( gl_in[0].gl_Position, gl_in[1].gl_Position, aTessCoord.x );
	vec4 p1 = mix( gl_in[3].gl_Position, gl_in[2].gl_Position, aTessCoord.x );
    return mix( p0, p1, aTessCoord.y );
}

vec2 CalcTexCoordAt(vec3 aTessCoord)
{
    vec2 t0 = mix( inTexCoord[0], inTexCoord[1], aTessCoord.x );
    vec2 t1 = mix( inTexCoord[3], inTexCoord[2], aTessCoord.x );
    return mix( t0, t1, aTessCoord.y );
}

vec3 CalcNormalAt(vec3 aTessCoord)
{
    vec3 n0 = mix( inNormal[0], inNormal[1], aTessCoord.x );
    vec3 n1 = mix( inNormal[3], inNormal[2], aTessCoord.x );
    return mix( n0, n1, aTessCoord.y );
}

vec4 CalcOffsetedPositionAt(vec3 aTessCoord, out float aOffset)
{
    vec4 position = CalcPositionAt(aTessCoord);
    vec2 texCoord = CalcTexCoordAt(aTessCoord);
    vec3 normal   = CalcNormalAt(aTessCoord);

    float x = (texCoord.x - 0.5) * 2.0;
    float y = (texCoord.y - 0.5) * 2.0;
    float d = mix(inMinHeight, inMaxHeight, texture(inHeightMap, texCoord).x);

    position.xyz += normal * d;
    aOffset = d;
    return position;
}

vec4 CalcOffsetedPositionAt(vec3 aTessCoord)
{
    float dummy = 0.0;
    return CalcOffsetedPositionAt(aTessCoord, dummy);
}

void main()
{
    float offset = 0.0;
    gl_Position = inProjectionMatrix * inModelViewMatrix * CalcOffsetedPositionAt(gl_TessCoord, offset);

    const float DELTA = 0.01;
    vec4 px0 = normalize(CalcOffsetedPositionAt(gl_TessCoord + vec3(-DELTA, 0.0, 0.0)));
    vec4 px1 = normalize(CalcOffsetedPositionAt(gl_TessCoord + vec3(+DELTA, 0.0, 0.0)));
    vec4 py0 = normalize(CalcOffsetedPositionAt(gl_TessCoord + vec3(0.0, -DELTA, 0.0)));
    vec4 py1 = normalize(CalcOffsetedPositionAt(gl_TessCoord + vec3(0.0, +DELTA, 0.0)));

    outNormal = normalize(cross(px1.xyz - px0.xyz, py1.xyz - py0.xyz));
    outNormal = inNormalMatrix * outNormal;

    outSurfaceTexCoord = CalcTexCoordAt(gl_TessCoord);
    outOffset = offset;

	return;
}
FragmentShaderについても、AmbientとDiffuseを計算してるだけなので割愛します。
雪にSpecularは計算しなくてもいいかなと思いましたが、そもそも雪面の色計算はもっと別のものを考えたいい方がいいでしょう。
2. 降った雪を積もらせる
完成図です。見た目にわかりやすいよう、粒子1粒による隆起量を大きめにしています。
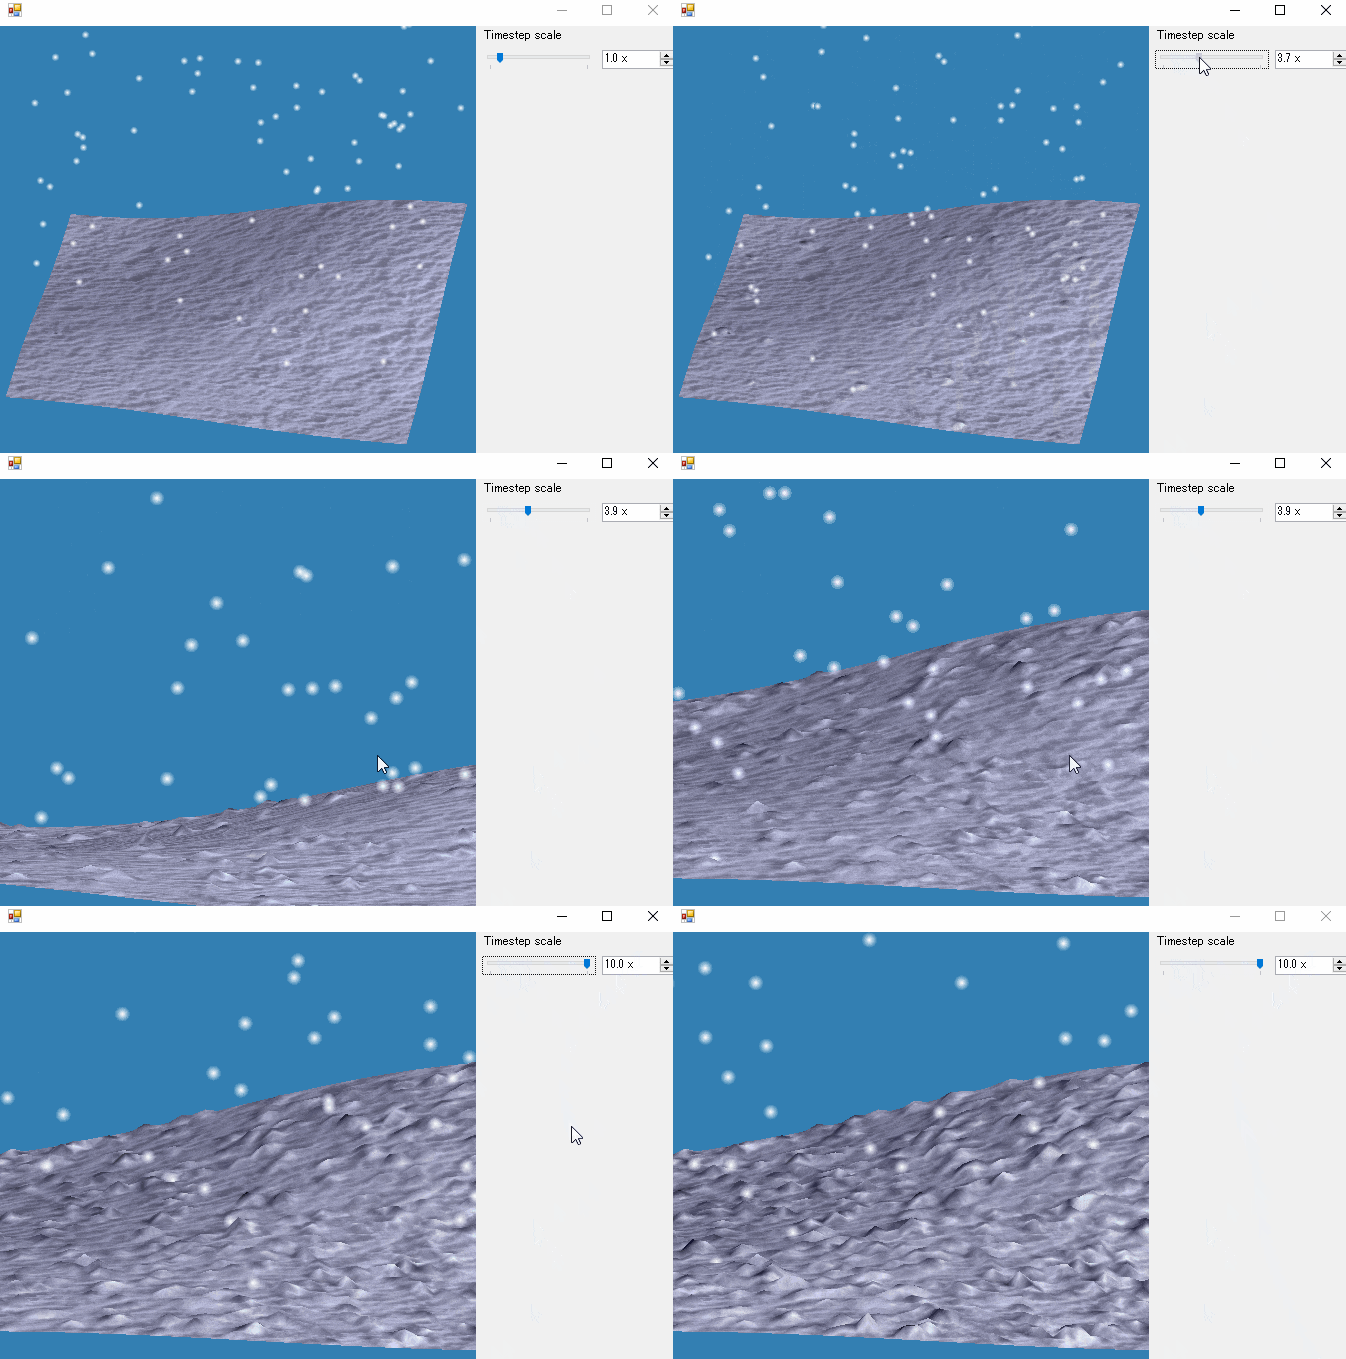
降雪の計算もComputeShaderで行っており、ComputeShader内で計算できるよう、各雪粒子はSSBOでデータを作っています。(降雪の計算自体はただ重力落下してるだけですが、特に重要じゃないのでシンプルに済ませてます)
各粒子の運動計算において
- 標高テクスチャから雪面の標高を算出し、
- 雪面を通り過ぎたら
- その点に対応するテクスチャ上のピクセルを検索
- テクスチャのピクセルに対する値を増加
が処理の流れとなります。
また、単純に1ピクセルだけの値を加算すると尖った印象の見た目になってしまうので、周辺数ピクセルを加算するようにしています。
vec3 position = vec3(point.PositionX, point.PositionY, point.PositionZ);
vec3 velocity = vec3(point.VelocityX, point.VelocityY, point.VelocityZ);
vec3 acceleration = vec3(0.0, -9.8, 0.0);

const float con_MaxSpeed = 0.1;
velocity += acceleration * inTimeStep;
if (length(velocity) > con_MaxSpeed)
    velocity = normalize(velocity) * con_MaxSpeed;

position += velocity * inTimeStep;

ivec2 texPos = ivec2(int(0.5 + ((position.x + 0.5) * (inHeightMapSize.x - 1))),
                     int(0.5 + ((position.z + 0.5) * (inHeightMapSize.y - 1))));
texPos.x = min(inHeightMapSize.x - 1, max(0, texPos.x));
texPos.y = min(inHeightMapSize.y - 1, max(0, texPos.y));
float rawHeight = imageLoad(inHeightMap, texPos).x;
float height = mix(inMinHeight, inMaxHeight, rawHeight);

if (position.y < height) {
    point.Status = 1;

    for (int y = max(0, texPos.y - 5); y < min(inHeightMapSize.y - 1, texPos.y + 5); ++y) {
        for (int x = max(0, texPos.x - 5); x < min(inHeightMapSize.x - 1, texPos.x + 5); ++x) {
            vec4 h = imageLoad(inHeightMap, ivec2(x, y));
            h.x += 0.03;
            imageStore(inHeightMap, ivec2(x, y), vec4(h));
        }
    }
}

point.PositionX = position.x;
point.PositionY = position.y;
point.PositionZ = position.z;
point.VelocityX = velocity.x;
point.VelocityY = velocity.y;
point.VelocityZ = velocity.z;
Points[index] = point;
なお、雪面および雪粒子は座標系を共有しているため問題になりませんが、本来は座標変換の計算を入れるべきです。
今回は増加値を固定としていますが、粒子の半径に応じて周囲への影響や増加値を計算するべきでしょう。
また、複数の粒子が同じピクセルを参照することがあると思うので、なんらか対策は必要だと思います……。