目的
2022年さらに活用できるための備忘メモ用
年内のおさらい
技術メモまとめ
試したこと
1. Docker
MatterMost をここでは題材にしています。
git clone https://github.com/mattermost/mattermost-docker-preview.git
# Copyright (c) 2016-present Mattermost, Inc. All Rights Reserved.
# See License.txt for license information.
FROM mysql:5.7

RUN apt-get update && apt-get install -y ca-certificates

#
# Configure SQL
#

ENV MYSQL_ROOT_PASSWORD=mostest
ENV MYSQL_USER=mmuser
ENV MYSQL_PASSWORD=mostest
ENV MYSQL_DATABASE=mattermost_test

#
# Configure Mattermost
#
WORKDIR /mm

# Copy over files
ADD https://releases.mattermost.com/6.0.0/mattermost-team-6.0.0-linux-amd64.tar.gz .
RUN tar -zxvf mattermost-team-*-linux-amd64.tar.gz
ADD config_docker.json ./mattermost/config/config_docker.json
ADD docker-entry.sh .

RUN chmod +x ./docker-entry.sh
ENTRYPOINT ./docker-entry.sh

# Mattermost environment variables
ENV PATH="/mm/mattermost/bin:${PATH}"

# Create default storage directory
RUN mkdir ./mattermost-data
VOLUME /mm/mattermost-data

# Ports
EXPOSE 8065
dockerがインストール済みであれば、以下コマンドで起動完了
docker run --name mattermost-preview -d --publish 8065:8065 mattermost/mattermost-preview
2. VBA
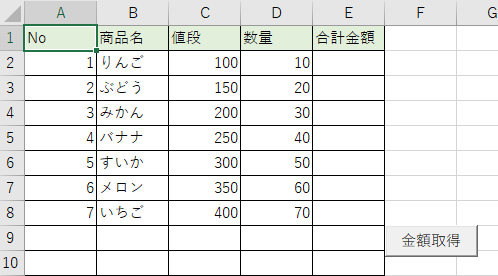
Do Until 文を極めれば、いろいろツールが作れる
    Dim row As Integer
    row = 2

    Do Until Cells(row, 1).Value = ""
        Cells(row, 5).Value = Cells(row, 3).Value * Cells(row, 4).Value
        row = row + 1
    Loop
No列は固定となるので、それを軸にすることで、大抵なツールを楽に作ることができる。まずは作りたいものをイメージしてエクセル上で設計して試行錯誤する。
3. JsRender.js
ReactやVueなどを使わない環境では、まだJqueryやNode.jsと共に使われるケースが多い。
https://www.jsviews.com/
読み込みに必要なもの
 <!-- Load jQuery -->
  <script src="https://code.jquery.com/jquery-3.5.1.js"></script>

  <!-- Load JsRender latest version, from www.jsviews.com: -->
  <script src="https://www.jsviews.com/download/jsrender.js"></script>
実装サンプル
<!-- 1.レンダリングされる最終的な箱の用意 -->
  <div id="result"></div>

  <!-- 2.レンダリング情報の宣言 -->
  <script id="myTmpl" type="text/x-jsrender">{{:name}}</script>

 <!-- 3.具体的なJSの中身  -->
  <script>
    var tmpl = $.templates("#myTmpl");
    var data = {name: "Jo"};
    var html = tmpl.render(data);  // テンプレート(tmp1)として【2】がレンダリングされる
    $("#result").html(html);   // ←ここで初めて【1】のDOMに出力される
  </script>
4. React.js と Webpack
そもそもReact.jsってなんだよ?
ググるといろいろ出てきますが、一言でいうと「古DOMと新DOMの差分から、更新したいDOMだけを見極めて、ブラウザにレンダリング情報をセクションとしてコンポーネント単位等でDOMに流し込むことができる。」
Reactインストール
$ npm install react react-dom
$ npm install -D @babel/preset-react
node.js って
npm とは
Node Package Manager の略。
JavaScript 系のパッケージを管理するツール。
必要とするパッケージをインストールする際、依存するパッケージもまとめてインストールしてくれる。
node.jsの初期編としては、まず...
npm init などで作成したpackage.jsonを基準に、npm installを実施して、node_moduleのディレクトリ作成される。
{
  "name": "myProject",
  "version": "1.0.0",
  "description": "",
  "main": "index.js", //←エントリポイント
  "scripts": {
    "test": "echo \"Error: no test specified\" && exit 1",
    "build”: "webpack --mode production",
    "dev”: "webpack --watch",

  },
  "keywords": [],
  "author": "",
  "license": "ISC"
}
webpack
複数のモジュールを1つにまとめて出力できる。モジュールバンドラ。
loderを用いることでjsファイル以外をまとめることができる。
Webpack インストール
$ npm install -D webpack webpack-cli webpack-dev-server html-webpack-plugin
Babelインストール
$ npm install -D @babel/core @babel/runtime @babel/plugin-transform-runtime @babel/preset-env babel-loader
Babel本体とプラグイン、プリセットの設定、webpackのローダーをインストール。
TypeScriptを使用する
$ npm install -D typescript ts-loader @babel/preset-typescript @types/react @types/react-dom
{
  "compilerOptions": {
    "target": "esnext",
    "jsx": "react",

    "forceConsistentCasingInFileNames": true,
    "strict": true,
    "noImplicitAny": true,
    "strictNullChecks": true,
    "noUnusedLocals": true,
    "noUnusedParameters": true,
    "noImplicitReturns": true,
    "moduleResolution": "node",
    "esModuleInterop": true,
    "isolatedModules": true,
    "allowSyntheticDefaultImports": true,
  },
  "include": ["src/**/*.ts", "src/**/*.tsx"],
  "exclude": ["node_modules"]
}
ビルド
$ npm run build

$ webpack --watch  ←WATCHモードとはビルド対象のファイルに変化があった場合に検知して、自動的に再ビルドしてくれる機能のことです。(一言でいうと修正してすぐ反映)
ビルド&実行
$ npx webpack serve --config webpack.config.js
const path = require("path");
const HtmlWebpackPlugin = require("html-webpack-plugin");

module.exports = {
  mode: "development",
  entry: path.resolve(__dirname, "src/app.tsx"), // エントリーポイント修正
  output: {
    path: path.resolve(__dirname, "dist"),
    filename: "app.js",
  },
  resolve: {
    modules: [path.resolve(__dirname, "node_modules")],
    extensions: [".js", ".ts", ".tsx"], // ts, tsx 追加
  },
    module: {
    rules: [
      {
        test: [/\.ts$/, /\.tsx$/],
        use: [
          {
            loader: "babel-loader",
            options: {
              presets: ["@babel/preset-env", "@babel/preset-react", "@babel/preset-typescript"], // typescript追加
            },
          },
          'ts-loader' // ts-loader追加
        ],
      },
    ],
  },
  plugins: [
    new HtmlWebpackPlugin({
      template: path.resolve(__dirname, "src/index.html"),
    }),
  ],
};
JSのテストツール
JEST などでテストメソッドを作成し、検証ができる。
5. Spring と Junit
Spring の話は略します
Junit
@ParameterizedTest
@ValueSource(strings = {"Java", "java", "JAVA"})
void upperCase(String s) {
    assertEquals("JAVA", s.toUpperCase());
}
@Test
    public void testJudgeGrade() {
        System.out.println("judgeGrade");
        int score = 0;
        Score instance = new Score();
        String expResult = "";
        String result = instance.judgeGrade(score);
        assertEquals(expResult, result);
        // TODO review the generated test code and remove the default call to fail.
        fail("The test case is a prototype.");
    }
Mockito
Mockitoは、Javaのユニットテストのために開発されたモックフレームワーク(mocking framework)です。テストでモックオブジェクトを直感的に操作できるのを目的として開発されています。
モックオブジェクトはテスト対象(テストしたいクラス)から呼び出される依存先のオブジェクトに代わって使用されるテスト用のオブジェクトです。
→参考:Mockito入門 ~モックとスタブ
https://crieit.net/posts/Mockito
スタブ
メソッドの実行に対して、事前に定義された振る舞い(引数、返り値)を提供するオブジェクト
モック
メソッドの実行に対して、実行回数やパラメータの呼び出しを記録するオブジェクトです。
スパイ
メソッドの実行に対して、実行回数やパラメータの呼び出しを記録するオブジェクトです。モックとの違いとして、基本的な定義では、モックはメソッドの実行中に検証するのに対して、スパイはメソッドの実行後に検証するという違いがあります。しかし、Mockitoで扱う検証メソッドではメソッドの実行後に検証するので両者の違いはありませんが、Mockitoにおけるスパイはオブジェクトを部分的にモックする用途で使用されています。
使用方法
- テスト対象のクラスに
@InjectMocksをつける - テスト対象のクラス内で呼ばれるクラスに
@Mockをつける - 前処理(
@BeforeEach)に、@Mockのモックオブジェクトを初期化する
    @Before
    public void init() {
        //@Mockアノテーションのモックオブジェクトを初期化
        //これを実行しないと@Mockアノテーション、@InjectMocksを付与した
        //Mockオブジェクトが利用できない
        MockitoAnnotations.initMocks(this);

        //Mockの設定
        //mapper.findAll()メソッドを実行した際の戻り値をここで設定
        when(mapper.findAll()).thenReturn(makeUserDataList());
    }
-
@Testをつけたメソッド内でInjectMocksした(テスト対象メソッド)を実行する -
assertEquals等でモックの結果と期待結果を比較
Mockito その他
→参考:引数の検証について
https://qiita.com/kyabetsuda/items/16c565460580a8354f6a
最後に
2022年は、自身の強みをさらに伸ばして、かつできなかったところを総復習し、
案件で活躍していきたいですね。良いお年を...


