はじめに
今回は、CoreAnimationを使ってアニメーションで遊んでみます。
GitHub
CoreAnimation
CoreAnimationはドキュメントでは以下のように書かれています。
Core Animation provides high frame rates and smooth animations without burdening the CPU and slowing down your app. Most of the work required to draw each frame of an animation is done for you. You configure animation parameters such as the start and end points, and Core Animation does the rest, handing off most of the work to dedicated graphics hardware, to accelerate rendering.
Core Animationは、CPUに負担をかけたり、アプリの速度を低下させたりすることなく、高いフレームレートとスムーズなアニメーションを提供します。 アニメーションの各フレームを描画するために必要な作業のほとんどは、あなたのために行われます。 開始点や終了点などのアニメーションパラメータを設定すると、Core Animationが残りの作業を行い、ほとんどの作業を専用のグラフィックハードウェアに渡して、レンダリングを高速化します。
つまり、軽くて高速に動く便利なフレームワークということですね!
実装(CABasicAnimation)
CABasicAnimationの完成品は以下です。
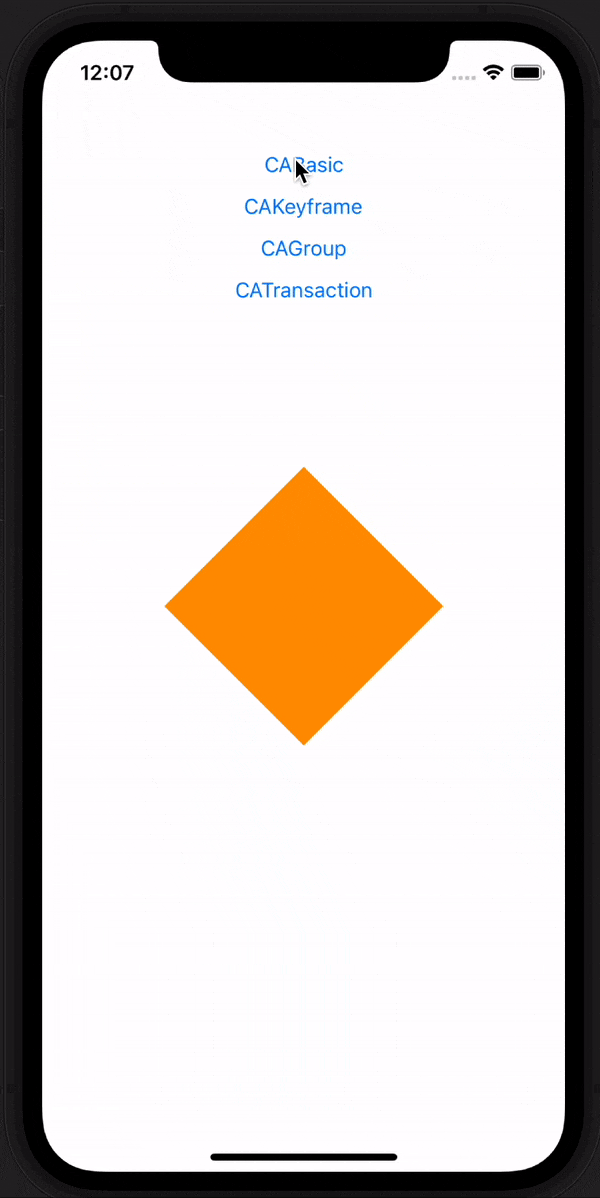
ストリーボードでUIButtonと正方形のUIViewを配置します。

final class ViewController: UIViewController {
@IBOutlet private weak var myView: UIView!
private var shapeLayer: CAShapeLayer!
private var path: UIBezierPath!
private var height: CGFloat { myView.frame.size.height }
private var width: CGFloat { myView.frame.size.width }
override func viewDidLoad() {
super.viewDidLoad()
setupMyView()
}
private func setupMyView() {
path = UIBezierPath()
path.move(to: CGPoint(x: width / 2, y: 0.0))
path.addLine(to: CGPoint(x: 0.0, y: height / 2))
path.addLine(to: CGPoint(x: width / 2, y: height))
path.addLine(to: CGPoint(x: width, y: height / 2))
path.close()
shapeLayer = CAShapeLayer()
shapeLayer.path = path.cgPath
shapeLayer.lineWidth = 3
myView.layer.mask = shapeLayer
}
// MARK: - CABasicAnimation
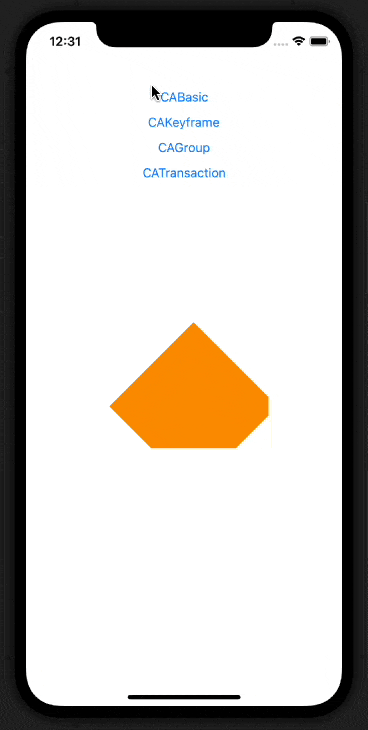
@IBAction private func CABasicButtonDidTapped(_ sender: Any) {
let animation = CABasicAnimation(keyPath: #keyPath(CALayer.opacity))
animation.fromValue = 1
animation.toValue = 0
animation.duration = 3
animation.timingFunction = CAMediaTimingFunction(name: .easeInEaseOut)
shapeLayer.add(animation, forKey: nil)
}
}
解説(CABasicAnimation)
CABasicAnimationを使うことで、簡単なアニメーションを実現することができます。
keyPathを指定することで、どのようなアニメーションにするのかを指定します。今回は、opacityを変更しています。
let animation = CABasicAnimation(keyPath: #keyPath(CALayer.opacity))
fromValueとtoValueで初めと終わりの値を指定できます。
animation.fromValue = 1
animation.toValue = 0
durationでアニメーション時間を指定できます。
animation.duration = 3
timingFunctionを使うことで、自然なアニメーションを実現できます。
以下の5つが用意されています。
・Linear
・EaseIn
・EaseOut
・EaseInEaseOut
・Default
実装(CAKeyframeAnimation)
CABasicAnimationよりもより細かいアニメーションができます。
// MARK: - CAKeyframeAnimation
@IBAction private func CAKeyframeButtonDidTapped(_ sender: Any) {
    let animation = CAKeyframeAnimation(keyPath: #keyPath(CALayer.position))
    let path = CGMutablePath()
    path.move(to: CGPoint(x: 0, y: 0))
    path.addCurve(to: CGPoint(x: 100, y: 100),
                  control1: CGPoint(x: 0, y: 100),
                  control2: CGPoint(x: 100, y: 100))
    path.addCurve(to: CGPoint(x: -100, y: 100),
                  control1: CGPoint(x: -50, y: 50),
                  control2: CGPoint(x: 100, y: -100))
    animation.path = path
    animation.duration = 3
    shapeLayer.add(animation, forKey: nil)
}
解説(CAKeyframeAnimation)
CAKeyframeAnimationのkeyPathを指定して、今回はpositionを変更してみます。
let animation = CAKeyframeAnimation(keyPath: #keyPath(CALayer.position))
CGMutablePathを使います。
let path = CGMutablePath()
CGMutablePathのaddCurveメソッドを使って曲線を描くようなアニメーションを実現させます。
path.addCurve(to: CGPoint(x: 100, y: 100),
              control1: CGPoint(x: 0, y: 100),
              control2: CGPoint(x: 100, y: 100))
path.addCurve(to: CGPoint(x: -100, y: 100),
              control1: CGPoint(x: -50, y: 50),
              control2: CGPoint(x: 100, y: -100))