はじめに
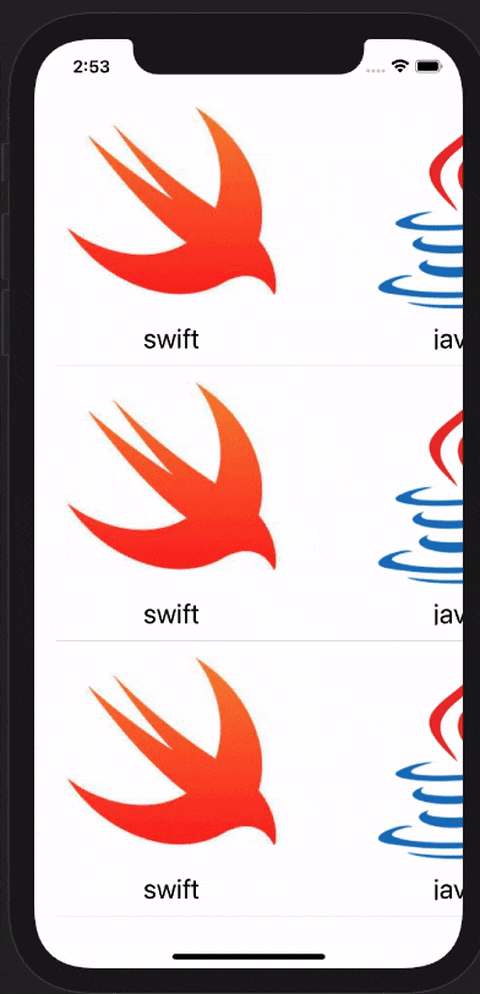
TableViewのなかにCollectionViewを入れて縦にも横にもスワイプできるようなものをつくってみましょう。
GitHub
手順
1.好きな画像を好きな枚数Assets.xcassetsに入れる。
2.ViewControllerにUITableViewを画面の大きさと同じサイズのレイアウトを張る。
3.Modelを用意する
struct Model {
    let text: String
    let imageName: String
    init(text: String, imageName: String) {
        self.text = text
        self.imageName = imageName
    }
}
4.カスタムテーブルビューセルを用意する。(CollectionTableViewCell)
このカスタムセルがテーブルビューの一つのセルなので、以下のようにカスタムセルにUICollectionViewを貼りましょう。
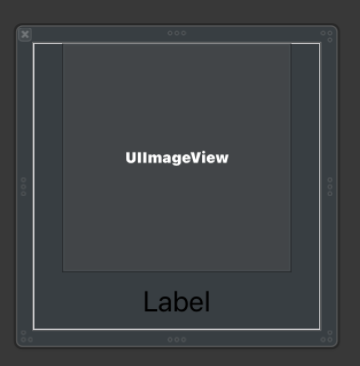
5.コレクションビューのカスタムセルを用意する。(MyCollectionViewCell)
これがコレクションビューに表示されるセルなので、imageとlabelをここに貼ります。
6.ViewControllerの実装
ViewControllerのtableViewにCollectionTableViewCellを登録してあげます。
final class ViewController: UIViewController {

    @IBOutlet private weak var tableView: UITableView!
    private var models = [Model]()

    override func viewDidLoad() {
        super.viewDidLoad()

        for _ in 1...10 {
            models.append(Model(text: "swift", imageName: "swift"))
            models.append(Model(text: "java", imageName: "java"))
            models.append(Model(text: "ruby", imageName: "ruby"))
            models.append(Model(text: "python", imageName: "python"))
        }

        tableView.delegate = self
        tableView.dataSource = self
        tableView.register(CollectionTableViewCell.nib(), forCellReuseIdentifier: CollectionTableViewCell.id)

    }

}

extension ViewController: UITableViewDelegate {

    func tableView(_ tableView: UITableView, heightForRowAt indexPath: IndexPath) -> CGFloat {
        return 250
    }

}

extension ViewController: UITableViewDataSource {

    func tableView(_ tableView: UITableView, numberOfRowsInSection section: Int) -> Int {
        return models.count
    }

    func tableView(_ tableView: UITableView, cellForRowAt indexPath: IndexPath) -> UITableViewCell {
        let cell = tableView.dequeueReusableCell(withIdentifier: CollectionTableViewCell.id, for: indexPath) as! CollectionTableViewCell
        cell.configure(with: models)
        return cell
    }

}
7.CollectionTableViewCellの実装
ポイントは、このカスタムテーブルビューセルにコレクションビューが入るので、ここでコレクションビューのデリゲートなどを設定してあげます。
また、ModelをViewControllerから受け取ってコレクションビューに渡していることに注意してください。
configureでcollectionView.reloadData()しないといけないことも注意が必要です。
final class CollectionTableViewCell: UITableViewCell {

    static var toString: String {
        return String(describing: self)
    }
    static let id = CollectionTableViewCell.toString
    static func nib() -> UINib {
        return UINib(nibName: CollectionTableViewCell.toString, bundle: nil)
    }
    private var models = [Model]()

    @IBOutlet private weak var collectionView: UICollectionView!

    override func awakeFromNib() {
        super.awakeFromNib()
        collectionView.delegate = self
        collectionView.dataSource = self
        collectionView.register(MyCollectionViewCell.nib(), forCellWithReuseIdentifier: MyCollectionViewCell.id)
    }

    override func setSelected(_ selected: Bool, animated: Bool) {
        super.setSelected(selected, animated: animated)
    }

    func configure(with models: [Model]) {
        self.models = models
        collectionView.reloadData()
    }

}

extension CollectionTableViewCell: UICollectionViewDelegate {

}

extension CollectionTableViewCell: UICollectionViewDataSource {

    func collectionView(_ collectionView: UICollectionView, numberOfItemsInSection section: Int) -> Int {
        models.count
    }

    func collectionView(_ collectionView: UICollectionView, cellForItemAt indexPath: IndexPath) -> UICollectionViewCell {
        let cell = collectionView.dequeueReusableCell(withReuseIdentifier: MyCollectionViewCell.id, for: indexPath) as! MyCollectionViewCell
        let model = models[indexPath.row]
        cell.configure(with: model)
        return cell
    }

}

extension CollectionTableViewCell: UICollectionViewDelegateFlowLayout {

    func collectionView(_ collectionView: UICollectionView, layout collectionViewLayout: UICollectionViewLayout, sizeForItemAt indexPath: IndexPath) -> CGSize {
        return CGSize(width: 250, height: 250)
    }

}
8.MyCollectionViewCellの実装
CollectionTableViewCellから受け取ったモデルの情報をUIImageとUILabelに反映します。
final class MyCollectionViewCell: UICollectionViewCell {

    static var toString: String {
        return String(describing: self)
    }
    static let id = MyCollectionViewCell.toString
    static func nib() -> UINib {
        return UINib(nibName: MyCollectionViewCell.toString, bundle: nil)
    }

    @IBOutlet private weak var myImageView: UIImageView!
    @IBOutlet private weak var myLabel: UILabel!

    override func awakeFromNib() {
        super.awakeFromNib()
    }

    func configure(with model: Model) {
        myImageView.image = UIImage(named: model.imageName)
        myLabel.text = model.text
    }

}
おわりに
さらにこのなかにTableViewを入れてそのなかに、、、