※ 多分どっかでLTしたときの資料
誰
- Twitter/GitHub/Qiita: @Quramy
- Webフロントエンジニア
- TypeScriptとかAngularとかVimとかの界隈で息をしています
- 書籍: 「Electronではじめるアプリ開発」
- GraphQL Tokyoでイベント主催したりとか
- 最近StorybookへのContributeが多め
「テストランナー」とは
ここでは、JavaScriptのUnitテストフレームワークを実行する部分のプログラムを指していると思ってください
テストランナーの種類
- Node.js ベース: MochaやJasmine、AVAのCLIなど
- 速い
- DOMが必要な場合、jsdomなどを用いる
-
ブラウザベース: Karma
- ブラウザを利用するオーバヘッドの分、遅い
- 実際のDOMエンジンが利用可能
Karma is 何
- AngularJSの開発チームが開発したテストランナー
- 割と歴史はある(2013年には存在していた)
- Node.jsからブラウザを操作する際はWebSocketを用いている
そもそも、ブラウザを利用した汎用テストランナー、Karmaくらいしか思いつかない。
テストランナーを自作しようと思った背景
- 元々は、Karma + Jasmine(= Angularの標準的な構成)を使っていた
- ブラウザにはPhantomJS -> Nightmare(=Electron) を利用していたけど、安定性に難があった
- WSが途切れた際の挙動など。CIがtimeoutしてしまったり。
- Pluginで拡張できるようなってるけど、拡張性が高そうに見えてそうでもない
- テストケース終了時点の画像で回帰テストを実行したい都合上、スクリーンショットのAPIを使いたい(Karmaでもできるんだけど)
Puppeteerの登場
- Chrome Devtool チーム謹製のスクレイピングツール
-
npm iしたときにChromiumをダウンロードしてきて、headlessで動作させる - 実体はNode.js製のCDP(Chrome Devtoool Protocol) Client
- Karmaに比べて抱負なAPI。スクリーンショット、Full HTML、PDFなど
要するにNode.jsから操作できてAPIが抱負なブラウザ
ということはPuppeteerを使えば、Karmaいらなくなるのでは ![]()
こうして脱Karmaの戦いが始まった
ちなみに間違って、「脱カルマ」とか「Free from karma」でググると、正しい情報にたどり着けずないので要注意。
作ってみよう
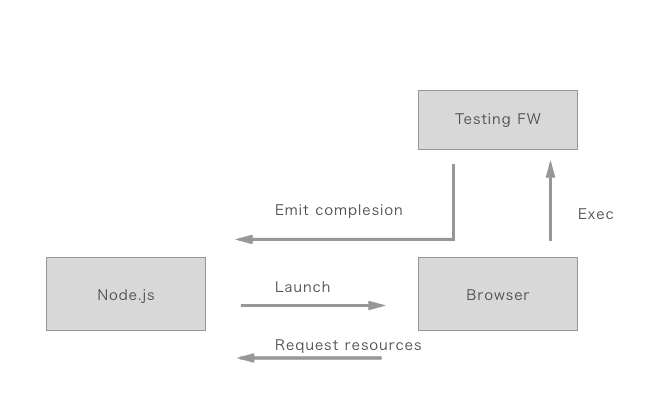
必要最小限のテストランナーの構造:
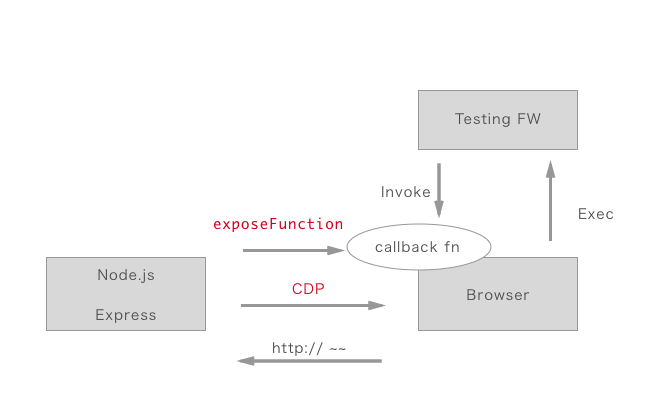
Puppeteerに当てはめるとこんな感じ
- Node.jsでWebサーバー立てる。Expressやwebpack-dev-serverなど
- JasmineやMochaなどのテストフレームワークを読み込むHTMLと.jsをserveする
- Puppeteerを起動して、上記のページを読み込む
- 全テストケースの完了時に発火させるコールバック関数をNode.js -> ブラウザへ公開しておく
- テストフレームワークの拡張ポイントを使って、全ケース完了時にコールバック関数を叩く
以降は、業務案件にぶち込む前にPoC的に作ったレポジトリからの抜粋。
Angular CLIベースのプロジェクト(=最初からKarma + Jasmine + webpack入り)のKarmaをPuppeteerでリプレースしたやつ。
Webサーバ部分
function createServer(port) {
  const app = express();
  const emitter = new Emitter();
  const handlers = [];      // karm plugin will push something like { handler: webpack-dev-middleware }.
  const testConfig = karma.config.parseConfig(path.resolve('./karma.conf.js'));
  const init = ngCLIKarmaPlugin['framework:@angular/cli'][1];
  init(testConfig, emitter, handlers); // conf, emitter, customFileHandlers,
  app.use(express.static(__dirname));
  app.use(handlers[0].handler);
  const server = {
    app,
    shutdown: () => new Promise(resolve => emitter.emit('exit', resolve)),
  };
  return new Promise((resolve, reject) => emitter.once('ready', () => app.listen(port, () => resolve(server))));
}
ブラウザにloadさせるHTML
<!doctype html>
<html>
  <head>
    <title>Angular test with Puppeteer</title>
    <link href="favicon.ico" rel="icon" type="image/x-icon" />
    <meta http-equiv="Content-Type" content="text/html; charset=UTF-8" />
    <meta name="viewport" content="width=device-width, initial-scale=1, maximum-scale=1, user-scalable=no" />
    <link rel="stylesheet" href="../node_modules/jasmine-core/lib/jasmine-core/jasmine.css" />
  </head>

  <body>
    <script src="/node_modules/jasmine-core/lib/jasmine-core/jasmine.js"></script>
    <script src="/node_modules/jasmine-core/lib/jasmine-core/jasmine-html.js"></script>
    <script src="/node_modules/jasmine-core/lib/jasmine-core/boot.js"></script>
    <script type="text/javascript" src="/main.bundle.js" crossorigin="anonymous"></script>
    <script>
let code = 0;
jasmine.getEnv().addReporter({
  specDone: function(result) {
    if (result.status !== 'passed') conde = 1;
  },
  jasmineDone: function() {
    if (typeof puppeteerDone === 'function') puppeteerDone(code);
  }
});
    </script>
  </body>
</html>
Puppeteer
async function runPuppeteer() {
  const browser = await puppeteer.launch({ args: ['--no-sandbox', '--disable-setuid-sandbox'] });
  const page = await browser.newPage();

  // Capture logging
  page.on('console', (...args) => console.log.apply(console, ['[Browser]', ...args]));

  // Expose Screenshot function
  await page.exposeFunction('capturePage', name => {
    const filename = path.resolve(__dirname, `actual_images/${name}.png`);
    console.log('[Node]', 'Save 🎨  to', filename);
    return page.screenshot({ path: filename, fullPage: true });
  });

  const server = await createServer(3100);

  await page.exposeFunction('puppeteerDone', async code => {
    await server.shutdown();
    process.exit(code);
  });

  await page.goto('http://localhost:3100/test/context.html');
}
この程度の行数でKarmaをPuppeteerに置き換えられます

実際に使ってみて
実際に業務で使ってるテストランナーは、これをベースに作成した物を利用中(コードは非公開)。
起動するPuppeteerのプロセスを増やして、テストケースを分散実行して性能をあげる機能などを盛り込んでいる。
CIでは、1,600 ケース + 850スクリーンショットを100秒程度で完了させている。
オマケ
ポイントを押さえてしまえば、他の基盤を使うのも簡単。
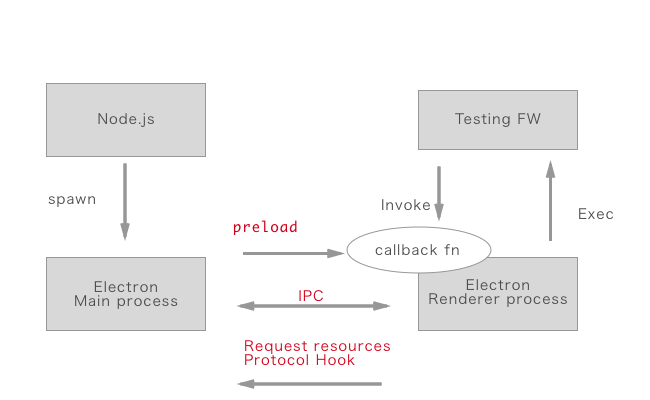
Electronをブラウザとして使えば、DOMとNode.jsが両方使えるテスト環境も作れる。
まとめ
- JavaScriptのテストランナーは結構簡単に作れる
- Chrome Devtool ProtocolやElectron IPCといったプロセス間通信の仕組みを利用
- 自分で作れば痒いとこにも手が届く
2018.05.31追記
上述のコードでは、説明の簡便の都合上、Puppeteerのプロセスを1つしか立ち上げていませんが、launch を何個も立ち上げられるようにして、並列度を稼ぐとCIでのテスト時間を削減できます。
ポイントは const page = await browser.newPage(); を並列化しても、CPUのロードアベレージが上がらない点です1。
-
裏をとったわけではないが、Chromiumが持っている何かしらの(多分TCPとかのIO関連?)の制約に引っかかっていると思われる ↩


