前回記事Fragment基礎 https://qiita.com/QiitaD/items/edb3d99ce03cd000b23f
に続き、今回もFragmentについて触れていく。
前回の補足
前回触れた使いまわしについてよくわからなかったので、調べてみた結果を綴る。
まず例として画面の
左側にボタン群、右側に入力欄群があるプログラムを考える。

例えば、これをFragmentで分けると以下になる。
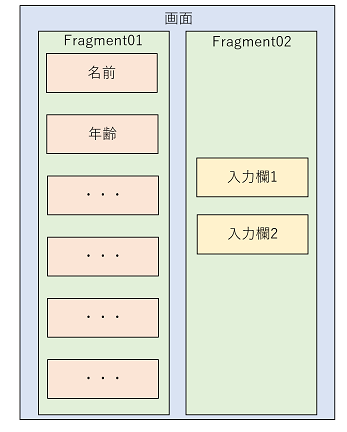
上記をファイル名に置き換えると以下のようにできる。

つまり、
activity_main.xmlでボタンや入力欄を定義するのではなく、
2つのFragmentのレイアウトを独立して定義し、
activity_main.xmlで2つのFragmentの位置を決めるということである。
それ故、仮に新しいレイアウトactivity_sub.xmlで上記と同じFragmentを使いたい場合、
activity_sub.xmlに使いたいレイアウトを持つFragmentを定義すればよい
(=使いまわしができる)ということである。
実装
上記のイメージ図を実装してみる。
Fragment実装に必要なファイルは
レイアウトファイ(xml)とそのロジックを書くファイル(java)である。
全体で必要となったのは以下の6つである。
1. MainActivity.java
2. activity_main.xml
3. Fragment01.java(ボタン二つだけにしてある)
4. fragment01.xml
5. Fragment02.java
6. fragment02.xml
(ただし、今回はFragment生成を確認すればよいだけなので、
クリックイベントなどは一切実装しない。)
サンプルは長くなるので「まとめ」の後に載せる。
結果
以下の結果が得られた。
成功である。

まとめ
以前画面遷移について記事を書いたことがある。
https://qiita.com/QiitaD/items/1495f2f9839fe8706d31
この記事ではIntentを使って画面遷移を行ったが、
Fragmentでも画面遷移をすることができる。
記事では触れないが、ぜひ試してみて頂きたい。
サンプル
- MainActivity.java
public class MainActivity extends AppCompatActivity {

    @Override
    protected void onCreate(Bundle savedInstanceState) {
        super.onCreate(savedInstanceState);
        setContentView(R.layout.activity_main);
    }
}
- activity_main.xml
<?xml version="1.0" encoding="utf-8"?>
<androidx.constraintlayout.widget.ConstraintLayout xmlns:android="http://schemas.android.com/apk/res/android"
    xmlns:app="http://schemas.android.com/apk/res-auto"
    xmlns:tools="http://schemas.android.com/tools"
    android:layout_width="match_parent"
    android:layout_height="match_parent"
    tools:context=".MainActivity">

    <fragment
        android:id="@+id/fragment"
        android:name="com.example.fragmentsample02.Fragment01"
        android:layout_width="150dp"
        android:layout_height="300dp"
        android:layout_marginStart="10dp"
        android:layout_marginTop="116dp"
        app:layout_constraintStart_toStartOf="parent"
        app:layout_constraintTop_toTopOf="parent" />

    <fragment
        android:id="@+id/fragment2"
        android:name="com.example.fragmentsample02.Fragment02"
        android:layout_width="150dp"
        android:layout_height="300dp"
        android:layout_marginStart="200dp"
        android:layout_marginTop="116dp"
        app:layout_constraintStart_toStartOf="parent"
        app:layout_constraintTop_toTopOf="parent" />
</androidx.constraintlayout.widget.ConstraintLayout>
- Fragment01.java
public class Fragment01 extends Fragment {

    @Override
    public View onCreateView(
            LayoutInflater inflater,
            ViewGroup container,
            Bundle savedInstanceState){
        return inflater.inflate(R.layout.fragment01, container, false);
    }
}
- fragment01.xml
<?xml version="1.0" encoding="utf-8"?>
<androidx.constraintlayout.widget.ConstraintLayout xmlns:android="http://schemas.android.com/apk/res/android"
xmlns:app="http://schemas.android.com/apk/res-auto"
xmlns:tools="http://schemas.android.com/tools"
android:layout_width="match_parent"
android:layout_height="match_parent"
tools:context=".Fragment01">

    <FrameLayout
        android:layout_width="match_parent"
        android:layout_height="match_parent"
        tools:layout_editor_absoluteX="52dp"
        tools:layout_editor_absoluteY="49dp">

        <Button
            android:id="@+id/buttonInputName"
            android:layout_width="150dp"
            android:layout_height="105dp"
            android:text="Input Name" />

        <Button
            android:id="@+id/buttonInputAge"
            android:layout_width="150dp"
            android:layout_height="105dp"
            android:layout_marginStart="0dp"
            android:layout_marginTop="114dp"
            android:text="Input Age" />
    </FrameLayout>
</androidx.constraintlayout.widget.ConstraintLayout>
- Fragment02.java
public class Fragment02 extends Fragment {

    @Override
    public View onCreateView(
            LayoutInflater inflater,
            ViewGroup container,
            Bundle savedInstanceState){
        return inflater.inflate(R.layout.fragment02, container, false);
    }
}
- fragment02.xml
<?xml version="1.0" encoding="utf-8"?>
<androidx.constraintlayout.widget.ConstraintLayout xmlns:android="http://schemas.android.com/apk/res/android"
xmlns:app="http://schemas.android.com/apk/res-auto"
xmlns:tools="http://schemas.android.com/tools"
android:layout_width="match_parent"
android:layout_height="match_parent"
tools:context=".Fragment01">


    <FrameLayout
        android:layout_width="match_parent"
        android:layout_height="match_parent"
        tools:layout_editor_absoluteX="52dp"
        tools:layout_editor_absoluteY="49dp">

        <EditText
            android:id="@+id/buttonInputName"
            android:layout_width="390dp"
            android:layout_height="105dp"
            android:text="input->" />

        <EditText
            android:id="@+id/buttonInputAge"
            android:layout_width="390dp"
            android:layout_height="105dp"
            android:layout_marginStart="0dp"
            android:layout_marginTop="114dp"
            android:text="confirm->" />
    </FrameLayout>
</androidx.constraintlayout.widget.ConstraintLayout>