(追記) 注意
この方法で Marionette.js のアプリケーションを実装していると、参照の問題が発生し、AppRouter が起動しないなどの不具合に遭遇しました。
Marionette.js が参照している Backbone と import Backbone from 'backbone'; した Backbone がそれぞれ別のオブジェクトを参照してしまっているようです。
そのため結局は Gem browserify-rails を使う方法を諦め、
npm で Gulp と Browserify をインストールして、それらで ES6 をトランスパイルする方法に切り替えました。
この記事は残しておきますが、個人的には以下の方法は 非推奨 とさせてください。
はじめに
Marionette.js、Module 廃止するってよ。
Marionette.Module に以下の記述がありました。
Marionette.Module is deprecated, and is scheduled to be removed in the next major release of the library. Instead
of Marionette.Module, you should use AMD/CommonJS/ES6 for modularity. A Marionette.Module shim is available if necessary after its removal.
せっかくなので ES6 の module が使いたいですね。
目的
Rails で Marionette.js を ES6 で書くため環境を構築する。
手順
01. Gem browserify-rails のインストール
今回肝となるのが browserify-rails という Gem です。
この Gem を使うことで Rails に Browserify の機能を導入できます。さらに Babelify (Browserify 用の Babel 変換ライブラリ) を併用することで ES6 のトランスパイルも行えます。
まずは Gemfile に browserify-rails を追加して bundle install しましょう。
gem 'browserify-rails', '~> 1.5.0'
$ bundle install
次に application.rb に以下の行を追加します。
config.browserify_rails.commandline_options = '-t babelify'
02. 各種 JavaScript パッケージのインストール
package.json を手動で作成するか npm init で作成するかで方法を分けています。
方法 1
package.json を手動で作成して npm install します。
{
  "name": "",
  "description": "",
  "license": "MIT",
  "engines": {
    "node": "^4.1.1"
  },
  "repository": {},
  "dependencies": {
    "babelify": "^6.3.0",
    "backbone": "^1.2.3",
    "backbone.marionette": "^2.4.3",
    "browserify": "^11.2.0",
    "browserify-incremental": "^3.0.1"
  }
}
$ npm install --save
ちなみに browserify-incremental は、ファイルの更新を監視して差分だけビルドするためのライブラリです。
方法 2
package.json を手動で作成せずに npm init で package.json を作成した後で npm install します。
$ npm init
$ npm install browserify browserify-incremental babelify backbone backbone.marionette --save
03. application.coffee (application.js) の編集
まず Marionette.Application を起動するだけのコードを ES6 で書きます。
'use strict';
import Marionette from 'backbone.marionette';
let App = new Marionette.Application();
App.on('start', () => {
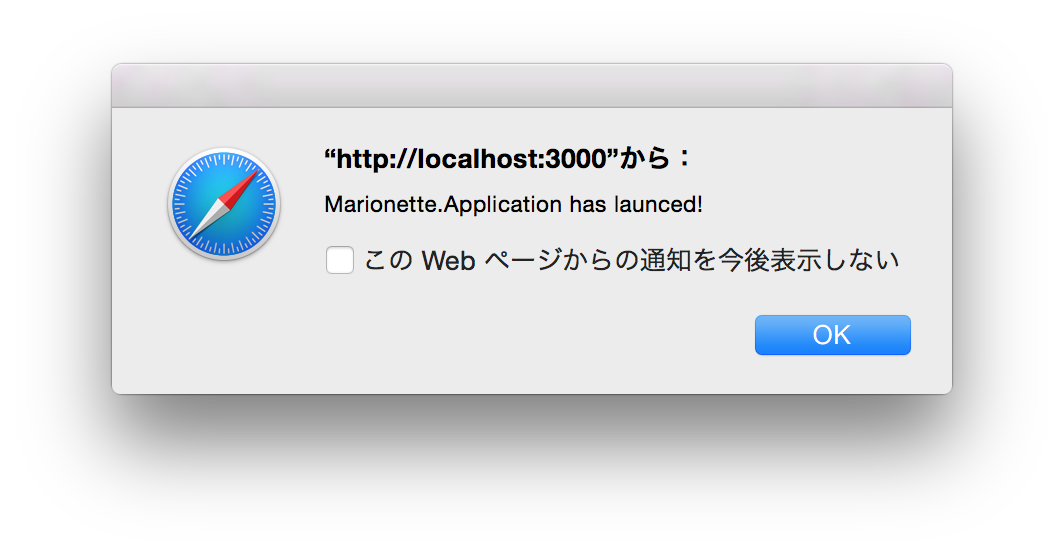
alert('Marionette.Application has launced!');
});
App.start();
次に app/assets/javascripts/application.coffee (application.js) を以下のように編集します。
# = require jquery
# = require jquery_ujs

$ -> require('./backbone/app')
Sprockets で require するものは最小限にとどめ、基本的に node_modules から require あるいは import するようにします。
これで完成です。
04. 動作確認
後は適当なコントローラを実装して Rails を起動し、http://localhost:3000/ にアクセスしてみましょう。
alert が表示されれば成功です。
まとめ
今回は browserify-rails を導入して ES6 で記述した Marionette.Application が起動するところまで確認しました。
複雑な設定無しで ES6 の開発ができるのはとても便利ですね。