
はじめに
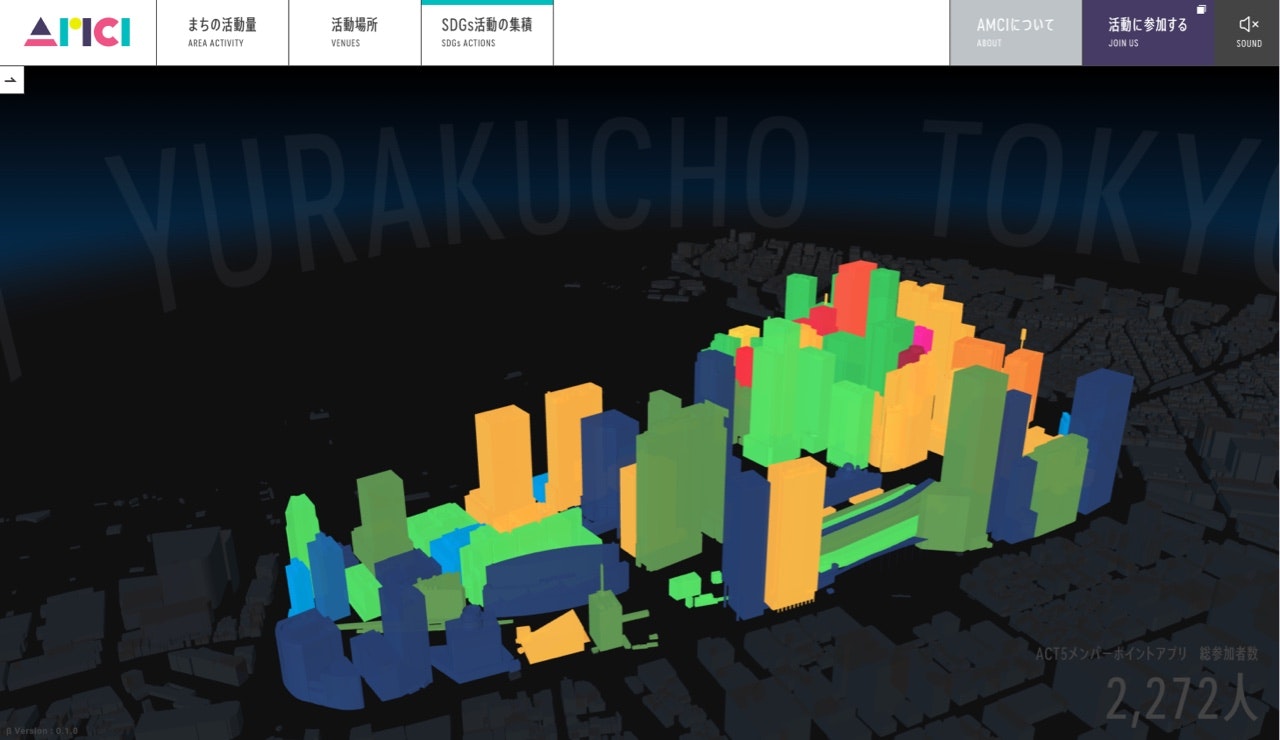
今回は前回(#03 木の葉のパーティクルを動かす)に続いて、AMCIサイトの「SDGs活動の集積」ページで使用している、ビル毎に色を変えて動かす方法について説明していきたいと思います。
実装方法
まずビル毎に動かしたり、色を変えるには、モデルデータの作りとthree.js側での管理方法を工夫する必要があります。
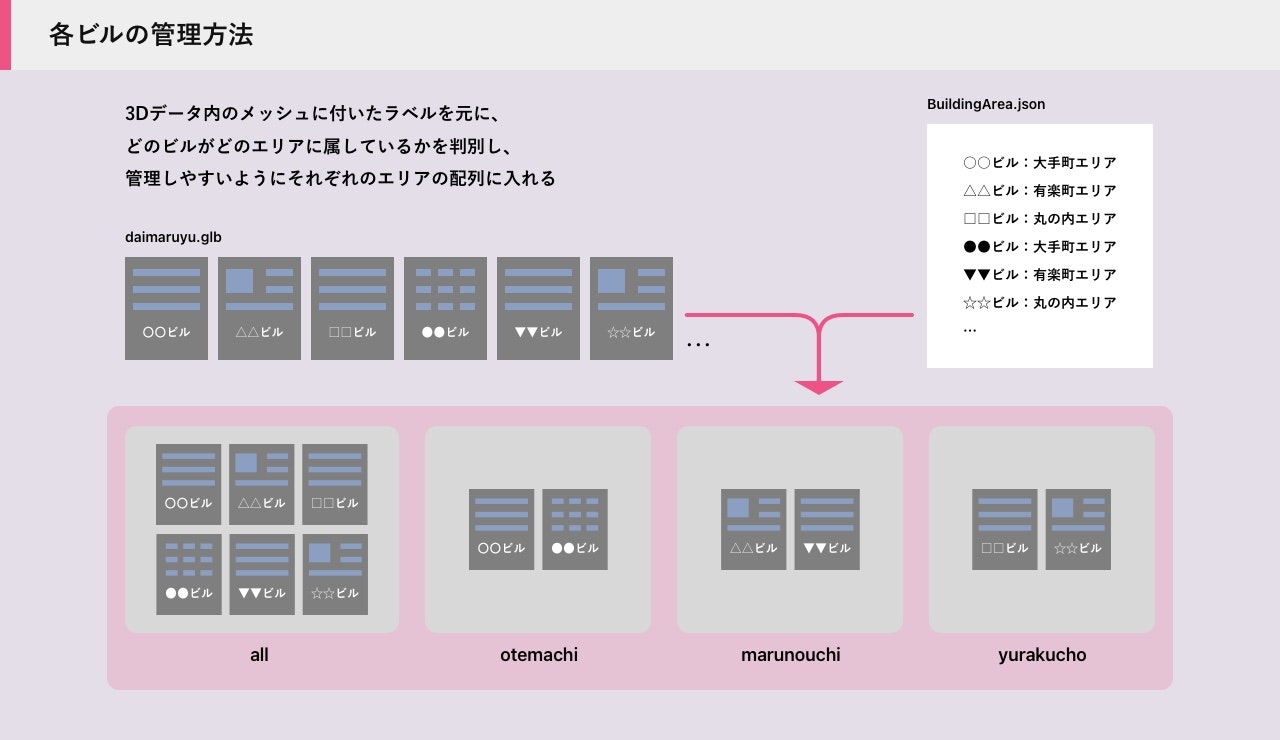
今回は、Blenderでモデル(daimaruyu.glb)の出力を行っていますが、下記の図のようにモデル内のビルのメッシュ毎に名前を付け、さらにJSONでビルの属性を管理する事で、どのビルがどのエリアに属しているかを判別しています。
さらに、それぞれ別の配列にメッシュへの参照値を入れておくことで、エリア毎の色の変更が簡単に行えるようになります。
これを踏まえた上で、ビルの色変えの手順は以下のようになります。
- ビルのモデルの準備
- 色を適用するマテリアルを作成(アニメーションはシェーダーで実装)
- データを読み取りビル毎にマテリアルを適用
実装例
まずビルのモデルの準備ですが、こちらはBlenderなどの操作が必要になるため、サンプルのデータをお使い頂くか、先程の図のような形で、個別に処理を適用できるようなデータをご用意ください。
次にマテリアルの作成です。
少し長いのですが、アニメーションをShaderで行うため、 THREE.ShaderMaterial を継承したカスタムマテリアルを作成しています。
Uniform変数で、ビルのindex, total、そして色を送っています。
import * as THREE from 'three'
import Core from '../Core'
import vert from './glsl/sdgs.vert'
import frag from './glsl/sdgs.frag'

export default class SDGsMaterial extends THREE.ShaderMaterial {
  constructor() {
    const time = Core.time.total

    super({
      side: THREE.DoubleSide,
      lights: true,
      fog: true,
      transparent: true,
      blending: THREE.NormalBlending,
      // blending: THREE.AdditiveBlending,
      depthWrite: true,
      uniforms: THREE.UniformsUtils.merge([
        THREE.UniformsLib.common,
        THREE.UniformsLib.specularmap,
        THREE.UniformsLib.envmap,
        THREE.UniformsLib.aomap,
        THREE.UniformsLib.lightmap,
        THREE.UniformsLib.emissivemap,
        THREE.UniformsLib.bumpmap,
        THREE.UniformsLib.normalmap,
        THREE.UniformsLib.displacementmap,
        THREE.UniformsLib.fog,
        THREE.UniformsLib.lights,
        {
          diffuse: { value: new THREE.Color(0xcccccc) },
          emissive: { value: new THREE.Color(0x999999) },
          specular: { value: new THREE.Color(0x111111) },
          shininess: { value: 120 },
          opacity: { value: 0.8 },
        },
        {
          time: { value: time },
          index: {value: 0},
          total: {value: 0},
          actColor : {value: new THREE.Color(0xffff00)},
        },
      ]),
      vertexShader: vert,
      fragmentShader: frag,
    })

    this.type = 'SDGsMaterial'
    this.color = new THREE.Color(0x000000)
    this.specular = new THREE.Color(0x111111)
    this.shininess = 30

    this.map = null

    this.lightMap = null
    this.lightMapIntensity = 1.0

    this.aoMap = null
    this.aoMapIntensity = 1.0

    this.emissive = new THREE.Color(0xffffff)
    this.emissiveIntensity = 2.0
    this.emissiveMap = null

    this.bumpMap = null
    this.bumpScale = 1

    this.normalMap = null
    this.normalMapType = THREE.TangentSpaceNormalMap
    this.normalScale = new THREE.Vector2(1, 1)

    this.displacementMap = null
    this.displacementScale = 1
    this.displacementBias = 0

    this.specularMap = null

    this.alphaMap = null

    this.envMap = null
    this.combine = THREE.MultiplyOperation
    this.reflectivity = 1
    this.refractionRatio = 0.98

    this.wireframe = false
    this.wireframeLinewidth = 1
    this.wireframeLinecap = 'round'
    this.wireframeLinejoin = 'round'

    this.flatShading = false

    this.COLORS = [
      new THREE.Color(0xD6252E),
      new THREE.Color(0xC89931),
      new THREE.Color(0x2B9144),
      new THREE.Color(0xAF2534),
      new THREE.Color(0xDB3F31),
      new THREE.Color(0x04A2C6),
      new THREE.Color(0xF2B02B),
      new THREE.Color(0x7B1E33),
      new THREE.Color(0xE3652B),
      new THREE.Color(0xCD1E77),
      new THREE.Color(0xEB9533),
      new THREE.Color(0xC28431),
      new THREE.Color(0x466E3A),
      new THREE.Color(0x0173A7),
      new THREE.Color(0x3DA448),
      new THREE.Color(0x164B77),
      new THREE.Color(0x1D2E51)
    ]
  }
}
// modelMatrix: オブジェクト座標からワールド座標へ変換する
// viewMatrix: ワールド座標から視点座標へ変換
// modelViewMatrix: modelMatrixとviewMatrixの積算
// projectionMatrix: カメラの各種パラメータから3次元を2次元に射影し、クリップ座標系に変換する行列
// cameraPosition: カメラの位置
// normalMatrix: 頂点法線ベクトルを視点座標系に変換する行列
// position: 頂点座標
// normal: 頂点法線ベクトル
// uv: テクスチャを貼るためのUV座標

#include <common>
#include <uv_pars_vertex>
#include <uv2_pars_vertex>
#include <displacementmap_pars_vertex>
#include <envmap_pars_vertex>
#include <color_pars_vertex>
#include <fog_pars_vertex>
#include <normal_pars_vertex>
#include <morphtarget_pars_vertex>
#include <skinning_pars_vertex>
#include <shadowmap_pars_vertex>
#include <logdepthbuf_pars_vertex>
#include <clipping_planes_pars_vertex>

uniform float time;
uniform float index;
uniform float total;
uniform vec3 actColor;

// varying vec4 vWorldPosition;
// varying vec3 vNormal;
// varying vec4 vTexCoords;
varying vec3 vViewPosition;
varying vec2 vUv;

void main(){
  #include <uv_vertex>
  #include <uv2_vertex>
  #include <color_vertex>
  #include <beginnormal_vertex>
  #include <morphnormal_vertex>
  #include <skinbase_vertex>
  #include <skinnormal_vertex>
  #include <defaultnormal_vertex>
  #include <normal_vertex>
  #include <begin_vertex>
  #include <morphtarget_vertex>
  #include <skinning_vertex>
  #include <displacementmap_vertex>
  #include <project_vertex>
  #include <logdepthbuf_vertex>
  #include <clipping_planes_vertex>

  vViewPosition = - mvPosition.xyz;
  vUv = uv - 0.5;

  #include <worldpos_vertex>
  #include <envmap_vertex>
  #include <shadowmap_vertex>
  #include <fog_vertex>

  vec3 nPos = position;
  float norm = index / total;
  float speed = 0.5;
  nPos.y *= 1.0 + abs(sin((time + index) * speed)) * 0.5;
  gl_Position = projectionMatrix * modelViewMatrix * vec4( nPos, 1.0 );
}
// viewMatrix: ワールド座標から視点座標へ変換
// cameraPosition: カメラの位置

uniform vec3 diffuse;
uniform vec3 emissive;
uniform vec3 specular;
uniform float shininess;
uniform float opacity;

#include <common>
#include <packing>
#include <dithering_pars_fragment>
#include <color_pars_fragment>
#include <uv_pars_fragment>
#include <uv2_pars_fragment>
#include <map_pars_fragment>
#include <alphamap_pars_fragment>
#include <alphatest_pars_fragment>
#include <aomap_pars_fragment>
#include <lightmap_pars_fragment>
#include <emissivemap_pars_fragment>
#include <envmap_common_pars_fragment>
#include <envmap_pars_fragment>
#include <cube_uv_reflection_fragment>
#include <fog_pars_fragment>
#include <bsdfs>
#include <lights_pars_begin>
#include <normal_pars_fragment>
#include <lights_phong_pars_fragment>
#include <shadowmap_pars_fragment>
#include <bumpmap_pars_fragment>
#include <normalmap_pars_fragment>
#include <specularmap_pars_fragment>
#include <logdepthbuf_pars_fragment>
#include <clipping_planes_pars_fragment>

uniform float time;
uniform float index;
uniform float total;
uniform vec3 actColor;

varying vec2 vUv;

void main() {
  #include <clipping_planes_fragment>

  vec4 diffuseColor = vec4( diffuse, opacity );
  ReflectedLight reflectedLight = ReflectedLight( vec3( 0.0 ), vec3( 0.0 ), vec3( 0.0 ), vec3( 0.0 ) );
  vec3 totalEmissiveRadiance = emissive;

  #include <logdepthbuf_fragment>
  #include <map_fragment>
  #include <color_fragment>
  #include <alphamap_fragment>
  #include <alphatest_fragment>
  #include <specularmap_fragment>
  #include <normal_fragment_begin>
  #include <normal_fragment_maps>
  #include <emissivemap_fragment>
  // accumulation
  #include <lights_phong_fragment>
  #include <lights_fragment_begin>
  #include <lights_fragment_maps>
  #include <lights_fragment_end>
  // modulation
  #include <aomap_fragment>

  vec3 outgoingLight = reflectedLight.directDiffuse + reflectedLight.indirectDiffuse + reflectedLight.directSpecular + reflectedLight.indirectSpecular + totalEmissiveRadiance;

  #include <envmap_fragment>
  #include <output_fragment>
  #include <tonemapping_fragment>
  #include <encodings_fragment>
  #include <fog_fragment>
  #include <premultiplied_alpha_fragment>
  #include <dithering_fragment>


  vec3 nColor = outgoingLight;
  nColor *= actColor;

  gl_FragColor = vec4(nColor, diffuseColor.a);
}
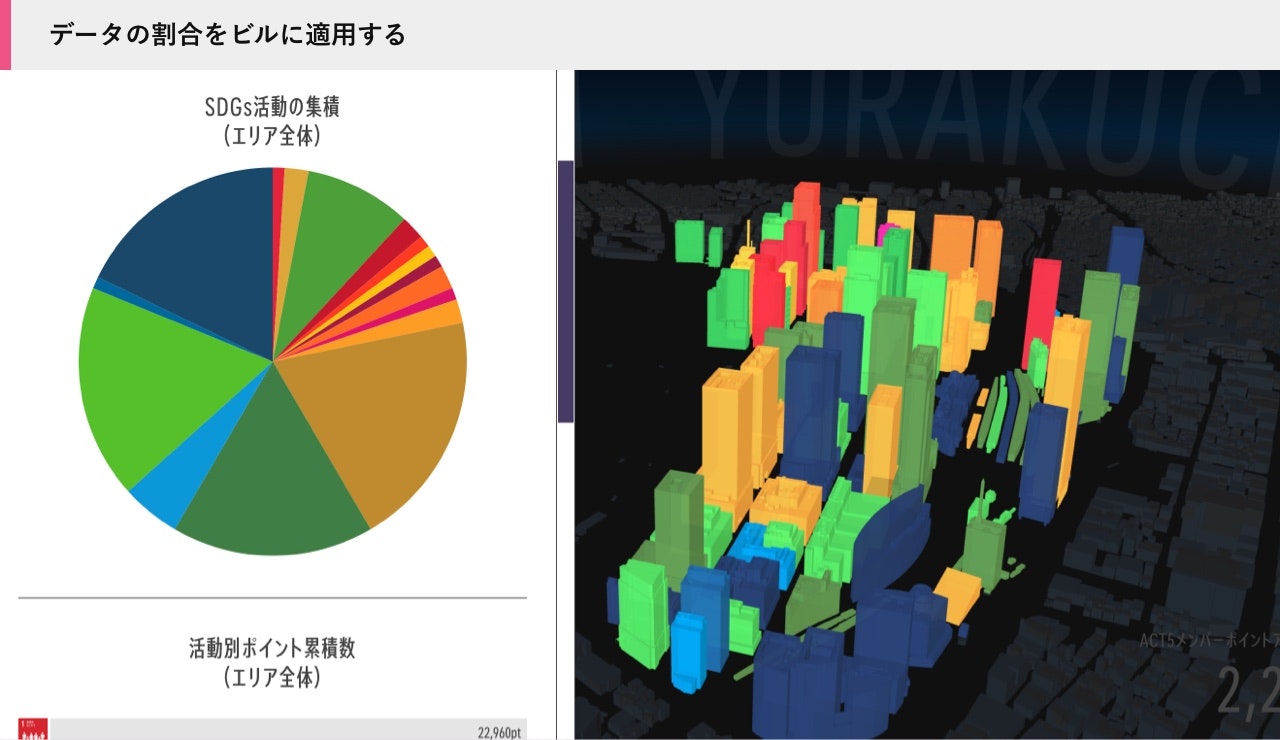
マテリアルの準備ができたら、データに応じた色をビルに適用していきます。
setup(){
  this.object = Loader.getAsset('daimaruyu')
  Core.scene.add(this.object)

  this.all = []
  this.otemachi = []
  this.marunouchi = []
  this.yurakucho = []

  console.log('Daimaruyu', this.object)
  console.log('BuildingArea', BuildingArea)

  this.object.traverse((obj) => {
    // console.log(obj.type, obj.name)
    if(obj.isMesh) {
      const name = obj.name
      const area = BuildingArea[name].area
      // console.log(name, area)

      obj.area = area
      this.all.push(obj)

      switch (area){
        case 'otemachi':
          this.otemachi.push(obj)
        break;
        case 'marunouchi':
          this.marunouchi.push(obj)
        break;
        case 'yurakucho':
          this.yurakucho.push(obj)
        break;
      }
    }
  })
    ...
}
setup()の冒頭で、モデルデータの読み込み、ステージへの配置を行っています。
this.object = Loader.getAsset('daimaruyu')
Core.scene.add(this.object)
下記の処理は、子要素がもしMeshだったらそれぞれのエリアの配列に格納する、という処理です。
事前にエリア毎にビルをまとめておくことで、ビジュアライズのエリアを切り替えが簡単に行なえます。
TIPS
traverse を使うとそのオブジェクトの子要素に対して個別に処理が行えます
this.object.traverse((obj) => {
  // console.log(obj.type, obj.name)
  if(obj.isMesh) {
    const name = obj.name
    const area = BuildingArea[name].area
    // console.log(name, area)

    obj.area = area
    this.all.push(obj)

    switch (area){
      case 'otemachi':
        this.otemachi.push(obj)
      break;
      case 'marunouchi':
        this.marunouchi.push(obj)
      break;
      case 'yurakucho':
        this.yurakucho.push(obj)
      break;
    }
  }
})
続いて、実際にビルのメッシュに色を割り当てていきます。

"percents": {
  "1": 1, // (1)貧困をなくそう
  "2": 2, // (2)飢餓をゼロに
  "3": 9, // (3)すべての人に健康と福祉を
  "4": 2, // (4)質の高い教育をみんなに
  "5": 1, // (5)ジェンダー平等を実現しよう
  "6": 0, // (6)安全な水とトイレを世界中に
  "7": 1, // (7)エネルギーをみんなに。そしてクリーンに
  "8": 1, // (8)働きがいも経済成長も
  "9": 2, // (9)産業と技術革新の基盤を作ろう
  "10": 1, // (10)人や国の不平等をなくそう
  "11": 2, // (11)住み続けられるまちづくりを
  "12": 20, // (12)つくる責任、つかう責任
  "13": 17, // (13)気候変動に具体的な対策を
  "14": 5, // (14)海の豊かさを守ろう
  "15": 18, // (15)陸の豊かさも守ろう
  "16": 1, // (16)平和と公正をすべての人に
  "17": 18 // (17)パートナーシップで目標を達成しよう
}
こちらはビジュアライズに使用しているJSONの雛形です、percents内のkeyはSDGsの目標番号、そしてvalueはその番号のパーセンテージになります。なので全てを足すと100となり、このデータを使ってビルにSDGsのテーマカラーを付けていきます。
setSDGsMaterial(area){
  let group = this.getAreaGroup(area)
  // console.log('setSDGsMaterial', area, group)

  const material = this.sdgsMat
  // console.log(material)

  // get colors
  let data = Data.sdgData[area]
  console.log('SDGs Data', data)

  let percentAry = []
  let groupColorAry = []
  const groupLen = group.length

  for(let key in data.percents){
    let value = data.percents[key]
    for(let i = 0; i < Number(value); i++ ){
      percentAry.push(key)
    }
  }
  console.log('percentAry', percentAry)

  let step = percentAry.length / groupLen

  // attachi material
  for(let i = 0; i < groupLen; i++){
    let aryIndex = Math.round(step * i)
    let actId = Number(percentAry[aryIndex]) - 1
    let color = material.COLORS[actId]
    // console.log(i, aryIndex, actId, color)

    const mesh = group[i]
    const cmat = material.clone()
    cmat.uniforms.total.value = group.length
    cmat.uniforms.index.value = i
    cmat.uniforms.actColor.value = color
    mesh.material = cmat
  }

  this.currentMatKey.current = Core.SDGS_MAT
}
下記のコードでデータをパースし、ビルに割り当てる前の配列(percentAry)を作成しています。
let percentAry = []
let groupColorAry = []
const groupLen = group.length

for(let key in data.percents){
  let value = data.percents[key]
  for(let i = 0; i < Number(value); i++ ){
    percentAry.push(key)
  }
}
console.log('percentAry', percentAry)

let step = percentAry.length / groupLen
そして続く、下記のコードでは
マテリアルをクローンし、ビルデータ毎にSDGsのテーマカラーを変えマテリアルを適用しています。
// attachi material
for(let i = 0; i < groupLen; i++){
  let aryIndex = Math.round(step * i)
  let actId = Number(percentAry[aryIndex]) - 1
  let color = material.COLORS[actId]
  // console.log(i, aryIndex, actId, color)

  const mesh = group[i]
  const cmat = material.clone()
  cmat.uniforms.total.value = group.length
  cmat.uniforms.index.value = i
  cmat.uniforms.actColor.value = color
  mesh.material = cmat
}
はじめに
今回は前回(#03 木の葉のパーティクルを動かす)に続いて、AMCIサイトの「SDGs活動の集積」ページで使用している、ビル毎に色を変えて動かす方法について説明していきたいと思います。
実装方法
まずビル毎に動かしたり、色を変えるには、モデルデータの作りとthree.js側での管理方法を工夫する必要があります。
今回は、Blenderでモデル(daimaruyu.glb)の出力を行っていますが、下記の図のようにモデル内のビルのメッシュ毎に名前を付け、さらにJSONでビルの属性を管理する事で、どのビルがどのエリアに属しているかを判別しています。
さらに、それぞれ別の配列にメッシュへの参照値を入れておくことで、エリア毎の色の変更が簡単に行えるようになります。
これを踏まえた上で、ビルの色変えの手順は以下のようになります。
- ビルのモデルの準備
- 色を適用するマテリアルを作成(アニメーションはシェーダーで実装)
- データを読み取りビル毎にマテリアルを適用
実装例
まずビルのモデルの準備ですが、こちらはBlenderなどの操作が必要になるため、サンプルのデータをお使い頂くか、先程の図のような形で、個別に処理を適用できるようなデータをご用意ください。
次にマテリアルの作成です。
少し長いのですが、アニメーションをShaderで行うため、 THREE.ShaderMaterial を継承したカスタムマテリアルを作成しています。
Uniform変数で、ビルのindex, total、そして色を送っています。
import * as THREE from 'three'
import Core from '../Core'
import vert from './glsl/sdgs.vert'
import frag from './glsl/sdgs.frag'

export default class SDGsMaterial extends THREE.ShaderMaterial {
  constructor() {
    const time = Core.time.total

    super({
      side: THREE.DoubleSide,
      lights: true,
      fog: true,
      transparent: true,
      blending: THREE.NormalBlending,
      // blending: THREE.AdditiveBlending,
      depthWrite: true,
      uniforms: THREE.UniformsUtils.merge([
        THREE.UniformsLib.common,
        THREE.UniformsLib.specularmap,
        THREE.UniformsLib.envmap,
        THREE.UniformsLib.aomap,
        THREE.UniformsLib.lightmap,
        THREE.UniformsLib.emissivemap,
        THREE.UniformsLib.bumpmap,
        THREE.UniformsLib.normalmap,
        THREE.UniformsLib.displacementmap,
        THREE.UniformsLib.fog,
        THREE.UniformsLib.lights,
        {
          diffuse: { value: new THREE.Color(0xcccccc) },
          emissive: { value: new THREE.Color(0x999999) },
          specular: { value: new THREE.Color(0x111111) },
          shininess: { value: 120 },
          opacity: { value: 0.8 },
        },
        {
          time: { value: time },
          index: {value: 0},
          total: {value: 0},
          actColor : {value: new THREE.Color(0xffff00)},
        },
      ]),
      vertexShader: vert,
      fragmentShader: frag,
    })

    this.type = 'SDGsMaterial'
    this.color = new THREE.Color(0x000000)
    this.specular = new THREE.Color(0x111111)
    this.shininess = 30

    this.map = null

    this.lightMap = null
    this.lightMapIntensity = 1.0

    this.aoMap = null
    this.aoMapIntensity = 1.0

    this.emissive = new THREE.Color(0xffffff)
    this.emissiveIntensity = 2.0
    this.emissiveMap = null

    this.bumpMap = null
    this.bumpScale = 1

    this.normalMap = null
    this.normalMapType = THREE.TangentSpaceNormalMap
    this.normalScale = new THREE.Vector2(1, 1)

    this.displacementMap = null
    this.displacementScale = 1
    this.displacementBias = 0

    this.specularMap = null

    this.alphaMap = null

    this.envMap = null
    this.combine = THREE.MultiplyOperation
    this.reflectivity = 1
    this.refractionRatio = 0.98

    this.wireframe = false
    this.wireframeLinewidth = 1
    this.wireframeLinecap = 'round'
    this.wireframeLinejoin = 'round'

    this.flatShading = false

    this.COLORS = [
      new THREE.Color(0xD6252E),
      new THREE.Color(0xC89931),
      new THREE.Color(0x2B9144),
      new THREE.Color(0xAF2534),
      new THREE.Color(0xDB3F31),
      new THREE.Color(0x04A2C6),
      new THREE.Color(0xF2B02B),
      new THREE.Color(0x7B1E33),
      new THREE.Color(0xE3652B),
      new THREE.Color(0xCD1E77),
      new THREE.Color(0xEB9533),
      new THREE.Color(0xC28431),
      new THREE.Color(0x466E3A),
      new THREE.Color(0x0173A7),
      new THREE.Color(0x3DA448),
      new THREE.Color(0x164B77),
      new THREE.Color(0x1D2E51)
    ]
  }
}
// modelMatrix: オブジェクト座標からワールド座標へ変換する
// viewMatrix: ワールド座標から視点座標へ変換
// modelViewMatrix: modelMatrixとviewMatrixの積算
// projectionMatrix: カメラの各種パラメータから3次元を2次元に射影し、クリップ座標系に変換する行列
// cameraPosition: カメラの位置
// normalMatrix: 頂点法線ベクトルを視点座標系に変換する行列
// position: 頂点座標
// normal: 頂点法線ベクトル
// uv: テクスチャを貼るためのUV座標

#include <common>
#include <uv_pars_vertex>
#include <uv2_pars_vertex>
#include <displacementmap_pars_vertex>
#include <envmap_pars_vertex>
#include <color_pars_vertex>
#include <fog_pars_vertex>
#include <normal_pars_vertex>
#include <morphtarget_pars_vertex>
#include <skinning_pars_vertex>
#include <shadowmap_pars_vertex>
#include <logdepthbuf_pars_vertex>
#include <clipping_planes_pars_vertex>

uniform float time;
uniform float index;
uniform float total;
uniform vec3 actColor;

// varying vec4 vWorldPosition;
// varying vec3 vNormal;
// varying vec4 vTexCoords;
varying vec3 vViewPosition;
varying vec2 vUv;

void main(){
  #include <uv_vertex>
  #include <uv2_vertex>
  #include <color_vertex>
  #include <beginnormal_vertex>
  #include <morphnormal_vertex>
  #include <skinbase_vertex>
  #include <skinnormal_vertex>
  #include <defaultnormal_vertex>
  #include <normal_vertex>
  #include <begin_vertex>
  #include <morphtarget_vertex>
  #include <skinning_vertex>
  #include <displacementmap_vertex>
  #include <project_vertex>
  #include <logdepthbuf_vertex>
  #include <clipping_planes_vertex>

  vViewPosition = - mvPosition.xyz;
  vUv = uv - 0.5;

  #include <worldpos_vertex>
  #include <envmap_vertex>
  #include <shadowmap_vertex>
  #include <fog_vertex>

  vec3 nPos = position;
  float norm = index / total;
  float speed = 0.5;
  nPos.y *= 1.0 + abs(sin((time + index) * speed)) * 0.5;
  gl_Position = projectionMatrix * modelViewMatrix * vec4( nPos, 1.0 );
}
// viewMatrix: ワールド座標から視点座標へ変換
// cameraPosition: カメラの位置

uniform vec3 diffuse;
uniform vec3 emissive;
uniform vec3 specular;
uniform float shininess;
uniform float opacity;

#include <common>
#include <packing>
#include <dithering_pars_fragment>
#include <color_pars_fragment>
#include <uv_pars_fragment>
#include <uv2_pars_fragment>
#include <map_pars_fragment>
#include <alphamap_pars_fragment>
#include <alphatest_pars_fragment>
#include <aomap_pars_fragment>
#include <lightmap_pars_fragment>
#include <emissivemap_pars_fragment>
#include <envmap_common_pars_fragment>
#include <envmap_pars_fragment>
#include <cube_uv_reflection_fragment>
#include <fog_pars_fragment>
#include <bsdfs>
#include <lights_pars_begin>
#include <normal_pars_fragment>
#include <lights_phong_pars_fragment>
#include <shadowmap_pars_fragment>
#include <bumpmap_pars_fragment>
#include <normalmap_pars_fragment>
#include <specularmap_pars_fragment>
#include <logdepthbuf_pars_fragment>
#include <clipping_planes_pars_fragment>

uniform float time;
uniform float index;
uniform float total;
uniform vec3 actColor;

varying vec2 vUv;

void main() {
  #include <clipping_planes_fragment>

  vec4 diffuseColor = vec4( diffuse, opacity );
  ReflectedLight reflectedLight = ReflectedLight( vec3( 0.0 ), vec3( 0.0 ), vec3( 0.0 ), vec3( 0.0 ) );
  vec3 totalEmissiveRadiance = emissive;

  #include <logdepthbuf_fragment>
  #include <map_fragment>
  #include <color_fragment>
  #include <alphamap_fragment>
  #include <alphatest_fragment>
  #include <specularmap_fragment>
  #include <normal_fragment_begin>
  #include <normal_fragment_maps>
  #include <emissivemap_fragment>
  // accumulation
  #include <lights_phong_fragment>
  #include <lights_fragment_begin>
  #include <lights_fragment_maps>
  #include <lights_fragment_end>
  // modulation
  #include <aomap_fragment>

  vec3 outgoingLight = reflectedLight.directDiffuse + reflectedLight.indirectDiffuse + reflectedLight.directSpecular + reflectedLight.indirectSpecular + totalEmissiveRadiance;

  #include <envmap_fragment>
  #include <output_fragment>
  #include <tonemapping_fragment>
  #include <encodings_fragment>
  #include <fog_fragment>
  #include <premultiplied_alpha_fragment>
  #include <dithering_fragment>


  vec3 nColor = outgoingLight;
  nColor *= actColor;

  gl_FragColor = vec4(nColor, diffuseColor.a);
}
マテリアルの準備ができたら、データに応じた色をビルに適用していきます。
setup(){
  this.object = Loader.getAsset('daimaruyu')
  Core.scene.add(this.object)

  this.all = []
  this.otemachi = []
  this.marunouchi = []
  this.yurakucho = []

  console.log('Daimaruyu', this.object)
  console.log('BuildingArea', BuildingArea)

  this.object.traverse((obj) => {
    // console.log(obj.type, obj.name)
    if(obj.isMesh) {
      const name = obj.name
      const area = BuildingArea[name].area
      // console.log(name, area)

      obj.area = area
      this.all.push(obj)

      switch (area){
        case 'otemachi':
          this.otemachi.push(obj)
        break;
        case 'marunouchi':
          this.marunouchi.push(obj)
        break;
        case 'yurakucho':
          this.yurakucho.push(obj)
        break;
      }
    }
  })
    ...
}
setup()の冒頭で、モデルデータの読み込み、ステージへの配置を行っています。
this.object = Loader.getAsset('daimaruyu')
Core.scene.add(this.object)
下記の処理は、子要素がもしMeshだったらそれぞれのエリアの配列に格納する、という処理です。
事前にエリア毎にビルをまとめておくことで、ビジュアライズのエリアを切り替えが簡単に行なえます。
TIPS
traverse を使うとそのオブジェクトの子要素に対して個別に処理が行えます
this.object.traverse((obj) => {
  // console.log(obj.type, obj.name)
  if(obj.isMesh) {
    const name = obj.name
    const area = BuildingArea[name].area
    // console.log(name, area)

    obj.area = area
    this.all.push(obj)

    switch (area){
      case 'otemachi':
        this.otemachi.push(obj)
      break;
      case 'marunouchi':
        this.marunouchi.push(obj)
      break;
      case 'yurakucho':
        this.yurakucho.push(obj)
      break;
    }
  }
})
続いて、実際にビルのメッシュに色を割り当てていきます。
"percents": {
  "1": 1, // (1)貧困をなくそう
  "2": 2, // (2)飢餓をゼロに
  "3": 9, // (3)すべての人に健康と福祉を
  "4": 2, // (4)質の高い教育をみんなに
  "5": 1, // (5)ジェンダー平等を実現しよう
  "6": 0, // (6)安全な水とトイレを世界中に
  "7": 1, // (7)エネルギーをみんなに。そしてクリーンに
  "8": 1, // (8)働きがいも経済成長も
  "9": 2, // (9)産業と技術革新の基盤を作ろう
  "10": 1, // (10)人や国の不平等をなくそう
  "11": 2, // (11)住み続けられるまちづくりを
  "12": 20, // (12)つくる責任、つかう責任
  "13": 17, // (13)気候変動に具体的な対策を
  "14": 5, // (14)海の豊かさを守ろう
  "15": 18, // (15)陸の豊かさも守ろう
  "16": 1, // (16)平和と公正をすべての人に
  "17": 18 // (17)パートナーシップで目標を達成しよう
}
こちらはビジュアライズに使用しているJSONの雛形です、percents内のkeyはSDGsの目標番号、そしてvalueはその番号のパーセンテージになります。なので全てを足すと100となり、このデータを使ってビルにSDGsのテーマカラーを付けていきます。
setSDGsMaterial(area){
  let group = this.getAreaGroup(area)
  // console.log('setSDGsMaterial', area, group)

  const material = this.sdgsMat
  // console.log(material)

  // get colors
  let data = Data.sdgData[area]
  console.log('SDGs Data', data)

  let percentAry = []
  let groupColorAry = []
  const groupLen = group.length

  for(let key in data.percents){
    let value = data.percents[key]
    for(let i = 0; i < Number(value); i++ ){
      percentAry.push(key)
    }
  }
  console.log('percentAry', percentAry)

  let step = percentAry.length / groupLen

  // attachi material
  for(let i = 0; i < groupLen; i++){
    let aryIndex = Math.round(step * i)
    let actId = Number(percentAry[aryIndex]) - 1
    let color = material.COLORS[actId]
    // console.log(i, aryIndex, actId, color)

    const mesh = group[i]
    const cmat = material.clone()
    cmat.uniforms.total.value = group.length
    cmat.uniforms.index.value = i
    cmat.uniforms.actColor.value = color
    mesh.material = cmat
  }

  this.currentMatKey.current = Core.SDGS_MAT
}
下記のコードでデータをパースし、ビルに割り当てる前の配列(percentAry)を作成しています。
let percentAry = []
let groupColorAry = []
const groupLen = group.length

for(let key in data.percents){
  let value = data.percents[key]
  for(let i = 0; i < Number(value); i++ ){
    percentAry.push(key)
  }
}
console.log('percentAry', percentAry)

let step = percentAry.length / groupLen
そして続く、下記のコードでは
マテリアルをクローンし、ビルデータ毎にSDGsのテーマカラーを変えマテリアルを適用しています。
// attachi material
for(let i = 0; i < groupLen; i++){
  let aryIndex = Math.round(step * i)
  let actId = Number(percentAry[aryIndex]) - 1
  let color = material.COLORS[actId]
  // console.log(i, aryIndex, actId, color)

  const mesh = group[i]
  const cmat = material.clone()
  cmat.uniforms.total.value = group.length
  cmat.uniforms.index.value = i
  cmat.uniforms.actColor.value = color
  mesh.material = cmat
}
サンプルデータ
当記事のサンプルデータは、下記のリポジトリにて公開しています。
https://github.com/Project-PLATEAU/AMCI-Sample