
はじめに
今回は前回(#01 背景と地面の色の変更方法)に続いて、AMCIのホーム画面で使用している射影テクスチャマッピング演出についての説明をしていきたいと思います。
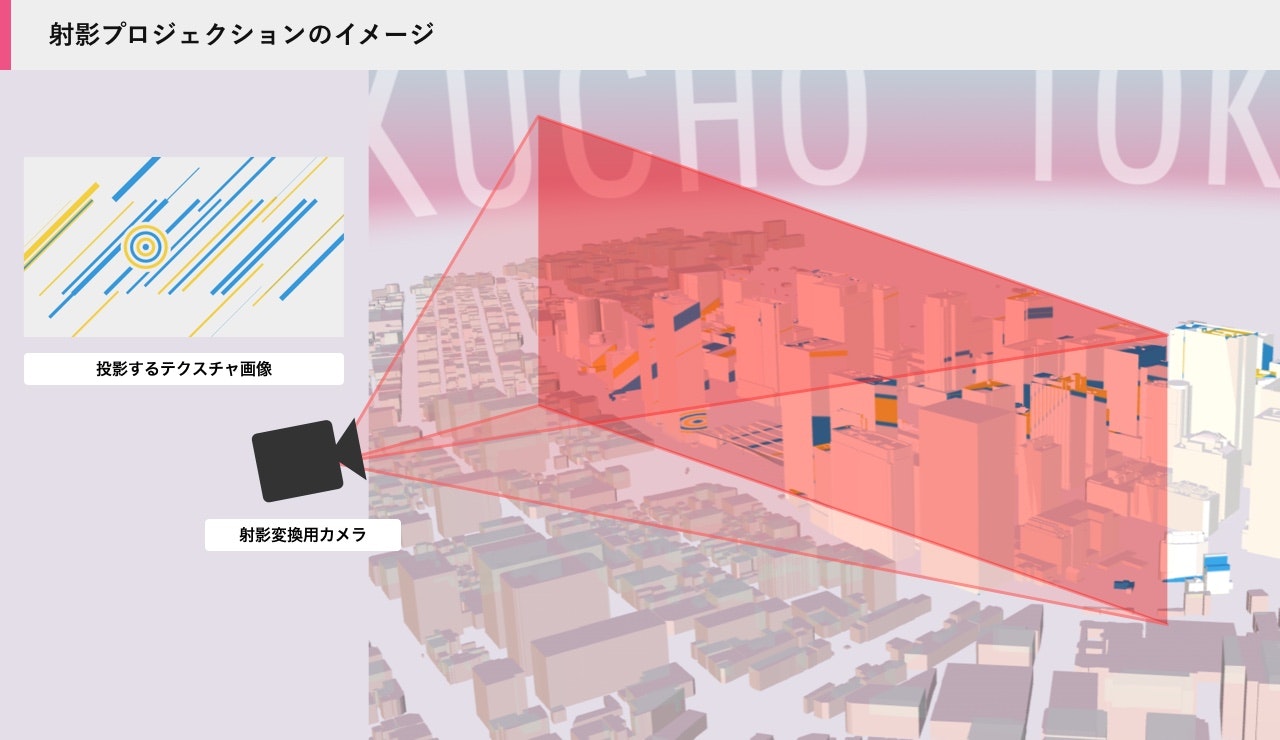
まず、射影テクスチャマッピングとはどんなものかといいうと、プロジェクターから映像が照射されて壁や物に映像が投影される様を、3D空間上で再現したマッピング手法です。
テクスチャ画像を射影変換することで三次元空間上に投影することができます。
実装方法
具体的な変換の手順は以下の通りです。
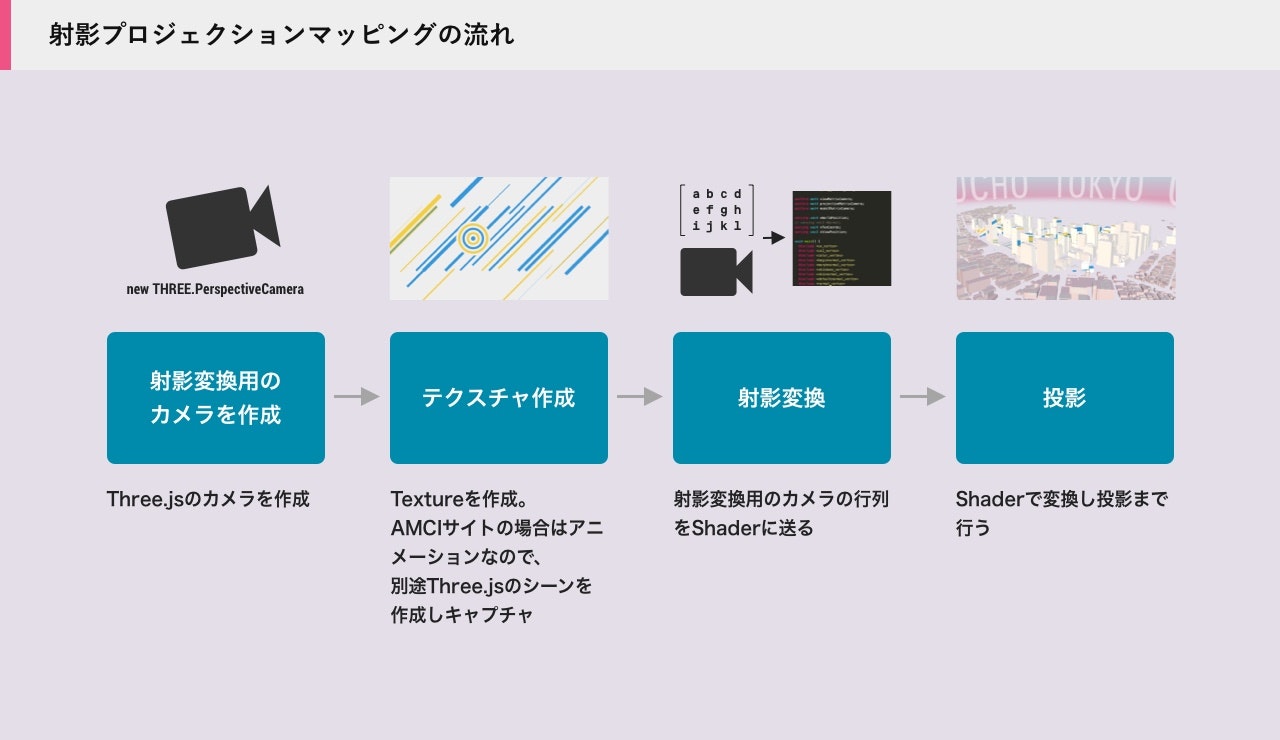
まず、射影変換を行うためのカメラを作成します。
このカメラがプロジェクター的な役割になり、最終的にこの地点から投影されたテクスチャがビル群などに投影されます。
次にテクスチャを作成します。
図にも記載してありますが、AMCIサイトの場合は静止画のテクスチャではなくアニメーションを行っているので THREE.CanvasTexture を用いてテクスチャを作成しています。
そして、変換用のカメラの行列をShaderに送ることで、上記のテクスチャをオブジェクトにマッピングすることが出来ます。
実装例
それでは実際のソースコードを参考に、上述の手順を見ていきます。
変換用のカメラを作成
this.pcamera = new THREE.PerspectiveCamera(50, 16 / 9, 0.1, 10000)
this.pcamera.position.set(12, 1, 5.4)
this.pcamera.lookAt(this.scene.position)
射影変換に使うカメラを作成します。
こちらは射影するポジションによって動かす必要があるので、メインカメラとは別に作成します。
PerspectiveCameraの引数の2つ目のアスペクト比はテクスチャのアスペクト比と揃えて下さい。
PerspectiveCameraの引数はこちら
PerspectiveCamera(fov: Number, aspect: Number, near: Number, far: Number)
テクスチャの作成(アニメーション)
setup(){
  const canvas = document.getElementById('texture')
  this.texture = new THREE.CanvasTexture(canvas)

  const width = 960
  const height = 540

  // Scene
  const scene = new THREE.Scene()
  scene.background = new THREE.Color(0xeeeeee)

  // Render
  const renderer = new THREE.WebGLRenderer({
    canvas,
    antialias: true,
    alpha: true
  })
  renderer.setPixelRatio(window.devicePixelRatio)
  renderer.setSize(width, height)

  // Camera
  const camera = new THREE.OrthographicCamera(-width / 2, +width / 2, height / 2, -height / 2, 1, 1000)
  // camera.position.set(0, 0, 5)
  // camera.lookAt(scene.position)

  // Object
  const planes = new THREE.Object3D()
  scene.add(planes)

  ...
}

update(){
  ...
  this.texture.needsUpdate = true
}
アニメーションを行う部分のコードを入れるとかなり長くなってしまうので、Canvas要素をテクスチャにする部分を重点的に説明します。
まず THREE.CanvasTexture についてですが、こちらはHTMLのCanvas要素からテクスチャを作成するクラスになります。
Three.jsでのアニメーションはCanvas要素で描画されるので、描画したものをそのままテクスチャとして扱う事ができます。
またターゲットのCanvas要素はメインの描画で使用するものとは別のCanvasが必要です。
ここで2点ポイントがあります。
まず1つ目は、CanvasTextureのneedUpdate = trueにしないとキャプチャがされない点。
これは、上記コードのupdate関数内に記載していますが、needUpdateのフラグがtrueになっていないとキャプチャが行われないので注意してください。
2つ目は、テクスチャの中身のカメラは THREE.OrthographicCamera を使用します。
これは、平行投影用のカメラ(パースがOFF)なので、平面的な表現をする場合は PerspectiveCamera ではなくこちらを使用します。
射影変換
import * as THREE from 'three'
import vert from './glsl/projection.vert'
import frag from './glsl/projection.frag'

export default class ProjectedMaterial extends THREE.ShaderMaterial {

  constructor({camera, texture, color = 0xffffff} = {}) {

    if (!texture || !texture.isTexture) {
      throw new Error('Invalid texture passed to the ProjectedMaterial')
    }
    if (!camera || !camera.isCamera) {
      throw new Error('Invalid camera passed to the ProjectedMaterial')
    }

    // カメラ行列の更新
    camera.updateProjectionMatrix()
    camera.updateMatrixWorld()
    camera.updateWorldMatrix()

    // カメラの行列を取得
    const viewMatrixCamera = camera.matrixWorldInverse.clone()
    const projectionMatrixCamera = camera.projectionMatrix.clone()
    const modelMatrixCamera = camera.matrixWorld.clone()
    const projPosition = camera.position.clone()

    super({
      side: THREE.FrontSide,
      lights: true,
      transparent: false,
      blending: THREE.NormalBlending,
      depthWrite: true,
      uniforms: THREE.UniformsUtils.merge([
        THREE.UniformsLib.common,
        THREE.UniformsLib.specularmap,
        THREE.UniformsLib.envmap,
        THREE.UniformsLib.aomap,
        THREE.UniformsLib.lightmap,
        THREE.UniformsLib.emissivemap,
        THREE.UniformsLib.bumpmap,
        THREE.UniformsLib.normalmap,
        THREE.UniformsLib.displacementmap,
        THREE.UniformsLib.fog,
        THREE.UniformsLib.lights,
        {
          emissive: { value: new THREE.Color( 0x000000 ) },
          specular: { value: new THREE.Color( 0x000000 ) },
          shininess: { value: 0 }
        },
        {
          color: { value: new THREE.Color(color) },
          tex: { value: texture },
          viewMatrixCamera: { type: 'm4', value: viewMatrixCamera },
          projectionMatrixCamera: { type: 'm4', value: projectionMatrixCamera },
          modelMatrixCamera: { type: 'mat4', value: modelMatrixCamera },
          projPosition: { type: 'v3', value: projPosition },
        }
      ]),
      vertexShader: vert,
      fragmentShader: frag
    })

    this.isProjectedMaterial = true
  }

  updateCamera(camera){
    // カメラ行列の更新
    camera.updateProjectionMatrix()
    camera.updateMatrixWorld()
    camera.updateWorldMatrix()

    // カメラの行列を取得
    const viewMatrixCamera = camera.matrixWorldInverse.clone()
    const projectionMatrixCamera = camera.projectionMatrix.clone()
    const modelMatrixCamera = camera.matrixWorld.clone()
    const projPosition = camera.position.clone()

    this.uniforms.viewMatrixCamera.value = viewMatrixCamera
    this.uniforms.projectionMatrixCamera.value = projectionMatrixCamera
    this.uniforms.modelMatrixCamera.value = modelMatrixCamera
    this.uniforms.projPosition.value = projPosition
  }
}
こちらは実際にビルのモデルに割り当てているマテリアルのコードです。
ShaderMaterial を継承し、新たにマテリアルのクラスを作成しています。
ここでは引数に変換用のカメラとテクスチャを受け取り、行列をシェーダーに送っています。
またカメラ位置を変更した際には、updateCamera関数で行列の更新を行っています。
// アニメーションを更新
this.animationRender.update(Core.time)

// マテリアル内のUniform変数を更新
const pmat = this.materials.ProjectedMaterial
if(pmat) pmat.uniforms.tex.value = this.animationRender.texture
テクスチャの更新はマテリアルのUniform変数 tex: { value: texture } を変更することで更新できます。
毎フレームテクスチャを更新したい場合は、こちらも毎フレーム実行する必要があります。
投影
// modelMatrix: オブジェクト座標からワールド座標へ変換する
// viewMatrix: ワールド座標から視点座標へ変換
// modelViewMatrix: modelMatrixとviewMatrixの積算
// projectionMatrix: カメラの各種パラメータから3次元を2次元に射影し、クリップ座標系に変換する行列
// cameraPosition: カメラの位置
// normalMatrix: 頂点法線ベクトルを視点座標系に変換する行列
// position: 頂点座標
// normal: 頂点法線ベクトル
// uv: テクスチャを貼るためのUV座標

#include <common>
#include <uv_pars_vertex>
#include <uv2_pars_vertex>
#include <displacementmap_pars_vertex>
#include <envmap_pars_vertex>
#include <color_pars_vertex>
#include <fog_pars_vertex>
#include <normal_pars_vertex>
#include <morphtarget_pars_vertex>
#include <skinning_pars_vertex>
#include <shadowmap_pars_vertex>
#include <logdepthbuf_pars_vertex>
#include <clipping_planes_pars_vertex>

uniform mat4 viewMatrixCamera;
uniform mat4 projectionMatrixCamera;
uniform mat4 modelMatrixCamera;

varying vec4 vWorldPosition;
// varying vec3 vNormal;
varying vec4 vTexCoords;
varying vec3 vViewPosition;

void main() {
  #include <uv_vertex>
  #include <uv2_vertex>
  #include <color_vertex>
  #include <beginnormal_vertex>
  #include <morphnormal_vertex>
  #include <skinbase_vertex>
  #include <skinnormal_vertex>
  #include <defaultnormal_vertex>
  #include <normal_vertex>
  #include <begin_vertex>
  #include <morphtarget_vertex>
  #include <skinning_vertex>
  #include <displacementmap_vertex>
  #include <project_vertex>
  #include <logdepthbuf_vertex>
  #include <clipping_planes_vertex>

  vViewPosition = - mvPosition.xyz;

  #include <worldpos_vertex>
  #include <envmap_vertex>
  #include <shadowmap_vertex>
  #include <fog_vertex>

  // vNormal = mat3(modelMatrix) * normal;
  vWorldPosition = modelMatrix * vec4(position, 1.0);
  vTexCoords = projectionMatrixCamera * viewMatrixCamera * vWorldPosition;
  gl_Position = projectionMatrix * modelViewMatrix * vec4(position, 1.0);
}
// viewMatrix: ワールド座標から視点座標へ変換
// cameraPosition: カメラの位置

uniform vec3 diffuse;
uniform vec3 emissive;
uniform vec3 specular;
uniform float shininess;
uniform float opacity;

#include <common>
#include <packing>
#include <dithering_pars_fragment>
#include <color_pars_fragment>
#include <uv_pars_fragment>
#include <uv2_pars_fragment>
#include <map_pars_fragment>
#include <alphamap_pars_fragment>
#include <alphatest_pars_fragment>
#include <aomap_pars_fragment>
#include <lightmap_pars_fragment>
#include <emissivemap_pars_fragment>
#include <envmap_common_pars_fragment>
#include <envmap_pars_fragment>
#include <cube_uv_reflection_fragment>
#include <fog_pars_fragment>
#include <bsdfs>
#include <lights_pars_begin>
#include <normal_pars_fragment>
#include <lights_phong_pars_fragment>
#include <shadowmap_pars_fragment>
#include <bumpmap_pars_fragment>
#include <normalmap_pars_fragment>
#include <specularmap_pars_fragment>
#include <logdepthbuf_pars_fragment>
#include <clipping_planes_pars_fragment>

uniform vec3 color;
uniform sampler2D tex;
uniform vec3 projPosition;

// varying vec3 vNormal;
varying vec4 vWorldPosition;
varying vec4 vTexCoords;

void main() {
  #include <clipping_planes_fragment>

  vec4 diffuseColor = vec4(diffuse, opacity);
  ReflectedLight reflectedLight = ReflectedLight(vec3(0.0), vec3(0.0), vec3(0.0), vec3(0.0));
  vec3 totalEmissiveRadiance = emissive;

  #include <logdepthbuf_fragment>
  #include <map_fragment>
  #include <color_fragment>
  #include <alphamap_fragment>
  #include <alphatest_fragment>
  #include <specularmap_fragment>
  #include <normal_fragment_begin>
  #include <normal_fragment_maps>
  #include <emissivemap_fragment>

  // accumulation
  #include <lights_phong_fragment>
  #include <lights_fragment_begin>
  #include <lights_fragment_maps>
  #include <lights_fragment_end>

  // modulation
  #include <aomap_fragment>

  vec3 outgoingLight = reflectedLight.directDiffuse + reflectedLight.indirectDiffuse + reflectedLight.directSpecular + reflectedLight.indirectSpecular + totalEmissiveRadiance;

  #include <envmap_fragment>
  #include <output_fragment>
  #include <tonemapping_fragment>
  #include <encodings_fragment>
  #include <fog_fragment>
  #include <premultiplied_alpha_fragment>
  #include <dithering_fragment>

  vec2 uv = (vTexCoords.xy / vTexCoords.w) * 0.5 + 0.5;
  vec4 outColor = texture2D(tex, uv);

  // this makes sure we don't render the texture also on the back of the object
  vec3 projectorDirection = normalize(projPosition - vWorldPosition.xyz);
  float dotProduct = dot(vNormal, projectorDirection);
  if (dotProduct < 0.0) {
    outColor = vec4(color, 0.0);
  }

  gl_FragColor = vec4(outColor.rgb * outgoingLight, 1.0);
}
こちらはプロジェクションマテリアルで使用しているシェーダーのコードです。
この中で、実際に射影変換を行っているコードが以下になります。
マテリアルから送られてきたカメラの行列をテクスチャの座標にかけて、射影変換用の座標を作成します。
vTexCoords = projectionMatrixCamera * viewMatrixCamera * vWorldPosition;
そしてフラグメントシェーダーのほうでは、上記の座標をUVに変換し描画を行います。
vec2 uv = (vTexCoords.xy / vTexCoords.w) * 0.5 + 0.5;
vec4 outColor = texture2D(tex, uv);
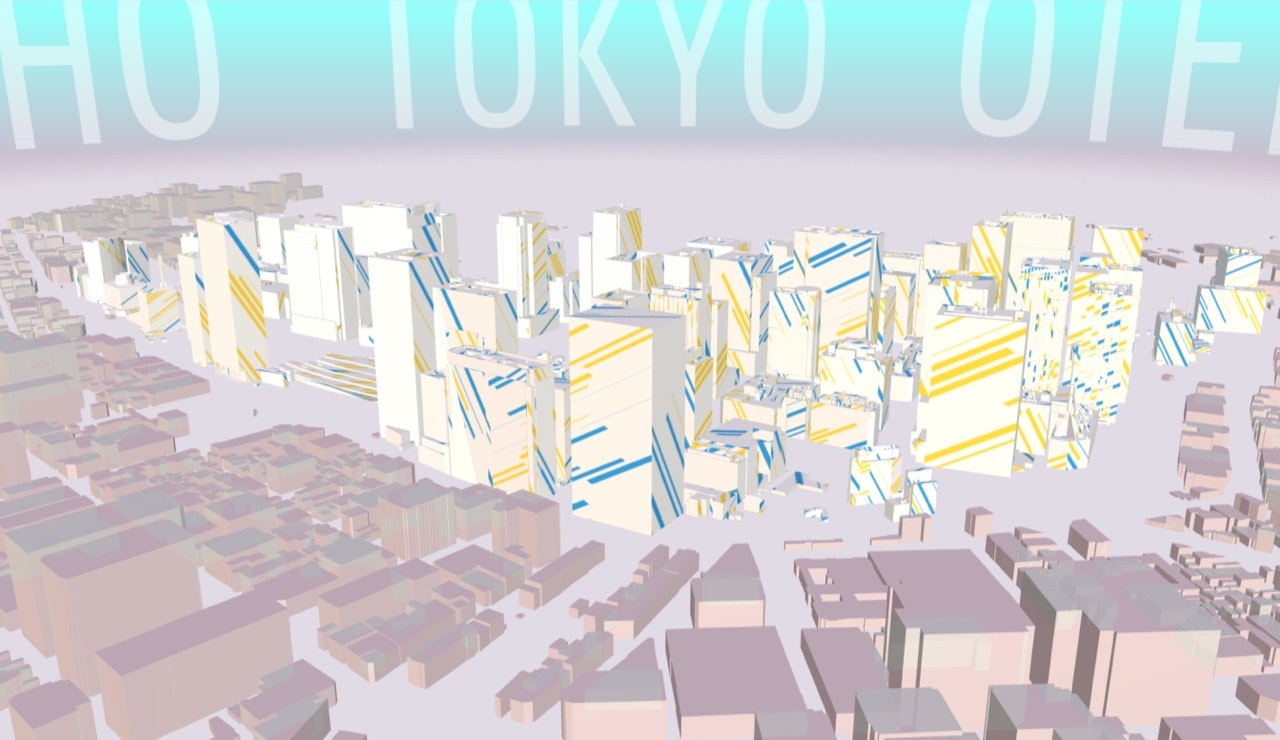
射影変換をしていないもの
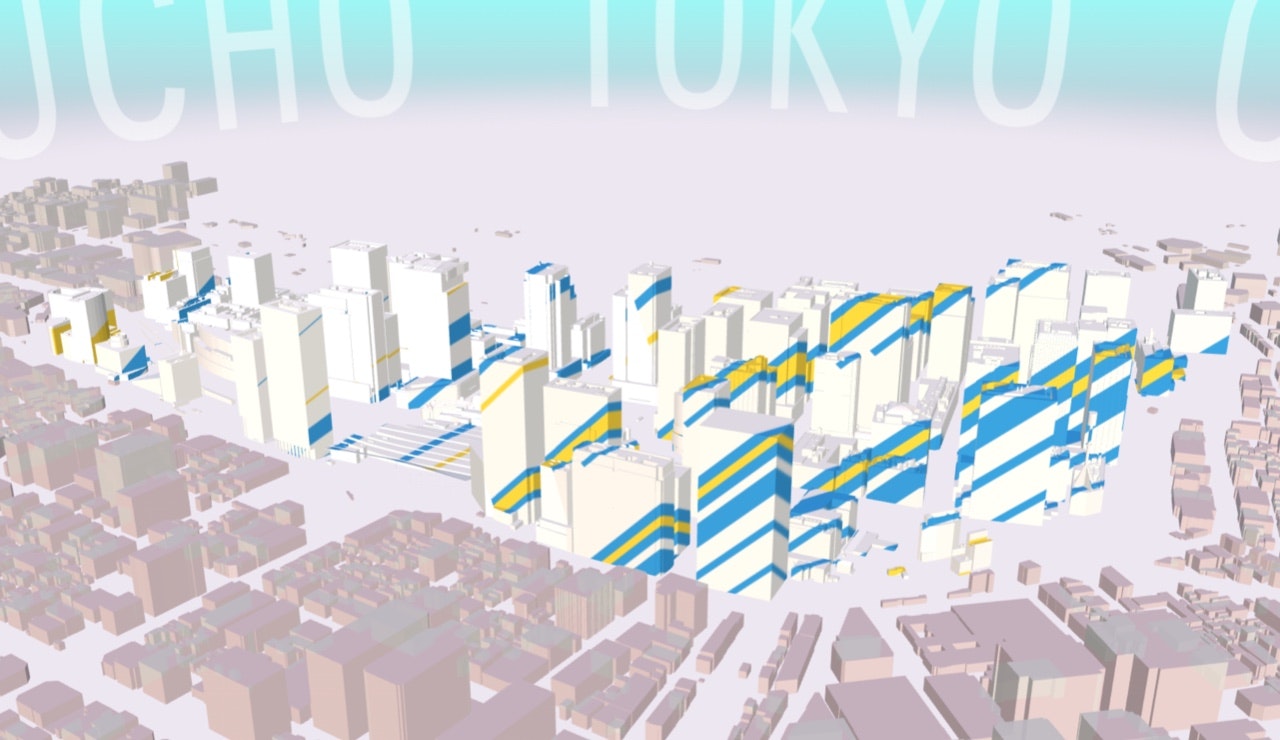
射影変換をしたもの
参考
サンプルデータ
当記事のサンプルデータは、下記のリポジトリにて公開しています。
https://github.com/Project-PLATEAU/AMCI-Sample