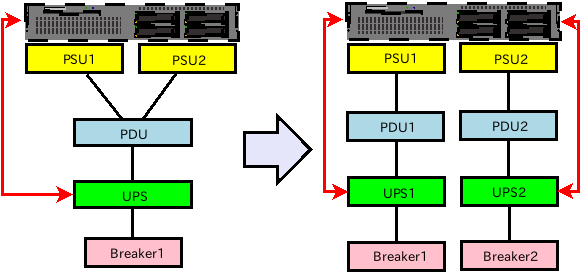
背景
サーバー屋さんで最も数がでていると思われる2ソケットサーバーは大抵PSUが2個、ストレージサーバー等では3個の冗長電源構成になっていて、余程ハイスペックCPUやGPUを搭載してたりしない限り片肺での稼働も可能になっている。
サーバー搭載のPSU(電源ユニット)の故障までの冗長性を確保するのであれば、その上流のPDUやUPSは1系統でいいかもしれないが、できればブレーカから分けてUPSの故障などにも対応できるようにできないか?と考えるのは自然な要求だと思う。世の中には発電所や電力会社から分けたいなんて需要もあるようだけど、ここでは考えない。
フリーのapcupsdを用いて、それを実現してみる。
用意
- OS 環境
- CentOS7.3.1611
- UPS
- Smart-UPS 3000 RM XL
- apcupsd
- apcupsd-3.14.12 (epel 由来)
- 接続
- USBx2 (USB/シリアル併用も可能だが、最近のサーバーはシリアルを持ってないことが増えた)
実装
apcupsdは単独では複数のUPSを管理できないため、接続するUPSの数だけ設定を分けて作成し、それぞれapcupsdを立ちあげ、その上で停電時の処理スクリプト内でand条件やor条件を付ける必要がある。
複数USBへの対応
USBケーブルを繋ぐとudevがhidとして認識してデバイスを作り、apcupsdは勝手にそれを認識するため、通常の1台のみ接続の場合apcupsd.confではDEVICE欄を空欄にすることになっている。しかし、厳密に2台を区別したければ、また他のデバイスが同様な認識をする場合にも、別名を割り当てる必要がある。
ケーブルを刺した状態でlsusbコマンドを叩き、バスIDとデバイスナンバーを取得する。
[root@server ~]# lsusb
Bus 002 Device 002: ID 8087:8002 Intel Corp.
......
Bus 003 Device 046: ID 051d:0002 American Power Conversion Uninterruptible Power Supply
Bus 003 Device 047: ID 051d:0002 American Power Conversion Uninterruptible Power Supply
これは接続されるたびに異なる番号になるので、接続した全てのUPSシリアル番号を取得してudevルールを作成する。
[root@server ~]# lsusb -v -s 003:046

Bus 003 Device 046: ID 051d:0002 American Power Conversion Uninterruptible Power Supply
Device Descriptor:
  bLength                18
  bDescriptorType         1
  bcdUSB               1.10
  bDeviceClass            0 (Defined at Interface level)
  bDeviceSubClass         0
  bDeviceProtocol         0
  bMaxPacketSize0         8
  idVendor           0x051d American Power Conversion   ←これと
  idProduct          0x0002 Uninterruptible Power Supply  ←これと
  bcdDevice            0.06
  iManufacturer           3 American Power Conversion
  iProduct                1 Smart-UPS 3000 RM XL FW:691.01.M USB FW:7.4
  iSerial                 2 AS170XXXXXXX   ←これを使う
  bNumConfigurations      1
取得した情報をもとに、/etc/udev/rules.d/に30-apcups.confを作成し、以下のように記述する。
KERNEL=="hiddev*", ATTRS{idVendor}=="051d", ATTRS{idProduct}=="0002", ,ATTRS{serial}=="AS170XXXXXXX", SYMLINK+="apcups2"
KERNEL=="hiddev*", ATTRS{idVendor}=="051d", ATTRS{idProduct}=="0002", ,ATTRS{serial}=="AS170YYYYYYY", SYMLINK+="apcups1"
このファイルを作成後、ケーブルを抜き差しすると以下のようにリンクが作成される。
[root@server ~] ls -l /dev/apcups*
lrwxrwxrwx 1 root root 11  3月 17 19:26 /dev/apcups1 -> usb/hiddev1
lrwxrwxrwx 1 root root 11  3月 17 19:26 /dev/apcups2 -> usb/hiddev0
監視設定
/etc/apcupsd/apcupsd.confをapcupsd-1.conf, apcupsd-2.conf としてコピーして、DEVICEには作成した/dev/apcups1, /dev/apcups2をそれぞれ指定する。UPSNAMEやEVENTFILEは分けておくこと。同様にSTATFILE, NISPORTも必要であれば変更しておく。
/usr/lib/systemd/system/apcupsd.serviceを設定と同様 -1, -2 の2つにわけ、それぞれの設定ファイルを読み込むようExecStartを書き換える。
[Service]
ExecStartPre=-/bin/rm -f /etc/apcupsd/powerfail
ExecStart=/sbin/apcupsd -b -f /etc/apcupsd/apcupsd-1.conf
設定を読み込んで enable & start。
[root@server ~] systemctl daemon-reload
[root@server ~] systemctl enable apcupsd-1; systemctl enable apcupsd-2
[root@server ~] systemctl start apcupsd-1; systemctl start apcupsd-2
ToDo
今はどっちが落ちてもシャットダウンする「OR条件」で動作することになる。これを、シャットダウンスクリプト内で互いの生死を確認して、一方が生きていればシャットダウンしない「AND条件」でシャットダウンするようにする。
