加速度センサーとは
加速度センサーとは、その名の通りセンサー本体が動いた時の加速度を測ることができます。
今回は秋月電子のMMA8452Q使用3軸加速度センサーモジュールキットを使います。
秋月電子で一番安い加速度センサーです。
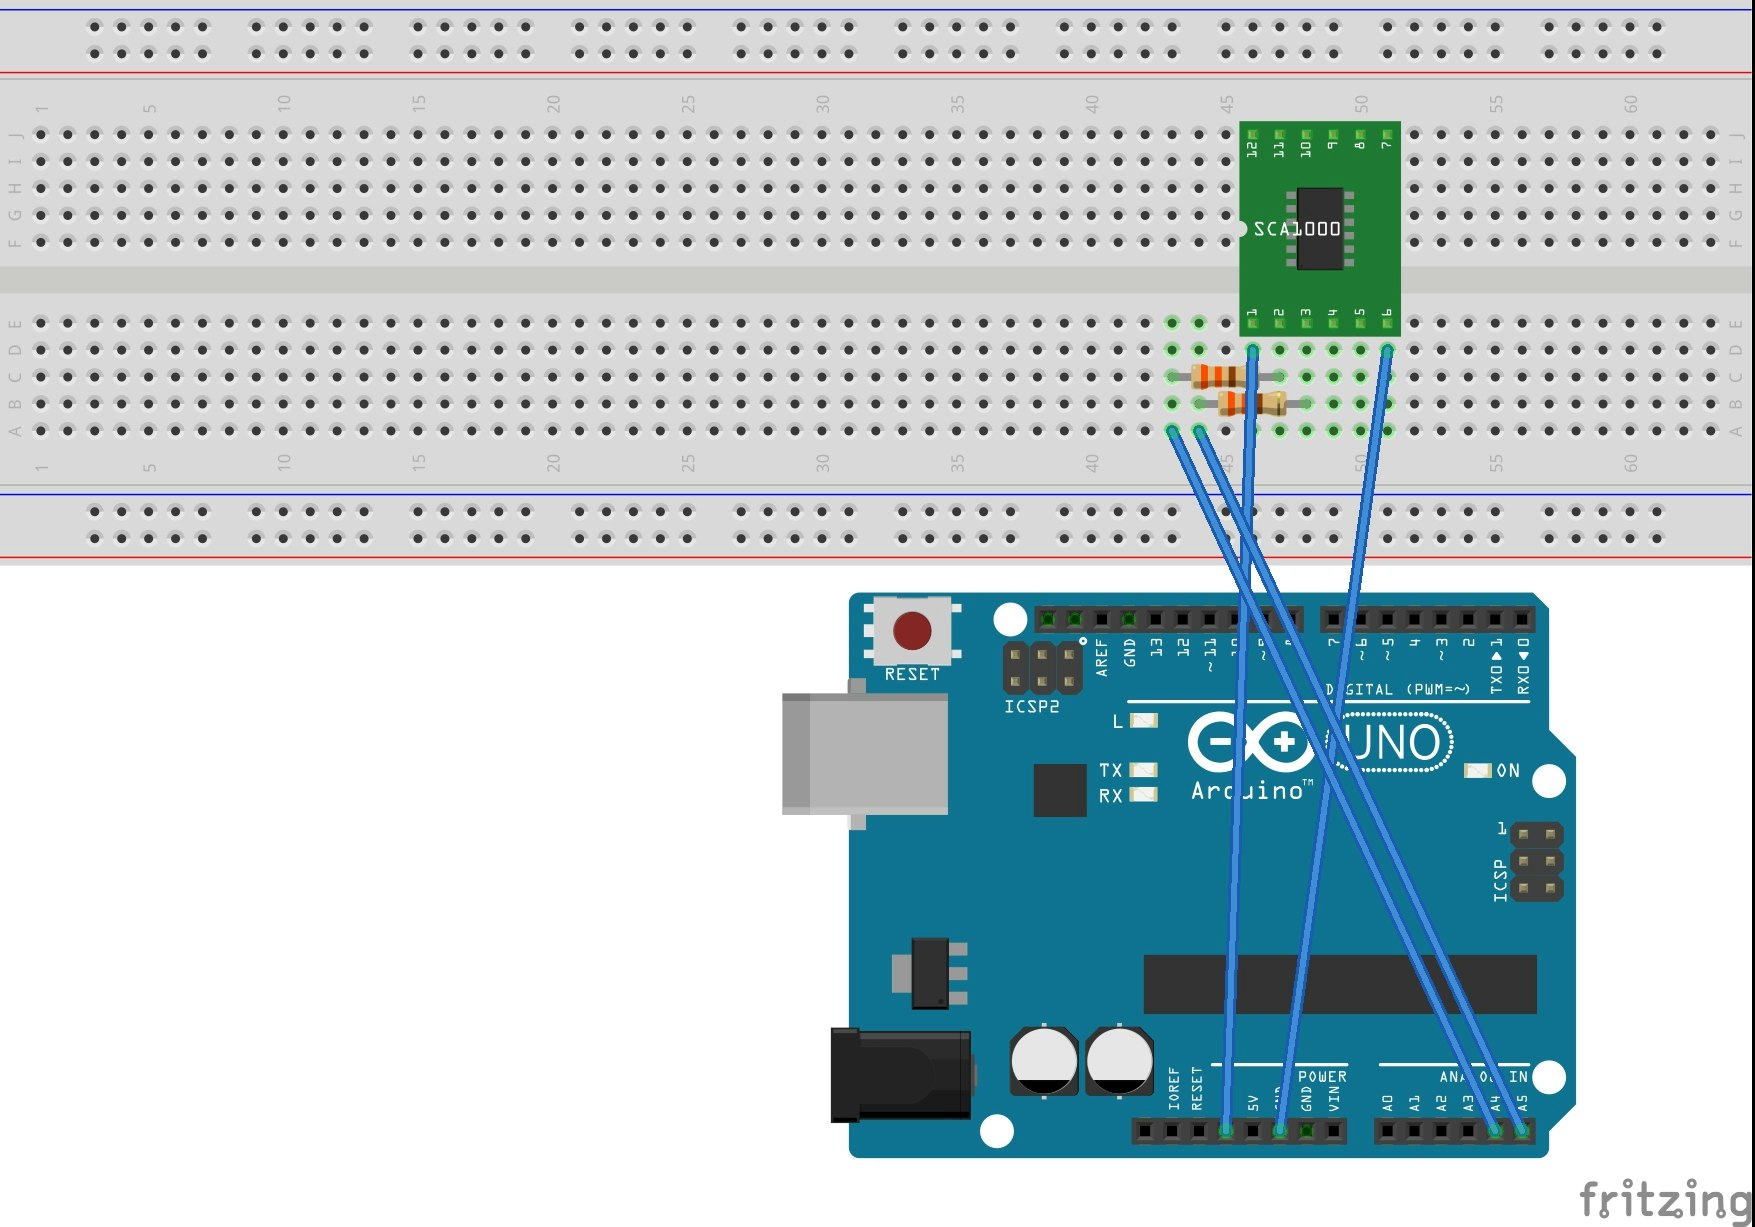
配線
上のようにします。
名前がSCA1000となっていますが気にしないでください(今回使っているセンサーがfritzingにありませんでした)。基板に3.3VとかいてあるところをArduinoの3.3Vに、GNDをGNDに、SDAとSCLをA4とA5につなげればOKです。
プログラム
秋月電子の取扱説明書にサンプルプログラムが載っているのでそれをそのまま使います。
// I2C を使用するのに必要です。
# include <Wire.h>

// MMA8452のI2Cスレーブアドレスを設定します。
// 基板ジャンパSJ1が未接続(デフォルト)なら0x1D、はんだで接続したら 0x1Cです。
# define MMA8452_ADRS 0x1D

// MMA8452の内部レジスタアクセスと加速度算出に使う定数です。
# define MMA8452_OUT_X_MSB 0x01
# define MMA8452_XYZ_DATA_CFG 0x0E
# define MMA8452_CTRL_REG1 0x2A
# define MMA8452_CTRL_REG1_ACTV_BIT 0x01
# define MMA8452_G_SCALE 2

void setup() {
  byte tmp;

  // UARTのボーレートは、38400bpsに設定します。
  Serial.begin(38400);
  Wire.begin();

  // MMA8452の内部レジスタを設定します。
  tmp = MMA8452_ReadByte(MMA8452_CTRL_REG1); MMA8452_WriteByte(MMA8452_CTRL_REG1, tmp &
~(MMA8452_CTRL_REG1_ACTV_BIT));
  MMA8452_WriteByte(MMA8452_XYZ_DATA_CFG, (MMA8452_G_SCALE >> 2));

  tmp = MMA8452_ReadByte(MMA8452_CTRL_REG1);
  MMA8452_WriteByte(MMA8452_CTRL_REG1, tmp | MMA8452_CTRL_REG1_ACTV_BIT);
}

void loop() {
  byte buf[6]; float g[3];

  // MMA8452の内部レジスタにある測定値を読み込みます。
  // X: g[0], Y: g[1], Z: g[2] に対応します。
  MMA8452_ReadByteArray(MMA8452_OUT_X_MSB, 6, buf);
  g[0]=-(float((int((buf[0] << 8) | buf[1]) >> 4))/((1 << 11) /
MMA8452_G_SCALE));
  g[1]=-(float((int((buf[2] << 8) | buf[3]) >> 4))/((1 << 11) /
MMA8452_G_SCALE));
  g[2]=-(float((int((buf[4] << 8) | buf[5]) >> 4))/((1 << 11) /
MMA8452_G_SCALE));

  // 測定値をタブで区切ってUARTに出力します。
  // このようにすることで、Arduino IDEのシリアルプロッタでグラフ 表示ができます。
  Serial.print(g[0], 4);
  Serial.print("\t");
  Serial.print(g[1], 4);
  Serial.print("\t");
  Serial.print(g[2], 4);
  Serial.println("\t");
  delay(10);
}

void MMA8452_ReadByteArray(byte adrs, int datlen, byte * dest)
{
  Wire.beginTransmission(MMA8452_ADRS);
  Wire.write(adrs);
  Wire.endTransmission(false);
  Wire.requestFrom(MMA8452_ADRS, datlen);
  while(Wire.available() < datlen);
  for(int x = 0 ; x < datlen ; x++){
    dest[x] = Wire.read();
  }
}

byte MMA8452_ReadByte(byte adrs) {
  Wire.beginTransmission(MMA8452_ADRS);
  Wire.write(adrs);
  Wire.endTransmission(false);
  Wire.requestFrom(MMA8452_ADRS, 1)
  while(!Wire.available());
  return(Wire.read());
}

void MMA8452_WriteByte(byte adrs, byte dat) {
  Wire.beginTransmission(MMA8452_ADRS);
  Wire.write(adrs);
  Wire.write(dat);
  Wire.endTransmission();
}
グラフを見る
ArduinoIDEから書き込みます。
この時、ツール>シリアルプロッタを起動すると、センサーの値をArduinoIDEからグラフで見ることができます。
最後に
最後まで読んでくださりありがとうございました。
何か不備などがありましたら、コメントで教えてください。
